🚨 In a DIY emergency or rush?
Skip the details and jump straight to our 30-second cheat sheet for the most crucial info.
If your attic insulation has crept out to the eaves and buried your soffit vents , you are not alone. It happens all the time after adding blown-in insulation, after an insulation company “fluffs” the edges, or after years of settling and air movement near the eaves.
The problem is bigger than comfort. A blocked soffit intake can trap moisture, feed mold, and shorten the life of your roof sheathing and shingles. The good news is this is usually a very fixable DIY job if you work carefully and understand how attic ventilation is supposed to function.
Why soffit intake matters
Attic ventilation is a system, not a single vent. The basic idea is:
- Intake brings fresh outdoor air in, usually through soffit vents under the eaves.
- Exhaust lets warmer, moisture-laden air out, usually through a ridge vent, roof vents, or gable vents.
When intake gets blocked, exhaust cannot do its job. Think of it like trying to drink a thick milkshake with a straw that has a pinch in it. Your ridge vent cannot exhaust well if intake is pinched off. Air cannot flow.
What can go wrong
- Moisture buildup from normal indoor humidity rising into the attic (showers, cooking, breathing).
- Mold and mildew on roof decking and rafters, especially in colder months when the roof deck stays cool.
- Frost in winter that melts later and looks like a roof leak.
- Hot attic in summer, which can raise cooling costs and make upstairs rooms miserable.
- Ice dams risk increases if heat is trapped at the roofline and melts snow unevenly.
Even if you have a ridge vent, a powered attic fan, or a whole-house attic fan, those features are not a substitute for clear, continuous intake at the eaves.
Balance intake and exhaust
Here is the simple rule I follow: aim for roughly balanced intake and exhaust. Many codes and manufacturer guides target close to a 50/50 split of NFVA (net free ventilating area), and the big goal is avoiding depressurization and short-circuiting.
If you have strong exhaust with weak intake, the attic can start pulling air from places you do not want, like:
- Bathroom fan ducts that leak into the attic
- Recessed light fixtures
- Attic hatches and pull-down stairs
- Wall top plates and other gaps
That “makeup air” is often warm, humid indoor air. In winter, that is exactly how you end up with condensation and mold on the underside of the roof sheathing.
NFVA in plain English
Vent products are rated by NFVA (net free ventilating area). You do not have to do perfect math to benefit from this concept:
- If your ridge vent runs the full length of the roof but your soffits are half blocked, your system is likely out of balance.
- More exhaust does not fix a starved intake. It often makes the attic pull harder from the house.
Also, ridge vent products vary. Some have external baffles and different NFVA ratings, so the real check is intake NFVA versus exhaust NFVA, not just vent length.
How to spot blocked soffits
You can spot this without fancy tools. You just need a flashlight and the willingness to crawl carefully.
Signs in the attic
- Insulation piled into the eaves until it touches the roof deck.
- No visible air channel from the soffit area up toward the attic.
- Dark staining or speckling on roof sheathing near the edges (possible condensation or mold).
- Rusty nail tips poking through the sheathing, especially near eaves.
Signs in the house
- Musty smell in closets near exterior walls
- Ceiling corners that show seasonal staining
- Upstairs rooms that are hard to cool
Exterior checks
From a ladder, soffit vent panels can look fine while being blocked from the attic side. But it also works the other way: the attic side might be clear, while the soffit itself cannot breathe because of:
- Painted-over perforated soffit
- Clogged insect screen packed with dust or debris
- Blocked vent strips (insulation, trim, or retrofits covering the openings)
In other words, make sure the vent is open on both sides of the assembly.

Safety first
I love DIY, but I do not love falling through ceilings. Do this safely and slowly.
Gear I actually use
- N95 or P100 respirator (especially in older attics)
- Safety glasses
- Gloves
- Headlamp plus a backup flashlight
- Knee pads or a scrap of rigid foam to kneel on
- Long sleeves (attic itch is real)
Tools that make this easier
- Small garden rake or a piece of scrap wood to pull insulation back
- Hammer stapler or manual stapler
- Utility knife and extra blades
- Tape measure
- Plywood or a couple of boards for safer crawling and kneeling
Movement rules
- Only step on joists or on solid decking. Drywall will not hold you.
- Watch for roofing nails at the underside of the roof deck.
- Do not bury electrical junction boxes under insulation when you are done.
- Mind the temperature. Summer attics get dangerous fast. Work early morning if you can.
Fire and hazard notes
- Recessed lights: do not cover unless they are IC-rated, and keep required clearances. If you are unsure, look up the fixture rating or ask an electrician.
- Chimneys and flues: keep insulation and foam back per code and manufacturer requirements. Use proper flashing and fire-rated materials where needed.
- Knob-and-tube wiring: do not bury it in insulation. This is a common “stop and call a pro” moment.
- Vermiculite: may contain asbestos. Do not disturb it. Follow local regulations and get it tested if suspected.
If you see widespread mold, a sagging roof deck, or anything you cannot identify, pause and consider bringing in a pro for evaluation.
Fix blocked soffits
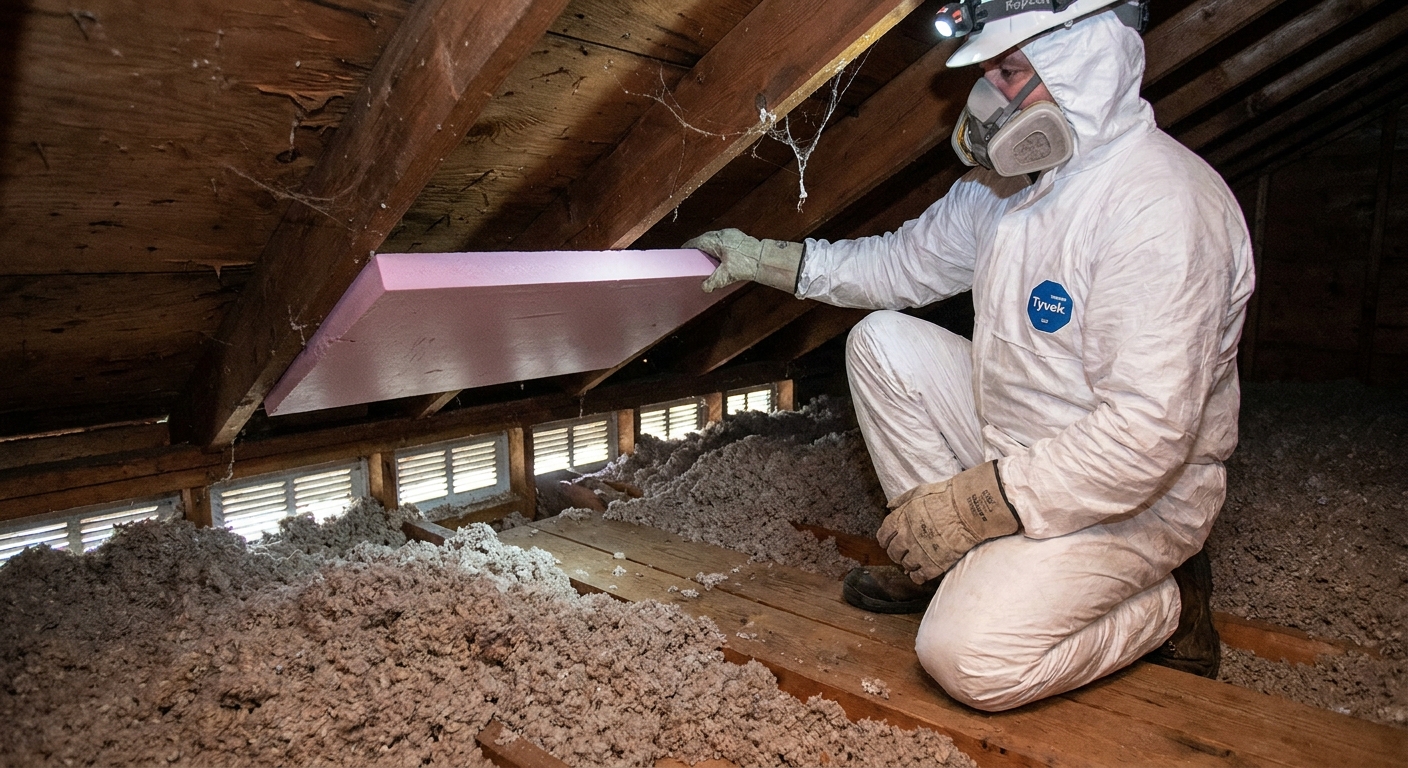
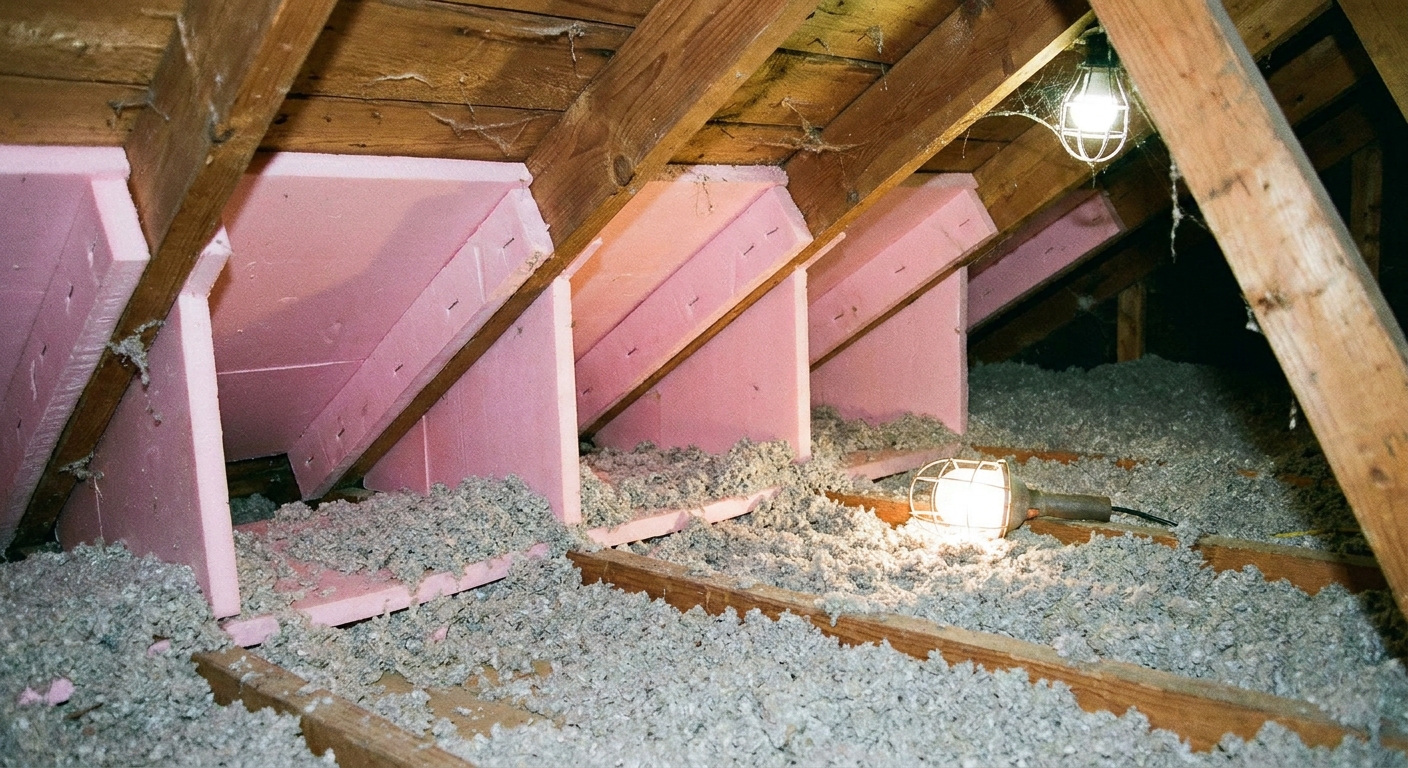
The long-term solution is almost always the same: create a protected air channel from the soffit up into the attic using baffles (also called rafter vents or ventilation chutes), then keep insulation from collapsing back into that channel.
What baffles do
- They hold back insulation at the eaves.
- They maintain an open path for outside air to flow up the underside of the roof deck.
- They help reduce moisture issues by supporting consistent airflow.
Materials that work
- Foam or polystyrene baffles: common, inexpensive, easy to cut.
- Cardboard baffles: work, but can sag if they get damp.
- Plastic baffles: durable, good for longer spans.
- Staples for fastening to rafters.
- One-part spray foam or caulk for air sealing at top plates (optional but smart) .
My budget pick for most homes is foam baffles and a basic hammer stapler.
Step by step
- Pick one bay to start. Work between two rafters. This keeps you organized and helps you learn the rhythm.
- Pull insulation back gently. Use a small rake, a gloved hand, or a piece of scrap wood. Do not compact it more than necessary.
- Find the soffit intake area. You are looking for the opening above the exterior wall top plate where air should come in from the soffit vent.
- Install the baffle. Slide it up against the underside of the roof deck and staple its edges to the rafters. The bottom of the baffle should extend down close to the top plate so intake air enters the chute.
- Keep a real air gap. Do not crush the baffle flat. Most are designed to maintain roughly a 1 to 2 inch channel. Follow the product design and instructions.
- Extend if needed. In deeper attics or where insulation is high, overlap baffles so the chute continues above the insulation line.
- Create a dam to hold insulation back. Some baffles have built-in dams. If yours do not, add a strip of rigid foam or cardboard at the attic side to keep blown-in insulation from drifting back in.
- Put insulation back. Fluff it back to depth without blocking the chute.
- Repeat for every vented bay. Consistency is what makes the system work.
The common mistake
It is tempting to install the baffle but leave a gap at the bottom where insulation still slumps into the intake area. The baffle needs to reach down close enough to the top plate so air can enter freely. If you do not control that edge, you will be back in the attic next season doing it again.
Work with your insulation
This part matters because you can fix ventilation and accidentally hurt insulation performance if you are not careful.
Blown-in fiberglass or cellulose
- Pull it back, install baffle, then re-fluff to the original depth.
- Add an insulation dam at the eaves to keep it from drifting into the chute.
Batts at the eaves
- Batts love to get shoved tight into the corners, which blocks airflow.
- After baffles, make sure batts are not stuffed up against the roof deck. They should sit on the attic floor, not jam into the roofline.
Spray foam roofs
If your roof deck is spray-foamed, you may have an unvented attic by design. Do not add venting blindly. In that setup, soffit vents may be intentionally blocked. If you are unsure, check whether the insulation is on the attic floor (vented attic) or attached to the roof deck (often unvented).
Stop moisture at the source
Blocked soffits are often one part of a bigger moisture story. While you are in the attic, take ten extra minutes to look for these.
Bathroom fan ducts
- They should vent outside , not into the attic.
- Insulate ducts in cold climates to reduce condensation.
- Seal duct joints with foil tape, not duct tape.
Kitchen vents
Same rule. Greasy, humid air belongs outside.
Air leaks from the house
Warm air leaks from the house are moisture leaks. Look for gaps around:
- Plumbing stacks
- Chimney chases (use metal flashing and fire-rated sealant where required)
- Recessed lights (keep clearances and confirm IC rating)
- Attic hatch or pull-down ladder
Air sealing before adding more insulation is one of the best “thrifty but high-impact” moves you can make.
Ridge vents and fans
This is where homeowners get conflicting advice. Here is the practical version.
Ridge vent plus soffits
This is the gold standard in many homes because it creates a natural low-to-high airflow path. But it only works if the soffits can breathe and the intake and exhaust are reasonably balanced by NFVA.
Gable vents
Gable vents can help, but they can also short-circuit airflow if the house relies on soffit-to-ridge flow. If air enters one gable vent and exits the other, the eaves and roof deck edges might still stay damp and under-ventilated.
Powered attic fans
A powered fan can help remove heat, but it can also create negative pressure and pull conditioned air from the home if intake is weak. If you have a fan and blocked soffits, fix the soffits first. Then reassess.
Whole-house attic fans
Whole-house fans move a lot of air and they need a lot of attic exhaust area (often gable, ridge, or roof vents). If the attic cannot exhaust fast enough, performance suffers.
Blocked soffits are still worth fixing for overall ventilation and moisture control, but for whole-house fans, exhaust area is usually the main bottleneck. Ideally you have both: clear soffit intake for normal attic ventilation, and adequate high exhaust area for the fan to dump air outdoors.
After the fix
Once baffles are in and insulation is back in place, you can do a few sanity checks.
- Visual check: from the attic, you should see a continuous chute above the insulation at every vented bay.
- Cold day check: look for new frost or dampness on the sheathing near eaves over the next few cold mornings. Less is the goal.
- Odor check: musty smells should improve over time, especially after humidity sources are addressed.
If you still see heavy condensation, the culprit is often a combination of air leaks from the house and bathroom fans venting incorrectly.
When to call a pro
DIY is great, but there are situations where I would personally pick up the phone:
- Widespread mold growth or soft roof decking
- Signs of roof leaks you cannot trace
- Complex rooflines with valleys and tight eaves that you cannot access safely
- Possible asbestos or vermiculite insulation (do not disturb suspected asbestos, follow local rules)
- Knob-and-tube wiring
- Unclear venting strategy (vented versus unvented attic)
Even one consult can save you from throwing money at the wrong fix.
Next steps checklist
- Confirm you have a vented attic (insulation on the attic floor, not the roof deck).
- Check soffit vents outside for paint, clogs, or blocked vent strips.
- Inspect eaves for insulation blocking soffit intake.
- Install baffles in every rafter bay that needs them and keep the designed air gap open.
- Add an insulation dam so blown-in insulation cannot drift back.
- Air seal major attic bypasses and confirm bath fans vent outdoors.
- Re-check intake and exhaust balance if you have a powered attic fan or whole-house fan.
If you do those steps, you will usually solve the heat and moisture issues at the source instead of chasing symptoms year after year.
The 30-Second Cheat Sheet
Essential takeaways for: Attic Soffit Vents Blocked by Insulation? How to Restore Airflow
Fast diagnosis
- Blocked soffit vents often look like blown-in insulation or batts packed into the eaves until they touch the roof deck, leaving no visible air path.
- If intake is blocked, ridge vents and attic fans cannot work properly. Air cannot exhaust well if it cannot enter.
- Common symptoms: musty attic smell, condensation or dark staining on sheathing near eaves, hot upstairs rooms, winter frost in the attic.
What to do (the fix that lasts)
- Pull insulation back from the eaves in each rafter bay.
- Install baffles (rafter vents) stapled to the rafters to create a consistent air channel from soffit to attic. Follow the baffle design and keep the channel open (often about 1 to 2 inches).
- Add an insulation dam so blown-in insulation cannot drift back and block the chute.
- Re-fluff insulation to the original depth without blocking the channel.
Moisture and mold prevention checks
- Bathroom and kitchen fans must vent outside, not into the attic.
- Air seal big attic leaks around plumbing stacks, attic hatches, and ceiling penetrations.
- Do not “solve” weak intake by adding more exhaust. Aim for roughly balanced intake and exhaust (often close to 50/50 NFVA, within vent manufacturer specs).
Safety essentials
- Wear a respirator, eye protection, gloves, and a headlamp.
- Step only on joists or solid decking. Never on drywall.
- Keep clearance from hot items (chimneys, flues, some recessed lights). Follow local code and manufacturer requirements.
- Avoid working in extreme heat.
When to call a pro
- Widespread mold, soft roof decking, suspected asbestos (including vermiculite), knob-and-tube wiring, or you are unsure whether the attic is designed to be vented or unvented.
💡 Tip: Scroll up to read the full article for detailed, step-by-step instructions.
⬆️ Back to topAbout Marcus Vance
Content Creator @ Grit & Home
Marcus Vance is a lifelong DIY enthusiast and self-taught home renovator who has spent the last decade transforming a dilapidated 1970s ranch into his family's dream home. He specializes in budget-friendly carpentry, room-by-room renovations, and demystifying power tools for beginners. Through his writing, Marcus shares practical tutorials and hard-learned lessons to help homeowners tackle their own projects with confidence.