🚨 In a DIY emergency or rush?
Skip the details and jump straight to our 30-second cheat sheet for the most crucial info.
Pull-down attic stairs are one of those “works perfectly until it doesn’t” pieces of hardware. One day the ladder pops open like normal, the next day it either refuses to stay up or it won’t latch shut unless you shove it like you’re closing a stubborn truck tailgate.
I have fought this exact battle in my 1970s ranch. In my case it was a tiny alignment issue that slowly got worse until the latch barely kissed the strike plate (the metal catch piece). The good news is most attic stair problems come from a short list of culprits, and you can usually fix them with basic tools and a careful approach.
Tools (keep it simple)
- Stable step ladder
- Safety glasses
- Flashlight or headlamp
- Screwdriver or nut driver (whatever fits your hardware)
- Pencil for marking positions
- Dry lubricant or a small amount of silicone spray
- Shims (for re-squaring a frame)
Safety first
Attic stairs combine sharp metal, stored spring energy, heavy moving parts, and awkward body positions. That is a bad mix if you rush. Before you adjust anything:
- Wear safety glasses. A spring clip, fastener, or dust can pop loose.
- Have a helper nearby, especially if you are removing springs or working overhead.
- Do not exceed the load rating. Many common units are rated around 250 to 375 pounds including what you carry, but it varies widely by brand and design. Check the label or manual and treat the number as absolute.
- Use a stable step ladder to access the frame comfortably. Do not balance on the attic ladder while adjusting springs or hinges.
- Keep fingers out of pinch points around hinge arms and pivots.
If the ladder is actively dropping on its own, the frame looks cracked, or you cannot tell how the springs or struts are retained, stop. That is a good time to pull the manual or call a pro.
Know your mechanism
Before you copy any fix from the internet (including mine), take 30 seconds and identify what is doing the lifting and guiding on your unit:
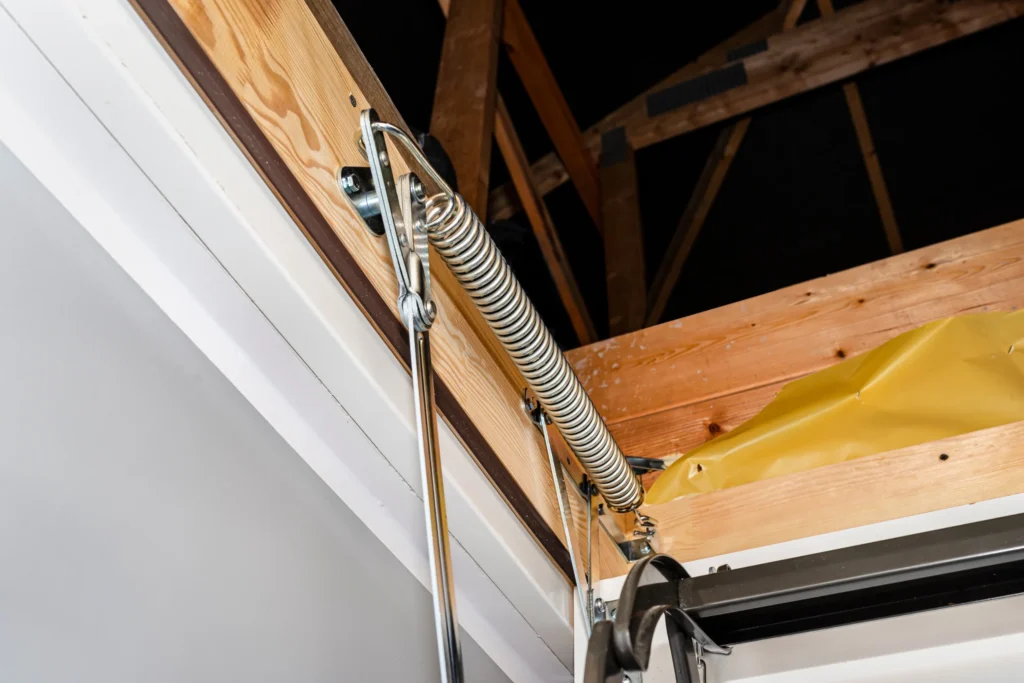
- Extension springs on each side are common on older and mid-range ladders.
- Gas struts (cylinders) are common on newer ladders. When they fail, they usually lose charge and no longer hold the hatch up. They are typically replaced, not adjusted.
- Torsion bars or other hinge geometries exist too, and the adjustment steps can be totally different.
If you see a brand label on the back of the hatch door, snap a photo and look up the manual by model number. It is the safest shortcut.
Quick diagnosis
If it won’t stay open
- It opens but slowly creeps down
- It snaps down hard and feels heavy
- It stays open only if you hold it
If it won’t latch
- Door is flush on one side but not the other
- You have to push the hatch upward to latch
- The latch tongue hits the strike plate instead of entering it
Those symptoms usually point to spring or strut assist, hinge binding, loose fasteners, weatherstripping interference, or a frame that has shifted out of square.
Won’t stay open fixes
1) Check the springs or struts
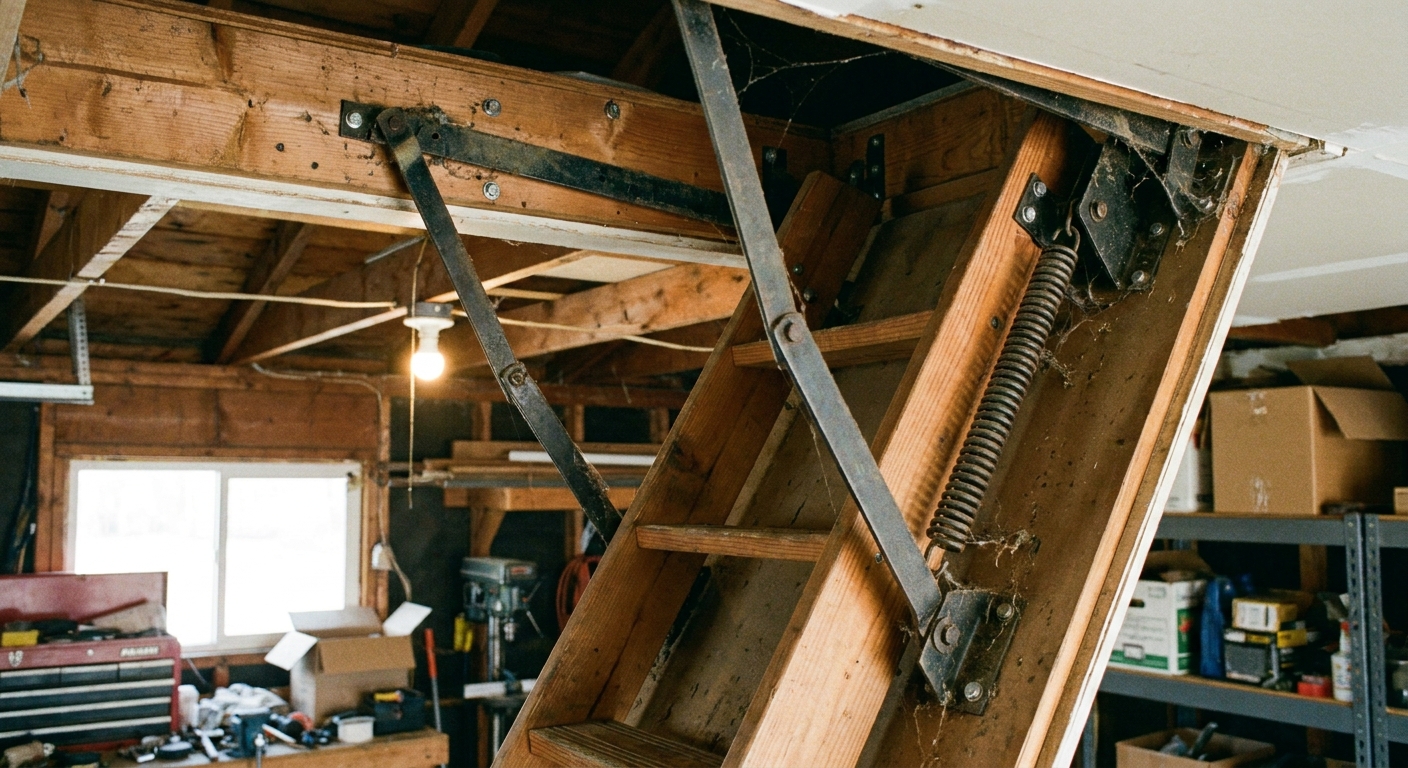
Most pull-down attic ladders use extension springs on each side to counterbalance the weight of the hatch door and ladder. Many newer models use gas struts instead. Different parts, same idea: provide controlled lift and keep the assembly from feeling like a trap door.
What to look for:
- A spring is broken, stretched out, rusted through, or missing a clip.
- One side has more assist than the other (uneven pull can twist the hatch door and create latching problems).
- On gas strut units: a strut that will not hold the hatch up, moves in jerks, or looks oily at the shaft seals.
- Anything rubbing: springs or struts contacting wood, insulation, wiring staples, or fasteners.
What to do:
- With the ladder down, take clear photos of both sides so you can match the configuration.
- Inspect hooks, S-links, and brackets for bending or cracks.
- If your unit has multiple attachment holes or an adjustable chain, move one side at a time to increase tension slightly, then test.
- If you have gas struts and the hatch will not stay open, replacement is usually the fix. Replace struts as a matched pair and match length and force rating to your model.
Nuance that matters: Too little assist makes the ladder feel heavy and drop. Too much assist can make closing harder and can even push the hatch back open or make latching feel “springy.”
Big caution: Springs and struts store energy. If you are not 100 percent sure how your parts are retained, stop and look up your ladder’s manual by brand and model. If the ladder is older, the safest move is often a matched replacement kit.
2) Inspect hinge arms for binding or damage
Many ladders use folding metal hinge arms (often scissor-style) to guide the hatch door down and keep it aligned. Some use different hinges, but the concept is the same: both sides should move smoothly and mirror each other.
- Look for bent arms, cracked rivets, missing fasteners, and shiny rub marks where metal is scraping.
- Test by slowly opening and closing while watching both sides. One side should not lag, jump, or twist.
- Light lubrication can help: use a dry lubricant or a small amount of silicone spray on pivot points. Wipe excess so it does not drip onto drywall.
If an arm is bent, lubrication will not fix it. Replace the arm or the full hinge assembly if parts are available.
3) Tighten frame and hinge fasteners
Attic ladders move, and movement loosens screws over time. A few backed-out screws can shift the geometry just enough that the hatch door no longer behaves.
- Check lag screws or structural screws at the ladder frame.
- Check hinge screws and any bolts that hold the arms.
- If screws spin without tightening, the wood may be stripped. Upgrade to a slightly larger diameter screw or use structural screws designed for framing.
Do not just send in longer screws blindly. You do not want to punch through the ladder frame into a moving mechanism.
4) Check for rubbing at the opening
Sometimes the ladder is fine, but the hatch door is rubbing on the drywall edge, trim, or a shifted framing member. That friction can keep it from opening fully and can also make it feel unstable.
- Look for scuffed paint or raw wood on the door edges.
- Check if insulation is bunched up and dragging.
- Check for weatherstripping that is swollen, doubled over, or misplaced.
- If needed, lightly sand the high spot or trim a tiny amount of wood from the rubbing edge.
Won’t latch fixes
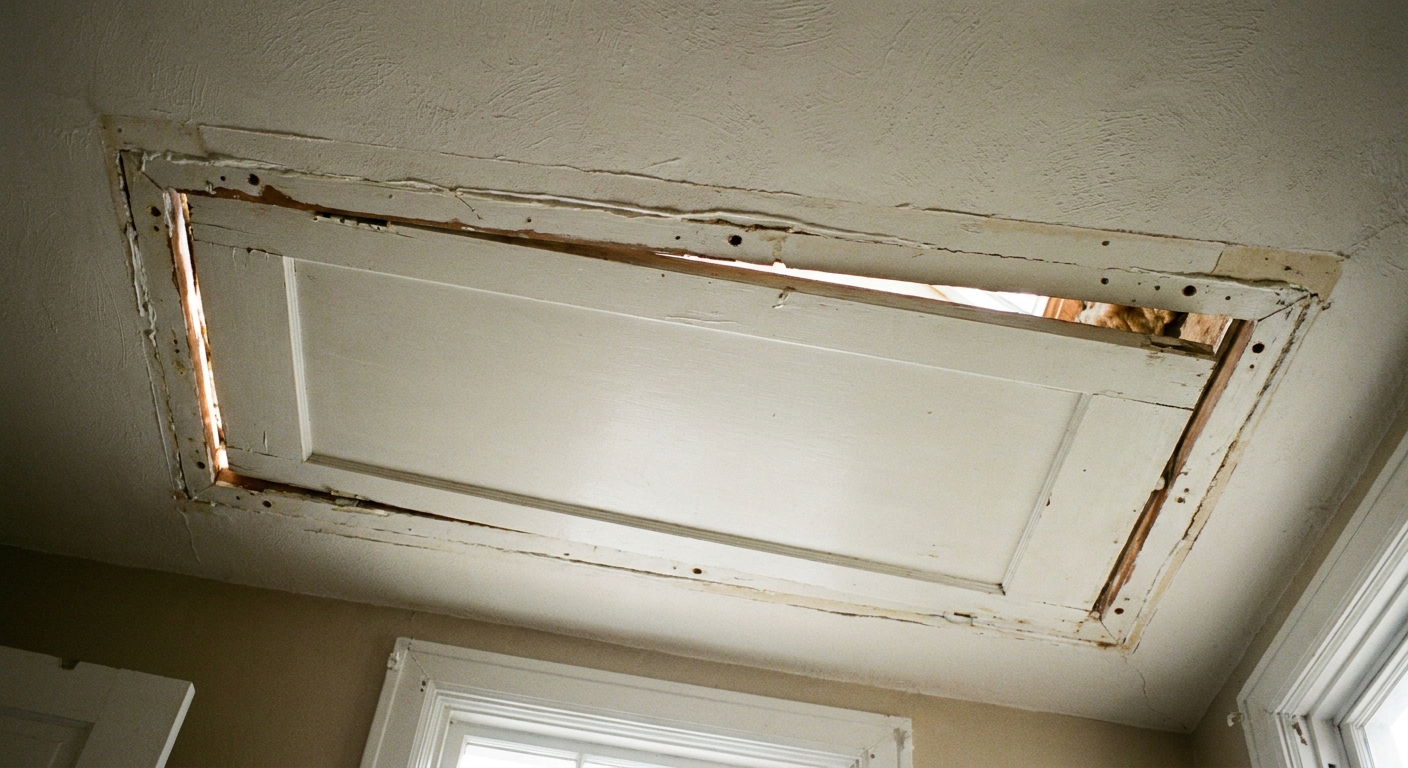
1) Confirm the hatch door is square
If the hatch is low on one corner, the latch will hit the strike plate wrong and never fully engage. This is often caused by a slightly twisted frame, uneven spring assist, or a hinge arm that is not moving like its partner.
Quick test: Close the hatch and look at the reveal (the gap) around the door. If the gap is tight on one side and wide on the other, alignment is your problem.
2) Check weatherstripping and hatch stops
This one is sneaky. Thick, bunched-up, or shifted weatherstripping can keep the hatch door from closing flush, which makes the latch feel like it is “almost” there but never quite catches.
- Look for doubled-over foam seals, loose adhesive, or insulation caught on the seal.
- Check that the hatch stops (small wood strips or built-in lips the door closes against) are intact and not missing on one side.
- If you recently added an attic tent or extra insulation cover, confirm it is not blocking the hatch door from seating.
3) Tighten the latch and strike plate
This is the simplest win. The constant vibration and tugging can loosen the latch, and then the tongue no longer lines up with the strike plate.
- Tighten the latch body screws.
- Tighten the strike plate screws.
- If the strike plate holes are wallowed out, fill them with wood glue and toothpicks, let it set, then re-screw.
4) Adjust the strike plate (small moves matter)
If the latch tongue is hitting the strike plate instead of entering it, you can usually fix it by shifting the strike plate slightly.
- Mark the current position with pencil.
- Loosen screws and nudge the plate 1 to 2 mm toward where the latch needs to go.
- Retighten and test.
If there is no room to shift, you can file the opening of the strike plate a touch. Go slow. Remove a little, test a lot.
5) Look for a twisted frame
If your house has settled or the attic ladder frame was never installed perfectly square, the hatch can rack over time. That shows up as a door that wants to sit crooked no matter what you do with the latch hardware.
What to look for:
- Gaps that change seasonally (humidity and framing movement).
- One hinge assembly sitting closer to the wood frame than the other.
- Door only latches if you push hard on a specific corner.
Possible fix: Re-square the frame from the attic side (if accessible) by loosening mounting screws slightly, shimming where needed, then re-tightening. If that sounds like a lot, it can be. But it is often the real fix when everything else has been “adjusted” five times.
6) Check ladder length and angle
If the ladder feet hit the floor too hard because the ladder is too long, it can push the whole assembly upward and rack the hatch door. If it is too short, the hatch can hang oddly and pull on the hinges.
- With the ladder fully open, the feet should sit flat and solid on the floor without bowing the ladder or lifting the hinge side.
- The ladder angle should feel comfortable, not too steep and not forced.
- If you have a wood ladder you need to trim, follow the manufacturer cut chart and cut equal amounts. Uneven trimming is a classic way to create a latch problem that did not exist before.
- If you recently changed flooring thickness, re-check ladder length.
If your unit has adjustment screws
Some attic ladders have tension adjustment bolts or screws on the hinge mechanism. The goal is smooth motion, stay-open stability, and a hatch that closes flush without a wrestling match.
- Make adjustments in quarter turns.
- Adjust both sides equally unless you are correcting a side-to-side imbalance.
- After each change, open and close the ladder fully and watch both sides for symmetry.
If you cannot find any branding, look on the back of the hatch door for a label or stamp. Searching the model number plus “adjustment” usually pulls up a PDF manual.
When to call a pro
- The rough opening framing is cracked, sagging, or feels soft.
- You see ceiling movement, major out-of-square issues, or anything that looks structural.
- You cannot identify the spring or strut retention method safely.
- Electrical wiring, ductwork, or plumbing is in the way of the mechanism.
Replace parts or replace the unit
Sometimes the most budget-friendly move is replacing the right part. Other times, it is replacing the whole unit before it becomes a safety hazard.
Replace parts if:
- A spring is broken or stretched and replacement springs are available as a matched set.
- A gas strut has lost charge and the correct replacement is available (replace as a pair).
- The latch is worn, bent, or missing pieces.
- A hinge arm assembly is visibly bent but the wood frame is solid.
Replace the full unit if:
- The wood frame is cracked, split, or sagging.
- Multiple hinge points are sloppy and parts are discontinued.
- The opening is badly out of square and you would rather correct framing and start fresh.
- The ladder is rated too low for how you actually use the attic.
If you do replace the unit, measure the rough opening carefully and verify ceiling height range. A lot of frustration comes from installing a ladder that is close enough but not actually sized for the space.
Troubleshooting checklist
- Won’t stay open: identify mechanism, check springs or struts, check hinge arms for binding, tighten fasteners, remove rubbing points, verify balanced assist side to side.
- Won’t latch: check door gaps, check weatherstripping and stops, tighten latch and strike plate, shift strike plate slightly, look for frame twist, confirm ladder length and angle are correct.
- Feels dangerous: stop and replace worn parts or the entire unit.
My rule: if I cannot open and close it smoothly with one hand on the rail and one hand on the pole, something is off. These things should feel controlled, not like a trap door in a movie.
The 30-Second Cheat Sheet
Essential takeaways for: Attic Stairs Won’t Stay Open or Latch? Fix It Fast
Fast fixes (in order)
- Identify the mechanism first: Most units use extension springs and scissor arms, but some use torsion bars or gas struts. The fix steps change, so look for a label and follow your manual when in doubt.
- Won’t stay open: Inspect both springs or struts for damage, missing clips, leaks, or uneven assist. Adjust tension in small steps if your ladder allows it, or replace weak gas struts as a matched pair.
- Won’t latch: Tighten the latch and strike plate screws first. Check for thick, shifted, or bunched weatherstripping that keeps the hatch from sitting flush. If the latch tongue hits the strike plate, nudge the strike plate slightly, then retest.
- Binding: Watch the hinge arms while opening and closing. If one side moves differently, look for bent arms, loose bolts, missing stops, or rubbing.
- Rubbing: Check hatch edges for scuffs. Drywall edges, trim, bunched insulation, or swollen weatherstripping can keep the door from seating and latching.
Safety essentials
- Wear eye protection and keep hands away from hinge and arm pinch points.
- Use a stable step ladder for adjustments, not the attic ladder itself.
- Do not exceed the attic ladder load rating (you + what you carry). Check the label or manual.
- If a spring is broken, a strut is failing, or the frame is cracked, stop and replace parts or the full unit.
When to replace instead of fight it
- Cracked or sagging wood frame.
- Multiple worn hinge points and discontinued parts.
- Visible bent hinge arms that cannot be straightened safely.
- Gas struts that will not hold the hatch up even after basic checks (replace as a pair).
💡 Tip: Scroll up to read the full article for detailed, step-by-step instructions.
⬆️ Back to topAbout Marcus Vance
Content Creator @ Grit & Home
Marcus Vance is a lifelong DIY enthusiast and self-taught home renovator who has spent the last decade transforming a dilapidated 1970s ranch into his family's dream home. He specializes in budget-friendly carpentry, room-by-room renovations, and demystifying power tools for beginners. Through his writing, Marcus shares practical tutorials and hard-learned lessons to help homeowners tackle their own projects with confidence.