Seeing water drip from a bathroom exhaust fan is one of those problems that makes your stomach drop. It feels like a roof leak, but in cold climates it is often something far less dramatic: warm, wet bathroom air meeting a cold duct and turning into water.
The good news: most fan drips are fixable with basic tools and a little detective work. The key is figuring out which of the three usual suspects you have: duct condensation, a roof or flashing leak, or restricted airflow that is trapping humid air.
If you are new to how these systems are laid out, here is the basic path: fan housing in the ceiling connects to a duct run through an attic or wall cavity, and that duct should terminate at a roof cap or exterior wall hood.
First: what to do right now
Before you chase the cause, do a quick damage-control pass.
- Protect the area with a towel or bucket to save flooring and drywall.
- Pop the grille down and dry it. If the housing is wet, gently dab it dry too.
- Check for water near wiring or the motor. If you see pooling inside the housing, water in the electrical compartment, or any sign of arcing, turn the fan off at the switch and shut off the breaker until it is inspected.
- Look for swelling or staining on drywall around the fan. Take a photo so you can tell later if it is getting worse.
- If water is pouring (not just dripping), or you see a brown ring spreading fast, treat it like a roof leak and skip ahead to the roof-leak section.
My rule of thumb: a few drips after a hot shower in January usually screams condensation. A steady drip during rain, or staining that keeps growing even when the fan is never used, points toward a leak.
Quick diagnosis: condensation or roof leak?
Signs it is duct condensation (very common in winter)
- It happens when the weather is cold, especially after a hot shower.
- The drip is clear water and often slows down once the bathroom cools off.
- You may hear a faint “tick tick” as drops hit the grille.
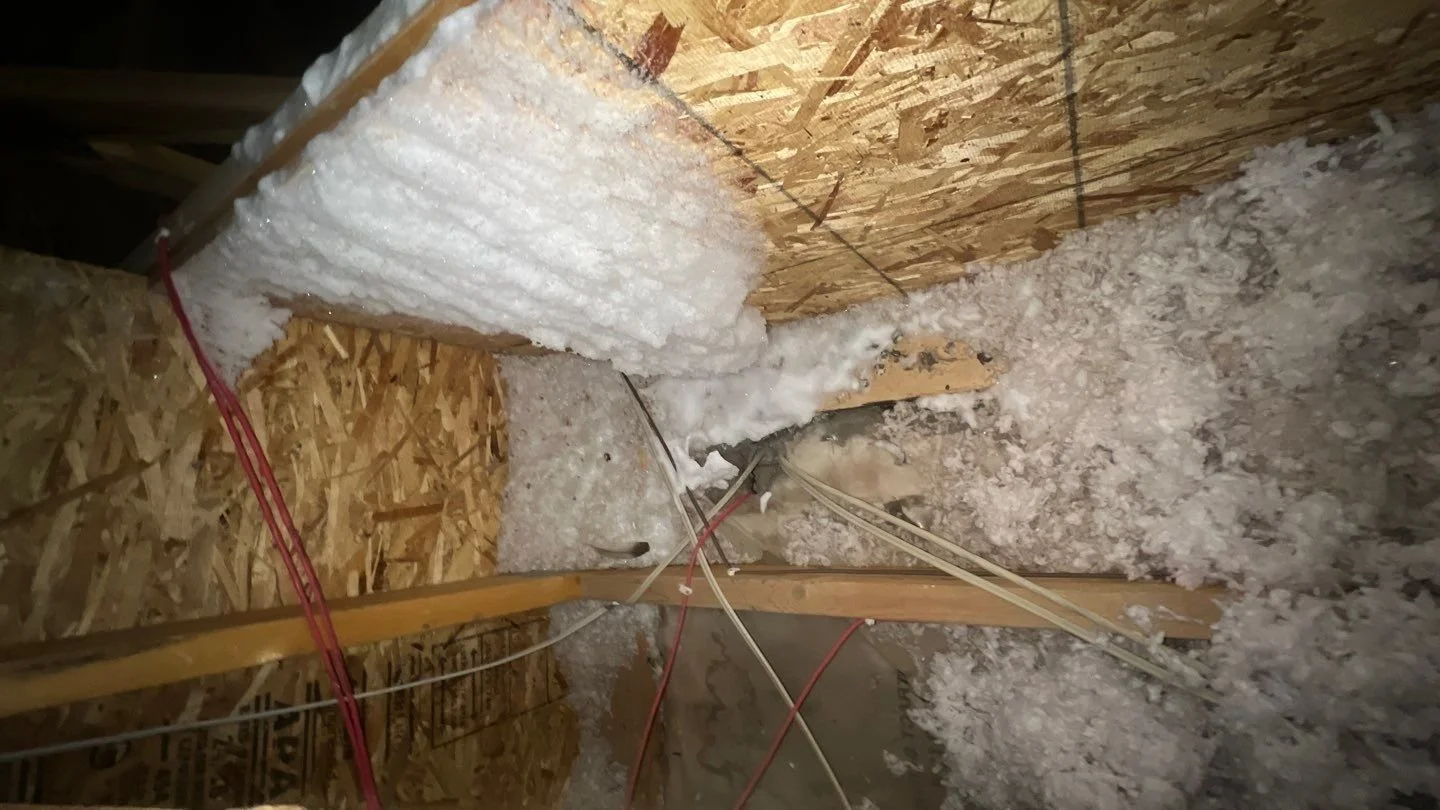
- The attic duct feels cold to the touch and may look damp on the outside.
Signs it is a roof or flashing leak
- Dripping increases during rain or snow melt, even without showers.
- Water looks dirty or leaves brownish stains on the grille or ceiling.
- Wet insulation or roof decking is visible near the roof cap.
- The problem appears in spring and fall storms too, not just deep winter.
Signs it is blocked airflow or poor vent design
- Mirrors stay fogged long after a shower.
- You smell lingering humidity or musty odor.
- The fan sounds like it is running, but you barely feel airflow at the grille.
- The exterior vent flap barely opens, or never opens.
Cause #1: Cold-climate duct condensation
Condensation happens when warm, moist bathroom air travels into a cold duct. The moisture in that air hits a cold interior surface, condenses into water, and then runs back downhill. If your duct slopes the wrong way, that “downhill” can be right back toward your fan housing.

Fix 1: Use the right duct and insulate it well
In cold attics, bare ductwork is basically a condensation machine. Insulation helps keep the duct’s interior surface warmer (closer to the bathroom air temperature) so you are less likely to hit the dew point inside the run. It also helps humid air make it outside before it dumps water where you do not want it.
- Best option: Smooth rigid metal duct (properly sized, sealed, and insulated in unconditioned space). It moves air better, resists sagging, and does not have corrugated ridges that can trap water.
- Good, easier option: Insulated flex duct rated for bath fans, sized to match your fan port (commonly 4 inch or 6 inch). If you use flex, keep it short, pulled reasonably tight, and well supported so it does not form bellies where water can pool.
- Good option: Wrap existing duct with foil-faced fiberglass duct wrap and seal seams with foil HVAC tape.
- Avoid: Leaving gaps around elbows and connections. Those cold spots are where water starts.
If you are wrapping duct, keep the insulation snug but not crushed. Compressed insulation loses effectiveness.
Fix 2: Make sure the duct drains to the exterior
This one is huge, and also easy to miss. You want any condensation that forms to drain out, not back to the fan.
- Aim for a continuous slope from the fan toward the roof or wall termination, with no low spots.
- Support sagging flex duct every few feet so it does not form bellies that collect water.
- Shorten excessively long runs if possible. Long duct equals more cold surface area and more friction loss.
What about vertical roof runs? If your duct goes up and out a roof cap, the final section is often vertical and cannot slope “down” to the exterior. In that case, your best defenses are excellent insulation, airtight connections, a short, smooth route, and a fan runtime that clears humidity without running for hours unnecessarily.
Fix 3: Seal leaky joints so warm air does not dump into the attic
Even a small air leak at a connection can blow moist air into the attic, where it condenses on anything cold. That can cause mold and frost in winter.
- Use foil HVAC tape and a clamp made for flex duct at each connection.
- Do not rely on standard cloth duct tape. It fails in heat and cold cycles.
Fix 4: Reduce humidity spikes
If you take long, hot showers, you are basically stress-testing your ventilation.
- Crack the bathroom door during showers if privacy allows, especially in tiny bathrooms.
- Keep the fan grille clean so it can move air freely.
Cause #2: Roof leak at the vent cap or flashing
Sometimes the fan is innocent and the roof penetration is the culprit. A cracked roof cap, failed flashing, or bad sealant can send water down the duct and right into the fan housing.
How to check safely
- Attic check: With a flashlight, look around the duct where it exits. Check the roof decking for dark staining or wetness.
- During rain: If possible, check the attic while it is raining. Active drips near the termination are a strong clue.
- Exterior check: From the ground, look for a damaged vent cap, missing hood, or lifted shingles near the penetration.
If roof work makes you uneasy, that is not a character flaw. Steep roofs and wet shingles are no joke. This is one of those times calling a roofer can be money well spent.
Common fixes
- Replace a cracked or missing hooded vent cap (especially if wind-driven rain can enter).
- Repair flashing that is loose or improperly integrated with shingles.
- Clear debris that traps water around the vent.
- Make sure it is a proper bath-fan termination with a damper, not an improvised cap that invites rain or pests.
One note from my own trial and error: slapping more caulk on a bad flashing job is usually temporary. If water is getting in, the long-term fix is proper flashing, not bigger beads of sealant.
Cause #3: Blocked airflow and damper problems
A bathroom fan has to move air from point A to point B without fighting obstacles. If the airflow is restricted, humidity lingers, ducts stay wetter longer, and condensation gets worse. In extreme cases, moisture can accumulate and drip even when the bathroom does not feel that steamy.
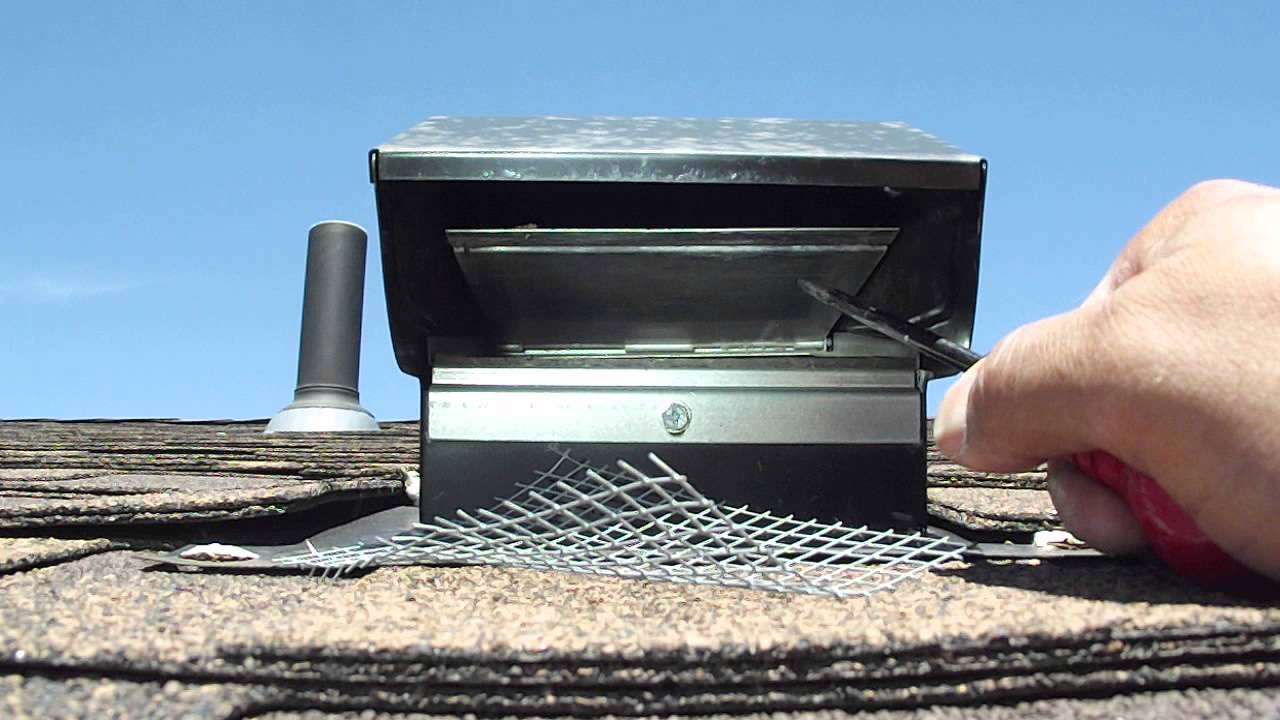
Check the exterior vent hood
- Make sure the flap opens freely when the fan runs.
- Remove lint, dust, or insect nests.
- In freezing climates, check for an ice-stuck flap after a cold snap.
- If your hood has a screen mesh, keep it clean. Screens can clog and strangle airflow (and many pros avoid them for bath fans for exactly that reason).
Check the backdraft damper
Many fans have a damper at the fan housing, the exterior hood, or both. If it sticks shut, your fan is basically blowing into a closed door.
- Turn the fan on and feel for suction at the grille.
- A quick tissue test can tell you if there is airflow, but it is only a rough check. If you want to get more serious, an inexpensive anemometer can help you quantify airflow.
- If airflow is weak, inspect the damper for paint, dust, or misalignment.
- Replace broken dampers rather than trying to rig them open. An open damper can dump cold air into the bathroom and make condensation worse.
Look for crushed, kinked, or too-long duct runs
- Flex duct should be pulled reasonably tight, not accordion-stacked.
- Too many elbows and long runs reduce airflow dramatically.
- Match duct size to the fan outlet. Do not choke a 6 inch fan down to 4 inch unless the manufacturer explicitly allows it.
How long should you run the bathroom fan?
This is where a lot of well-meaning homeowners accidentally create problems. Running the fan is good, but the goal is to remove moisture effectively and not leave a cold duct sitting full of humid air.
Practical runtime guidance
- Before a shower: 2 to 5 minutes (gets air moving).
- During the shower: Run it the whole time.
- After the shower: 20 to 30 minutes is a solid starting point for most bathrooms.
If you have recurring condensation, consider a timer switch or a humidity-sensing switch. In my house, the timer switch paid for itself just in reduced “oops, we forgot to run the fan” moments.
When longer is not better
If your duct is poorly insulated and runs through a freezing attic, running the fan for hours can keep feeding warm, moist air into a cold tube. That can mean more condensation. Fix the duct first, then dial in runtime.
Step-by-step: my troubleshooting order
If you want the most efficient path, here is the order I recommend. It goes from easiest checks to the deeper fixes.
- Confirm it is clear water and note when it happens (after showers, during rain, only in winter).
- Check for electrical risk. If water is in the housing near wiring or the motor, shut off power at the breaker and inspect before running it again.
- Check the exterior vent hood for a stuck flap, lint, a clogged screen, or blockage.
- Check fan airflow at the grille. Weak airflow suggests restriction, duct issues, or an underpowered fan.
- Inspect the attic duct for insulation, sagging low spots, crushed sections, and slope back toward the fan.
- Seal and insulate all duct connections.
- Inspect the roof penetration and surrounding decking for leak clues.
When dripping means a bigger ventilation issue
Sometimes the drip is just the symptom. If you fix the duct and damper and still struggle with moisture, the fan system may be under-designed for the space.
Red flags
- Mold or peeling paint on the ceiling even though the fan runs.
- Condensation on windows most of the winter.
- A fan that is loud but moves little air.
- The fan vents into the attic (always a problem) or into a soffit in a way that can feed moist air right back into the attic (a common, and often problematic, setup).
What better design looks like
- Correct fan size for the bathroom. A common rule of thumb is 1 CFM per square foot, but many guidelines also point to minimums like 50 CFM intermittent or 20 CFM continuous (often referenced in ventilation standards). Long duct runs, elbows, and tall ceilings can all justify going bigger.
- Smooth, properly sized duct with minimal elbows and a short route to outside.
- True outdoor termination with a hood and damper designed to keep rain and pests out without choking airflow.
If your current setup vents into the attic, put fixing that at the top of your list. Trapping moisture in an attic is how you end up with moldy insulation, frosty nail tips, and roof sheathing damage.
When to call a pro
I am all for DIY, but I am also a big fan of knowing when the risk outweighs the savings.
- Call a roofer if you suspect flashing failure, you see wet roof decking, or the roof is steep or high.
- Call an electrician if the fan is wired incorrectly, trips breakers, or you see water or damaged wiring in the housing.
- Call a mold remediation pro if you find widespread attic mold or saturated insulation.
Prevent it from coming back
- Use smooth rigid duct where you can, and insulate ductwork in unconditioned spaces.
- Keep the run as short and straight as possible, with continuous slope to the exterior and no low spots.
- Seal all joints with foil HVAC tape and proper clamps.
- Clean the fan grille and exterior hood a couple times a year.
- Use a timer so the fan runs long enough after showers.
- Keep the bathroom door cracked during showers if the room is small and steamy.
If you take one thing from this page, let it be this: a dripping bath fan is usually not “mysterious water.” It is moisture doing what moisture always does. It finds cold surfaces and low spots. Fix the airflow, fix the insulation, and give that duct a path to drain outside instead of back into your ceiling.
About Marcus Vance
Content Creator @ Grit & Home
Marcus Vance is a lifelong DIY enthusiast and self-taught home renovator who has spent the last decade transforming a dilapidated 1970s ranch into his family's dream home. He specializes in budget-friendly carpentry, room-by-room renovations, and demystifying power tools for beginners. Through his writing, Marcus shares practical tutorials and hard-learned lessons to help homeowners tackle their own projects with confidence.