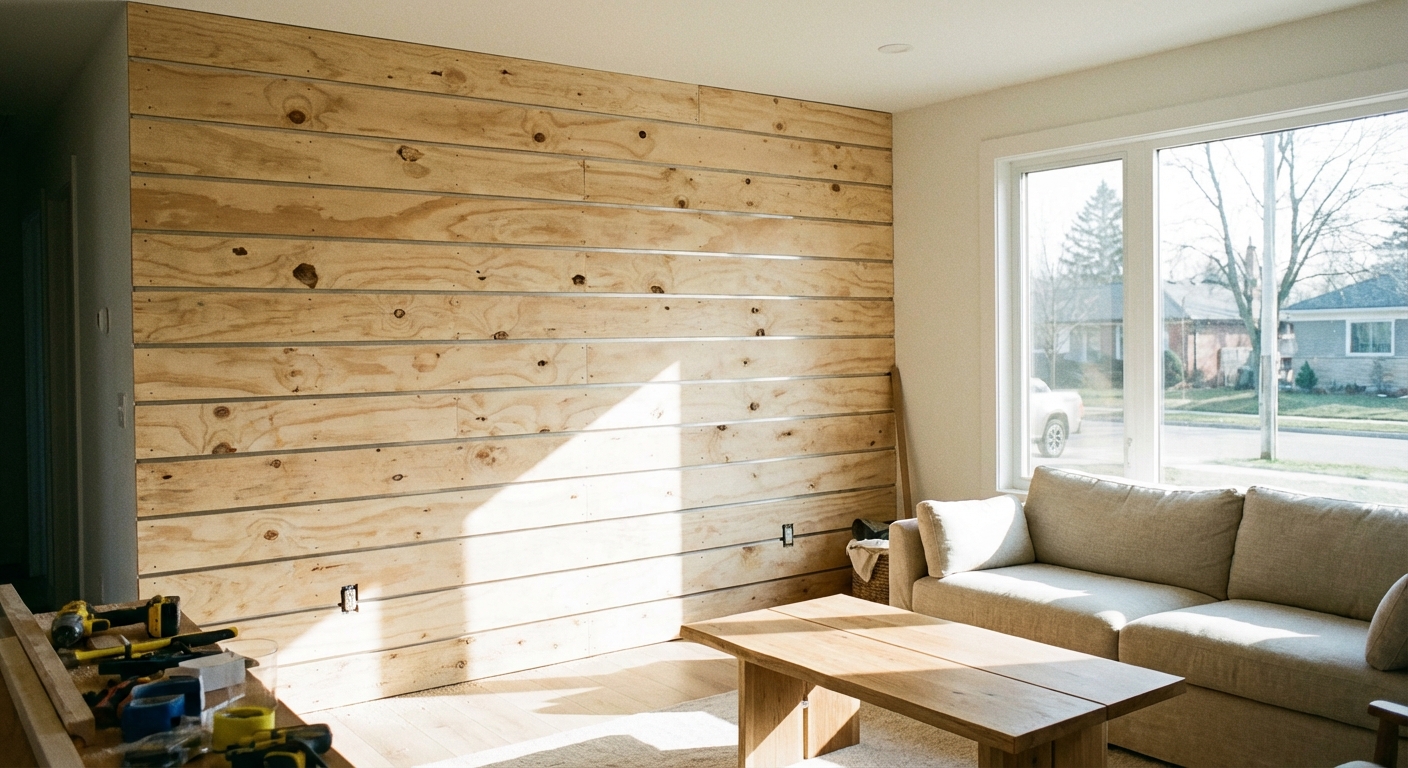
Real shiplap is great. Real shiplap is also pricey, heavy, and surprisingly unforgiving if your walls are even a little wavy. The workaround I keep coming back to in my own 1970s ranch is faux shiplap made from thin plywood strips. You get the same clean horizontal lines, you control the reveal, and you can build it with tools most homeowners already have or can borrow.
This tutorial is the budget version: one sheet of plywood turned into a whole accent wall, plus a little caulk and paint. I will walk you through planning, cutting, installing, and finishing so it looks intentional, not like “a bunch of boards on a wall.”
Why plywood strips work (and when they do not)
Pros
- Budget-friendly: One 4x8 sheet can cover a surprising amount of wall.
- Lightweight: Easier to hold up than solid boards.
- Consistent thickness: Helps your lines stay crisp.
- Beginner-friendly: Straight cuts and repeatable steps.
Cons
- Edges can look fuzzy if you use low-grade plywood or a dull blade.
- Not great for heavy texture unless you skim coat first.
- Water and steam: Use caution in full bathrooms unless you prime and seal well.
Where it shines: Bedrooms, dining rooms, hallways, home offices, nurseries, and living rooms.
Where I think twice: Behind a range, inside a shower, or anywhere that regularly gets soaked.
Budget and materials
Prices vary wildly by region, but the “tight budget” version typically lands in the $60 to $180 range for an average accent wall, depending on paint and tools you already own.
Materials
- Plywood: 1/4 inch sanded plywood is the sweet spot for most walls. 1/2 inch looks beefier but costs more and eats up outlet depth faster.
- Construction adhesive: Optional but helpful on walls that are a little wavy.
- 18-gauge brad nails: 1 inch to 1-1/4 inch is usually plenty for 1/4 inch strips.
- Spacers for the “reveal”: Nickels, paint stir sticks, or 1/8 inch tile spacers.
- Caulk: Paintable acrylic latex (for seams and edges).
- Wood filler: For nail holes.
- Primer and paint: More on finish options below.
Tools
- Tape measure and pencil
- Stud finder
- Level (2 foot works, 4 foot is better)
- Circular saw with a straightedge guide or a table saw (fastest for ripping strips)
- Miter saw or handsaw for length cuts
- Brad nailer (pneumatic or cordless) or a hammer and finish nails
- Caulk gun
- Sanding block or sanding sponge
My thrifty tip: If you do not own a table saw, you can still get clean rips with a circular saw and a straightedge. Clamp a level or a factory edge of plywood as your guide and take your time.
Pick your “shiplap” look
There are two popular faux shiplap looks. Both look great. One is simpler to finish.
Option A: Square edge with a reveal (easiest)
You install flat strips and leave a small gap between them (usually 1/8 inch). After paint, it reads like shiplap.
Option B: Reveal plus light caulk (cleanest painted look)
Same as Option A, but you run a tiny caulk bead along the seams after install. This hides minor wall waves and makes the lines look intentional.
My recommendation for beginners: 1/8 inch reveal using tile spacers. It looks crisp and forgiving.
Plan the layout
This is the part most tutorials rush, and it is where the wall either looks professional or looks like you ran out of boards at the ceiling.
Step 1: Measure wall height
Measure floor to ceiling in at least three spots (left, center, right). Homes settle. Ceilings are rarely perfect. Use the smallest measurement so you do not end up with the last board jammed in.
Step 2: Choose strip width
Common shiplap face widths are 5-1/4 inches, 7-1/4 inches, and 9-1/4 inches. With plywood, I like 5-1/2 inch or 7-1/4 inch strips because they are easy to measure and look right in most rooms.
Step 3: Do the row math
To estimate how many rows you will get (and whether the top row will be a tiny sliver), use this:
Wall height ÷ (board face width + gap width)
The decimal remainder tells you what happens at the top.
- Example: 96 inch wall height ÷ (5.5 inch board + 0.125 inch gap) = 96 ÷ 5.625 = 17.06. That means 17 full rows and a top row that is only about 0.06 of a row (a sad little sliver).
- If you get something like 17.5, you are in good shape. Your last row will be roughly half a board.
If the top row ends up too small, adjust now. You can:
- Start with a slightly narrower first board.
- Increase or decrease the reveal slightly (within reason).
- Pick a different strip width.
Rule of thumb: Try to keep the first and last rows at least 2-1/2 to 3 inches tall so it looks intentional.

Prep the wall
1) Remove what you can
- Baseboards and shoe molding if you plan to reuse them
- Outlet covers and switch plates (turn off power at the breaker first)
- Any hooks, nails, or floating shelf brackets
2) Patch and flatten
You do not need museum-perfect drywall, but you do need obvious bumps knocked down. Scrape paint drips, patch holes, and sand high spots.
3) Mark studs
Find studs and mark them lightly near the top and bottom of the wall. When the boards go up, you will still be able to see where to nail.
4) Paint behind the gaps (do this now)
This is the step that saves you later. If your wall is currently a darker color and you install white (or light) shiplap with a 1/8 inch reveal, the old paint will peek through every gap. Trying to paint inside those tiny seams after the boards are up is tedious and it is easy to flood the reveal.
What to do: Before you install anything, paint the wall the same color as your final shiplap color. If you are truly trying to stretch a gallon, at least paint horizontal “stripes” where the gaps will land. Full coverage is easier and usually faster.
5) Decide how you handle outlets
Adding 1/4 inch material usually requires outlet box extenders or longer screws so the receptacle sits flush with the new face of the wall. This is cheap, and it is a safety detail worth doing right.
Cutting plywood strips
Best method: Table saw
Set the fence to your strip width and rip all your boards. Keep the factory edge against the fence for consistent cuts.
Budget method: Circular saw + straightedge
- Measure and mark your strip widths across the sheet.
- Clamp a straightedge guide.
- Use a sharp plywood blade if you can.
- Cut slow and steady to reduce tear-out.
My mistake from early days: I once ripped strips with a dull framing blade and thought paint would hide the fuzz. It did not. A sharper blade is cheaper than redoing a wall.

Install the faux shiplap
Step 1: Find your starting point
You can start at the bottom and work up or start at the top and work down. I prefer starting at the bottom because baseboards hide small sins. If you removed baseboards, starting at the bottom still helps keep everything consistent.
Step 2: Snap or draw a level line
Do not trust your floor. Pick a height for the first board, then use a level to draw a straight reference line across the wall.
Step 3: Install the first board dead level
- Apply a few dabs of construction adhesive (optional).
- Set the board on your level line.
- Nail into studs when possible.
- Add a couple nails between studs to keep the strip tight to the wall.
Step 4: Use spacers for consistent reveals
Place your 1/8 inch spacers on top of the installed board, then set the next board on the spacers. Work your way across and up.
Step 5: Stagger seams the smart way
If your wall is longer than your board lengths, stagger seams so they do not line up in a vertical zipper. I like to alternate seam locations by at least two stud bays. If you can land seams on studs, even better.
Step 6: Work around outlets and switches
- Measure carefully and cut the opening with a jigsaw or oscillating tool.
- Dry fit before you nail.
- Install box extenders after the wall is complete and painted, then reinstall the device and cover plate.
Step 7: The last row
Measure the remaining gap in multiple spots and rip the final board to fit. This is where ceilings being out of level will show up, so measure left, middle, and right and choose the tightest fit.

Trim options
Faux shiplap looks best when the edges look finished. Pick one of these approaches depending on your budget and the look you want.
Option 1: Butt into existing trim
If the accent wall ends at an inside corner, you can run boards right into the corner and caulk the joint.
Option 2: Add corner trim (most forgiving)
Use inexpensive lattice or 1x2 boards on the outside edges. This hides uneven drywall edges and keeps the look crisp.
Option 3: Frame the wall
Add 1x3s or 1x4s around the perimeter like a frame. It costs more, but it looks custom.
Fill, caulk, sand, and paint
This is the “make it look like it belongs in the house” phase. Plan on spending as much time finishing as installing.
1) Fill nail holes
Use wood filler, let it dry, then sand flush.
2) Caulk seams and edges
- Run a thin bead where boards meet the wall at corners and along trim.
- If you want a more seamless painted look, lightly caulk along the gaps too, but do not overfill. You want the shadow line to remain.
3) Prime
Plywood can soak up paint unevenly. A good primer helps. If you used a decent sanded plywood, one coat of primer is usually enough.
4) Paint
For a classic look, use a soft white or a warm greige in an eggshell or satin finish. If you want a modern farmhouse vibe, deep moody colors also look fantastic with crisp reveals.
Roller tip: Use a small foam roller for a smoother finish, especially if you are trying to mimic painted wood boards.

Common mistakes
- Skipping the level line: Your eye will catch drifting rows immediately.
- Not planning the top row: A tiny final strip screams “DIY project.”
- Forgetting to paint behind the gaps: Dark wall color showing through the reveal is one of those things you cannot unsee.
- Forgetting outlet extenders: Outlets need to be flush for safety and a clean look.
- Using cheap, rough plywood: You will spend the savings in sanding and frustration.
- Over-caulking the gaps: Shiplap needs shadow lines to read as shiplap.
Quick FAQ
Should I paint the strips before or after installing?
If you want the fastest route, paint after installation. If you want the cleanest gaps with less brush work, prime and paint the strips first, then touch up after. I usually do install first because I always end up cutting and tweaking pieces.
Do I really need to paint the wall first?
If there will be visible reveals, yes. Even if the final look is all white, any darker wall color will show through the gaps. Painting first is faster than trying to detail-paint inside every seam after.
Can I do this on textured walls?
Light orange peel is usually fine. Heavy knockdown can leave voids behind thin plywood. If the texture is aggressive, skim coat or use a slightly thicker material.
Do I need adhesive if I nail into studs?
Not strictly, but a few dabs help pull boards tight on imperfect drywall. If you are renting or want easier removal later, skip adhesive and use nails only.
What reveal size looks best?
1/8 inch is a safe, classic choice. 3/16 inch reads a bit bolder. Larger gaps can start to look more like plank wall than shiplap.
My budget game plan
- Use 1/4 inch sanded plywood.
- Rip 5-1/2 inch strips for a classic look and good yield.
- Use tile spacers for consistent 1/8 inch gaps.
- Paint the wall first (seriously), then install.
- Nail into studs with a basic brad nailer, skip adhesive unless the wall is really wavy.
- Prime once, then paint two coats with a small roller.
If you take your time on the first board and the finishing work, this project punches way above its cost. It is one of my favorite “weekend-to-wow” upgrades because every time you walk into the room, you see the lines and think, yeah, I built that.
About Marcus Vance
Content Creator @ Grit & Home
Marcus Vance is a lifelong DIY enthusiast and self-taught home renovator who has spent the last decade transforming a dilapidated 1970s ranch into his family's dream home. He specializes in budget-friendly carpentry, room-by-room renovations, and demystifying power tools for beginners. Through his writing, Marcus shares practical tutorials and hard-learned lessons to help homeowners tackle their own projects with confidence.