🚨 In a DIY emergency or rush?
Skip the details and jump straight to our 30-second cheat sheet for the most crucial info.
If you have a cabinet door that suddenly looks crooked, rubs the face frame, or refuses to latch, you are usually 10 minutes away from a fix. Most of the time it is not a “bad cabinet.” It is a hinge that has drifted, screws that have loosened, or a screw hole that has given up after years of slamming shut.
I have fought this battle in my own 1970s ranch more times than I care to admit, especially after humid summers when doors swell a hair and hinges get cranky. The good news: you can dial most doors back in with a screwdriver and a calm, methodical approach.
Start with a quick diagnosis
Before you touch a screw, confirm what kind of “won’t close” problem you have. Different symptoms point to different fixes.
- Door is sagging and gap is bigger at the top than the bottom: hinge screws are loose, the cabinet box is out of square, or a screw hole is stripped.
- Door hits the cabinet frame on the hinge side: door needs side-to-side adjustment (Euro hinge) or hinge leaf needs to shift (traditional).
- Door hits top or bottom of opening: door needs up-and-down adjustment (Euro hinge) or hinge screws need repositioning.
- Door closes but pops back open: latch, magnetic catch, roller catch, or striker plate is misaligned or worn.
- Door rubs only sometimes: humidity swelling, loose hinge, or cabinet box movement.
Quick rule: If the door is “in the wrong place,” fix hinges first. If the door is “in the right place but won’t stay shut,” fix the catch second.
Tools and supplies
- #2 Phillips screwdriver (and a square/Robertson if your screws are that type)
- Hand screwdriver for final tightening (less chance of stripping)
- Small level or a straight edge (optional but helpful)
- Wood toothpicks or 1/8 inch hardwood dowel
- Wood glue
- Utility knife or chisel (for trimming shims)
- Cardboard or plastic shims (even an old playing card works)
If you use a drill or impact driver, keep the clutch low. Most cabinet hinge problems start with overtightened or stripped screws.
European cup hinges: adjust in 3 ways
Most modern kitchen and bath cabinets use European cup hinges. They have a round “cup” bored into the door and a hinge arm that mounts to a plate inside the cabinet. These are DIY-friendly because they are designed to be adjusted.
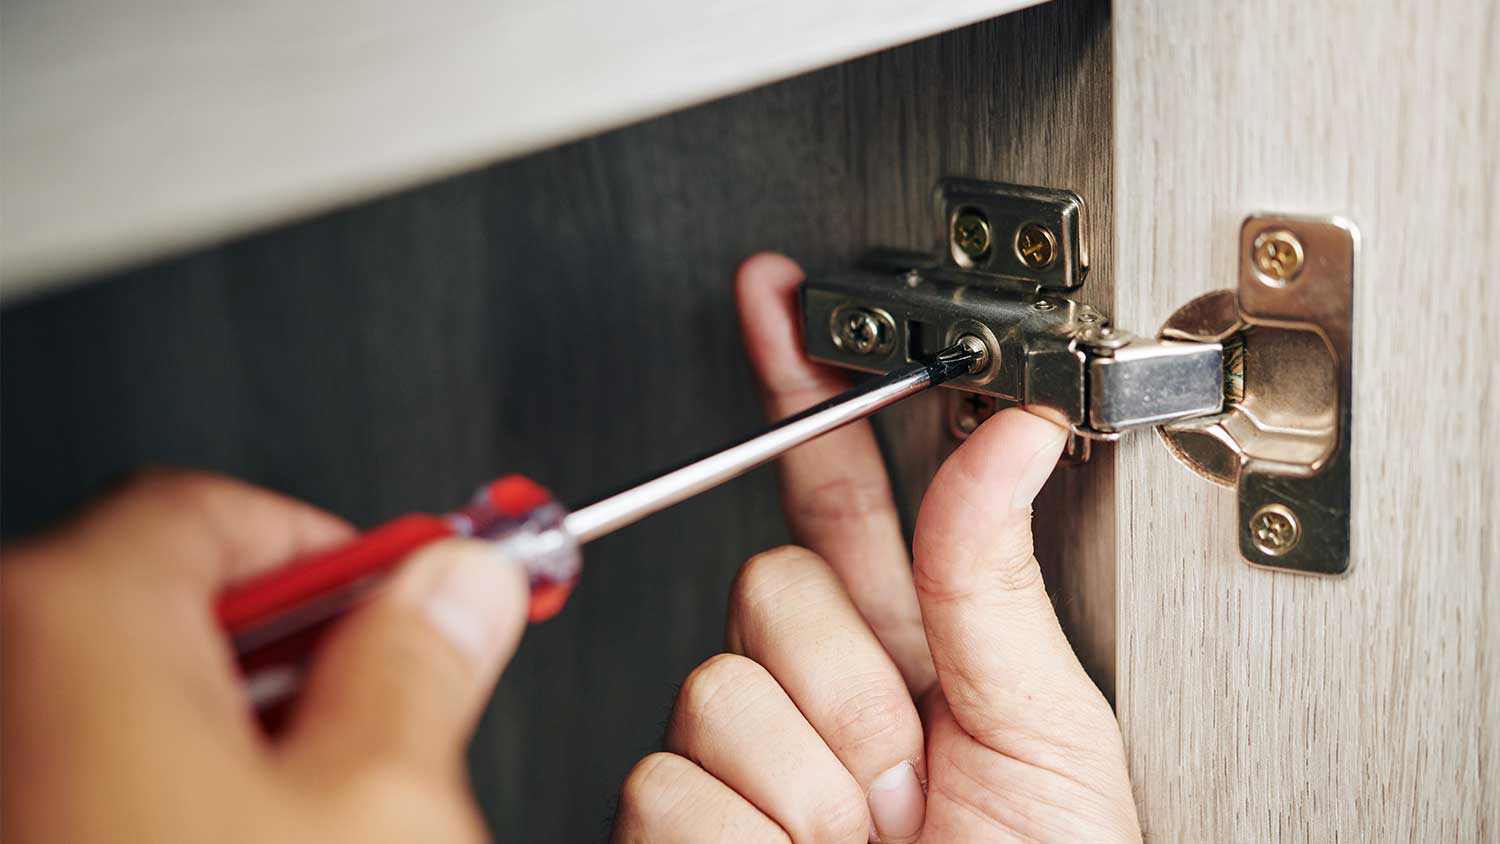
Step 1: Tighten mounting screws first
Open the door and snug these up before you adjust anything:
- Door-side screws that hold the cup hinge to the door.
- Cabinet-side screws that hold the mounting plate to the cabinet box.
If the hinge plate is loose, no amount of fine adjustment will stay put.
Step 2: Side-to-side (left/right) adjustment
This is the adjustment you use when doors collide in the middle, or the reveal gap looks uneven along the vertical edges.
- Find the screw on the hinge arm that moves the door toward or away from the cabinet side panel.
- Turn it in small increments, about a quarter turn at a time.
- Adjust the top and bottom hinges evenly so the door stays straight.
My habit: I close the door after every small change. It feels slow, but it prevents the classic “now I fixed one corner and messed up the other” spiral.
Step 3: Depth (in/out) adjustment
Use this when the door is proud of the face frame, or it sits too deep and rubs inside.
- Locate the depth screw (often the one closest to the cabinet box on the hinge arm).
- Turn to move the door in toward the cabinet or out toward you.
Depth matters for latching. If the door is too far out, magnetic catches sometimes barely grab.
Step 4: Height (up/down) adjustment
Some Euro hinges have a dedicated height adjustment on the mounting plate. Others require loosening the plate screws, shifting, then re-tightening.
- Support the door with your hand.
- Slightly loosen the mounting plate screws (do not remove them).
- Lift or lower the door to even out the top and bottom gaps.
- Re-tighten firmly.
Tip: If you have two doors side-by-side, set the first door where you want it, then match the second to it. Chasing perfection on both at once is a headache.
Traditional hinges: tighten, shift, shim
Older cabinets and many face-frame cabinets use traditional hinges, often visible on the outside edge. They usually do not have built-in micro-adjustment screws, so the fix is more about screw tightness, hinge position, and shimming.
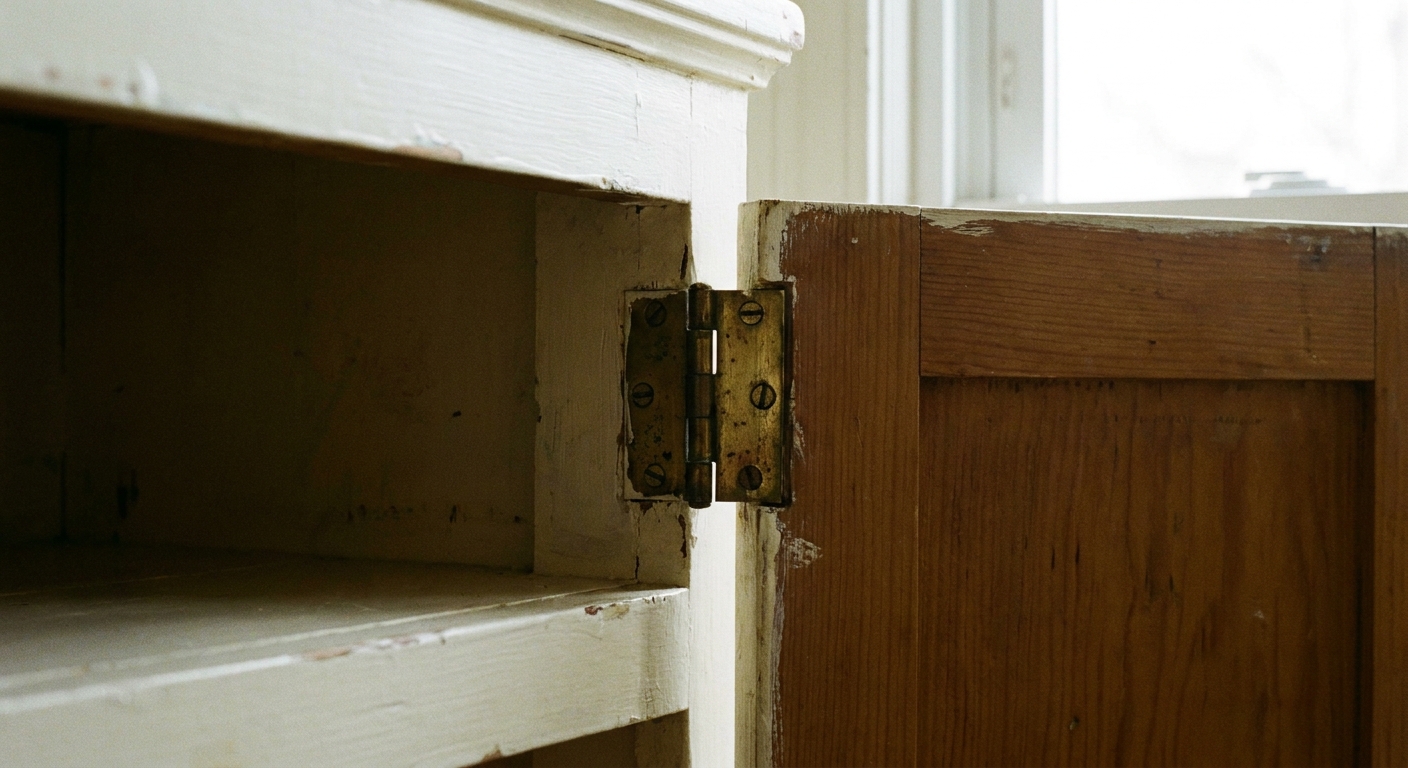
Step 1: Tighten all hinge screws
Start with the obvious. Open the door, and snug the screws on both the door and the face frame. If a screw just spins, jump to the stripped hole repair section below.
Step 2: Shift the hinge slightly
If the door is rubbing the frame at the top or bottom, you can often fix it by loosening screws slightly and nudging the hinge.
- Loosen the screws in the hinge leaf you want to move.
- Nudge the door up, down, or sideways a hair.
- Re-tighten while holding position.
This works best when the existing screw holes still have some “wiggle room.”
Step 3: Shim behind the hinge leaf
Shimming is how you correct a door that is twisted relative to the opening, even when the hinges are tight. A thin shim behind one hinge leaf changes the angle of the door.
- Cut a small shim from thin cardboard, veneer, or plastic packaging.
- Remove the hinge screws from one hinge leaf (usually the cabinet side is easier).
- Place the shim behind the hinge leaf and reinstall screws.
- Add or remove shim thickness until the reveal looks even and the door closes clean.
Where to shim:
- Door rubs at the top latch side: try shimming behind the bottom hinge.
- Door rubs at the bottom latch side: try shimming behind the top hinge.
I used to avoid shims because they felt “hacky.” Now I keep a stack of playing cards in the shop. One card thickness can be the difference between a smooth close and a daily annoyance.
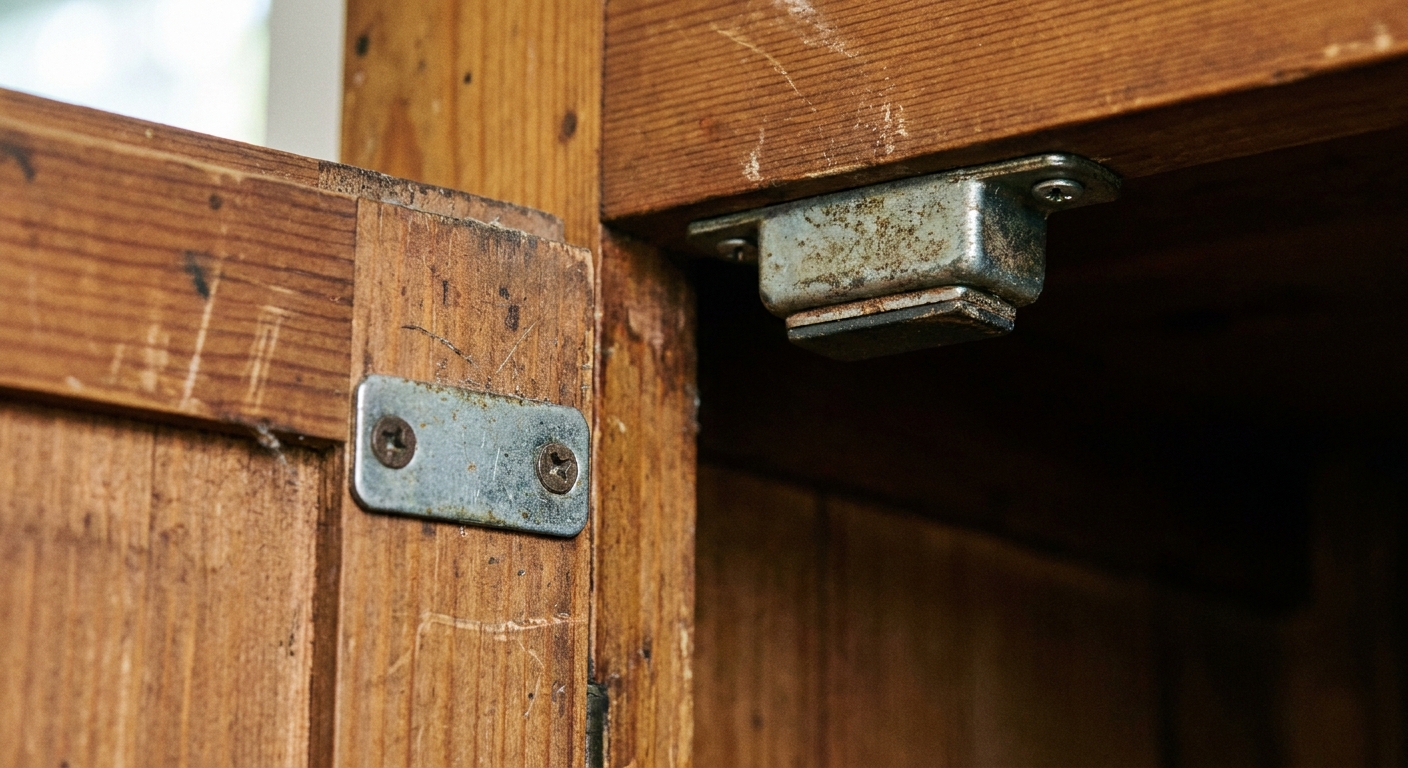
Door pops open: fix the catch
If your door hits the stop, then springs open, the hinges might be fine. The latch hardware is usually the culprit.
Magnetic catch alignment
- Close the door slowly and watch where the metal striker lands relative to the magnet.
- Loosen the striker screws slightly, shift it so it centers on the magnet, and re-tighten.
- If the magnet is adjustable or slotted, adjust the catch body too.
Common gotcha: If the door is sitting too far “out,” the magnet might barely touch. Do a quick depth adjustment on Euro hinges first.
Roller catch or ball catch alignment
- Check for a bent or loose catch bracket.
- Center the strike so it lands between the rollers or engages the ball smoothly.
- Replace worn rollers or a weak spring. They are cheap, and sometimes adjustment cannot overcome wear.
Striker plate rubbing
If you hear a scrape right before it closes, the striker plate may be slightly too high or low. Shift it until the door closes without friction. If the screws are stripped, repair the holes before you trust the alignment.
Stripped screw holes
If you tighten a hinge screw and it never gets snug, the hole is stripped. This is extremely common on particleboard cabinet boxes and on older solid wood doors that have been adjusted repeatedly.
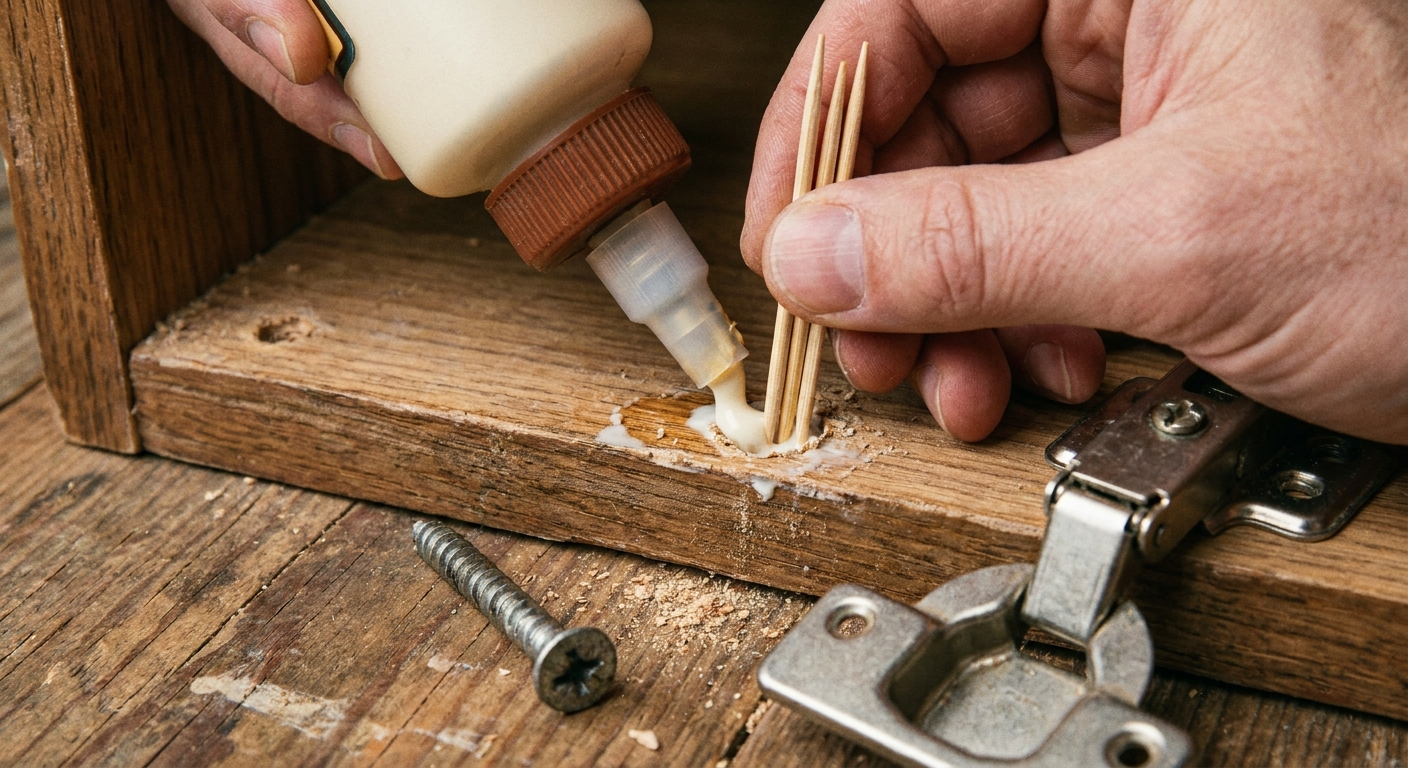
Toothpick and glue method
- Remove the screw.
- Put a few drops of wood glue into the hole.
- Pack in toothpicks (or a bamboo skewer) until snug.
- Snap or cut them flush.
- Let the glue set 15 to 30 minutes if you can, then reinstall the screw by hand.
Hardwood dowel method
- Drill the hole out cleanly to match your dowel size (often 1/4 inch works well).
- Glue in a hardwood dowel and let it dry.
- Re-drill a small pilot hole and reinstall the hinge screw.
Longer screws: when they help
A slightly longer screw can bite into fresh material and hold better, especially in face frames. But be careful in thin cabinet sides. You do not want a screw tip poking out the exterior.
Foolproof step order
If you want the simplest path to a clean result (and a satisfying before-and-after photo if you are the type), follow this order. It keeps you from chasing your tail.
- Optional photo: Door closed showing the uneven gaps and where it rubs.
- Step 1: Tighten all mounting screws.
- Step 2: Adjust side-to-side first (Euro) or shift hinge position (traditional).
- Step 3: Adjust height (up/down) to center the door in the opening.
- Step 4: Adjust depth (in/out) so it closes flush and latches reliably.
- Step 5: Shim if reveals are still weird.
- Step 6: Align catch or striker if it will not stay closed.
- Optional photo: Door closed after with even gaps.
When adjustment is not enough
Sometimes the hinge is telling you it is done. Here is when I stop fiddling and start repairing or replacing.
- Hinge is bent or cracked: replace it. A bent hinge will never adjust cleanly.
- Hinge cup is loose in the door: the door material may be blown out. Repair with epoxy or replace the door if the damage is severe.
- Mounting plate keeps pulling out of particleboard: repair holes with dowels, or use a properly sized hinge repair plate made for Euro hinges.
- Cabinet box is out of square or loose from the wall: you can adjust doors all day and still hate the result. Tighten cabinet-to-wall screws and check for movement.
Do not make my mistakes
- Do not crank on adjustment screws. If an adjustment feels maxed out, something else is wrong, usually a loose mounting plate or stripped hole.
- Adjust both hinges. Moving only the top hinge can twist the door and create a new rub.
- Work in small turns. Quarter turns save time in the long run.
- Fix structure before cosmetics. A loose cabinet box will undo a perfect hinge adjustment.
The 30-Second Cheat Sheet
Essential takeaways for: Cabinet Doors Sagging or Won’t Close? Fix the Hinges
Fast fix order (most problems)
- Snug all hinge screws (door side and cabinet side). If a screw spins, repair the hole.
- European cup hinges: adjust side-to-side first, then height, then depth.
- Traditional hinges: tighten, then shift hinge position. If reveals are still off, shim behind a hinge leaf.
- If it closes but pops open: align the magnetic catch, roller catch, or striker plate.
What screw does what (Euro hinges)
- Side-to-side: evens the gap between two doors and stops rubbing on the hinge side.
- Depth (in/out): makes the door sit flush and helps the latch engage.
- Height (up/down): fixes doors hitting the top or bottom of the opening.
Stripped hinge screw hole fix
Remove screw, add wood glue, pack toothpicks, snap flush, reinstall screw by hand. For badly blown holes: glue in a hardwood dowel, re-drill pilot hole.
Shim shortcut (traditional hinges)
Add a thin cardboard or plastic shim behind one hinge leaf to change the door angle. One playing-card thickness can fix a stubborn rub.
When to replace parts
- Hinge is bent, cracked, or sloppy: replace it.
- Catch hardware is worn or weak: replace catch or striker.
💡 Tip: Scroll up to read the full article for detailed, step-by-step instructions.
⬆️ Back to topAbout Marcus Vance
Content Creator @ Grit & Home
Marcus Vance is a lifelong DIY enthusiast and self-taught home renovator who has spent the last decade transforming a dilapidated 1970s ranch into his family's dream home. He specializes in budget-friendly carpentry, room-by-room renovations, and demystifying power tools for beginners. Through his writing, Marcus shares practical tutorials and hard-learned lessons to help homeowners tackle their own projects with confidence.