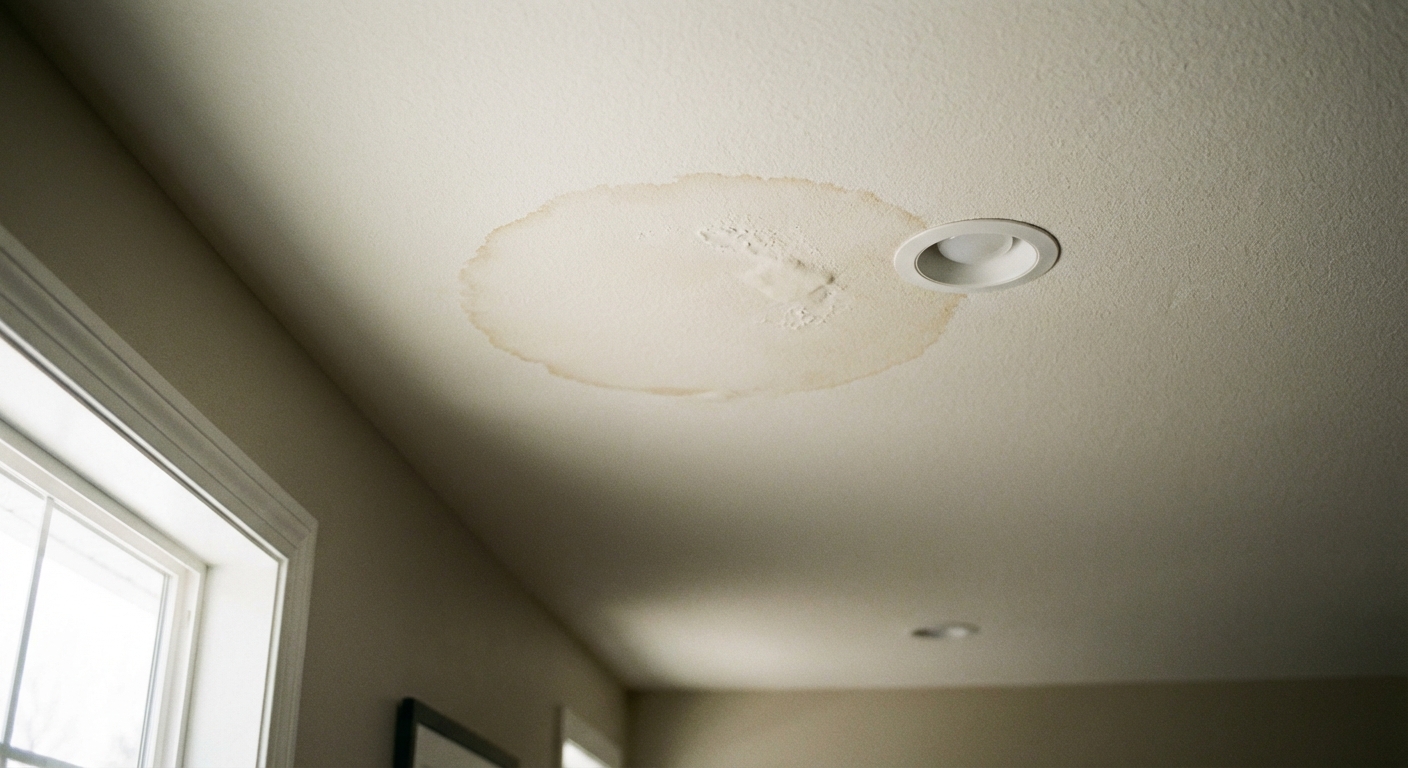
Ceiling water stains are like the check engine light on your car. Sometimes it is a loose gas cap, and sometimes it is something you need to pull over for. The goal is not to panic. The goal is to figure out where the water came from, stop it for good, then repair the ceiling so the stain does not bleed back through your paint.
I have chased stains that were “definitely the roof” and turned out to be an overflowing upstairs toilet. I have also patched a ceiling too early and watched the ring come right back after the next storm. This page will help you avoid both mistakes.
First things first: is it active right now?
Before you worry about color charts and paint, answer one question: is the stain still getting wet?
- Touch test: Press a paper towel to the darkest part. If it picks up moisture, treat it as active.
- Tape test: Tape a 12 inch square of foil or plastic wrap over the stain edges sealed. Check in a few hours. Condensation often forms on the room side. A leak from above often wets from the ceiling side and may not bead on the inside surface as fast.
- Mark it: Lightly pencil the stain perimeter and date it. If it grows, you are still leaking.
Safety note: If the ceiling is sagging, bulging, or dripping near a light fixture, shut off power to that circuit at the breaker and put a bucket under it. Wet drywall can fail suddenly.
Read the stain: location clues that narrow it fast
Where the stain shows up is often more useful than what it looks like.
Stain on the top floor ceiling (under the attic or roof)
- Most likely: roof leak, flashing leak, ice dam, or attic condensation.
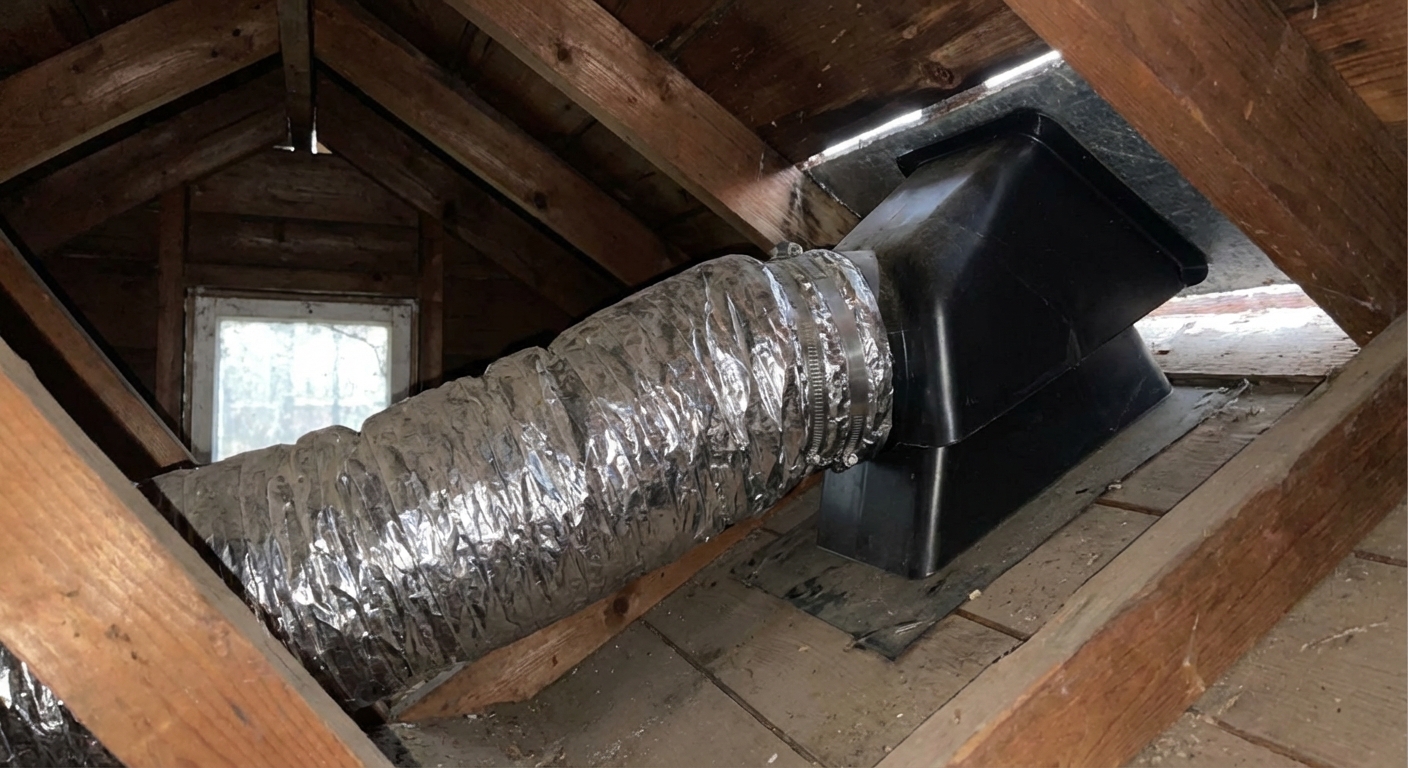
- Also possible: an HVAC duct sweating in the attic, or a bath fan dumping moist air into the attic.
Stain on a lower floor ceiling (with a bathroom, kitchen, or laundry above)
- Most likely: plumbing leak from a supply line, drain, toilet, tub, shower pan, dishwasher, or washing machine.
- If it shows after using a specific fixture (shower, toilet), that is a huge hint.
Stain near an exterior wall or corner
- Often: roof flashing near a valley, chimney, skylight, or wall intersection.
- Could be: condensation from a cold corner with poor insulation or air sealing.
Stain around a vent, register, or duct chase
- Often: condensation on cold ductwork, a disconnected duct, or warm moist air meeting a cold surface.
What the color usually means (and what it does not)
Color is a clue, not a verdict. A roof leak can look identical to a plumbing leak. That said, here are patterns I see most often.
- Light tan or yellow ring: common “old leak” look. Often from a small roof drip or an intermittent plumbing seep that has dried.
- Dark brown spot with a ring: repeated wetting and drying, pulling tannins and dirt through the drywall paper. Common with roof leaks and slow plumbing leaks.
- Gray or black speckling: possible mold growth, often tied to condensation or a long-running leak. Needs attention even if the water source seems minor.
- Rust-colored stain: water interacting with metal, like a drywall corner bead, nail, screw, metal duct, or an old cast iron pipe nearby.
- White, chalky, or bubbly paint: moisture trapped under paint. Often points to ongoing dampness or repeated humidity cycles.
Quick diagnostic table: match the cause to the clues
Use this as a starting point, then confirm with a targeted inspection.
Roof leak
- Where: top floor ceilings, near exterior walls, chimneys, skylights, valleys, or roof penetrations.
- When it shows up: after rain or wind-driven storms. Sometimes delayed by hours.
- Stain look: brown ring, irregular blob, sometimes multiple small spots.
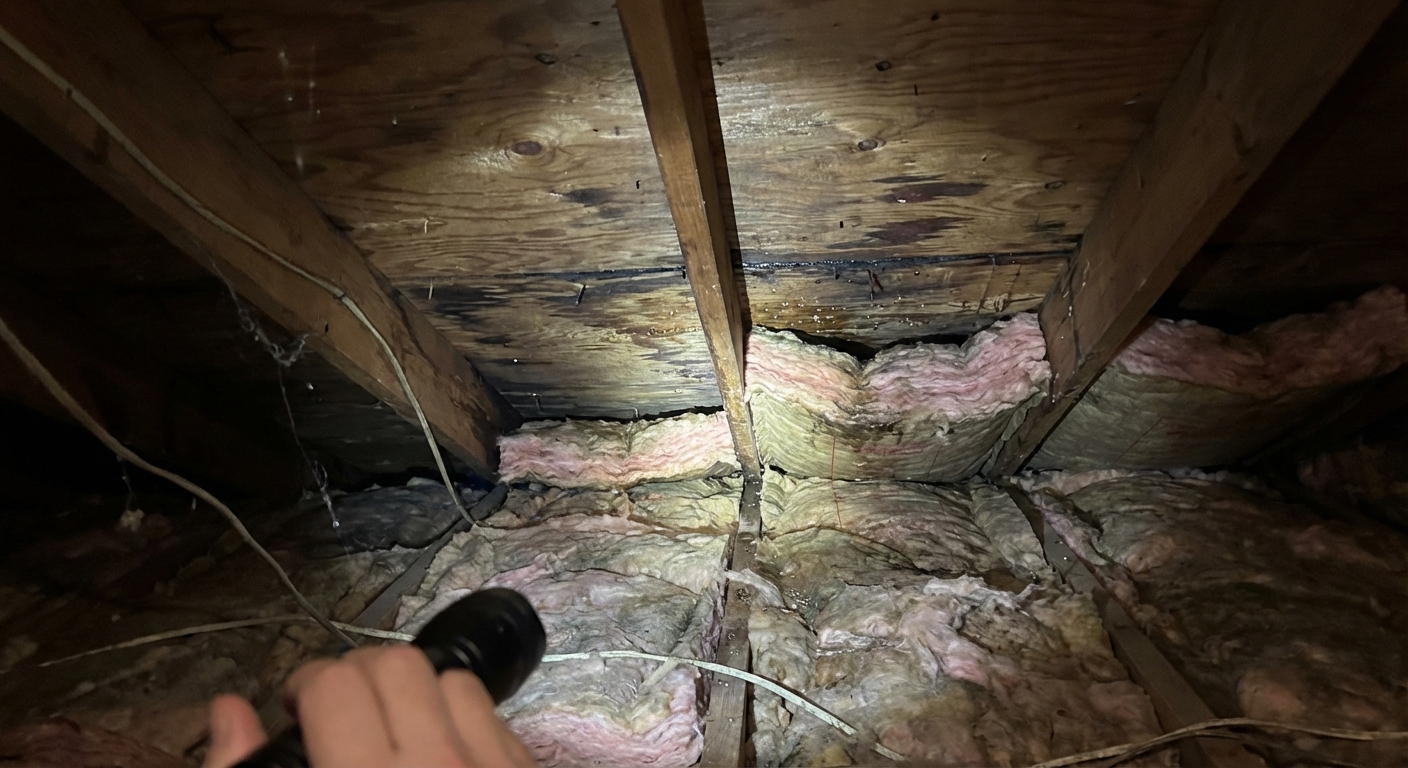
- Confirm it: inspect attic during or right after rain with a bright flashlight. Look for wet decking, darkened wood, shiny nails, or drips on insulation.
Plumbing leak
- Where: below a bathroom, kitchen, or laundry. Often near a tub, shower, toilet, sink, dishwasher, or washing machine location.
- When it shows up: after running water, flushing, draining a tub, using a shower, or during dishwasher or washer cycles.
- Stain look: can be a tight dark spot or a wider area. Paint may bubble.
- Confirm it: run one fixture at a time and watch for new moisture. Check supply lines and shutoff valves first, then drains and traps. A leak that happens only during draining often points to the drain or overflow, not the supply.
Condensation (humidity problem)
- Where: corners, around vents, near exterior walls, above bathrooms, near attic hatches, and on ceilings under uninsulated attic spaces.
- When it shows up: cold snaps, long hot showers, cooking, or seasonal swings. Not tied to rain.
- Stain look: sometimes diffuse discoloration, sometimes mold specks, sometimes peeling paint without a distinct ring.
- Confirm it: check indoor humidity with a cheap hygrometer. If you are consistently over about 50 percent in winter, condensation becomes more likely. Inspect attic for frost on nails or wet insulation.
Ice dam (cold climate winter issue)
- Where: top floor ceilings near exterior walls, especially below roof eaves. Often repeats in the same place each winter.
- When it shows up: after snow, then a warm-up, then refreeze. You may see it even when it is not actively snowing.
- Stain look: brown rings and spreading patches, sometimes multiple areas along an exterior wall line.
- Confirm it: look for thick ice at the roof edge, icicles, or water backing up under shingles. In the attic you may see wet insulation near the eaves.
When to worry (and when it might be cosmetic)
Worry now if you see any of these
- Sagging drywall, a soft “pillow” feel, or a bulge that looks like it is holding water
- Dripping or active wet spots
- Stain near lights, ceiling fans, or electrical boxes
- Musty odor that does not go away
- Repeated staining in the same area after you “fixed it”
- Visible mold growth beyond a few pinpoint specks
It may be cosmetic if all of these are true
- The stain is old and has not grown for months
- The ceiling is dry and firm
- You have confirmed the original source is repaired (roof patch, plumbing replacement, condensation corrected)
Even then, I still recommend doing the simple pencil outline trick for a couple weeks before you paint. It is cheap insurance.
How to find the source: my step-by-step checklist
Start with the simplest, most likely causes. This is how I troubleshoot without ripping open ceilings on day one.
- Check timing: rain event, fixture use, or cold weather condensation pattern?
- Go above the stain: if there is an attic, get eyes on it. If there is a bathroom above, look inside the vanity and around the toilet and tub access panel.
- Look for a path: water travels along joists, pipes, ducts, and drywall seams. The stain might be several feet from the actual leak.
- Use a moisture meter (optional but helpful): scan around the stain to find the wettest edge. That points “upstream.”
- Do controlled tests:
- Plumbing: run cold water, then hot, then drain. Flush. Run the shower with the drain covered for a few minutes, then release it and watch below.
- Roof: inspect attic during rain. If you cannot, look for water tracks, staining on rafters, and wet nail tips.
If you cannot find it, it is time to call a pro. A good roofer or plumber will often diagnose in one visit what can take a homeowner several weekends of guesswork.
Fixing the cause (the part that actually matters)
Painting a ceiling stain without fixing the source is like putting a bandage over a smoke alarm. Here are the common “real” fixes.
Roof leak fixes
- Replace missing or damaged shingles.
- Repair or replace flashing at chimneys, vents, skylights, and valleys.
- Clear debris and check for punctures around roof penetrations.
- If the roof is old and failures are widespread, budgeting for replacement may be the true fix.
Plumbing leak fixes
- Tighten or replace supply line connections and shutoff valves.
- Replace a failing wax ring (toilet leak) if water shows up after flushing.
- Repair the tub or shower drain and overflow if leaks show up during draining.
- Re-caulk is not a fix for plumbing behind the wall, but it can help with splash and surface water issues.
Condensation fixes
- Run bath fans during showers and for 20 to 30 minutes after. Make sure they vent outdoors, not into the attic.
- Address attic air leaks (around lights, pipes, attic hatch) and improve insulation where needed.
- Use a dehumidifier if indoor humidity stays high.
- Insulate cold ductwork and seal duct joints so warm air does not leak into cold spaces.
Ice dam fixes
- Improve attic air sealing and insulation to keep the roof surface colder and more uniform.
- Verify soffit and ridge ventilation are working and not blocked.
- In stubborn cases, install heat cable strategically or consult a roofing pro about an ice and water shield upgrade during the next re-roof.
Dry it out before you patch or paint
Once the source is fixed, let the ceiling dry thoroughly. This is the step that saves you from the “why is the stain back?” problem.
- Give it time: small leaks may dry in a few days. Bigger soak-through can take 1 to 2 weeks, sometimes longer.
- Move air: run a fan in the room, and if safe, a dehumidifier.
- Check for softness: if drywall feels crumbly, swollen, or delaminated, it may need patching, not just paint.
Repairing the ceiling surface (patching if needed)
If the drywall is sound and flat, you can usually go straight to stain-blocking primer. If it is damaged, do this first.
If paint is bubbled or drywall paper is loose
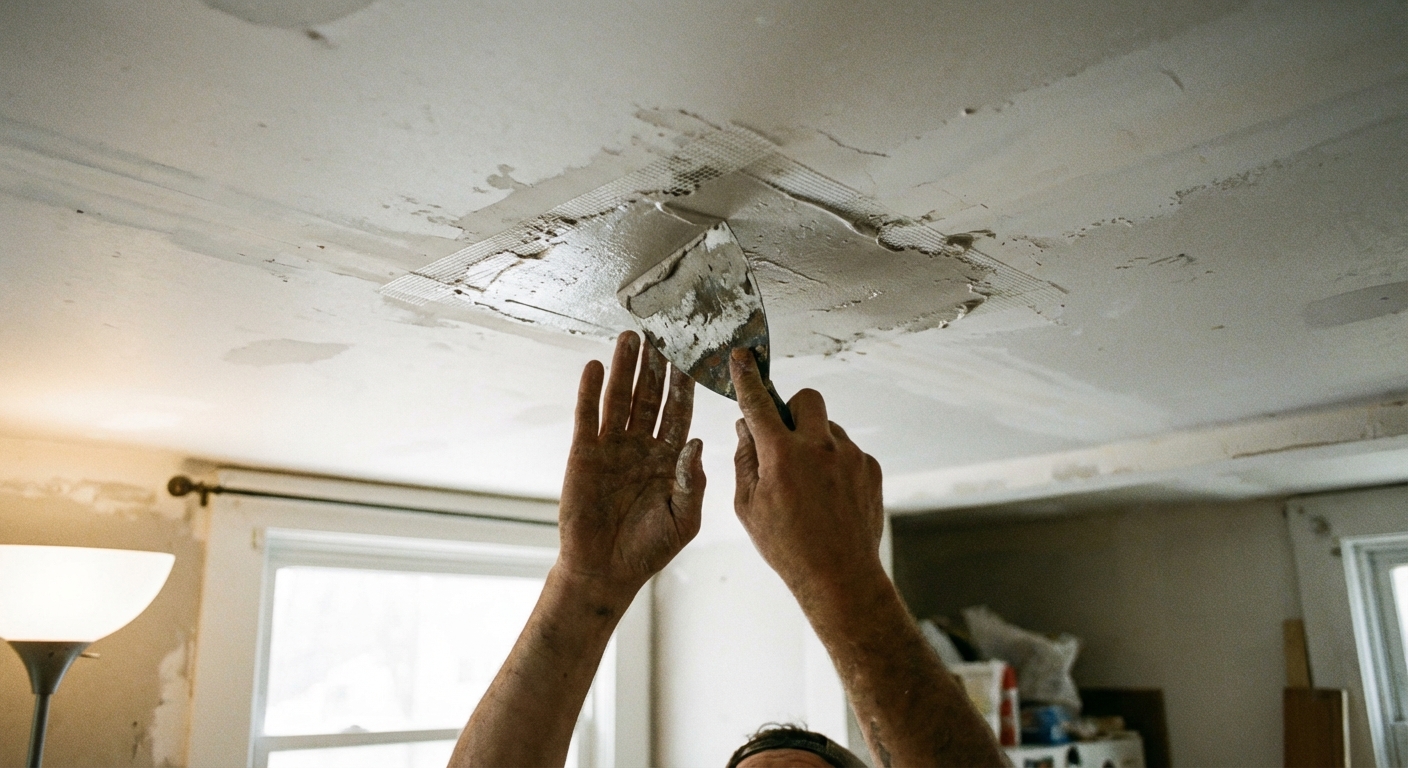
- Scrape away loose paint with a putty knife.
- Cut away torn drywall paper and fuzzy edges.
- Seal exposed paper with a problem-surface sealer or an oil-based or shellac-based primer, then skim coat with joint compound.
- Sand smooth, dust off, then prime again before painting.
If the ceiling is sagging or cracked
- Probe gently with a screwdriver. If it is soft across a wide area, plan on cutting out and replacing that section.
- If there is a bulge holding water, poke a small drain hole with a bucket underneath, then cut out and patch once dry. This can be messy, but it prevents a bigger collapse.
Seal, prime, repaint: the foolproof order
Here is the sequence that has worked best for me on stubborn water stains.
Step 1: Use the right stain-blocking primer
Regular wall primer is often not enough for water stains. Look for a stain-blocking primer and choose based on severity:
- Shellac-based primer: best for heavy stains and smoke-like bleed-through. Strong odor, fast drying. Great “problem solver.”
- Oil-based stain-blocking primer: excellent for water stains and tannins. Slower dry time and odor, but very reliable.
- Water-based stain blockers: can work for light stains, but are more likely to let a dark ring ghost back through.
My thrifty tip: Spot-prime the stain area with shellac or oil, then use a standard ceiling primer over the whole ceiling if you are repainting the room. That saves money and keeps coverage consistent.
Step 2: Prime wider than the stain
Prime 2 to 6 inches past the visible ring. Water wicks through drywall paper, and the edge is where bleed-through loves to show up.
Step 3: Paint the ceiling with a true ceiling paint
- Use flat or matte ceiling paint for best hiding.
- Feather your roller edges and keep a wet edge to avoid lap marks.
- If you only paint a spot, it will often flash. In many rooms, the cleanest look is repainting the whole ceiling.
FAQ homeowners ask me about ceiling stains
Can I just paint over a water stain?
You can, but it usually comes back. At minimum you need a stain-blocking primer. And if the source is still active, paint is just a temporary mask.
Do water stains always mean mold?
No. Many stains are just discoloration from dirty water. Mold becomes more likely when materials stay damp or humidity stays high. If you see black speckling that spreads, treat it seriously and address moisture and ventilation.
Why is the stain far from where the leak is?
Water follows framing and gravity. It can travel along a joist, hit a seam, then drip at a low point like a light fixture opening. That is why attic and plumbing inspections matter more than guessing from the room below.
When should I cut an inspection hole?
If the leak is active and you cannot identify the source from above (attic) or from fixture access, a small inspection hole can be worth it. Cut a neat square so patching is easier later, and cut outside the wettest area so the drywall is stronger.
A simple plan you can follow this weekend
- Day 1: Determine if it is active. Track timing, outline the stain, check attic or the room above.
- Day 2: Confirm the source with a controlled test (fixture-by-fixture or attic inspection during rain). Make the repair or schedule the right pro.
- Following week: Let it dry fully. Scrape and patch any damaged drywall.
- Final step: Spot-prime with a real stain blocker, then repaint for a clean finish.
If you want one takeaway, make it this: Do not rush the cosmetic fix. The ceiling will forgive you for waiting. It will not forgive you for trapping moisture or skipping stain-blocking primer.
About Marcus Vance
Content Creator @ Grit & Home
Marcus Vance is a lifelong DIY enthusiast and self-taught home renovator who has spent the last decade transforming a dilapidated 1970s ranch into his family's dream home. He specializes in budget-friendly carpentry, room-by-room renovations, and demystifying power tools for beginners. Through his writing, Marcus shares practical tutorials and hard-learned lessons to help homeowners tackle their own projects with confidence.