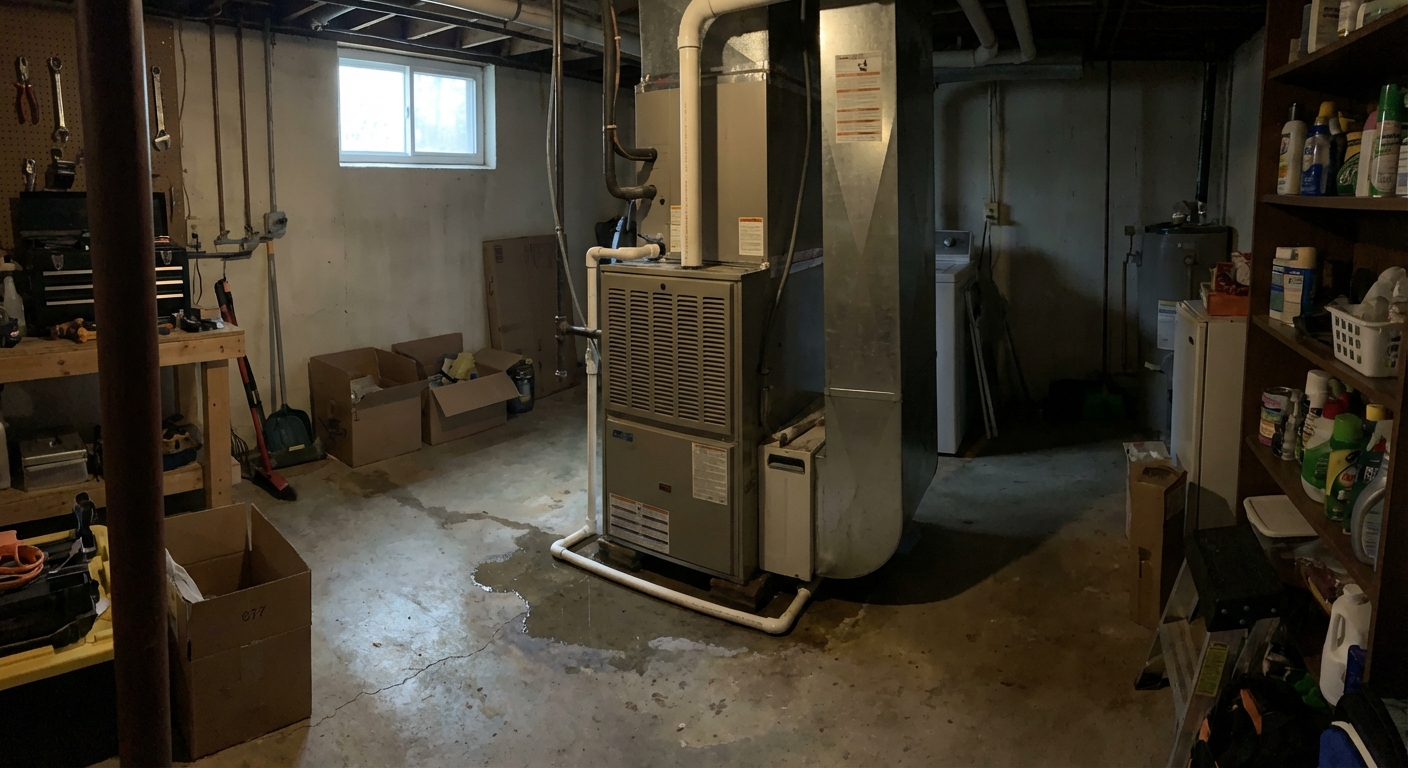
When a central AC leaks water inside, it feels urgent because it is. I have seen a small drip turn into soggy drywall and swollen baseboards in a weekend. The good news: most indoor leaks come from a handful of predictable issues you can diagnose in under 30 minutes.
This guide walks you through the five most common causes, the quick checks that confirm each one, and what you can safely fix yourself versus what should go to an HVAC tech.
First: shut it down and protect the area
Before you troubleshoot, do a quick damage-control routine. It keeps you safe and buys you time.
- Turn the system off at the thermostat. If water is actively running, flip the furnace or air handler switch off too.
- Kill power at the breaker if you see water near wiring or the control board.
- Soak up standing water with towels or a wet dry vac. Put a shallow pan under the drip if you can.
- Check your filter access door and nearby ductwork for wet insulation. Wet insulation can mold fast.
Heads up: If the leak is in an attic unit and water is showing on a ceiling, stop the system immediately. Ceiling drywall can collapse when it gets saturated.
Quick diagnosis: where is the water coming from?
Take two minutes to look for the source. This determines which fix you try first.
- Water under the unit near a white PVC pipe: usually a clogged condensate drain or cracked drain pan.
- Water dripping from the front or bottom panel: can be a frozen coil that is thawing.
- Water stains on supply plenum or ducts: often condensation from poor airflow or insulation issues, sometimes tied to freezing.
- Water only after the AC runs awhile: points to freeze and thaw cycles, drain issues, or installation problems.
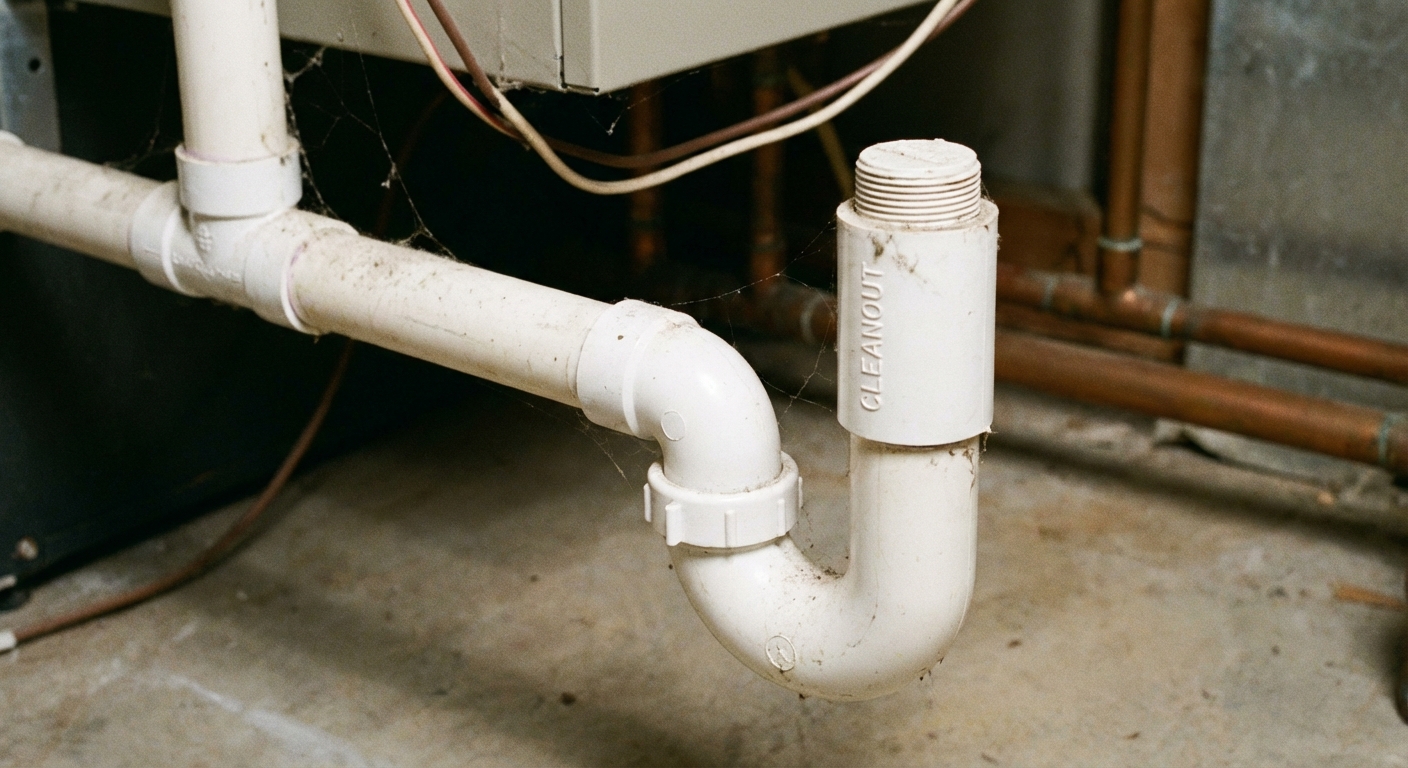
Cause #1: Clogged condensate drain line
This is the big one. Your AC removes humidity from the air, and that water is supposed to flow into a drain pan and out through a condensate line. If that line clogs with algae, slime, dust, or a kink, the pan overflows and you get an indoor leak.
How to tell
- Water is pooling around the air handler or dripping from the unit.
- You see a full pan when you look inside the access panel.
- The drain line outside is barely dripping or not dripping at all while the AC is running.
- Some systems shut off and show a float switch trip, but many just keep running and overflowing.
DIY fix
- Turn off power to the air handler at the breaker.
- Find the drain line cleanout near the unit. It is often a capped vertical PVC stub.
- Wet dry vac method (my favorite): Go outside to where the drain line exits and seal a wet dry vac hose to the pipe with a rag or tape. Vacuum for 1 to 2 minutes to pull the clog out.
- Flush the line from the cleanout with warm water. If it backs up immediately, you still have a clog.
- Sanitize with distilled vinegar. A common homeowner approach is about 1 cup into the cleanout, then let it sit 20 to 30 minutes before a light flush. Avoid harsh chemicals that can damage components or create fumes.
When to call a pro
- You cannot locate a cleanout or the line is routed in a way you cannot access.
- The line repeatedly clogs. That can indicate poor slope, missing trap setup, or debris washing off a dirty coil.
- You suspect a broken line inside a wall or ceiling.
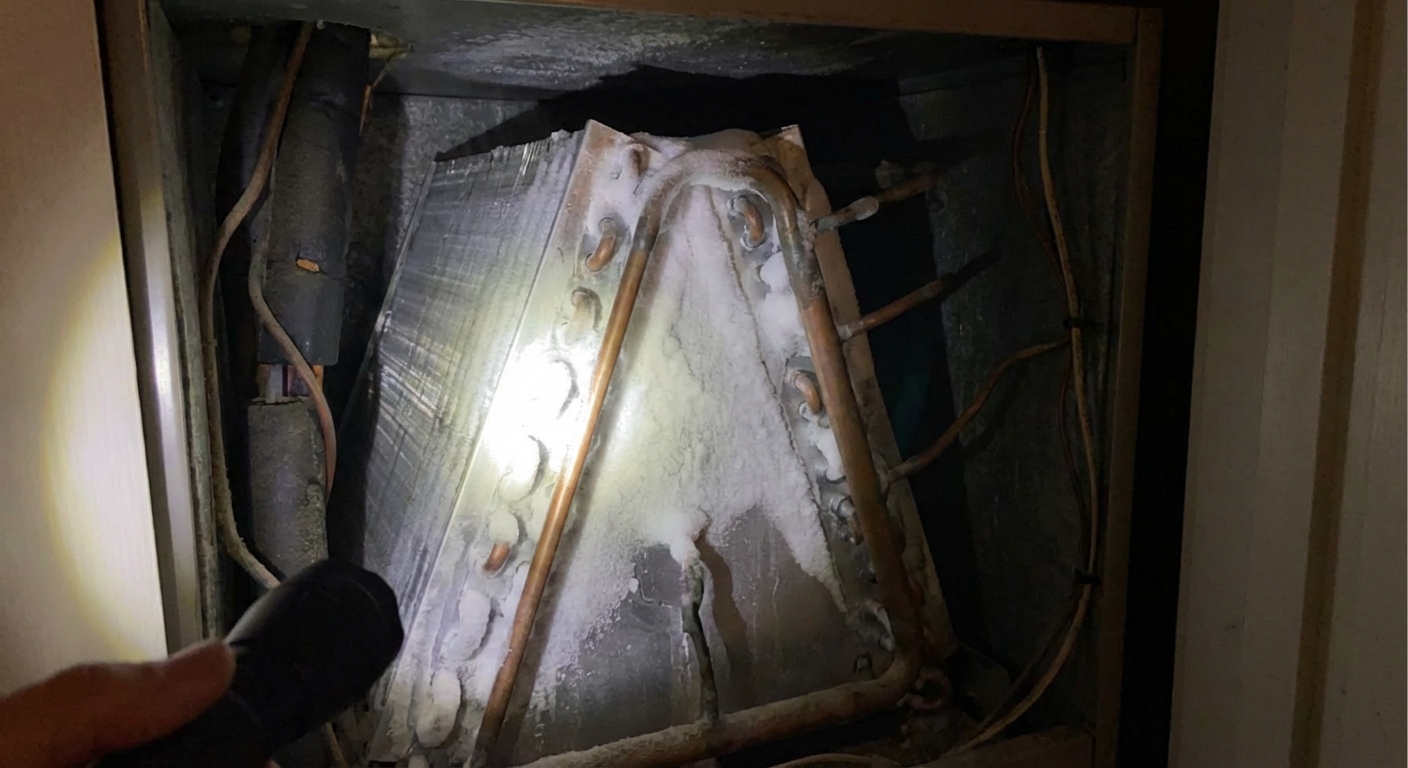
Cause #2: Dirty air filter leading to frozen evaporator coil
Here is the pattern I see constantly: airflow gets choked by a filthy filter, the evaporator coil gets too cold, moisture freezes on it, and then you end up with a “mystery” puddle when the system cycles off and that ice melts.
How to tell
- Weak airflow from vents.
- Ice or frost on the refrigerant line near the indoor unit, or on the coil if you can see it.
- Water leak appears after the AC has been running for a long stretch.
- Filter looks gray, fuzzy, or bowed inward.
DIY fix
- Turn the AC off and set the fan to ON at the thermostat to help thaw, if the fan will run without the compressor. If you are unsure, shut the whole system off and let it thaw naturally.
- Let it fully thaw. This can take a few hours. Put towels down or a pan under the unit.
- Replace the air filter with the correct size and airflow direction. Make sure the arrow on the filter points toward the blower.
- Check vents to confirm a few are open and not blocked by furniture or rugs.
My real-world note
I once tried to “just run it anyway” after swapping the filter. All I did was refreeze the coil and double the mess. Thawing completely is not optional if you want the leak to stop.
When to call a pro
- It freezes again within a day or two. That often points to low refrigerant, a blower issue, or a dirty coil.
- You cannot access the coil safely or the cabinet panels are sealed with foil tape and you are not sure what to open.
Cause #3: Cracked, rusted, or misaligned drain pan
Your indoor unit has a drain pan underneath the coil to catch condensation. Older metal pans can rust through. Plastic pans can crack. And sometimes the pan is fine, but it is not sitting level, so water runs to the wrong spot and spills out.
How to tell
- The drain line is clear, but you still get water under the unit.
- You see rust flakes, standing water, or a visible crack in the pan.
- The leak happens even with modest runtime and no coil icing.
DIY fix (limited, but possible)
- Turn off power and remove the access panel to inspect the pan with a flashlight.
- Clean debris from the pan so you can actually see the surface.
- Temporary patch for a small crack: a water-resistant epoxy or sealant rated for HVAC pans can buy time, but it is not a forever fix.
- Check level: If the air handler is slightly out of level, carefully shim per manufacturer guidance so water flows to the drain outlet. Do not get aggressive here. A small adjustment can make a big difference.
When to call a pro
- The pan is part of the coil assembly or requires coil removal to replace.
- There is heavy rust. Rust usually means it has been leaking awhile and there may be more damage.
Cause #4: Low refrigerant (often shows up as freezing, then leaking)
Refrigerant does not get “used up.” If it is low, it is usually leaking out somewhere. Low refrigerant can drop coil temperature enough to freeze, and then you get a lot of water when it melts. The puddle is the symptom. The refrigerant issue is the cause.
How to tell
- Coil freezes even with a clean filter and good airflow.
- AC runs constantly but struggles to cool.
- You notice hissing near refrigerant lines or oily residue on line connections.
What you can do
- Turn the system off to prevent compressor damage and let the coil thaw.
- Replace the filter if it is dirty and confirm vents are open.
- Schedule HVAC service for a proper leak check and recharge. Handling refrigerant requires licensing in many places and the correct equipment.
Why this matters
Topping off refrigerant without fixing the leak is like putting air in a tire with a nail. It might work for a bit, but it is not the repair.
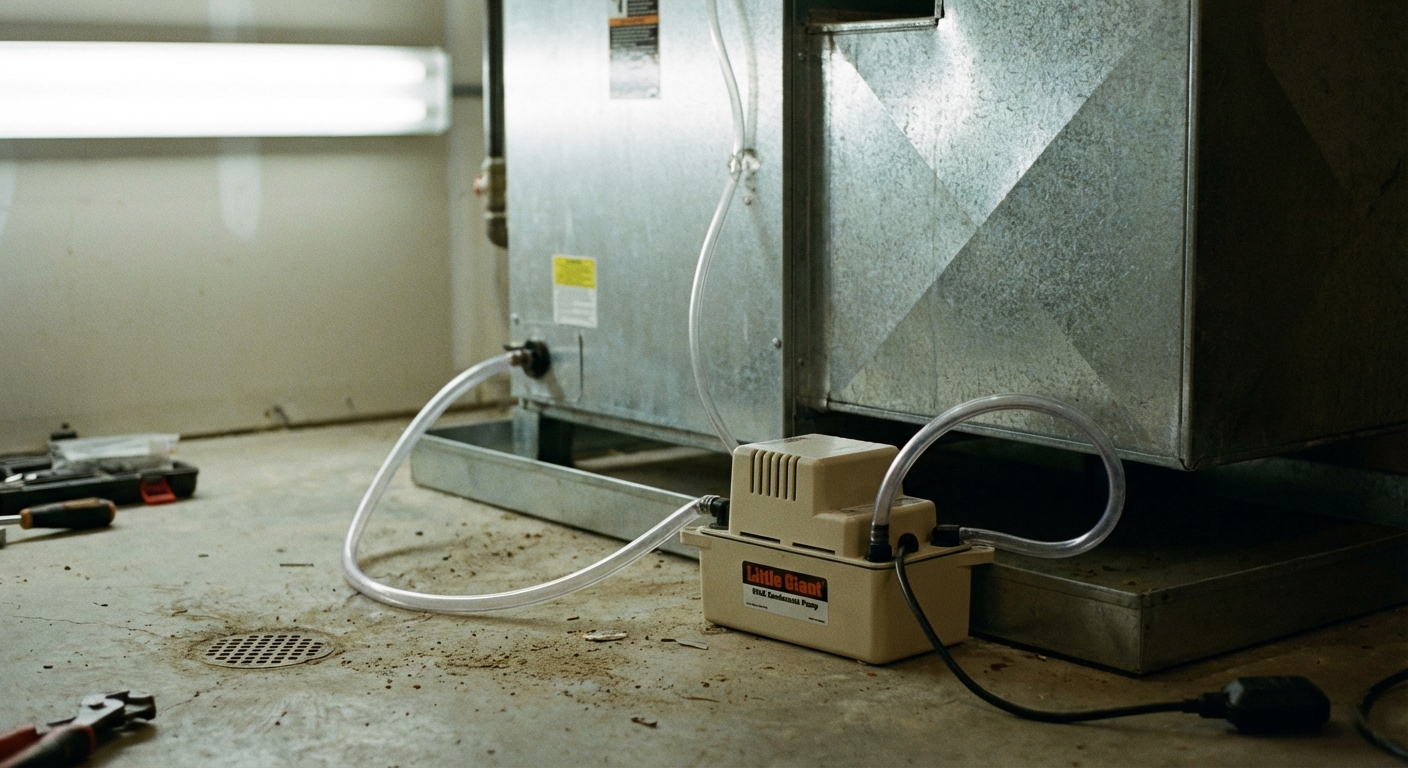
Cause #5: Improper installation or drain line issues (slope, trap, insulation)
Not every leak is “something broke.” Sometimes the system was installed with a drain line that slopes the wrong way, no trap where one is required, or poor insulation on cold surfaces. Those problems can cause water to back up or condensation to drip from places that should stay dry.
Common install-related culprits
- Drain line lacks proper downward slope, so water sits and grows algae, then clogs.
- Missing or incorrect trap on negative-pressure air handlers, which can prevent proper draining.
- Disconnected drain line inside the cabinet or at a fitting.
- Uninsulated supply plenum or suction line, leading to condensation dripping onto the cabinet or floor.
- Attic units missing a secondary pan or safety shutoff, increasing the chance of ceiling damage.
What you can check safely
- Look for an obvious loose fitting on the PVC near the unit.
- Confirm the drain line is not pinched and appears to run downhill to its outlet.
- Check for sweating on metal ductwork right above the unit. If it is dripping, insulation or airflow issues may be involved.
When to call a pro
- The unit is in an attic or crawlspace and access is unsafe.
- You suspect trap design, pitch, or condensate pump issues.
- You see condensation forming on ducts and fittings you cannot easily insulate correctly.
Troubleshooting flowchart (fast order of operations)
If you want the shortest path to “make it stop leaking,” here is the order I use at my own house:
- Turn AC off and clean up water.
- Check filter. Replace if dirty.
- Look for ice on the indoor coil line. If iced, thaw fully.
- Clear the condensate drain line with a wet dry vac and flush.
- Inspect drain pan for cracks, rust, or overflow marks.
- If freezing returns or cooling is weak, call HVAC for refrigerant and system diagnostics.
Prevent it next time (cheap habits that pay off)
- Change filters on a schedule. Many homes land in the 1 to 3 month range depending on pets and dust.
- Pour vinegar into the condensate cleanout a few times each cooling season to slow algae growth.
- Keep supply vents open and return vents unblocked for steady airflow.
- Have the coil and drain inspected during seasonal HVAC maintenance, especially if your unit is in an attic.
- Consider a float switch if you have an attic air handler. It can shut the system off before a pan overflows.
When water means “stop and call now”
DIY is great, but here are a few situations where I would not mess around:
- Water near electrical components inside the cabinet or on the floor by the control board area.
- Ceiling sagging or active ceiling leak from an attic unit.
- Repeated freezing after filter and drain line are addressed.
- Musty odor plus ongoing moisture, which can signal mold growth in insulation or ductwork.
If you tackle just one thing today, make it the filter and the condensate drain line. Those two fixes solve a huge chunk of indoor AC leaks, and they are the most homeowner-friendly.
About Marcus Vance
Content Creator @ Grit & Home
Marcus Vance is a lifelong DIY enthusiast and self-taught home renovator who has spent the last decade transforming a dilapidated 1970s ranch into his family's dream home. He specializes in budget-friendly carpentry, room-by-room renovations, and demystifying power tools for beginners. Through his writing, Marcus shares practical tutorials and hard-learned lessons to help homeowners tackle their own projects with confidence.