🚨 In a DIY emergency or rush?
Skip the details and jump straight to our 30-second cheat sheet for the most crucial info.
If your lawn has random, straw-colored patches that seem to spread in the hottest, sun-baked spots, you are not alone. The first time it happened at my place, I blamed the sprinkler coverage, then fungus, then my mower. Turns out the real culprit can be tiny insects that love heat and dry turf: chinch bugs.
The good news is you do not have to guess. In this guide I will show you exactly what chinch bug damage looks like, a simple can test to confirm them, and how to separate their damage from drought stress, grubs, or fungal disease. Then we will walk through a practical rescue plan: watering adjustments, dethatching when it actually helps, and insecticide timing that follows the label, with clear re-entry and pet notes.

What chinch bug damage looks like
Chinch bugs feed by piercing grass blades and sucking out plant juices. In some turf and species combinations (especially southern chinch bug in St. Augustine), extension guidance often describes their feeding as causing the plant to shut down water transport, sometimes attributed to salivary toxins and related injury. The practical takeaway is the same: it can look like drought even when you are watering.
Common signs
- Straw-colored patches that start small and expand.
- Damage begins in hot, sunny areas like south-facing slopes, along sidewalks and driveways, and in the middle of open lawn.
- Edges look “fire-ringed” with a yellow halo where yellow grass borders still-green turf.
- Grass does not bounce back after watering the way drought-stressed turf usually does.
- That “crispy” feel when you tug the blades, but the turf is not necessarily loose like grub damage.
Grasses most often hit: St. Augustine is the big one in many warm regions. Other chinch bug species can also damage centipede, zoysia, and bermuda. For cool-season lawns, the hairy chinch bug is a common culprit and it is often associated with grasses like fescue and other cool-season turf depending on region.
The simple can test
You do not need fancy gear. This quick test flushes chinch bugs to the surface so you can confirm what you are dealing with before you treat.
What you need
- A large metal can with both ends removed (coffee can size works), or a short piece of 3 to 4 inch PVC
- Water from a hose or bucket
- Optional: a white paper plate to tap bugs onto for easier viewing
Step-by-step can test
- Pick the right spot. Go to the border between green grass and the straw-colored area. That is where the active feeding usually is.
- Push the can into the turf. Press it down 1 to 2 inches so it makes a seal.
- Fill with water. Pour in water until it is 2 to 4 inches deep inside the can.
- Wait and watch. Over the next 5 to 10 minutes, keep the water level up.
- Repeat. Do 2 to 4 tests in different patch edges. Chinch bugs can be clumped.
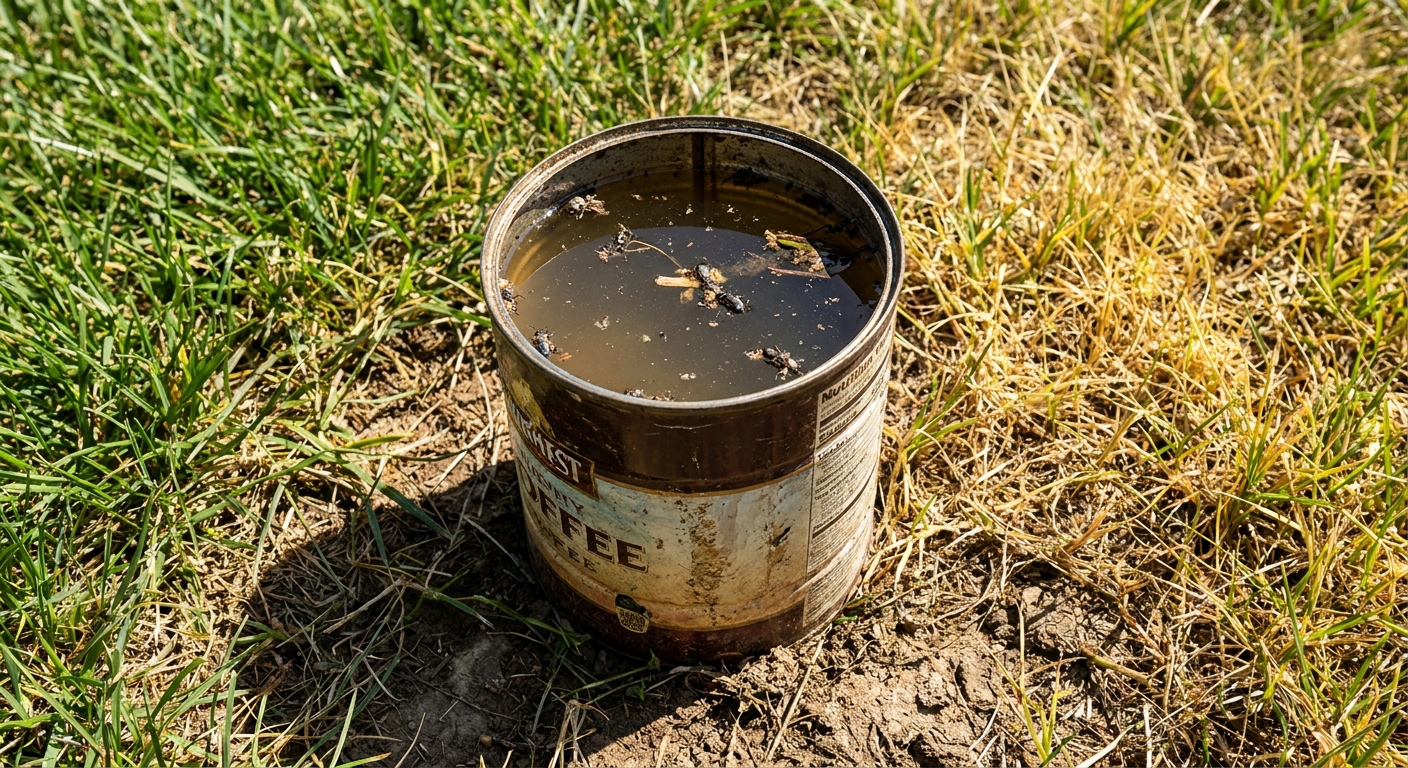
What you are looking for
Chinch bugs are tiny and quick (often around 1/8 inch as adults). Many adults are black with white wings (often with a darker triangular mark), while nymphs can be reddish or orange with a pale band as they grow. If you see multiple bugs in a few minutes, that is a strong confirmation.
How many is “enough” to act?
Thresholds vary by turf type, species, and region, so there is no single magic number for every lawn. Practically, if you are seeing multiple chinch bugs per can test in more than one spot along an actively spreading edge, treat that as a real infestation. If you run several tests and come up empty, you are probably chasing drought, compaction, fungus, or another pest.
Chinch bugs, drought, fungus, or grubs?
These problems can look similar from the curb. The difference is in the pattern, timing, and what the grass does after you correct moisture.
Chinch bugs vs drought stress
- Location: Drought stress often shows up broadly across high spots and areas with poor irrigation coverage. Chinch bugs usually start in the hottest sunny zones and expand outward in patches.
- Response to watering: Drought-stressed grass often improves within a few days of deep watering. Chinch bug damage often keeps spreading even if you water.
- Soil check: Stick a screwdriver into the ground. If it is hard to push in, you have real dryness or compaction in the mix.
Chinch bugs vs fungal disease
- Timing: Many fungal issues love warm, humid nights and frequent irrigation. Chinch bugs love hot, dry stretches.
- Pattern: Fungus can make circles or irregular patches that sometimes have a “smoke ring” look. Chinch bug patches often look like they burn outward from a sunny starting point.
- Leaf symptoms: Fungal diseases often show spots, lesions, or a greasy look on blades. Chinch bug damage looks more like general yellowing that turns straw-brown.
- Morning clues: Heavy dew lingering, mushroomy smell, or visible mycelium can point toward fungus .
Chinch bugs vs grubs
- Tug test: Grab a handful of grass and pull. With grub damage, turf can pull up easily because roots are chewed.
- Carpet test: Peel back a corner of turf like a rug. If you see C-shaped larvae in the soil and the roots are missing, grubs are likely involved.
- Chinch bug clue: With chinch bugs, turf is often still anchored, but it looks droughty and crispy.
If you are stuck: Do the can test first. It is fast, cheap, and prevents you from throwing fungicide at an insect problem (or vice versa).
Immediate plan
Once chinch bugs are confirmed, the goal is twofold: knock back the population and make the lawn less inviting. Chinch bugs thrive in stressed, dry turf with lots of thatch and heat.
1) Fix watering without overwatering
Overwatering can create its own problems, but under-watering makes chinch damage worse. Aim for deep, infrequent watering so roots chase moisture down.
- Target: Around 1 inch of water per week including rainfall is a common starting point, but it varies by grass type, soil, and weather. Some established warm-season lawns can get by with a bit less in mild weeks, while sandy soils may need the same weekly total split into more frequent cycles.
- Schedule: Water early morning so blades dry out during the day.
- Measure it: Put a few tuna cans out and run the sprinklers. Time how long it takes to fill to 1 inch.
- Avoid daily “sips” that keep roots shallow and turf stressed.
My mistake to avoid: I once chased brown spots by watering every evening. I did not fix the root zone, and I invited other issues. Deep morning watering works better in the long run.
2) Mow a little higher
Short grass heats up faster and dries out quicker. If your grass type allows it, raise your mowing height a notch or two during hot weather. Always follow the recommended mowing height for your turf variety.
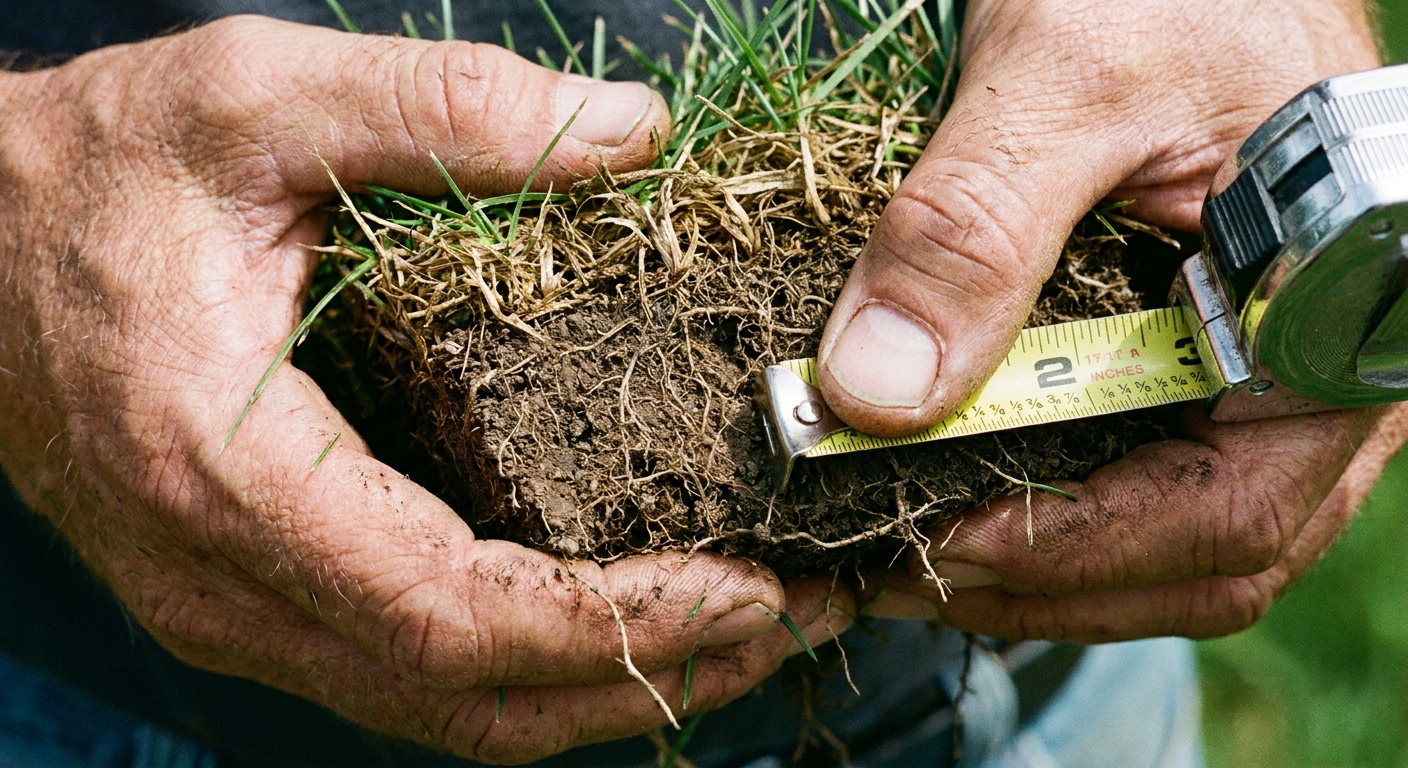
3) Dethatch when it is needed
Thatch is a layer of dead stems and roots that builds up between soil and green blades. A little is normal. Too much becomes chinch bug heaven because it stays warm and dry and gives them cover.
How to check thatch depth
- Cut a small wedge out of the lawn with a spade.
- Measure the spongy brown layer between soil and grass.
Rule of thumb: If thatch is about 1/2 inch or more , it is worth paying attention. Some cool-season lawns struggle once thatch gets past about 1/2 inch, while some warm-season lawns can sometimes tolerate closer to 1 inch. If it is thin, skip aggressive dethatching because it can stress the lawn and make damage look worse.
Timing note: Dethatch when grass is in active growth so it can recover. In many areas that means late spring through summer for warm-season lawns and early fall for cool-season lawns. Avoid dethatching in peak heat or drought conditions.
Insecticide basics
If your can test confirms chinch bugs and the damage is spreading, a labeled insecticide can be the right tool. The key is using the correct product for chinch bugs, applying it at the correct time, and following the label like it is a set of plans for a load-bearing wall.
When to treat
- Treat when you see active bugs on the patch edges, not just old damage.
- Early infestations respond best. Once grass is fully straw-brown, it may not green back up without repair.
- Most outbreaks show up during hot weather when turf is stressed, often mid to late summer, but this varies by region.
What to use
Look for lawn insect products that list chinch bugs on the label. Common active ingredients in consumer products may include pyrethroids such as bifenthrin, cyfluthrin, lambda-cyhalothrin, or similar. Depending on your region and product availability, other labeled actives may include neonicotinoids (such as imidacloprid or dinotefuran) and newer options. The label is the final word.
Application tips
- Hit the border zone. Treat a band that includes the damaged area and extends into healthy grass where bugs are moving.
- Spot-treat when you can. If the infestation is localized, treat the active edges first instead of blanket-spraying the whole yard.
- Mind the thatch. If the label calls for watering in, do it. If the label says do not water in, do not. Chinch bugs often live in the thatch layer, so instructions vary by product design.
- Do not scalp first. Scalping can stress the lawn and speed moisture loss.
- Recheck in 7 to 14 days. If bugs are still active and the label allows a second application, follow the label interval exactly.
IPM note
Correct identification matters because it helps you avoid unnecessary applications that can disrupt beneficial insects and natural predators. Scout the sunny edges during hot spells, treat only when you confirm activity, and lean on mowing height, watering habits, and thatch control to make the lawn less inviting long-term.
Re-entry, kids, and pets
This is not the section to skim. Follow the product label for:
- Re-entry time after application, often until spray has dried or after watering-in is complete, depending on product type.
- Pet safety, including keeping animals off treated turf until the label says it is safe.
- Buffer zones near gardens, play areas, or water features.
If you have a dog that treats the yard like its personal salad bar, be extra cautious. Keep pets inside during application, and do not let them back out until the labeled re-entry conditions are met.
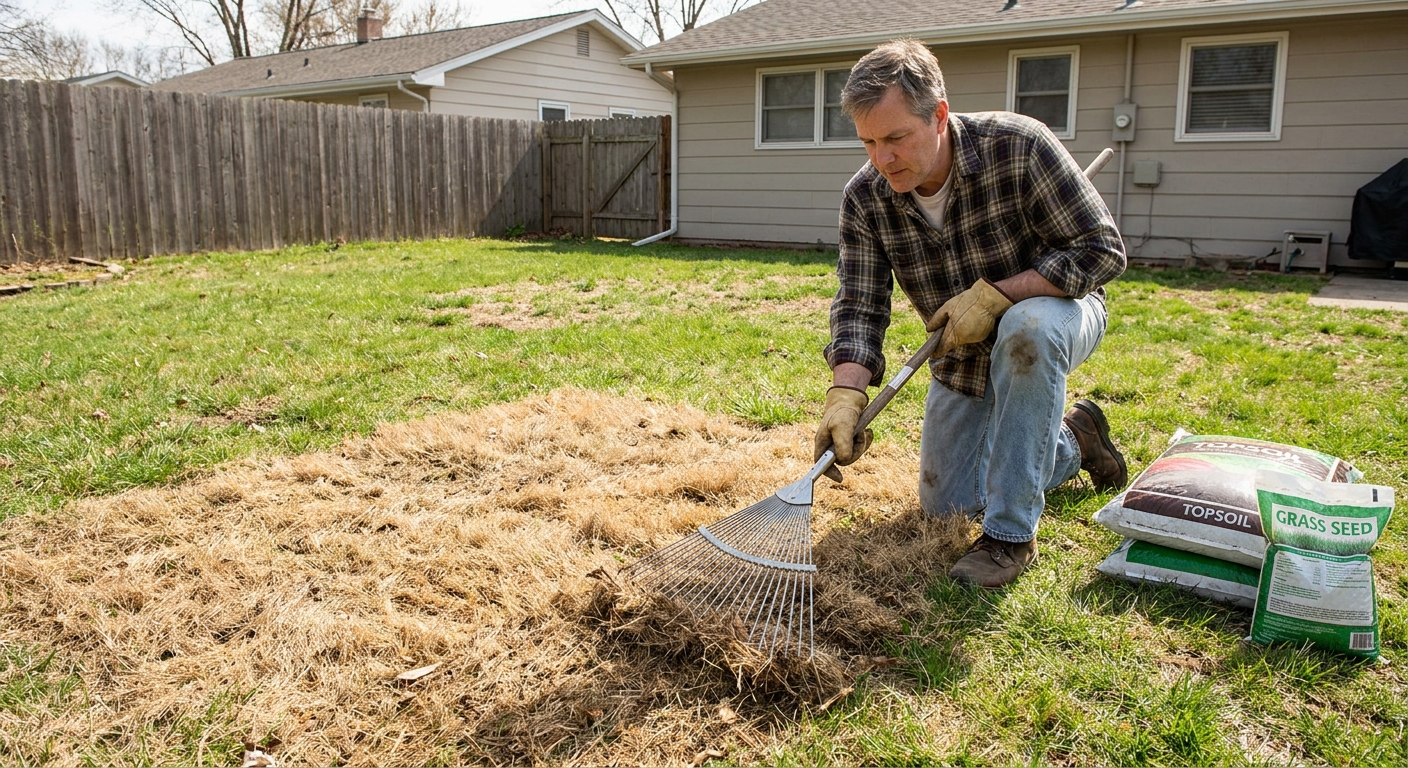
Repair the dead patches
After you stop the insects, you can focus on getting the lawn looking like a lawn again.
Step-by-step patch recovery
- Rake out the dead material. Remove loose straw so sunlight and water reach the soil.
- Loosen the top layer. A garden rake or hand cultivator is usually enough for small spots.
- Topdress lightly. Add a thin layer of screened compost or clean topsoil to improve moisture retention.
- Re-seed or re-sod as appropriate. Cool-season lawns often reseed well. Many warm-season grasses are repaired with sod or plugs.
- Water for establishment. Keep the top inch of soil consistently moist until seed germinates or sod roots in, then taper to deeper watering.
Prevention
- Keep thatch under control. Avoid over-fertilizing and overwatering, and dethatch only when needed.
- Feed the lawn appropriately. Follow local recommendations for your grass type and avoid pushing heavy nitrogen during extreme heat.
- Sharpen mower blades. Clean cuts heal faster and reduce stress.
- Reduce heat stress. Mow higher in summer and improve irrigation coverage in hot zones.
- Scout during heat. Check sunny edges near pavement during hot spells. Catching chinch bugs early is the whole game.
When to call in help
If you are seeing fast-spreading damage across a large area, or if you cannot confirm the pest and treatments are not working, it can be worth calling a local extension office or a reputable lawn pro. A correct ID saves money fast.
Pro tip: Take clear photos of the patch edges, a close-up of blades, and your can test results. The more specific you can be, the quicker you will get a solid answer.
FAQ
Will chinch bug damage grow back?
Light damage can recover if you stop the bugs and reduce stress. Fully straw-brown areas often need patch repair with seed, sod, or plugs depending on your grass type.
Do chinch bugs live in the soil?
They usually hang out in the thatch and near the crown of the plant, not deep in the soil like some other pests. That is why thatch management and label-directed watering matters.
Is the can test reliable?
For homeowners, it is one of the best quick checks. Test multiple locations at the border zone and give it several minutes. If you still see nothing, the problem may be drought, fungus, compaction, grubs, or another insect.
The 30-Second Cheat Sheet
Essential takeaways for: Chinch Bug Damage: Find Them and Save Your Lawn
Fast diagnosis
- Classic sign: Straw-colored patches that start in hot, sunny areas and spread outward.
- Best confirmation: Do the can test at the border between green and yellow grass.
- Quick rule-out: If turf lifts like a carpet, check for grubs before you treat for chinch bugs.
The 5-minute can test
- Push a bottomless coffee can 1 to 2 inches into the lawn edge.
- Fill with 2 to 4 inches of water.
- Watch 5 to 10 minutes, topping off water as it soaks in.
- If chinch bugs are present, you may see tiny bugs (often around 1/8 inch) float or crawl on the surface.
Chinch bugs vs drought vs fungus
- Drought: improves after a few days of deep watering.
- Fungus: often tied to humidity and frequent watering, may show spots or lesions on blades.
- Chinch bugs: often keep spreading in sunny heat, even if you water.
What to do today
- Water smarter: deep, infrequent morning watering. Measure output with tuna cans.
- Mow higher: reduce heat stress.
- Check thatch: if it is over about 1/2 inch (and sometimes closer to 1 inch in some warm-season lawns), dethatching can help (do not do it in extreme heat).
- Spot-check edges: focus scouting and treatments on the active border when possible.
Insecticide basics
- Use a lawn insect product that lists chinch bugs on the label.
- Treat the active edge plus a band of healthy turf.
- Follow label instructions for whether to water in or not water in.
- Re-entry and pets: keep kids and pets off until the label says it is safe (often after drying or after watering-in is complete, depending on product).
💡 Tip: Scroll up to read the full article for detailed, step-by-step instructions.
⬆️ Back to topAbout Marcus Vance
Content Creator @ Grit & Home
Marcus Vance is a lifelong DIY enthusiast and self-taught home renovator who has spent the last decade transforming a dilapidated 1970s ranch into his family's dream home. He specializes in budget-friendly carpentry, room-by-room renovations, and demystifying power tools for beginners. Through his writing, Marcus shares practical tutorials and hard-learned lessons to help homeowners tackle their own projects with confidence.