I have a soft spot for garage gyms because they are the perfect kind of DIY win: you take a space that is usually cold, cluttered, and half-forgotten and you turn it into something your family actually uses. You do not need a showroom build. You need a space that is comfortable enough to show up and durable enough to take a beating.
This guide walks you through the big pieces in the order that keeps you from doing work twice: clear-out, planning, floor, walls, lighting, power, climate, storage, and final equipment placement. I will also point out the mistakes I made early on so you can skip the expensive lessons.

Before you start: plan first
The fastest way to blow a garage gym budget is buying equipment before you know your layout, ceiling height, and power situation. Spend one evening measuring and sketching. It saves you weekends later.
Quick measurements to take
- Overall footprint: width and depth of the usable area (not counting the water heater, steps, or shelves you are keeping).
- Ceiling height: especially where you want a rack, pull-up bar, overhead press area, or ceiling-mounted heater.
- Garage door clearance: tracks, opener, and the lowest point when the door is open.
- Wall space: for mirrors, storage, TV, and fold-down benches.
- Electrical: where the outlets are and what is on the circuit.
Pick your gym zones
Most garage gyms work best as 3 simple zones:
- Strength zone: rack, bench, barbell, plates.
- Cardio zone: bike, rower, treadmill, jump rope.
- Mobility zone: open floor for stretching, kettlebells, mats.
If you keep parking in the garage, consider a partial conversion: gym along one wall with fold-up storage and a clear “parking lane.” It is not as Instagram-pretty, but it is realistic.
Spacing rules of thumb
- Walkways: aim for about 3 feet where you regularly pass behind a bench or around a rack.
- Barbell clearance: give yourself extra room on each end of the bar so you are not clipping walls, shelves, or a car bumper.
- Ceiling checks: confirm overhead press and pull-up clearance at the exact spot you will train, not just the middle of the garage.
Step 1: clear out cleanly
Do not underestimate this step. Garages become “miscellaneous storage” because the house never had a real system. A gym forces you to make one.
The 4-pile method
- Keep (garage): items you truly use in the garage.
- Keep (house): items that belong inside.
- Donate/sell: good stuff you do not use.
- Trash/recycle: broken, expired, or unsafe items.
My mistake: I used to “temporarily” stack everything along the back wall and promised myself I would organize later. Later never came. If it does not have a home by the end of the weekend, it becomes clutter again.

Step 2: fix problems now
Before you install flooring or hang mirrors, handle the boring fixes. This is where sweat equity pays off.
Checklist
- Moisture: look for water stains, damp corners, or efflorescence on concrete. If water is coming in, address grading, gutters, and door seals first. If you suspect hydrostatic pressure, drainage issues, or a failing vapor barrier, it is worth getting a professional opinion. Sealing alone does not always solve it.
- Pests: seal gaps around framing, penetrations, and the sill plate. Steel wool and foam work well for small gaps.
- Cracks in the slab: for typical hairline or small settling cracks, use a quality polyurethane or self-leveling concrete crack sealant so your flooring sits flatter. If a crack is wide, offset, spreading, or constantly wet, treat it as a “pause and evaluate” moment.
- Garage door seals: replace bottom seal and side weatherstripping if daylight shows through.
If your garage smells musty, do not mask it with air fresheners. You need airflow, dehumidification, and moisture control.
Step 3: choose flooring
Flooring is the foundation of a functional gym. It protects your slab, reduces noise, and makes the space feel finished. For many DIY garage gyms, rubber is the go-to because it is tough and forgiving. Exceptions exist, like a true multipurpose garage, ultra-tight budgets, or garages with ongoing moisture problems where you do not want to trap water under non-breathable layers.
DIY options (and what they cost)
- Rubber stall mats (typically 3/4 inch): tough, budget-friendly, great for racks and deadlifts. Expect them to be heavy and slightly smelly at first.
- Interlocking rubber tiles: easier to carry and cut, cleaner look, but can separate under heavy rolling equipment or lateral movement.
- Rolled rubber: most seamless and professional, but harder to handle solo and often costs more.
Thickness guide
- 3/8 inch: light dumbbells, cardio machines, general workouts.
- 1/2 inch: a solid all-around thickness for most home gyms.
- 3/4 inch: heavy lifting zones and areas where impact is higher.
Quick qualifier: impact protection depends on how you lift (controlled vs dropped), whether you use bumper plates, and whether you add a platform. A platform can let you protect the slab even if you do not cover the whole garage in the thickest rubber.
Install tips
- Let mats acclimate: lay them flat for a day or two if possible. Rubber relaxes and gaps shrink.
- Square your first row: if the first line is crooked, everything is crooked.
- Cut with a sharp utility knife: score multiple passes, use a straightedge, and change blades often.
- Consider a platform zone: if you lift heavy, build a simple plywood-and-rubber platform under your bar path to protect the slab and mats.
Moisture note: if your slab wicks moisture, avoid sealing it in with non-breathable layers without a plan. In some situations, a vapor barrier approach makes sense. In others, you are better off solving the water source first so you do not create a hidden damp trap.
Thrifty tip: you do not have to cover the entire garage. Cover the strength and mobility zones first, then expand later.

Step 4: insulate and seal
If your garage is freezing in winter or feels like an oven in summer, motivation disappears fast. Comfort is not a luxury. It is what makes the gym usable.
Air sealing first
Insulation works best when air leaks are controlled. Look for gaps at:
- Where framing meets concrete
- Electrical boxes and wall penetrations
- Garage door perimeter
- Between the garage and the house (especially around the door)
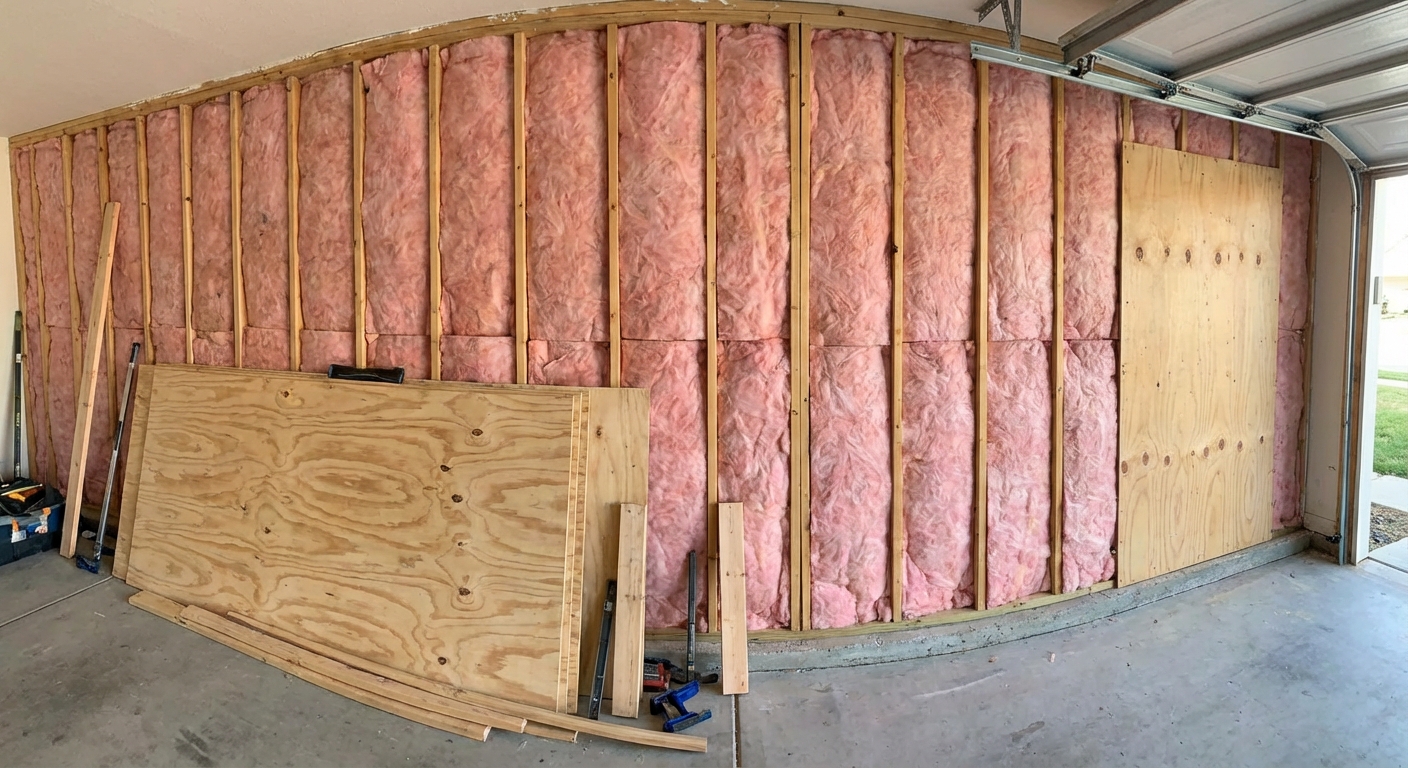
Wall insulation options
- Fiberglass batts: DIY-friendly if your walls are open. Install correctly with no big gaps or compression.
- Foam board: great for rigid coverage and can be used on concrete or block walls with the right adhesive and fastening method.
- Mineral wool: excellent sound and fire resistance, fits snug, often a little pricier.
Drywall or plywood?
If you want the gym to feel like a real room, drywall plus paint is the biggest visual upgrade you can do. It also protects insulation and makes it easier to clean dust. If full drywall is not in the budget, plywood panels can be great where you want to mount storage or a TV.
Safety note: garages can have fire separation requirements between the garage and living space, and requirements vary by jurisdiction. If you are changing walls shared with the house, or modifying the door between the house and garage, check local codes. Also note that leaving framing exposed or skipping required drywall layers can be a code issue in some setups.
Step 5: upgrade lighting
Many garages have one sad bulb in the middle of the ceiling. Great for finding a rake, not great for lifting, stretching, or filming form checks.
What works well
- LED shop lights: bright, efficient, and easy to install.
- Linkable LED strips or bars: good coverage across a two-car garage.
- Task lighting: a small adjustable light near a workbench or stretching corner is a nice bonus.
Lighting tips
- Go brighter than you think: you can always turn lights off, but you cannot “wish” the garage brighter mid-workout.
- Use daylight color temperature: around 4000K to 5000K feels clean and alert.
- Place lights over zones: prioritize the rack, the bench area, and the open floor.
My mistake: I installed one big light and called it good. Shadows drove me nuts. Multiple fixtures spaced out make the space feel twice as big.

Step 6: handle power safely
Home gyms quietly become cord jungles: fans, speakers, treadmill, chargers, and a TV. Plan power now so you are not tripping mid-set.
DIY-friendly improvements
- Add a surface-mounted outlet: if your wall is unfinished, conduit and surface boxes can be a clean solution.
- Plan for dedicated circuits when needed: treadmills, heaters, and some chargers often require more than a shared garage circuit can comfortably handle. Check the equipment nameplate amperage and the circuit rating, and do not guess.
- Mount a power strip: on the wall near your cardio or media area to keep cords off the floor.
When to call an electrician
- You need a new circuit run from the panel
- You are not sure what else is on the garage circuit
- You want a 240V outlet for certain equipment
- Your panel is older and already crowded
There is no shame in calling in pros for electrical. I am thrifty, not reckless.
Step 7: air quality and ventilation
This is the unglamorous piece that makes your gym feel better fast. Sweat, rubber, dust, and humidity add up in a closed garage.
- Simple ventilation: crack the garage door a few inches during workouts (if security and weather allow) or open a side door or window for cross-breeze.
- Exhaust help: a window fan or an exhaust fan can pull out humid, stale air.
- CO safety: do not run a vehicle in the garage to “warm it up” while you train. If your gym shares air with the house, consider a carbon monoxide alarm in or near the garage if permitted by local guidance.
Step 8: climate control
You do not need perfect HVAC to get good workouts. You just need “good enough” for your climate.
Options that work in real garages
- Fans: cheap and effective. A wall-mounted oscillating fan saves floor space.
- Dehumidifier: huge if you have humidity, rust, or that damp smell.
- Space heater: good for spot heating, but keep clearance from flammables and never run cords under mats.
- Mini-split: the comfort champion for hot and cold, but it is a bigger spend and often worth professional install.
Comfort trick: even basic insulation plus a fan can transform how the room feels. The goal is consistency, not luxury.
Step 9: storage that sticks
The best garage gym is the one you can reset in two minutes. Storage is what makes that possible.
My favorite DIY storage upgrades
- Wall-mounted pegboard or slatwall: for bands, jump ropes, collars, and small accessories.
- Heavy-duty shelving: for bins and rarely used items, ideally away from the workout zones.
- Plate storage: on the rack, a plate tree, or wall-mounted pegs rated for the load.
- Dumbbell rack: keeps the floor clear and your toes safe.
- Ceiling racks: great for seasonal storage if you are not worried about ceiling height for lifts.
Rule of thumb: store heavy things low, and keep anything you drop below shoulder height.

Step 10: set equipment in place
Once the floor is down and the walls are brighter, it is time to place equipment for real. This is where a little planning makes workouts feel smooth instead of cramped.
Placement basics
- Rack: leave room behind and in front for safe bar movement and loading plates.
- Bench area: make sure you can walk around it without bumping dumbbells.
- Cardio machines: allow space for getting on and off, plus airflow from a fan.
- Open floor: protect a clear rectangle for mobility work. This is what makes the gym feel bigger.
Anchoring and mounting safety
- Rack stability: follow the manufacturer guidance for anchoring. Some racks can be anchored to concrete, some to a platform, and some are designed to be freestanding. The goal is no tip risk, especially with pull-ups or band work.
- Wall-mounted storage: hit studs when possible, or use proper masonry anchors for block or concrete. “Looks secure” is not a rating.
Mirrors or no mirrors?
Mirrors help with form checks and make the space feel larger. If you install them, mount securely and avoid placing them where a barbell can hit. If mirrors are not your thing, a phone tripod and good lighting can do the job for form review.
Noise and vibration
If you share a wall with living space, plan for noise. Rubber helps, and a platform can reduce vibration. Also be realistic about time of day and what will keep the peace.
Budget ranges
Every garage is different, but here are ballpark numbers I see over and over. Start with the essentials and expand as you go.
Starter setup
- Rubber flooring in key areas
- Brighter LED lighting
- Basic storage hooks and a small rack
Typical DIY cost: $300 to $900 (depending on how much flooring you cover)
Comfort-focused build
- Flooring throughout
- Insulation and wall finish
- Fan or dehumidifier
- Organized storage system
Typical DIY cost: $1,000 to $3,500
High-comfort garage gym
- Finished walls and ceiling
- Upgraded electrical as needed
- Mini-split or more permanent heating and cooling
Typical cost: $3,500 and up
Thrifty reminder: the gym build and the equipment budget are separate. Build the room first so you do not ruin nice gear with moisture, poor lighting, or unstable flooring.
Optional reality check: basic equipment (rack, barbell, bench, plates) can range widely depending on new vs used and how heavy-duty you go. Many people land somewhere in the mid-hundreds to a couple thousand dollars just for the strength essentials.
Common mistakes
- Buying equipment before planning: measure first, then buy.
- Ignoring moisture: damp garages will rust your equipment and stink up your mats.
- Going too thin on flooring: you feel it in your joints and your slab feels it when you drop weight.
- Under-lighting the space: dim gyms feel depressing and cramped.
- No storage plan: clutter returns faster than you think.
- Skipping anchoring and mounting basics: a wobbly rack or ripped-out wall hook is an injury waiting to happen.
A simple weekend plan
If you want momentum, here is a realistic sequence that works for most DIYers.
Weekend 1
- Clear out and sort everything
- Seal obvious gaps and replace garage door weatherstripping if needed
- Patch major slab cracks and address moisture red flags
Weekend 2
- Install lighting upgrades
- Lay rubber flooring in your main zones
- Set up basic wall storage
Weekend 3 (optional comfort upgrade)
- Insulate and finish one wall at a time
- Add fan, dehumidifier, or heater depending on your climate
- Dial in equipment placement and cable management
Give yourself permission to build in stages. A functional gym beats a perfect gym that never gets finished.
Final check
When I walk into a good garage gym, I can tell someone actually works out there. It is not about matching equipment colors. It is about clear floors, bright light, comfortable temps, and no obstacles between you and your first set.
If you want a single next step: clear one wall, sketch your zones, and price out rubber flooring and lighting. Those two upgrades alone can turn a dusty garage into a space that feels like yours.
About Marcus Vance
Content Creator @ Grit & Home
Marcus Vance is a lifelong DIY enthusiast and self-taught home renovator who has spent the last decade transforming a dilapidated 1970s ranch into his family's dream home. He specializes in budget-friendly carpentry, room-by-room renovations, and demystifying power tools for beginners. Through his writing, Marcus shares practical tutorials and hard-learned lessons to help homeowners tackle their own projects with confidence.