🚨 In a DIY emergency or rush?
Skip the details and jump straight to our 30-second cheat sheet for the most crucial info.
If you’ve got water stains near a chimney, don’t let the “it’s probably the roof” guess drag on for months. Chimneys are basically little brick and concrete roofs sitting on top of your roof, and when the top details fail, water can sneak in, soak the masonry, and show up in places that make no logical sense. I’ve chased a chimney leak that presented as a wet ceiling two rooms away. Water is a world class liar.
This article will help you figure out whether you’re dealing with a cracked chimney crown, a thin wash coat that is failing, a missing or poor chimney cap , or some combination of the above. We’ll also cover what common stains mean, what you can safely do as a temporary patch, what a proper rebuild usually involves, and when it is time to bring in a mason.
Chimney crown vs cap
Chimney crown
The crown is the formed, sloped concrete (or mortar) “lid” at the very top of a masonry chimney. Its job is to shed water away from the brick and keep rain from running straight into the chimney structure.
Quick terminology note: Some people call the top surface a “wash” or “wash coat.” In many places, that specifically means a thin mortar skim over the top. It is common, but it is also failure-prone. A properly built crown is thicker, shaped to drain, and built to last.
A good crown is:
- Sloped so water runs off.
- Thick and well-formed (thin mortar smears fail quickly).
- Built with an expansion gap between the crown and the flue tile, then sealed with a flexible sealant so different materials can move without cracking the crown.
- Built with a drip edge (kerf) underneath so water drips free instead of clinging back to the brick.
Chimney cap
The cap is usually a metal cover that sits over the flue opening. It keeps rain, animals, and debris out of the flue. Some chimneys also have a wider “topper” style cap that covers more of the crown area.
A good cap is:
- Correctly sized for the flue and secured (not a loose, rattly hat).
- Screened to keep critters out without clogging easily.
- Sloped to shed water.
- Made of corrosion-resistant metal (stainless is ideal, copper is excellent, cheap galvanized tends to rust sooner).
Quick mental model: The crown protects the masonry structure. The cap protects the flue opening. When either one fails, you can end up with roof and attic water damage.
What the stains mean
Chimney leaks are sneaky because water can enter at the top and travel inside the chimney mass, then dump out at the roofline, attic, or fireplace opening.
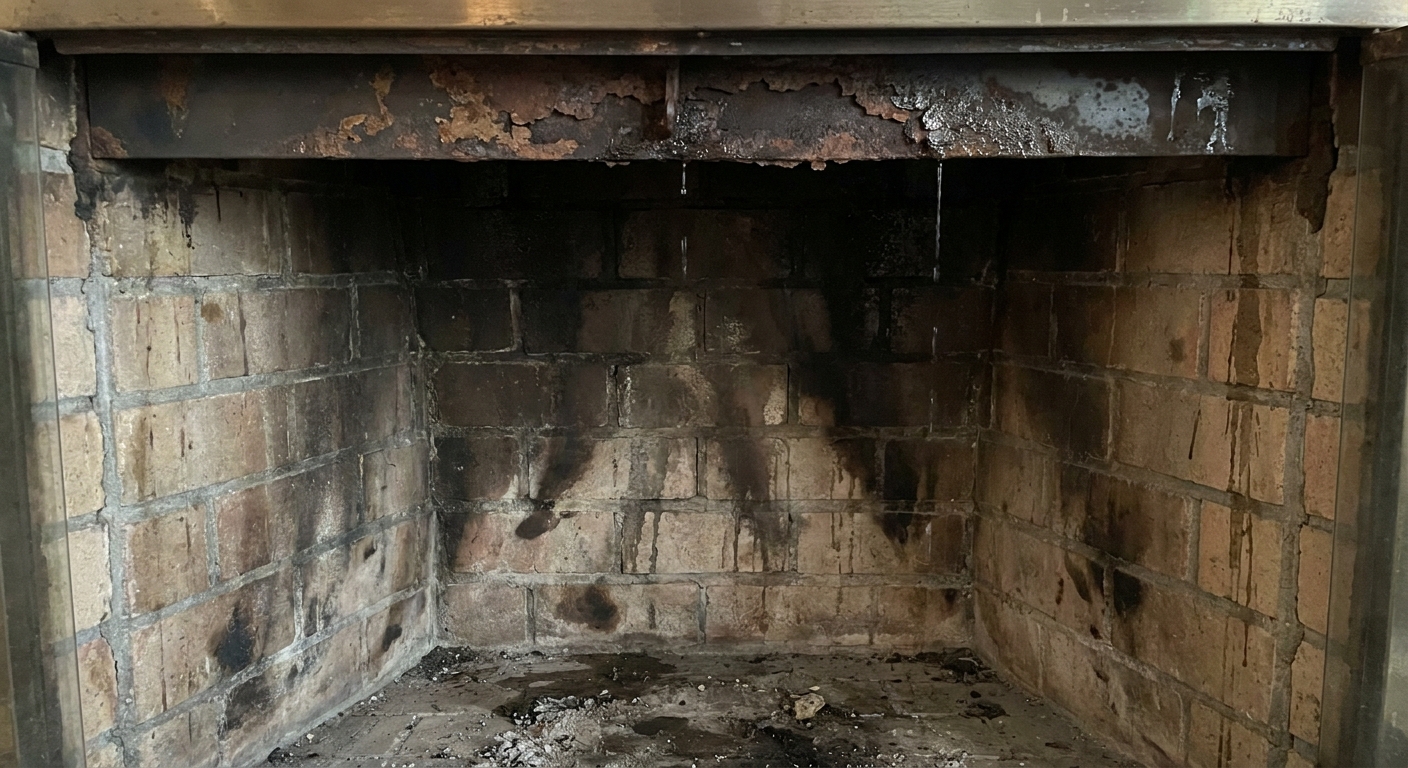
1) Firebox or damper stains
- What it looks like: Rust on the damper, white or gray streaking, damp firebox walls, musty smell, flaking soot, or water sitting on the smoke shelf.
- Most common causes: Missing or damaged cap, cap too small, clogged cap screen causing overflow, cracked crown around the flue, failed seal at the flue-to-crown joint, or deteriorated flue tile.
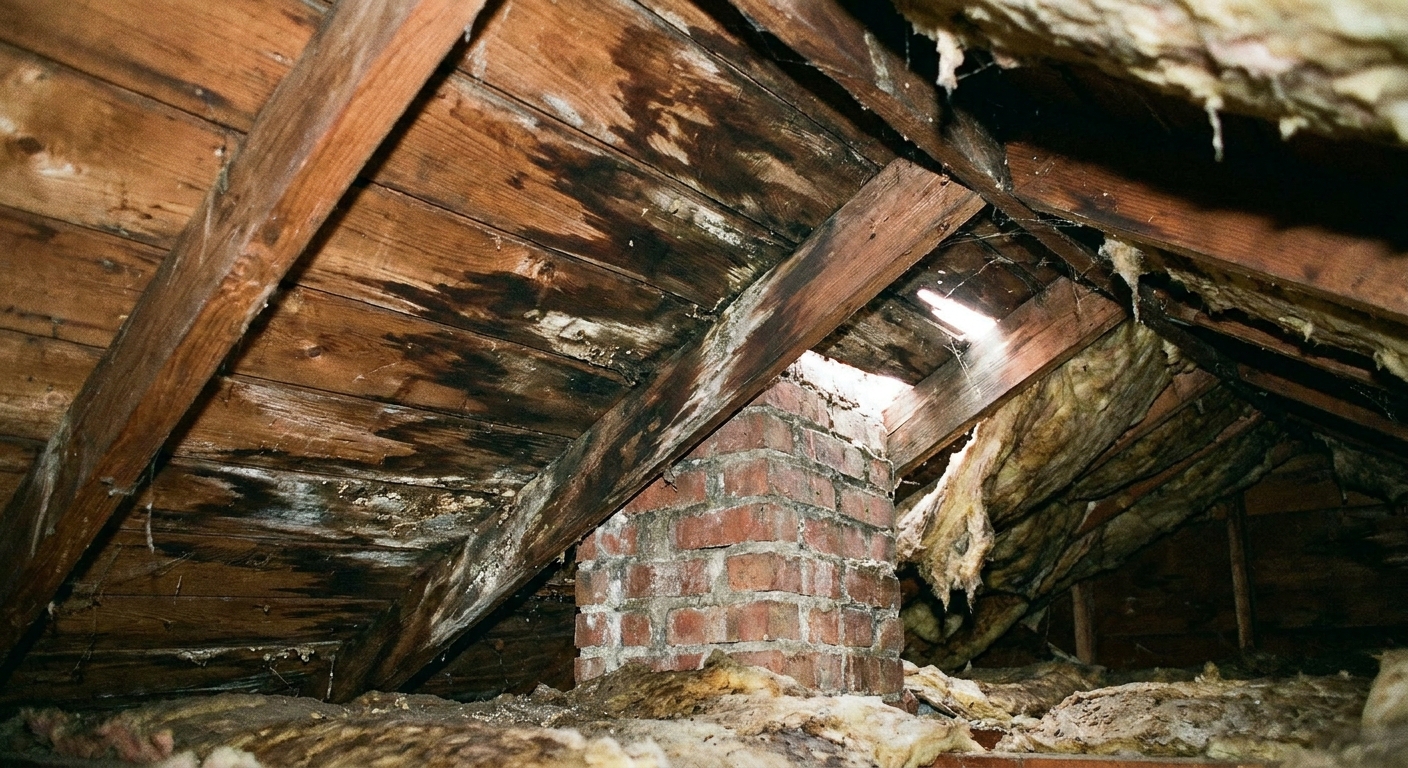
2) Attic sheathing stains near the chimney
- What it looks like: Dark plywood staining, damp insulation near the chimney chase, drip marks on rafters, or moldy smelling wood above the ceiling.
- Most common causes: Water entering through cracked crown or missing cap and soaking down the chimney mass, or a roof flashing issue at the chimney. Wind-driven rain makes both look worse.
3) Ceiling or wall stains nearby
This is the classic head fake. Water can run along framing members and show up in the “wrong” spot. If the stain grows after wind-driven rain, the chimney top and flashing jump higher on the suspect list.
DIY inspection
I’m all for DIY detective work, but I’m also strict about roof safety. If you are not comfortable on a roof, don’t do it. You can gather a lot of info from the ground with binoculars, and from inside the attic with a headlamp.
From the ground
- Is there a cap at all? Missing cap is one of the simplest causes.
- Is the cap straight and secured? A crooked or lifted corner can let rain in.
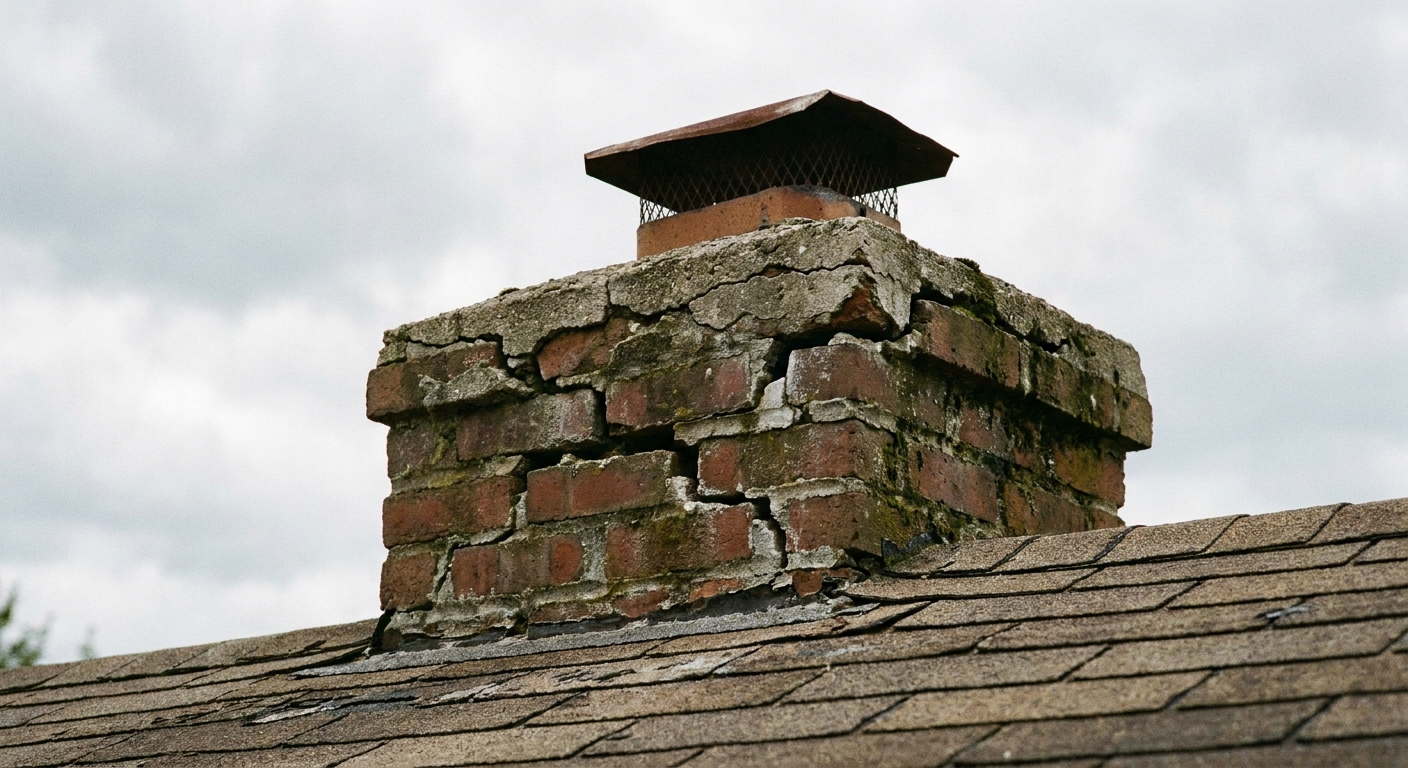
- Do you see crown cracks? Even hairline cracks can funnel water during repeated storms.
- Is the crown flat? Flat crowns tend to pond water and crack sooner.
- Is the flue tile exposed and gapped? The joint between the clay flue and the crown should not look like a broken ring.
From the attic
- Check after a rain: Fresh wet wood beats old stains for diagnosis.
- Trace the highest wet point: The highest wet point is usually closest to the entry source.
- Look at the flashing area visually: Watch for obvious gaps or daylight, but avoid poking or pulling on anything up there.
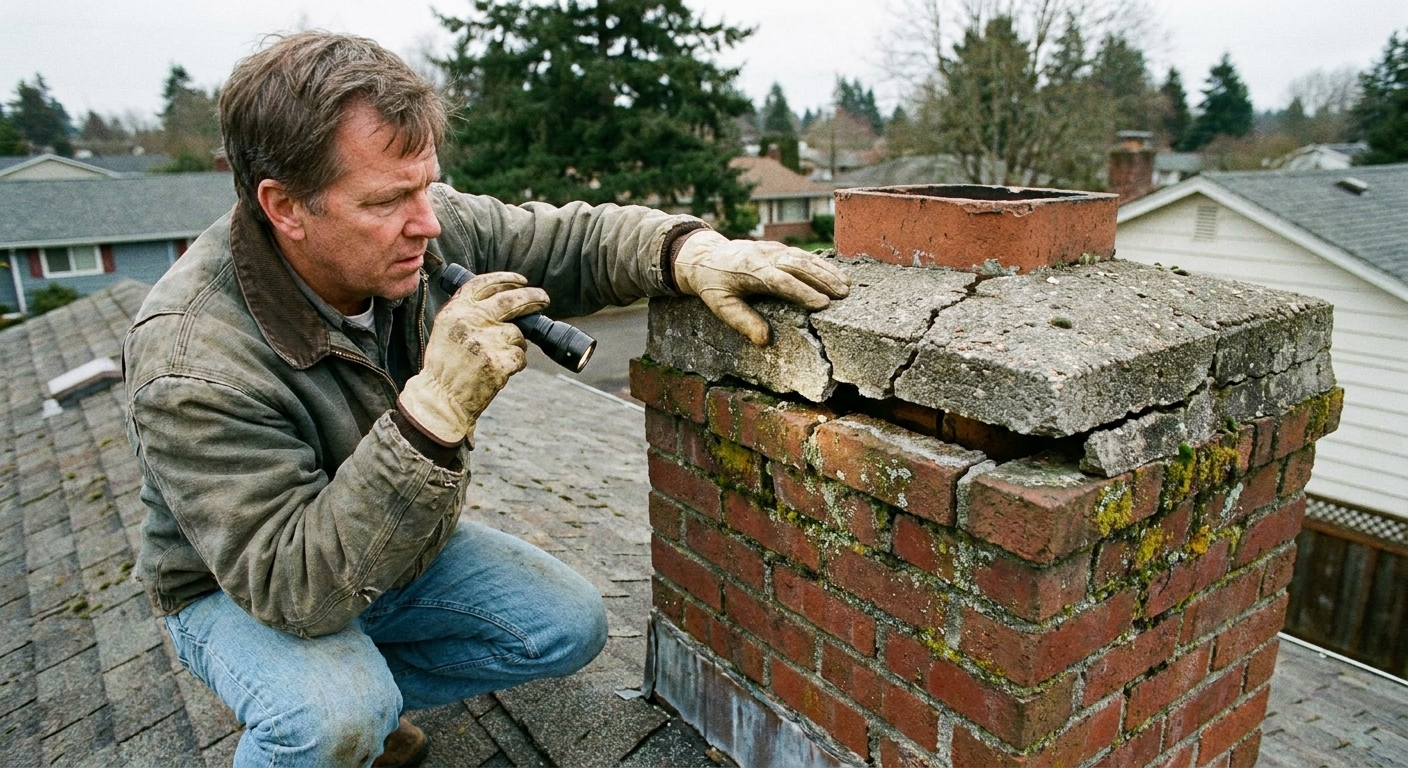
If you get on the roof (only if safe)
Do a slow, calm visual inspection. Don’t start smearing sealant everywhere. Random caulk often makes later repairs harder.
- Crown: Look for cracks, spalling, missing chunks, and an open expansion gap where crown meets flue tile.
- Cap: Look for rust holes, missing fasteners, bent mesh, or a cap that is too small or too low-profile to block wind-driven rain.
- Masonry: Look for crumbling mortar joints near the top courses and saturated, darkened brick.
- Flashing: If the leak is more “roofline” than “chimney top,” flashing becomes a prime suspect. For that deep dive, see our cross link: chimney flashing leak troubleshooting.
Cracked crown signs
These are the big tells that the crown (or a failing wash coat) is the problem or a major contributor:
- Cracks that run from the flue outward like spokes. Water follows those lines.
- Open gap around the flue tile where old sealant is missing, brittle, or gone.
- A thin wash coat instead of a real crown, especially when it is basically a skim layer with little shape or thickness.
- Spalling brick near the top where faces pop off from repeated freeze-thaw cycles.
- No drip edge, so water clings and runs down the chimney sides.
Why it matters: A crown is sacrificial. Once it cracks, it becomes a collection system for water. That water saturates brick and mortar, and in freezing climates it pries things apart. Ignore it long enough and you stop paying for a crown repair and start paying for masonry rebuild work.
Bad cap signs
A cap issue tends to show up as water in or near the firebox, plus the occasional wildlife surprise.
- No cap present or cap fell off after a wind event.
- Rust streaks down the flue tile or onto the crown from a cheap or failing metal cap.
- Screen clogged with creosote or soot (on wood-burning systems), causing water to overflow or forcing moisture to linger.
- Cap too small or too low-profile, letting wind-driven rain blow right into the flue.
- Animal activity like nesting material, chirping, scratching, or odd smells.
Important: Cap problems and crown problems love to travel together. A missing cap accelerates crown deterioration, and a cracked crown can let water in even with a decent cap.
Temporary fixes
If water is actively coming in and you need to buy time until a pro can schedule you, a temporary patch can help. The key word is temporary.
Reasonable temporary steps
- Add or replace the cap if it is missing and you can do it safely. For many chimneys, a basic stainless cap is a straightforward install.
- Seal small crown cracks with a product designed for chimney crowns, typically an elastomeric crown sealer.
- Seal the flue-to-crown expansion joint using a flexible, chimney-rated, exterior masonry-compatible sealant that stays UV-stable. The goal is a flexible joint, not a rigid mortar ring.
One timing caution: If the crown is saturated and freezing weather is coming, rushing a seal job can backfire. These products generally do best on a clean, dry surface, during a reasonable stretch of dry weather.
My own mistake, learned the hard way: I once used a generic concrete patch on a small crown crack. It looked great for a season, then separated right along the repair line. Chimney tops move more than you think.
Temporary steps to avoid
- Roofing tar on the crown. It gets brittle, looks awful, and can hide damage while water keeps sneaking in.
- Smearing mortar over everything. Mortar is not a flexible sealant. It cracks, then you are right back where you started.
- Coating brick with waterproof paint as a “seal.” Trapped moisture can make spalling worse. Chimneys need to dry.
If the leak is urgent and you cannot safely access the chimney top, a reputable chimney company can often do an inspection and temporary stabilization quickly.
Proper repairs
Here is the practical difference between a smart patch and a repair that actually resets the clock.
When sealing is often enough
- Cracks are hairline to small and the crown is otherwise solid.
- No major spalling or missing crown sections.
- Brick and mortar at the top courses are in decent shape.
- The flue tile is stable and not badly cracked.
Typical scope: clean surface, prep cracks as needed, apply elastomeric crown sealer, re-seal the flue-to-crown expansion joint, and install a properly sized cap.
When a crown rebuild is likely
- Crown is thin, flat, or crumbling.
- Cracks are wide, multiple, or the crown is separating from the chimney.
- Brick at the top courses is spalling and mortar joints are failing.
- Water intrusion has been happening long enough that you see interior damage and repeated staining.
Typical scope: remove failed crown, form and pour a new concrete crown with proper slope and drip edge (often reinforced, as appropriate for the design), set correct clearance around the flue tile, seal the expansion joint, and add a stainless or copper cap.
When it is bigger masonry work
If the top section of the chimney has loose bricks, missing mortar, or significant spalling, a mason may need to rebuild several courses before a new crown even makes sense. A new crown on unstable masonry is like putting new shingles on rotten roof sheathing. It looks finished, but it is not fixed.
Other leak sources
If you fix the top and still see water, do not assume you “did it wrong.” Chimneys can leak in a few other common ways:
- Flashing and counterflashing: A classic roofline leak. Start here if the wettest area is at the roof-chimney joint. See: chimney flashing leak troubleshooting.
- Worn mortar joints: Soft, recessed joints (especially near the top) can soak up wind-driven rain and dump it inside the stack. Tuckpointing can be the real fix.
- Brick absorption: Old brick can act like a sponge. If a pro recommends a water repellent, ask for a breathable silane/siloxane masonry water repellent, not paint.
- Chase cover problems (prefab chimneys): If you have a framed chase with siding, the metal chase cover can rust through or pull away at seams.
- Condensation vs leak: A little dampness with white powdery residue (efflorescence) can be moisture movement and condensation, not a roof leak. Active dripping after rain is a stronger “leak” signal.
When to call a mason
I love DIY, but chimneys are a place where “confident” can turn into “expensive” fast. Call a qualified chimney mason or chimney service company if any of these are true:
- Chunks of crown are missing, or you can wiggle pieces by hand.
- Bricks are loose near the top, or mortar joints are recessed and sandy.
- Flue tile is cracked, leaning, or the top tile is broken below the crown line.
- Repeated leaks after you have tried a cap replacement or basic sealing.
- Water damage in the attic that appears to be active or spreading.
- You have a steep roof, high chimney, or no safe way to access the top.
Ask the mason to explain whether the recommendation is a crown seal, a crown rebuild, or a partial chimney rebuild, and why. A good pro can show you cracks, gaps, and failing mortar up close with photos.
Keep leaks from coming back
- Use a quality cap and replace it before it rusts through.
- Keep the crown sloped and sealed, and maintain the flexible expansion joint at the flue.
- Watch the top courses. Early tuckpointing near the crown is cheaper than rebuilding later.
- After big storms, do a quick binocular check for shifted caps or fresh cracks.
- If you burn wood: schedule regular chimney inspections and cleanings so water issues and fire-safety issues do not get missed.
If your issue is smoke, draft, or backpuffing rather than water, that’s a different troubleshooting track. See our cross link: why your fireplace smokes. If your leak appears during freeze-thaw cycles and heavy snow, see: ice dam causes and fixes.
The 30-Second Cheat Sheet
Essential takeaways for: Cracked Chimney Crown or Bad Cap? Stop Roof and Attic Leaks
Fast diagnosis
- Water in firebox or rusted damper: usually a missing/failing chimney cap or a failed seal at the flue-to-crown expansion joint.
- Attic sheathing stains near chimney: could be crown cracks (water soaking down the chimney) or chimney flashing .
- Visible cracks on the concrete top: points to a cracked crown, especially cracks radiating from the flue.
What to check first (safe order)
- From the ground with binoculars: cap present? crown cracked? gap around flue tile?
- In the attic after rain: find the highest wet point near the chimney.
- Only if roof access is safe: confirm crown condition, cap attachment, and obvious flashing gaps.
Temporary fixes that are worth doing
- Install/replace a proper cap if missing.
- Seal hairline crown cracks with an elastomeric chimney crown sealer (when dry conditions allow).
- Re-seal the flue-to-crown joint with a flexible, chimney-rated, exterior masonry-compatible sealant.
What not to do
- Do not smear roofing tar or random caulk on the crown.
- Do not “paper over” cracks with mortar. It will crack again.
- Do not trap moisture with waterproof paint on brick.
When to call a mason
- Crown is crumbling or missing chunks.
- Top bricks are spalling or mortar is failing.
- Flue tile is cracked, loose, or leaning.
- Leaks are recurring or attic damage is spreading.
💡 Tip: Scroll up to read the full article for detailed, step-by-step instructions.
⬆️ Back to topAbout Marcus Vance
Content Creator @ Grit & Home
Marcus Vance is a lifelong DIY enthusiast and self-taught home renovator who has spent the last decade transforming a dilapidated 1970s ranch into his family's dream home. He specializes in budget-friendly carpentry, room-by-room renovations, and demystifying power tools for beginners. Through his writing, Marcus shares practical tutorials and hard-learned lessons to help homeowners tackle their own projects with confidence.