🚨 In a DIY emergency or rush?
Skip the details and jump straight to our 30-second cheat sheet for the most crucial info.
When tub or shower caulk starts cracking, peeling, or turning black, it is not just cosmetic. That seam is part of your water management system. If it fails, moisture can sneak behind the surround or tile, swell drywall, loosen trim, and create that musty smell nobody wants to admit is coming from their bathroom.
I have recaulked the same tub twice in my 1970s ranch. The first time I rushed it, left old residue behind, and used the wrong product because it was on sale. It looked great for a month, then started peeling like a sunburn. This article is the way I wish someone had walked me through it the first time.

First: Identify the problem
Not all bad-looking caulk needs the same fix. Here is what to look for before you grab a blade.
Cracks and gaps
- Common cause: movement between tub and wall, or caulk that got too thin while smoothing.
- Risk: water wicks behind the seam, especially at the back corners and the tub-to-tile joint.
Peeling or lifting edges
- Common cause: dirty or soapy surface, old silicone residue left behind, or latex caulk used in a wet zone.
- Risk: water runs behind the bead immediately.
Black spots or pink slime
- Common cause: mildew on the surface, or mildew growing behind the caulk where moisture is trapped.
- Risk: repeated regrowth if you recaulk over contamination.
Loose grout or missing tiles nearby
If the grout is crumbling, the tile sounds hollow, or the wall flexes when you press, caulk is not the real problem. Jump to the section on when grout failure means deeper repairs.
Quick note: When I say “surround,” I mean the acrylic or fiberglass wall panels (not tile). The same prep rules apply, but the scraping tools should be gentler on surrounds.
Silicone vs latex: What to use
This choice is where most DIY recaulk jobs succeed or fail.
100% silicone (best for wet zones)
- Where it belongs: tub-to-tile joint, shower pan-to-wall, corners of a surround, around shower fixtures, and any seam that sees regular water.
- Why: flexible, waterproof, long-lasting, and resists shrinking.
- Downside: harder cleanup, harder removal later, and it often will not stick well to leftover silicone residue.
Acrylic or latex caulk (okay for dry zones)
- Where it belongs: bathroom trim, baseboards, outside the shower, and cosmetic seams that do not get soaked.
- Why: easy to tool, water cleanup, paintable.
- Downside: not as durable under constant water and cleaning chemicals. It tends to shrink and crack sooner in showers.
Which silicone should you buy?
- Look for 100% silicone and a “Kitchen & Bath” label.
- Pick the color that matches your setup (white, clear, almond, etc.). Clear can look great, but it also shows any mess underneath, so prep matters even more.
- Mildew-resistant claims help slow surface growth, but they are not magic if water is getting behind the joint.
My rule: If it gets hit by shower spray or holds puddles, use 100% silicone. If it is outside the splash zone and you need paint, use acrylic/latex.
Tools and materials
- 100% silicone kitchen and bath caulk (mildew-resistant label is a nice bonus, not magic)
- Caulk gun (a smooth rod model is easier for beginners)
- Plastic razor scraper and/or nylon scraper (safer on acrylic/fiberglass surrounds)
- Utility knife with fresh blades (for scoring edges)
- Caulk remover gel (helpful for stubborn silicone)
- Alcohol for final wipe (isopropyl is common). Check your tub/surround care guidelines and spot-test first, especially on acrylic.
- Microfiber rags or paper towels
- Painters tape (optional but great for clean lines)
- Mildew cleaner: hydrogen peroxide, or a bleach-based cleaner for non-porous surfaces
- Backer rod (closed-cell foam) for big gaps
- Rubber gloves and ventilation
Safety basics (quick but important)
- Ventilate the bathroom, especially when using remover gel or bleach products.
- Wear gloves, and consider eye protection when scraping overhead or in corners.
- Never mix bleach with other cleaners (including ammonia or vinegar).
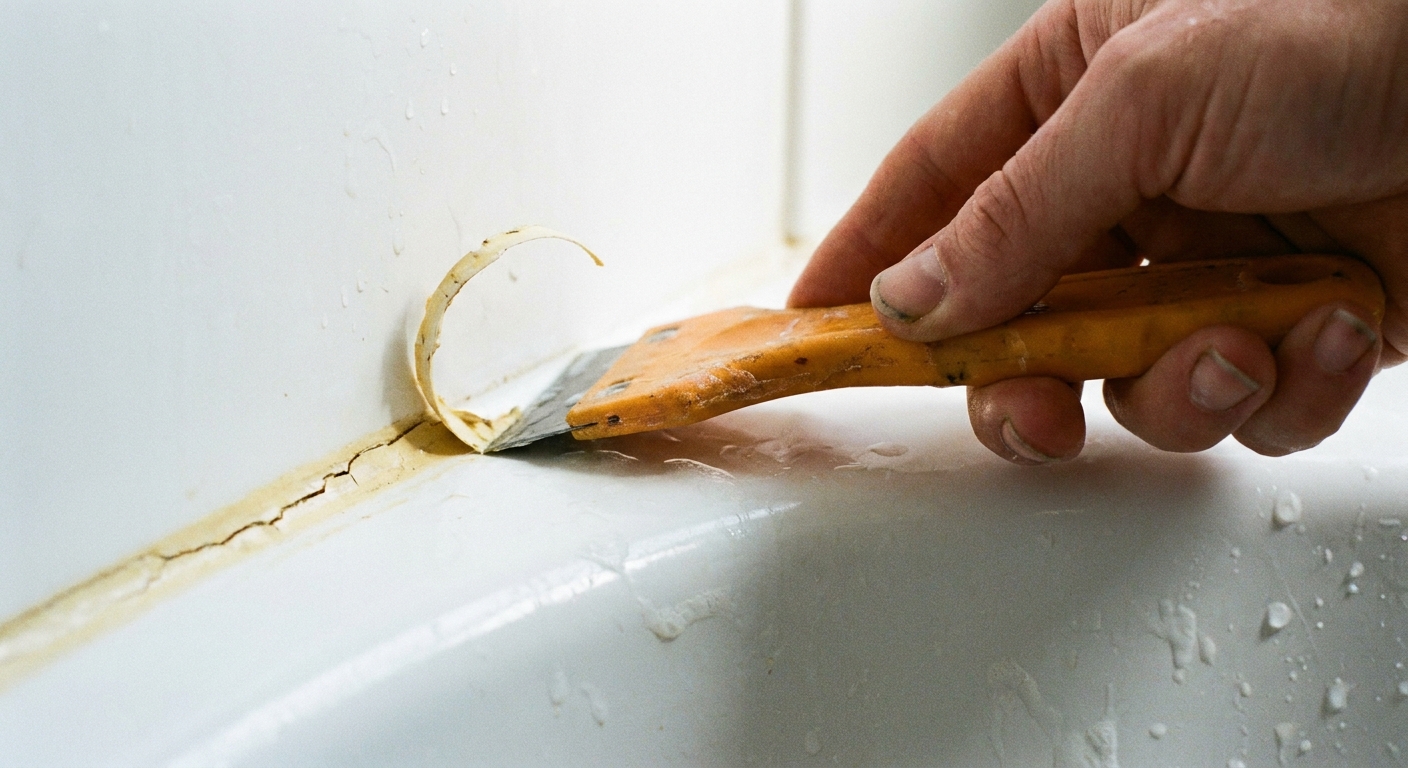
Remove old caulk safely
The goal is to remove all old caulk and residue. New silicone does not forgive leftovers, especially old silicone.
Step 1: Soften it if needed
If it is silicone and it is fighting you, apply a caulk remover gel and let it sit for the recommended time. This is especially helpful on textured surrounds where residue likes to hide.
Afterward, scrape and wipe until the gel residue is gone. If the label calls for rinsing, rinse. If it calls for wiping, wipe. Do not leave a chemical film behind and expect silicone to bond happily.
Step 2: Score both edges
Run a sharp utility knife along the wall side and the tub side of the bead. Use light pressure. You are cutting the caulk, not carving the surround.
Step 3: Lift and peel
Use a plastic scraper to lift an end. If you can grab it, pull slowly. Long strips are the goal. If it breaks every half inch, you probably need more softening time or a sharper score line.
Step 4: Remove the residue (the part everyone skips)
This is the difference between a bead that lasts 6 months and one that lasts years. Scrape again, then do a final wipe. If you can still feel a slick or rubbery film, keep going.
What not to do
- Do not use a metal razor blade on acrylic or fiberglass unless you are very experienced and can keep it perfectly flat. One tilt and you have a permanent scratch.
- Avoid caulking over existing silicone. Pros sometimes get away with it after aggressive removal and perfect prep, but for most DIY jobs the safest path is removal down to a clean surface.
- Do not use sandpaper on glossy surrounds. It can haze the finish and still not remove all silicone oils.
Mildew: Clean it first
If you see black or pink staining, treat it like a contamination problem, not a “new bead will hide it” problem.
Clean and disinfect
- Wash the area with a bathroom cleaner to remove soap scum and body oils first.
- Then apply a mildew killer appropriate for your surface. For most non-porous tub and surround materials, a bleach-based spray can work. Hydrogen peroxide is a good alternative and has less odor.
- Give it real dwell time. Ten minutes is a common minimum, but follow the label.
- Rinse well and dry.
If it comes right back
If you remove the caulk and find dark, slimy growth behind it, leave the seam open for a day or two with a fan running so the cavity can dry before you reseal.
If it keeps re-wetting, drying it out will not solve the real issue. Stop and investigate the source (leaky plumbing, failed grout or waterproofing, water getting behind a loose surround panel, etc.).
Important: Mildew-resistant caulk helps slow surface growth, but it cannot fix water getting behind the joint.
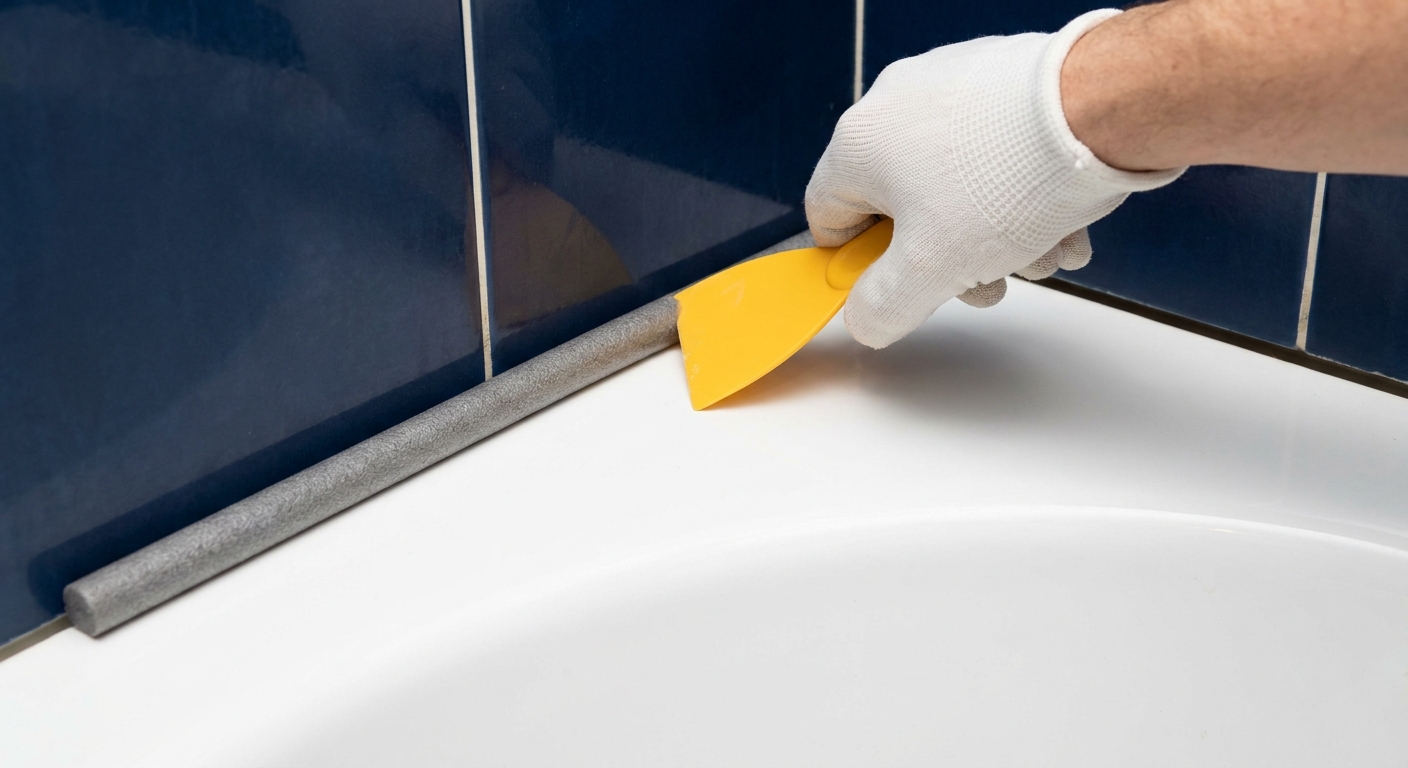
Big gaps: Use backer rod
Caulk is not meant to fill huge voids. If you try to bridge a big gap with silicone, it tends to slump, split, or pull loose as it cures.
The simple rule
- If the joint is deeper than it is wide, or wider than about 1/4 inch, consider backer rod.
- Backer rod supports the bead, reduces how much caulk you need, and helps prevent 3-sided adhesion (so the caulk can stretch instead of tearing).
How to use it
- Choose a diameter slightly larger than the gap so it compresses in place.
- Press it in with a blunt tool (a plastic putty knife works) so it sits below the surface, leaving room for a proper bead.
- Do not puncture it. If you tear it up, replace that section.
Prep: Dry and clean
This is the boring part that makes the whole job work.
- Dry the area completely. I like to run a fan and give it at least a few hours after cleaning. Overnight is even better if you can.
- Final wipe: use a cleaner compatible with your surface to remove lingering oils and cleaner residue, then let it flash off. (On acrylic, check the manufacturer guidance and spot-test any solvent.)
- The “tub loaded” trick (optional): If you are caulking a bathtub that flexes (common with acrylic and fiberglass), fill it partway with water before you apply silicone. The weight pulls the tub into its loaded position. You seal it there, which can help reduce splitting later when someone bathes. If you have a cast iron tub or a tub that feels rock-solid, this may not matter much.
Apply a clean bead
Cut the tip to size
Cut the nozzle at a 45-degree angle, and cut it smaller than you think. You can always apply a slightly bigger bead by moving slower. A giant opening forces too much caulk and makes a mess fast.
Lay one continuous bead
- Hold the gun at a consistent angle.
- Move steadily so the bead looks like a rope, not a series of blobs.
- Try to do long runs without stopping, especially across the back wall.
Tool it once
The goal is to press the caulk into both surfaces and leave a slightly concave bead.
- Caulk tool: very beginner-friendly and consistent.
- Gloved finger: works great if you keep it clean and use light pressure.
- Soapy water tip: Lightly mist your tool or finger with water plus a drop of dish soap. It can help prevent dragging. Do not soak the joint. Too much soap can interfere with adhesion on some silicones.
Once the caulk starts to skin over, stop tooling. Going back for “one more pass” is how you get a torn, lumpy bead.
Tape for crisp edges
If you want crisp lines, tape both sides of the joint leaving the desired gap. Tool the bead, then pull the tape immediately while the caulk is still wet.

Cure time: Wait to shower
This is where patience saves your work. Silicone that feels dry on top can still be curing underneath.
- Read the tube. Cure time varies by brand, humidity, and bead size.
- Typical guidance: many 100% silicone products need 24 hours before water exposure. Some call for 12 hours, some 48 hours.
- Cool, damp bathrooms cure slower. If your bathroom has poor ventilation, plan on extra time.
If you shower too soon, water can compromise the bond, and you are right back to peeling edges.
Common mistakes
- Leaving residue behind: if the surface feels slick, keep cleaning. Silicone hates leftovers.
- Caulking over wet surfaces: trapped moisture can cause failure and mildew.
- Using acrylic/latex in the shower: it might say “bath” on the label, but constant water exposure is another level.
- Making the bead too thin: a whisper-thin bead cracks. Give it some body.
- Too much caulk, then over-tooling: you can pull caulk out of the joint instead of pushing it in.
Troubleshooting fast
- It will not stick, fisheyes, or pulls away: usually soap scum, cleaner residue, or leftover silicone film. Remove it, clean again, dry again.
- It cracks after curing: joint movement, bead too thin, or a big gap that needed backer rod.
- Mildew returns quickly: moisture is staying trapped or the area is re-wetting. Improve ventilation and investigate for leaks or water intrusion.
When caulk is not the fix
Caulk is a flexible sealant, not structural repair. If these are happening, investigate before you just reseal the edge.
Signs of movement or water damage
- Grout lines are cracking repeatedly in the same spot.
- Tiles are loose, hollow-sounding, or you can press and feel movement.
- The wall behind the tile feels soft or spongy.
- You see staining on the ceiling below the bathroom, or on the wall outside the shower.
What that usually means
It can indicate a failing substrate (drywall where cement board should be), water getting behind the waterproofing, or a shower pan issue. At that point, regrouting and caulking is like painting over rot. You might be looking at removing tile, repairing the backer and waterproofing, and retiling the affected area.
Make it last
- Run the exhaust fan during showers and for 20 minutes after.
- Squeegee the walls and tub ledge if you can. Less standing water equals less mildew.
- Avoid harsh abrasives on silicone. Use a mild bathroom cleaner.
- Inspect corners every couple months. Small gaps are easy to fix before they become leaks.
If you do the prep right and give silicone the cure time it wants, recaulk is one of those satisfying Saturday projects that pays you back every time you step into a clean, dry shower.
The 30-Second Cheat Sheet
Essential takeaways for: Cracked, Peeling, or Moldy Shower Caulk? Strip It and Recaulk
Best caulk choice
- Inside showers and tub-to-tile joints: use 100% silicone (look for “Kitchen & Bath” and confirm it is 100% silicone, not “siliconized acrylic”).
- Outside the splash zone (paintable trim): acrylic/latex is fine.
Removal rules that prevent peel-back
- Score both edges with a sharp knife, then lift with a plastic scraper (safer on acrylic/fiberglass).
- Use caulk remover gel for stubborn silicone. Follow the label and remove gel residue before recaulking.
- Remove all residue. Silicone often will not bond reliably to leftover silicone film.
- Avoid caulking over existing silicone. Even if it “looks clean,” adhesion is often poor unless you remove it aggressively and prep perfectly.
Mildew: fix the cause, not the color
- Clean soap scum first, then disinfect (hydrogen peroxide or a bleach-based cleaner for non-porous surfaces).
- Never mix bleach with other cleaners (especially ammonia or vinegar). Ventilate well.
- If mildew was behind the bead, dry the area with a fan before recaulking. If it keeps re-wetting, stop and find the water source.
Backer rod for big gaps
- If the gap is wide (around 1/4 inch+) or very deep, press in closed-cell backer rod first.
- Backer rod supports the bead and helps prevent 3-sided adhesion so the caulk can stretch instead of tearing.
- Caulk is not meant to fill big voids by itself.
Smoothing technique
- Apply one steady bead, then tool it once into a smooth, slightly concave shape.
- Optional: painters tape for crisp edges. Pull tape immediately after tooling.
- Once a skin forms, leave it alone. Touching it again can cause tearing and lumps.
Cure time before showering
- Most silicone needs 24 hours before water exposure (check the tube).
- Cool, humid bathrooms may need longer.
When caulk is not enough
- If grout keeps cracking, tiles are loose, or walls feel soft, investigate water damage and substrate issues. Recaulk alone will not solve it.
💡 Tip: Scroll up to read the full article for detailed, step-by-step instructions.
⬆️ Back to topAbout Marcus Vance
Content Creator @ Grit & Home
Marcus Vance is a lifelong DIY enthusiast and self-taught home renovator who has spent the last decade transforming a dilapidated 1970s ranch into his family's dream home. He specializes in budget-friendly carpentry, room-by-room renovations, and demystifying power tools for beginners. Through his writing, Marcus shares practical tutorials and hard-learned lessons to help homeowners tackle their own projects with confidence.