🚨 In a DIY emergency or rush?
Skip the details and jump straight to our 30-second cheat sheet for the most crucial info.
There are few home smells as instantly unsettling as that heavy, sweet, rotten odor that seems to come from nowhere. If it is strongest near a ceiling, an exterior wall, or a closet that backs up to the attic, you are often dealing with a dead animal in a wall void, soffit (the boxed-in underside of your roof overhang), crawlspace, or attic.
I am all for DIY when it is safe and sensible. But this is one of those jobs where the goal is not “be a hero with a pry bar.” The goal is to locate the source without spreading contamination, avoid electrical hazards, and know when to call in a pro.

First: confirm the smell
Before you start pulling trim or poking holes, do a quick sanity check. Several issues can mimic a carcass smell, and chasing the wrong problem wastes time.
What dead-animal odor is like
- Sickly sweet and rotten, sometimes like spoiled meat.
- Often worse as the day warms up (heat increases odor release).
- Usually strongest in one zone, not evenly throughout the house.
Common look-alikes
- Sewer gas: sharp, gassy, “rotten egg” smell that can come and go with plumbing use.
- Mouse urine: ammonia-like, especially in cabinets or closets.
- Wet insulation or mold: earthy, musty, “old basement.”
- Electrical overheating: fishy or burning plastic smell. If you smell this, stop, shut off power to the area, and call an electrician.
If you are unsure, treat “fishy/burning” as electrical until proven otherwise. A dead animal is gross. An electrical fault can be catastrophic.
Safety rules
Odor hunts tempt people into risky places: tight attics, ladder work, and wall cavities full of wiring. Set yourself up like you are doing a dusty demo day.
PPE to use
- Nitrile gloves (double up if you are squeamish).
- Respirator or mask: ideally a NIOSH-approved half-face respirator with P100 filters. At minimum, an N95.
- Eye protection: especially in attics where insulation and debris fall.
- Long sleeves and clothes you can wash hot right away.
Keep kids and pets out
- Close the door to the affected room if you can.
- Do not let pets “investigate” the smell. They will.
Ventilation basics
- Open windows in the affected area.
- Use a box fan facing outward in a window to exhaust air (do not blow the smell deeper into the house).
- Close interior doors to contain the odor zone while you search.
Ladder and attic safety
- Have a second adult home if you are climbing or entering an attic.
- Use a ladder rated for your weight plus tools, on solid flooring.
- In the attic, only step on joists or a secured plank. Drywall ceilings will not hold you.
- Watch for nails poking through roof decking and low rafters.
- Attics get dangerously hot fast. Take breaks.
Electrical safety
- Assume every cable is live unless you have verified power is off.
- If you need to open an access panel near wiring, shut off the circuit at the breaker.
- Do not cut blindly into walls where outlets, switches, or light fixtures suggest wiring paths.
Odor mapping
The biggest DIY mistake here is starting with demolition. Instead, map the odor like you are tracking a draft.
Step 1: baseline
Start in a room that smells normal. Then walk toward the suspect area and note where the odor noticeably ramps up.
Step 2: simple grid
In the smelly room, imagine a tic-tac-toe grid on each wall and the ceiling. Sniff-check each section and rank it 0 to 5 in your notes. The goal is to identify the smallest area that consistently reads the strongest.
Step 3: check odor paths
- Return air grilles and HVAC returns (smell can travel).
- Ceiling light boxes and recessed cans (often open to attic air).
- Plumbing chases behind bathrooms and kitchens.
- Fireplace chases and built-ins on exterior walls.
If the smell is strongest near a ceiling fixture, it often points to the attic above rather than the wall itself.
Seasonal clues
You do not need to become a wildlife biologist, but a few patterns help narrow the search.
Common culprits by season
- Late fall to winter: mice and rats move in for warmth, then get trapped in wall voids or die near insulation after baiting.
- Spring: squirrels and raccoons are active in attics for nesting. You may find babies nearby.
- Summer: bats in attics and gable vents, especially in warmer regions.
Clues that point to a specific animal
- Flies appearing indoors near a window, light, or attic hatch can mean there is a carcass nearby.
- Scratching sounds earlier in the week followed by sudden silence is a common timeline.
- Stains on ceilings or walls can appear as decomposition fluids migrate (this is a “call a pro” flag if it is extensive).
Important: if you suspect bats, pause and check local guidance. Some species are protected in some regions, and removal is often regulated by season and method. When in doubt, call a wildlife control pro or your state wildlife agency.
Attic checks
If you have attic access, it is often the safest first place to look because you can inspect without cutting walls.
How to check without a mess
- Lay down a few boards or a piece of plywood across joists to create a stable kneeling path.
- Use a bright flashlight and go slow. Look along perimeter edges where animals travel.
- Focus on: around vents, soffit edges, chimney chases, and valleys where insulation looks disturbed.
What you are looking for
- The carcass itself (sometimes partially buried in insulation).
- Concentrated fly activity.
- Tufts of insulation pulled into a nest area.
- Droppings, tracks, or greasy rub marks along rafters.
When to stop
- You see extensive droppings (possible disease risk).
- You find a large animal (raccoon, opossum) in a tight spot.
- You cannot move safely without stepping off joists.
- You see damaged wiring, chewed cables, or exposed junction boxes.
At that point, you have done the valuable part: narrowing the location. A professional can handle removal and sanitation safely.
Wall checks
Wall cavities are where DIY can go sideways quickly, mainly due to wiring and plumbing. The goal is to confirm location with minimal openings.
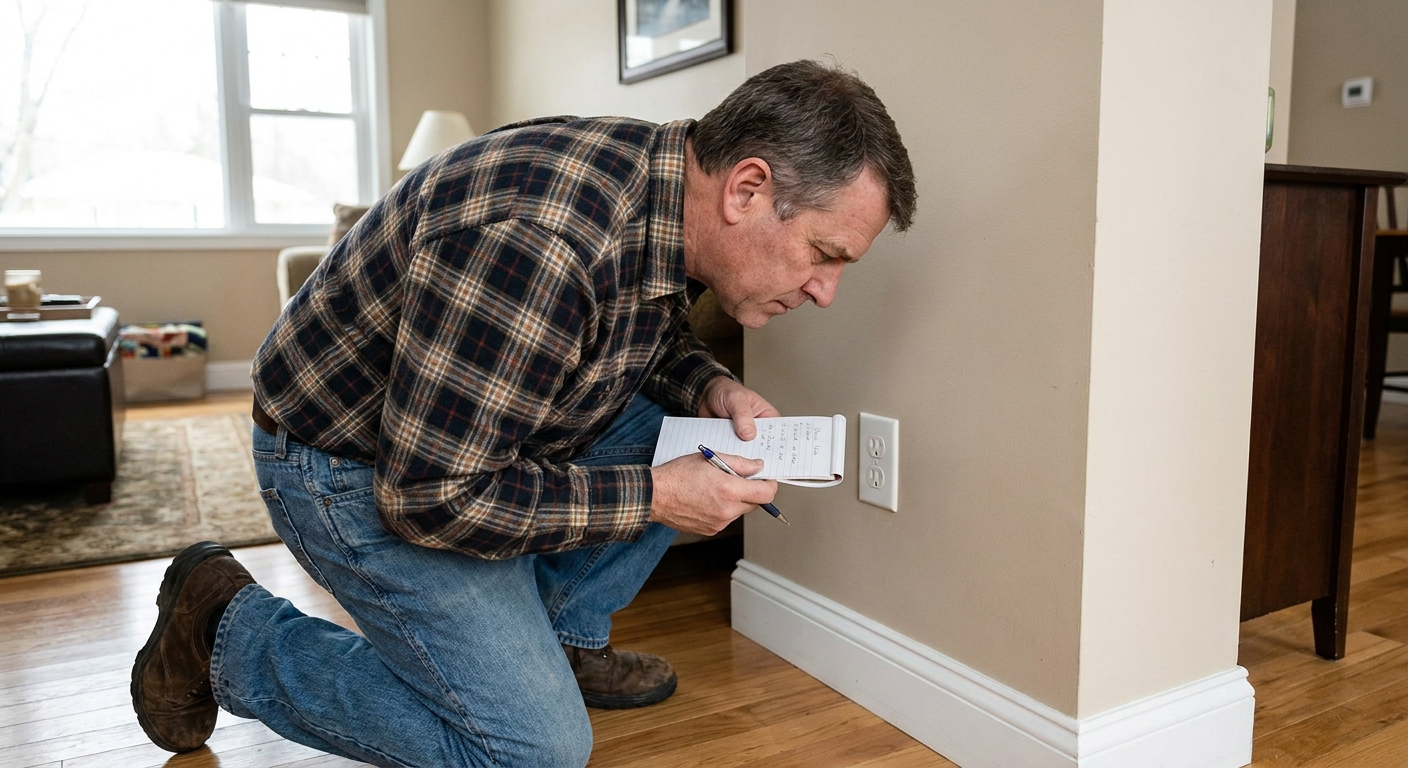
Non-invasive checks
- Outlet and switch plates: with the circuit off, remove the cover plate (not the device) and sniff near the opening. If it is markedly stronger, you are close.
- Baseboard edges: odor sometimes leaks at gaps where drywall meets flooring.
- Infrared camera (optional): occasionally helpful if there is a moisture issue or insulation disturbance, but decomposition heat signatures are inconsistent and often not detectable. Treat it as a bonus tool, not a reliable method.
If you must make a small inspection hole
Only do this if you are comfortable patching drywall and you have a strong reason to believe the carcass is right there.
- Shut off power to that wall at the breaker.
- Use a stud finder with live-wire (AC voltage) detection and stay away from outlet heights where wiring is common.
- Cut a small opening high on the wall if odor is strongest near the ceiling, or low if it is strongest near baseboards.
- Use a flashlight or borescope to look inside without enlarging the hole.
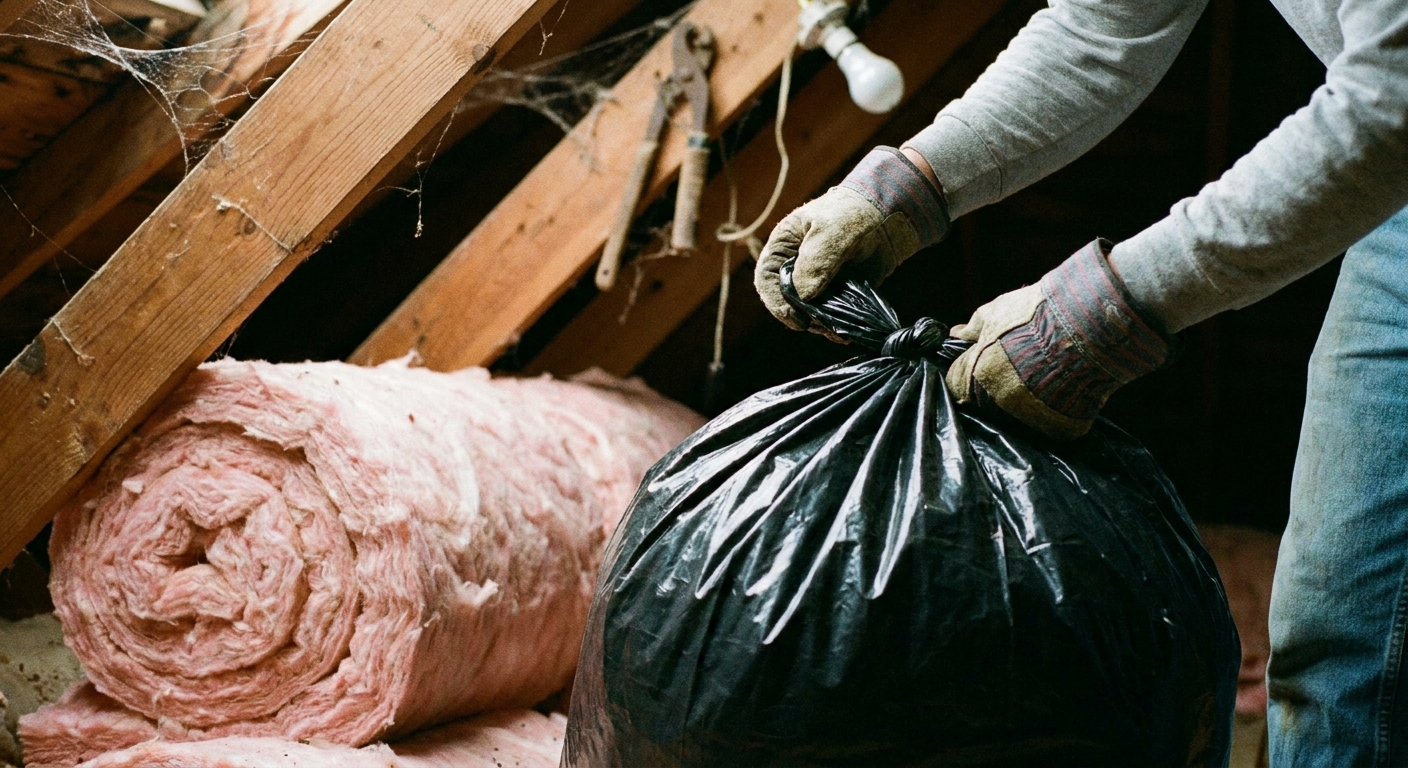
If you see blown-in insulation, be ready for it to spill. Have a trash bag, shop vac with a HEPA filter if possible, and plastic sheeting on the floor.
Removal: DIY vs pro
Here is my honest line in the sand: removing a small carcass in an accessible attic corner is usually a reasonable DIY job. Anything inside a wall cavity, under insulation you cannot control, or involving a large animal is often worth professional help.
DIY is reasonable when
- You can reach it without tearing out finished surfaces.
- It is small (mouse, small bird, small squirrel).
- You can bag it without contacting insulation everywhere.
- You can clean the immediate area and ventilate well.
Call a professional when
- The animal is large (raccoon, opossum) or you suspect multiple carcasses.
- It is in a wall, duct, chimney chase, or inaccessible soffit.
- You see maggots, heavy fly activity, or widespread staining.
- You have asthma, immune issues, or cannot wear a respirator comfortably.
- You suspect bats or you are not sure what species it is.
If you remove it yourself
- Double-bag in heavy-duty contractor bags. Add absorbent material (paper towels) if fluids are present.
- Seal the bag tightly and place it in a second bag immediately.
- Put it into an outdoor bin promptly to reduce odor and avoid attracting pests.
- Check local disposal rules. Many areas allow bagged disposal in trash, but some require special handling.
- Remove and bag contaminated insulation around the carcass if it is localized and accessible.
- Clean hard surfaces with an EPA-registered disinfectant according to label directions. For porous wood, you may need an enzymatic cleaner designed for biological odors.
Do not mix household chemicals like bleach and ammonia. Also, bleach is not a magic odor remover on porous materials.
Rodent droppings warning
If you encounter rodent droppings or nesting material, do not sweep or vacuum it dry. That can kick contaminated dust into the air. Lightly mist with disinfectant, let it soak per label directions, then wipe up with paper towels while wearing gloves and a respirator. If droppings are widespread, it is reasonable to stop and call a pro. For deeper guidance, look up CDC recommendations for cleaning up after rodents.
After: deodorize
The smell usually fades dramatically after removal, but it can linger if fluids soaked into insulation, drywall paper, or framing.
Steps that work
- Ventilate the space for a day or two when weather allows.
- Run a HEPA air purifier in the affected room.
- Use an enzymatic odor neutralizer on affected framing or subfloor. Follow dwell time instructions.
- Replace contaminated insulation instead of trying to “spray it clean.” Insulation is cheap compared to weeks of stink.
When you may need deeper remediation
- Odor does not noticeably improve within about 7 to 14 days after removal and cleanup (size, temperature, and contamination can change the timeline).
- Ceiling or wall staining spreads.
- You had a large animal or significant fluid contamination.
In those cases, pros may use ozone or hydroxyl treatments. Ozone is not a DIY tool. It can be harmful if used incorrectly and should never be run with people or pets in the home.
Exclusion: prevent it
Finding the smell solves today’s problem. Sealing entry points prevents the sequel.
Do not seal animals in
If you suspect there may be a live animal still using the space (especially in spring nesting season), do not rush to seal everything. You can trap animals inside and create a much bigger mess. A one-way door setup or a wildlife control pro is often the cleanest path.
Common entry points
- Soffit and fascia gaps, especially at roof corners.
- Gable vents and ridge vents without proper screening.
- Roof penetrations: plumbing vents, attic fans, chimney flashing gaps.
- Holes at the foundation line where pipes and cables enter.
- Garage attic transitions and roof-to-wall intersections.
Materials that hold up
- Hardware cloth (1/4-inch galvanized mesh) for vents and gaps.
- Metal flashing for chew-proof patches.
- Exterior-grade sealant for small cracks (paired with backing material when needed).
Avoid “spray foam only” for anything rodents can reach. It is great as a seal, but it is not chew-proof by itself.
Quick troubleshooting
Top floor, near the ceiling
Start in the attic. Check around recessed lights, bath fan ducts, and the attic hatch.
Exterior wall, especially a corner
Think soffit or wall void near a roof edge. Look outside for gaps and inside for outlet plate sniff tests (power off).
Near HVAC returns
Check the return plenum (the return-air box or duct area near the furnace or air handler) and nearby attic ductwork. Sometimes an animal dies near a return path and the smell distributes.
You used rodent bait recently
Wall voids are likely. This is where pros earn their keep, because odor can persist if you cannot remove the carcass and contaminated insulation.
Rule of thumb
If you can locate it confidently and reach it safely without cutting into finished walls or crawling across unsafe attic areas, you can probably handle removal with the right PPE and cleanup steps. If you are guessing, cutting blind, or dealing with a large animal, bring in a wildlife control or restoration company. Your lungs, your wiring, and your ceiling drywall will thank you.
If you want, tell me where the smell is strongest (room, wall vs ceiling, and whether you have attic access), and I will help you map a safe next step.
The 30-Second Cheat Sheet
Essential takeaways for: Dead Animal Smell in Walls or Attic: Find It Safely
Do this first (5 minutes)
- Rule out electrical: if the smell is fishy, burning, or plastic-like, shut off the circuit and call an electrician.
- Ventilate: open a window and run a box fan facing outward.
- Gear up: nitrile gloves, eye protection, and ideally a P100 respirator.
- Clear the area: keep kids and pets out of the affected zone while you investigate.
Find the source without demolition
- Odor map: walk room to room and note where it ramps up, then “grid” the strongest room (0 to 5 intensity).
- Check odor highways: attic hatch, recessed lights, bath fan ducts, return air grilles, plumbing chases.
- Attic first: easiest and safest place to confirm location. Only step on joists or a secured plank.
Safe wall checks
- Turn power off and remove only the cover plate on outlets or switches near the hot zone, then sniff near the opening.
- Avoid cutting walls unless you are confident and comfortable patching drywall. Never cut blindly near outlets, switches, plumbing walls, or HVAC chases.
DIY vs pro
- DIY is reasonable for a small, reachable carcass in an attic corner.
- Call a pro if it is in a wall/soffit/duct, it is a large animal, you see heavy fly activity or staining, or you suspect bats.
After removal
- Double-bag the carcass in contractor bags and get it into an outdoor bin promptly.
- Remove localized contaminated insulation if accessible. Replace it instead of spraying it.
- Use an enzymatic cleaner or EPA-registered disinfectant on affected framing.
Prevent the repeat
- Seal entry points with hardware cloth, metal flashing, and exterior-grade sealant.
- Do not seal openings if you think an animal may still be inside (especially during nesting season). Use a one-way door or call a pro.
- Do not rely on spray foam alone where rodents can chew.
💡 Tip: Scroll up to read the full article for detailed, step-by-step instructions.
⬆️ Back to topAbout Marcus Vance
Content Creator @ Grit & Home
Marcus Vance is a lifelong DIY enthusiast and self-taught home renovator who has spent the last decade transforming a dilapidated 1970s ranch into his family's dream home. He specializes in budget-friendly carpentry, room-by-room renovations, and demystifying power tools for beginners. Through his writing, Marcus shares practical tutorials and hard-learned lessons to help homeowners tackle their own projects with confidence.