🚨 In a DIY emergency or rush?
Skip the details and jump straight to our 30-second cheat sheet for the most crucial info.
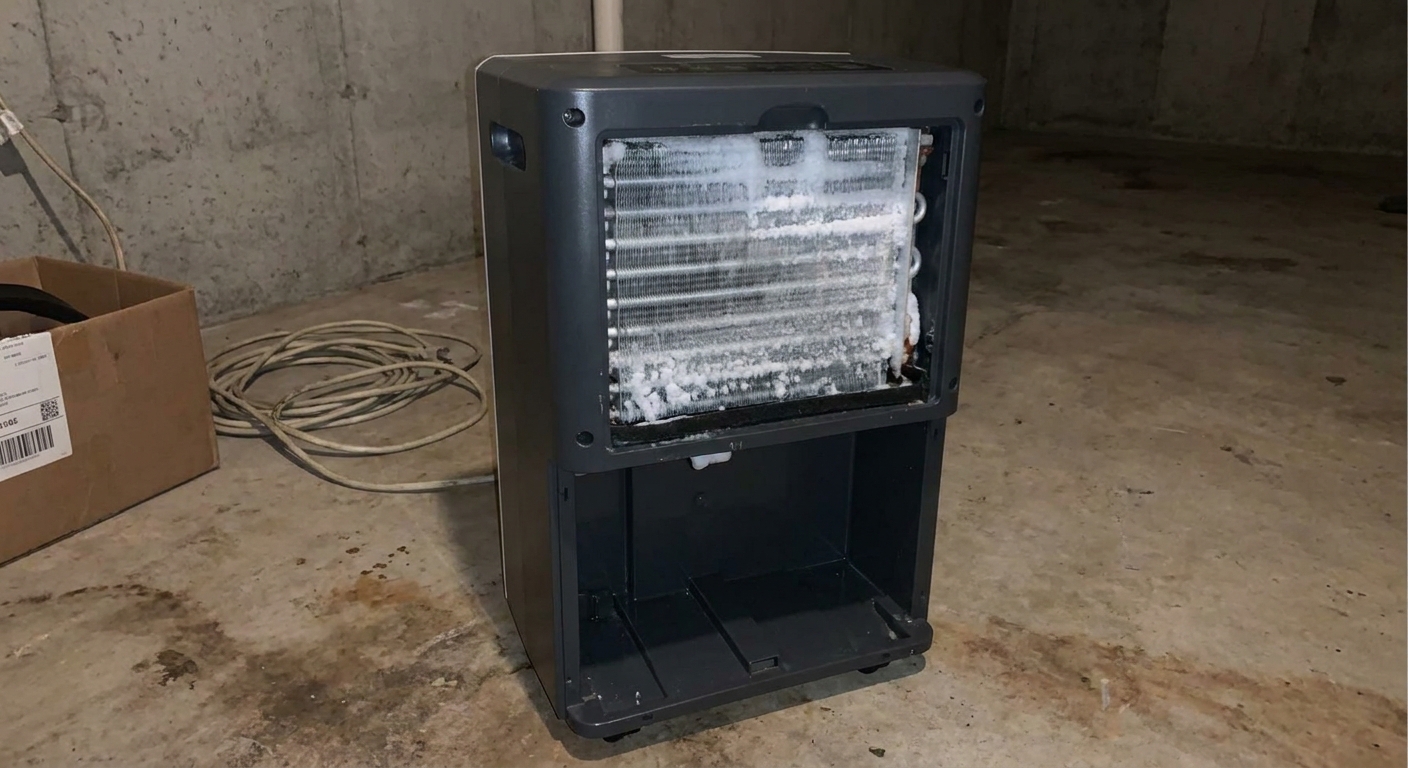
If you have ever pulled out your dehumidifier bucket and found it basically empty, then spotted a white “snow” blanket on the coils, you are not alone. Coil icing is one of those symptoms that sends homeowners down a long DIY rabbit hole because the unit still runs, the fan still blows, and it sounds like it is working. But it cannot collect water properly when the coil turns into a tiny freezer.
The good news is that most frosting issues come down to a few fixable basics: airflow restrictions, running the unit in a room that is too cold, dirty coils, bad placement, or settings that keep it running too hard in cool conditions. The not so fun news is that sometimes icing can point to a refrigerant issue, and that is a “stop and refer-out” moment for most homeowners.
Let’s walk through what is happening, what to try first, and how to tell when it is time to get service.
Why coils ice over
A dehumidifier works by pulling humid air across a cold evaporator coil. Moisture condenses into water and drips into the bucket or drain hose.
When conditions are wrong, that condensed water does not drip away. It freezes. Once ice forms, airflow drops even more, the coil gets colder, and icing accelerates. It is a snowball effect, just the frosty kind.
The most common root causes fall into these buckets:
- Not enough airflow across the coil (dirty filter, blocked intake, weak fan, cluttered area).
- Room temperature is too low for that model’s operating range.
- Coils are dirty so air cannot transfer heat correctly.
- Settings and run habits like “continuous” mode in a cool space that never lets the unit cycle normally.
- Drainage issues that can worsen refreezing if water pools where it should drain away.
- Refrigerant problems or sealed-system faults (usually needs a technician).
First step: thaw it safely
Before you diagnose anything, you need the unit fully thawed. Otherwise you are testing through a layer of ice and guessing.
Quick thaw checklist
- Turn the dehumidifier off and unplug it.
- Move it to a warmer spot if possible, or raise the room temp.
- Let it sit until the coil is completely clear. This can take a few hours.
- Protect the floor with towels because thaw water will drip.
Skip the shortcuts: Avoid scraping the coils or blasting them with a heat gun. Those aluminum fins bend easily, and once airflow is damaged, icing gets worse long-term.
Cause 1: low airflow
If the unit cannot move enough warm room air across the coil, the coil temperature drops too far and starts freezing moisture instead of draining it.
What to check
- Air filter: Pull it and look at it in good light. If it is gray, fuzzy, or “felt-like,” it is restricting airflow.
- Intake and exhaust: Make sure nothing is pressed against the grilles. I have seen units shoved tight against a wall, with a laundry basket parked in front of the intake, and then everyone wonders why it ices.
- Fan output: With the unit running (after thaw), you should feel a steady stream of air from the exhaust.
Fixes to try
- Clean the filter according to your manual. Many are rinseable. Let it dry fully before reinstalling.
- Vacuum the intake grille with a soft brush attachment.
- Give it space (more on clearance below).

Cause 2: dirty coils
Even with a clean filter, coils can get coated in dust, pet hair, or basement funk. Dirty fins reduce heat transfer, which can push the coil colder and promote icing.
How to inspect
- Unplug the unit.
- Remove the air filter and look at the coil surface behind it.
- If the fins look matted with dust or fuzzy debris, cleaning will help.
DIY coil cleaning
- Vacuum first with a soft brush attachment, moving in the direction of the fins.
- Use compressed air lightly if you have it, blowing from the clean side out if accessible.
- Coil cleaner: If the coil is greasy or heavily coated, use a foaming coil cleaner that is safe for aluminum and follow label directions. Keep water and overspray off electrical parts.
Confession: Early on, I “cleaned” a set of fins with a stiff brush and flattened a section like a bad hair day. Airflow never recovered until I carefully straightened them with a fin comb. Use soft tools and patience.
Cause 3: room too cold
This one surprises people. A dehumidifier is not the same as a freezer, but it does rely on coil temperatures that can dip below freezing when the room is cold enough.
Many consumer dehumidifiers are designed for typical living spaces and warmer basements. When the room temperature drops into the 40s or low 50s Fahrenheit, some units will start to frost, even if everything is clean.
What to do
- Check the manual for minimum operating temperature. Minimum operating temperatures typically fall between 41°F and 65°F depending on the model, and many standard units are closer to the low end of that range.
- Warm the space a bit, especially in winter basements, garages, and crawl spaces.
- Consider the right tool: For colder areas, look for a dehumidifier designed for low-temperature operation, often with better defrost controls.
Tip: If your unit has an “auto defrost” function and it is still icing constantly in a cold room, it may be doing its best but losing the battle.
Also normal: On some models, defrost looks like the compressor shutting off for a bit while the fan keeps running. That pause can be normal, not a failure.
Cause 4: poor placement
Dehumidifiers breathe a lot of air. If they are jammed into a corner or tucked behind furniture, they can recirculate their own cold exhaust and starve themselves of fresh room air.
Placement rules
- Give clearance: Follow your manual. If you want a simple rule of thumb, aim for 6 to 12 inches on all sides.
- Keep it level: A tilted unit can affect drainage and internal float switches.
- Don’t block the exhaust: Make sure the dry air can flow out into the room, not straight into a wall or curtain.
- Avoid dusty zones: Right next to a dryer vent, woodworking area, or litter box is asking for clogged filters and coils.
Cause 5: drain and bucket issues
Drain issues usually show up as water not collecting, but they can also worsen icing or refreezing in some designs if water cannot move away from where it should drip.
What to check
- Bucket seating: Make sure the bucket is fully seated. Many models will run the fan but stop the compressor if the bucket switch is not triggered correctly, which can create confusing symptoms.
- Drain hose slope: If you are using a hose, it should run downhill continuously with no loops that trap water.
- Clogs: Look for slime, mineral buildup, or debris in the drain outlet or hose.
- Internal drain channel: Some units have a little trough under the coil. If that trough is dirty, water can pool and refreeze during cold operation.
Fixes
- Flush the hose with warm water and a little dish soap, then rinse.
- Clean the bucket and bucket cavity.
- Gently wipe the drain trough area if accessible.
Cold-space warning: In a chilly basement, a thin drain hose can also freeze. If the hose runs along an exterior wall or through an unheated area, consider rerouting it or insulating it.
Cause 6: refrigerant or sealed-system problem
If you have done the basic airflow, cleaning, placement, temperature, and settings checks and the unit still ices quickly, you may be looking at a sealed-system problem.
A low refrigerant charge or a restriction can cause the evaporator coil to run abnormally cold, leading to rapid frost buildup, weak moisture removal, and long runtimes.
Red flags that point to service or replacement
- Coil frosts fast within 10 to 30 minutes of starting, even in a warm room.
- Only part of the coil ices while the rest stays warm. This is a common sealed-system clue, but it is not definitive, since airflow issues and uneven dirt can sometimes mimic the pattern.
- Little to no water collection despite high humidity.
- Oily residue near copper lines or coil connections.
- Hissing sounds that seem new.
Most portable dehumidifiers are not economically repairable for refrigerant leaks. A licensed HVAC tech can confirm the diagnosis, but many homeowners choose replacement once a sealed-system issue is identified.
Safety note: Stick to filter, coil-face, and drain cleaning. Avoid opening sealed panels or poking around refrigerant lines.
Troubleshooting order
If you want the fastest path to an answer, do it in this order:
- Thaw completely (unplug and wait).
- Clean or replace the air filter.
- Check placement and clearance (move it into open space).
- Clean the coil face gently.
- Verify room temperature is within the unit’s rating.
- Inspect drain setup (bucket seating, hose slope, clogs).
- Check your settings: avoid continuous mode in cool spaces and set a realistic target (often 45 to 55 percent) so the unit can cycle.
- Restart and monitor for 30 to 60 minutes.
If icing returns quickly after steps 1 through 7, you are likely in refer-out territory.
Prevent icing
- Filter routine: Check monthly during heavy use. Basements with pets or laundry need more frequent cleaning.
- Seasonal coil check: At the start of humid season, inspect the coil and vacuum the intake.
- Mind the temperature: If your basement gets cold in winter, either shut the unit down or switch to equipment designed for low temps.
- Set it to cycle: Continuous mode in a cool space can increase icing risk. Pick a target humidity and let it turn on and off.
- Drain smart: Keep the hose short, downhill, and clean.
- Keep it breathing: Clearance around the unit is not optional.
Keep using it or stop
Okay to keep using after you fix the cause
- It frosted once after a long run and a dirty filter.
- It frosted in a cold snap and stops once the room warms up.
- It was shoved in a tight corner and behaves normally after moving.
- You notice occasional compressor pauses that match normal defrost behavior.
Stop and seek service or replacement
- It frosts repeatedly in normal temperatures with good airflow.
- You see oily residue, hear hissing, or suspect refrigerant issues.
- The fan is weak, grinding, or intermittent.
- The unit trips breakers or smells like hot plastic.
The 30-Second Cheat Sheet
Essential takeaways for: Dehumidifier Coils Icing Up: Causes and Fixes
Fast diagnosis
- Coils frosting over almost always means: low airflow, room is too cold, dirty coil, or a sealed-system refrigerant problem. Drain or bucket issues can also worsen refreezing in some designs.
- First move: unplug and fully thaw. Troubleshooting a frozen coil is guessing.
Fixes to try in order
- Clean the air filter and vacuum the intake grille.
- Give it clearance (follow your manual; often 6 to 12 inches is a safe rule of thumb) and keep exhaust from blowing straight into a wall.
- Gently clean the coil fins with a soft brush vacuum and light compressed air if available.
- Check room temp against the manual. Cold basements and garages can cause icing even on healthy units.
- Inspect drainage: bucket seated correctly, hose runs downhill, no clogs or loops, and no frozen hose in cold areas.
- Check settings: avoid “continuous” in cool spaces, and use a reasonable target humidity (often 45 to 55 percent) so the unit can cycle.
Red flags: refer out
- Frost returns within 10 to 30 minutes in a normal-temperature room with a clean filter and good airflow.
- Only part of the coil ices or you notice oily residue on lines or connections (suggestive of sealed-system trouble, not proof by itself).
- Runs constantly but barely collects water and airflow is normal.
Prevention
- Check and clean the filter monthly in humid season.
- Keep the unit in open space with good airflow.
- Do not run standard units in spaces below their rated minimum temperature.
- Do not panic if the compressor pauses occasionally. That can be normal defrost behavior on some models.
💡 Tip: Scroll up to read the full article for detailed, step-by-step instructions.
⬆️ Back to topAbout Marcus Vance
Content Creator @ Grit & Home
Marcus Vance is a lifelong DIY enthusiast and self-taught home renovator who has spent the last decade transforming a dilapidated 1970s ranch into his family's dream home. He specializes in budget-friendly carpentry, room-by-room renovations, and demystifying power tools for beginners. Through his writing, Marcus shares practical tutorials and hard-learned lessons to help homeowners tackle their own projects with confidence.