First, a quick reality check
When a dehumidifier is working, you usually hear a fan and a compressor, and you see water collecting in the bucket or draining through a hose. So if it’s running but the bucket stays bone dry, it feels like it’s doing nothing.
Most of the time, the unit is not “dead.” It’s either not being asked to pull moisture (settings and conditions) or it can’t pull moisture (airflow, dirty coils, icing, or a refrigeration problem). We’ll go from the easy checks to the stuff that points to repair or replacement.
Quick note: dehumidifier temperature ranges, drain setups, and reset steps vary by model. If anything here conflicts with your manual, follow the manual.
Safety and setup
- Unplug the unit before you remove panels or clean coils.
- Give it time after moving it. If you transported it on its side, let it sit upright per the manufacturer’s recommendation (often several hours, sometimes up to a full day) before running. This lets compressor oil settle back where it belongs.
- Close windows and doors while testing. A dehumidifier can get overwhelmed by outdoor air leaks.
- Test in a smaller, closed area if you can. A huge open basement can make a good unit look weak.
Step 1: Humidity and settings
What “cut-in” means
Your dehumidifier’s humidistat has a target humidity (the setpoint). The unit “cuts in” when the room humidity rises above that target and it “cuts out” (or just runs the fan) when humidity is at or below it.
Room humidity might already be low enough
Dehumidifiers do not pull water constantly. They cycle on when the humidity is above your setpoint, then reduce output as the room dries.
- If your unit is set to 50% RH and the room is already 45 to 50% RH, you may get little to no water, especially in the first hour.
- Many units still run the fan even when the compressor is off, which makes it feel like it’s “running” without dehumidifying.
Do this quick test
- Set the humidistat to the lowest setting (or “Continuous”).
- Run for at least 1 to 2 hours in a closed room. If humidity is borderline, give it up to 4 hours.
- Listen for a steady compressor hum in addition to the fan.
If you never hear the compressor kick on, jump to the sections on bucket switches, defrost behavior, and sealed-system issues.
Pro tip: If you have a cheap hygrometer (even a $10 one), use it. The built-in humidistat on budget units can be off by 5 to 10 points.
Step 2: Temperature and placement
Most standard refrigerant (compressor) dehumidifiers slow down in cool spaces. When the air is colder, it holds less moisture, and the coil is more likely to ice up and trigger defrost. That means less water in the bucket and more “it’s running but nothing is happening” moments.
- Many standard models perform best roughly around 65 to 80°F.
- Below about 60 to 65°F, lots of portables start struggling, but the exact point depends on the model.
- Check your manual for the unit’s rated operating-temperature range. Many will run colder (often into the 40s) but with reduced capacity and more defrosting.
Placement basics
- Keep it out of tight corners and away from curtains, boxes, and furniture.
- Give it at least 12 inches of clearance, more if the space allows.
- For testing, put it where air can mix, not tucked against a cold exterior wall.
If your space is consistently cool, you have three options:
- Warm the space a few degrees and retest.
- Run it seasonally when temps are higher.
- Switch to a low-temp model with better defrost control, or use a desiccant dehumidifier for very cool areas. Desiccant units usually use more electricity, but they keep working when compressor models are miserable.
Step 3: Airflow
No airflow means no dehumidifying. The fan can run but still move very little air if the filter is clogged or the intake is blocked.
What to check
- Air filter: Pull it and look through it. If it looks fuzzy or gray, clean it.
- Intake and exhaust clearance: Give it open space on all sides.
- Fan output: With it running, you should feel a solid stream of air at the exhaust grille.
Filter cleaning (typical)
- Vacuum the filter gently.
- If it is washable, rinse with warm water and let it dry fully before reinstalling.
If the fan is weak, noisy, or intermittently stopping, you may be looking at a failing fan motor or capacitor. At that point, repair cost starts to matter, and we will talk replacement expectations below.
Step 4: Check for ice
This one is common in basements. If the coil is icing, water production can drop sharply, and the unit can spend a lot of time in defrost instead of pulling moisture.
What to do
- Unplug the unit and let it fully thaw. Do not chip ice off the fins.
- After it thaws, retest with clean filter, good clearance, and a warmer room if possible.
- If it re-ices quickly, that usually points back to temperature, airflow restriction, or a sensor or sealed-system issue.
Step 5: Coils
A dehumidifier needs clean coils for heat transfer. Dust on the evaporator coil can reduce capacity a lot, and if airflow is already marginal, it can look like the unit is barely doing anything.
Signs the coils might be dirty
- It runs constantly but pulls very little water.
- You notice a musty smell when it runs.
- The filter was dirty, which often means the coils have been eating dust too.
Basic coil cleaning (no heroics)
- Unplug and remove the filter.
- If you can see the coil fins, use a soft brush and a vacuum with a brush attachment to remove loose dust.
- For heavier buildup, use a no-rinse foaming coil cleaner made for HVAC coils, following the product directions.
- Let everything dry and reinstall the filter.
My own mistake: I once went at coil fins with a stiff brush like I was scrubbing a grill. Bent fins restrict airflow fast. If you do bend a few, a fin comb can straighten them, but it is better to be gentle in the first place.

Step 6: Defrost mode
Many compressor dehumidifiers have an automatic defrost mode. If the sensor thinks the coil is icing, the unit may pause dehumidifying while it defrosts. Depending on the design, the fan may keep running, which is confusing because it sounds like it is working, but it is not collecting much water during that period.
How to spot it
- A “Defrost” light is on, or the display shows defrost.
- The compressor seems to shut off while the fan keeps going.
- Performance is worst when the space is cool.
What to do
- Raise the room temperature if possible and retest.
- Confirm the filter and coils are clean so airflow is strong.
- Move the unit away from cold walls or cold floor zones if you can.
If the unit is stuck in defrost constantly, that can point to a sensor issue, airflow restriction, or low refrigerant. That is where repair versus replace becomes a real conversation.
Step 7: Drain and bucket issues
Sometimes the dehumidifier is collecting water, but it is not ending up where you expect.
Bucket seating and safety switch
Most units have a bucket switch. If the bucket is not fully seated, some units will still run the fan but will not run the compressor. Pull the bucket out, reseat it firmly, and make sure it clicks into place.
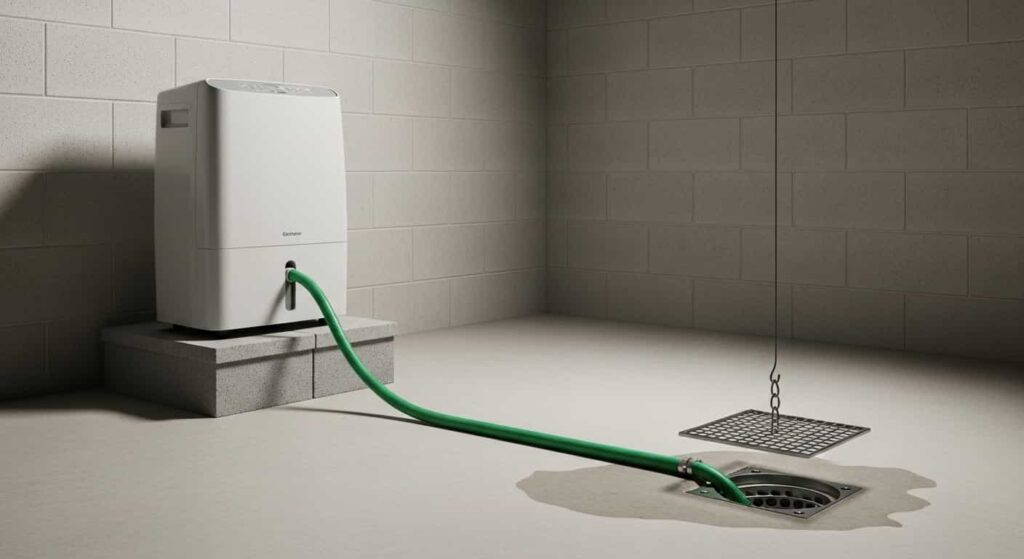
Continuous drain hose problems
- Make sure the hose runs downhill the entire way to the drain.
- Check for kinks, clogs, or a hose end submerged in standing water.
- Confirm the drain port cap is installed correctly if you are not using a hose.
Step 8: Sealed-system problems
If you have confirmed the room is warm enough, humidity is high enough, airflow is good, and coils are clean, yet the unit still will not collect water, you may be dealing with a sealed-system problem.
Common signs
- The compressor never seems to run, or it tries to start then clicks off.
- The coil never gets noticeably cool, or only a small section of the coil gets cold.
- It used to pull a full bucket a day, and now it pulls almost nothing under the same conditions.
- The discharge air is not warmer than room air when the compressor is running. If you want a clearer check than “feel,” use a simple thermometer and compare intake versus exhaust after 10 to 15 minutes of compressor run time.
Refrigerant leaks and compressor failures are not usually DIY-friendly. They require specialized tools, refrigerant handling, and often cost more than the unit is worth.
Repair vs replace
I am all for fixing things. I also like not throwing good money after bad.
When repair is usually worth it
- The unit is under warranty.
- The issue is clearly airflow, dirty coils, icing triggers, or a simple switch.
- You have a higher-end model and the repair cost is modest.
When replacement is usually smarter
- It is an older unit and you suspect refrigerant loss or a compressor problem.
- Your space is cool and the unit spends a lot of time in defrost. A different type of unit may fit better.
- A shop quotes a repair that is 40 to 60% of the cost of a new unit.
My rule of thumb: If it is a sealed-system issue on a typical big-box-store dehumidifier, I replace it. If it is a maintenance or airflow issue, I fix it and keep the money in my pocket.
Fast troubleshooting checklist
- Set to Continuous or the lowest RH and test in a closed room for 1 to 2 hours (up to 4 if humidity is borderline).
- Verify room temperature is in a reasonable range for your model. If you are below about 60 to 65°F, expect less water and more defrost on many units.
- Check placement and clearance so air can circulate.
- Clean the filter and confirm strong airflow.
- Check for ice, thaw if needed, then fix the cause.
- Clean coils gently.
- Watch for defrost behavior and reduce icing triggers.
- Reseat the bucket and confirm any drain hose runs downhill.
- If all of the above are good, consider sealed-system failure and weigh replacement.
When to call a pro
Call a technician if you suspect a compressor, capacitor, control board, sensor, or sealed-system refrigerant issue, especially if the unit is still under warranty. If it is not under warranty and it is a standard portable unit, get an estimate first and compare it to the price of a replacement that matches your room temperature and moisture load.
About Marcus Vance
Content Creator @ Grit & Home
Marcus Vance is a lifelong DIY enthusiast and self-taught home renovator who has spent the last decade transforming a dilapidated 1970s ranch into his family's dream home. He specializes in budget-friendly carpentry, room-by-room renovations, and demystifying power tools for beginners. Through his writing, Marcus shares practical tutorials and hard-learned lessons to help homeowners tackle their own projects with confidence.