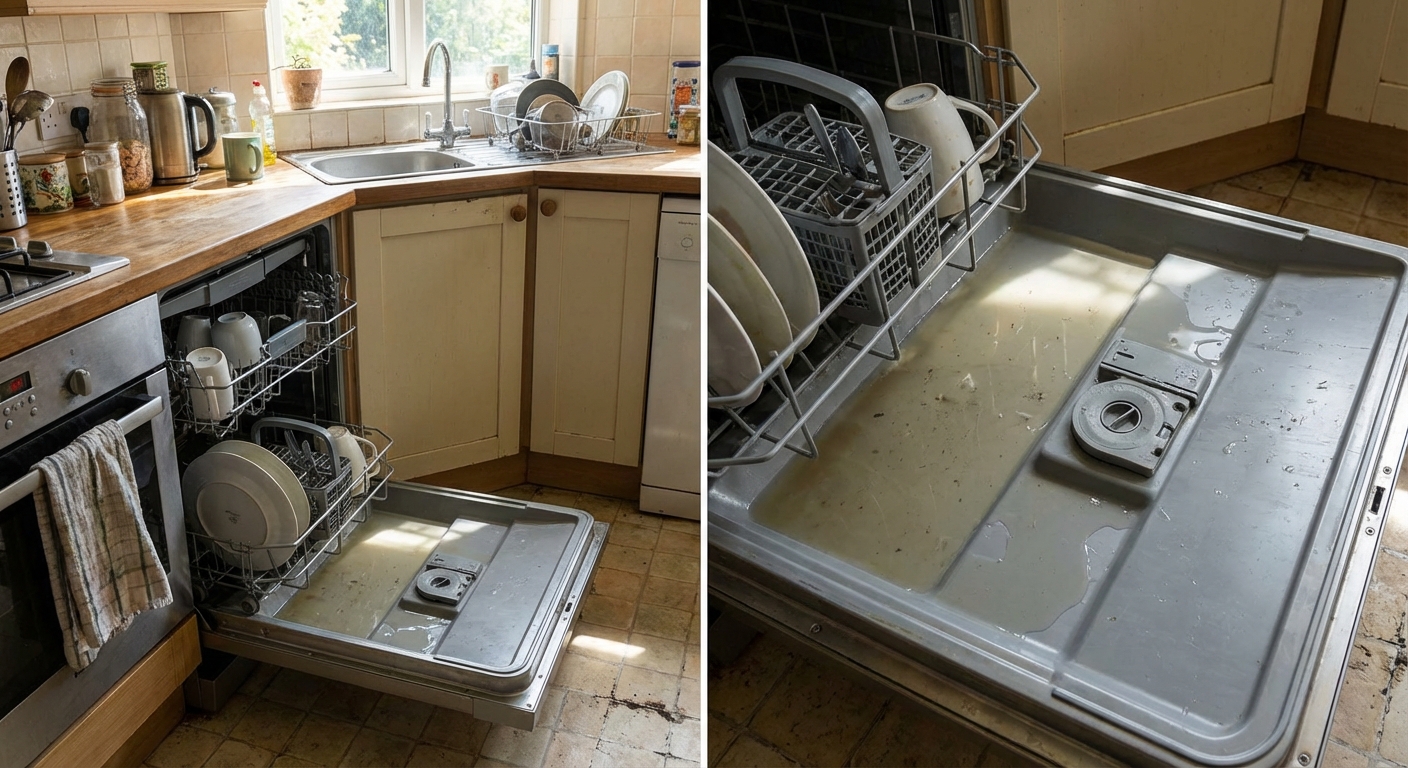
If you open the dishwasher after a cycle and find a little swamp at the bottom, you are not alone. In most homes, a dishwasher that will not drain comes down to one of a few everyday problems: a dirty filter area, a blocked hose, an air gap clogged with gunk, a disposal connection issue, a stuck check valve, or a tired drain pump.
I have learned the hard way that the best approach is simple and methodical. Start with the easy, no-parts checks first. You can often fix it in under an hour with nothing more than a towel, a screwdriver, and a little patience.
Tools to grab
- Towel and a shallow pan or bowl
- Screwdriver
- Pliers (for hose clamps)
- Soft brush or old toothbrush
- Optional but awesome: a wet/dry shop-vac
Safety first
- Kill power: Turn off the dishwasher at the breaker or unplug it under the sink if it is plugged in. Do not rely on the door switch.
- Protect your floor: Put a towel down in front of the dishwasher and keep a shallow pan nearby.
- Remove standing water: Use a cup, turkey baster, sponge, or a shop-vac so you can see what you are doing.
Quick note: A small amount of clean water in the sump area can be normal on many models. What we are talking about here is obvious standing water that smells, looks cloudy, or rises above the filter area.
Also: Never reach into a garbage disposal unless you have turned off power at the breaker first.
How draining works
Near the end of the cycle, the dishwasher drain pump pushes water out through the drain hose. That hose usually connects to either:
- A garbage disposal (most common), or
- A sink drain tailpiece (the straight drain pipe under the sink).
Along the way, many dishwashers also use a small check valve (often a rubber flapper) to keep dirty water from flowing back into the tub after the pump shuts off. If anything blocks the path, or if the pump cannot spin, the water stays put or comes right back.
Fix 1: Clean the filter area
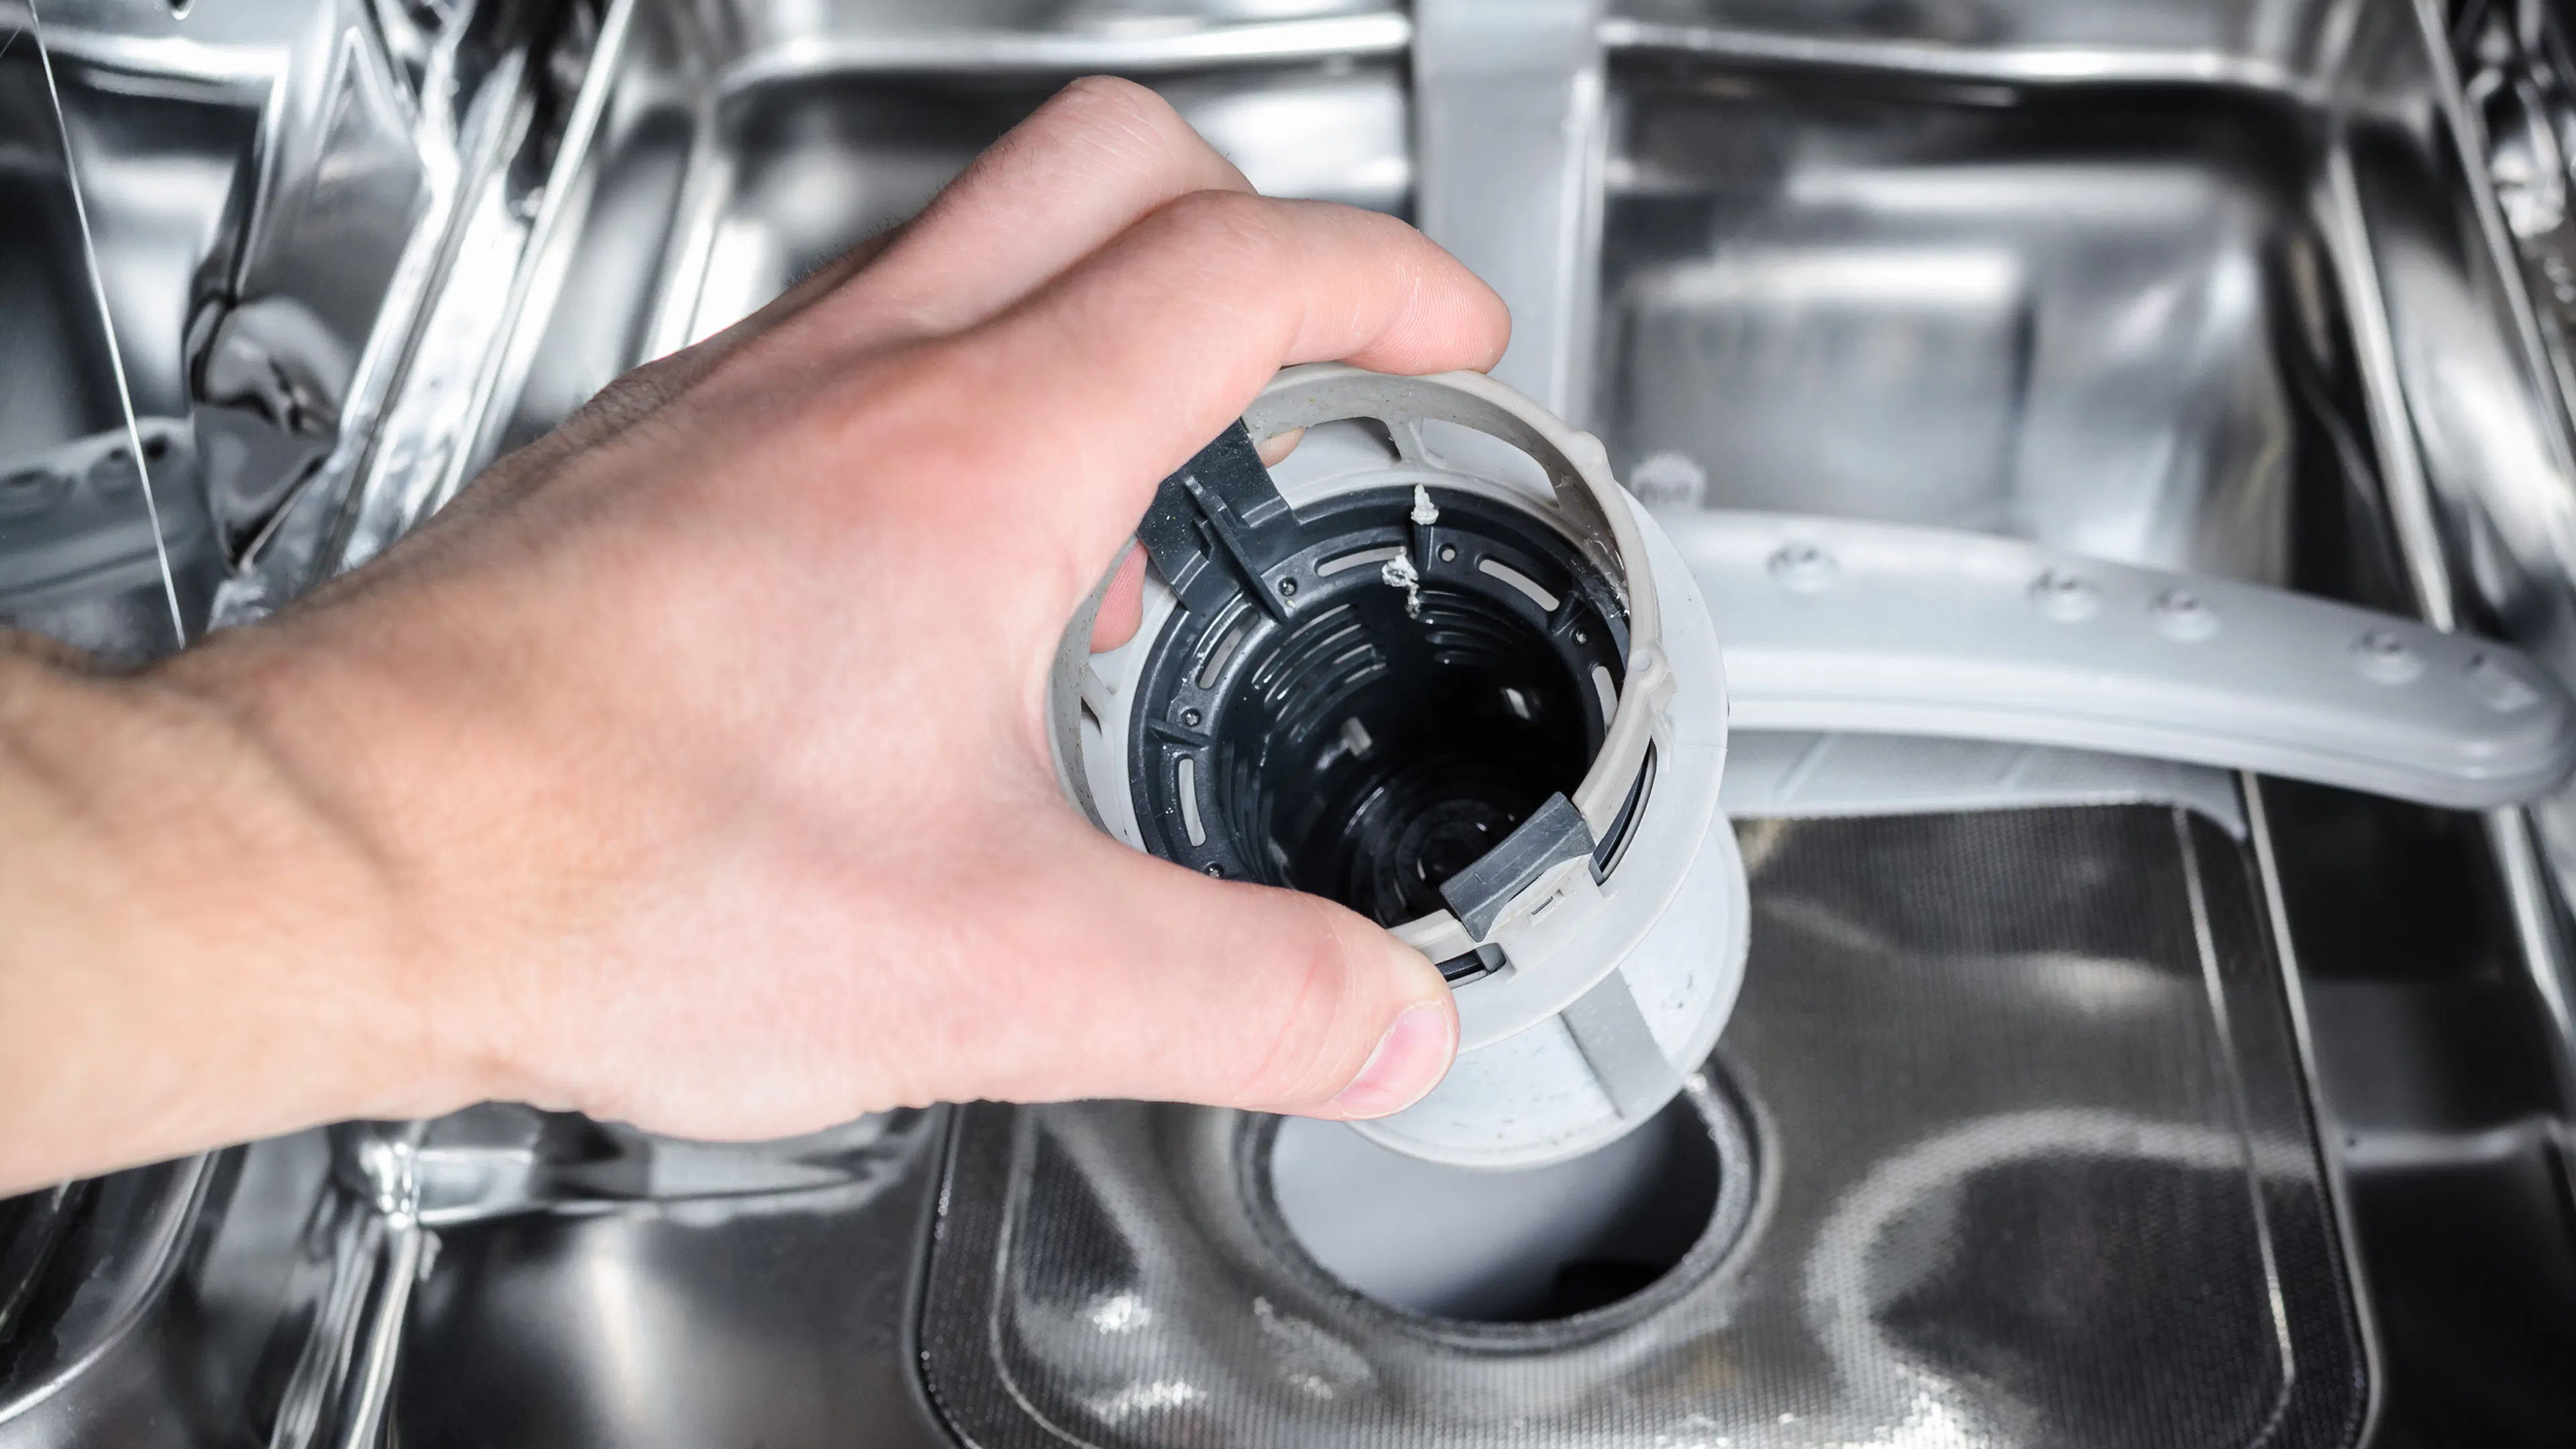
This is the number one cause in my experience, especially in homes that do not rinse dishes much (which is most of us). A dirty filter and sump area can restrict water flow, trap debris, and turn food bits into a paste that settles right where the machine needs to move water out.
What to do
- Pull out the bottom rack.
- Locate the filter assembly at the bottom (usually a round twist-lock piece).
- Twist and lift the filter out. Some models have a second flat screen underneath.
- Rinse under hot water. Use a soft brush or old toothbrush for the mesh.
- Wipe the sump area beneath the filter. Feel around for glass shards, labels, or bone fragments.
- Reinstall the filter snugly. A loose filter can let debris wander into places it does not belong.
Pro tip from my own mistake
I once reinstalled the filter crooked after a late-night cleanup and the dishwasher sounded grindy the next day. If it does not seat easily, pull it back out and try again. Forcing it usually makes things worse.
If that did not change anything, move under the sink.
Fix 2: Check the drain hose
If the filter area is clean and you still have standing water, head under the sink. The drain hose can kink from being shoved back during an installation, clog with grease and food sludge, or route in a way that encourages backflow.
What to look for
- Kinks or crushing: Any sharp bend can slow drainage dramatically.
- Clog at the connection: Gunk often collects right at the disposal or tailpiece nipple.
- Hose pushed on too far: On some disposals, shoving the hose too far onto the inlet can press it against an internal baffle and restrict flow.
- Clamp placement: The clamp should be snug and positioned over the inlet barb so the hose cannot slip or leak.
- High loop: The hose should loop up as high as possible under the counter before it drops to the drain connection. This helps prevent dirty sink water from flowing back into the dishwasher.
Code note: Some areas require a countertop air gap. A high loop is an alternative only where allowed. When in doubt, follow your local plumbing code.
What to do
- Put a towel and a shallow pan under the hose connection.
- Loosen the hose clamp at the disposal or tailpiece and slide the hose off.
- Check the hose opening for a plug of debris. Clean it out with a small bottle brush or a screwdriver handle wrapped in a rag.
- If you suspect the hose is clogged further back, flush it with hot tap water (not boiling) after disconnecting it, and be ready for spills.
Shop-vac tip: If you have a wet/dry shop-vac, you can hold it firmly to the end of the drain hose (or to the air gap outlet hose) to suck out stubborn sludge. It is surprisingly effective.
Thrifty note: If the hose is old, smelly, brittle, or permanently kinked, replacement is often cheaper than fighting it.
Fix 3: Clear the air gap
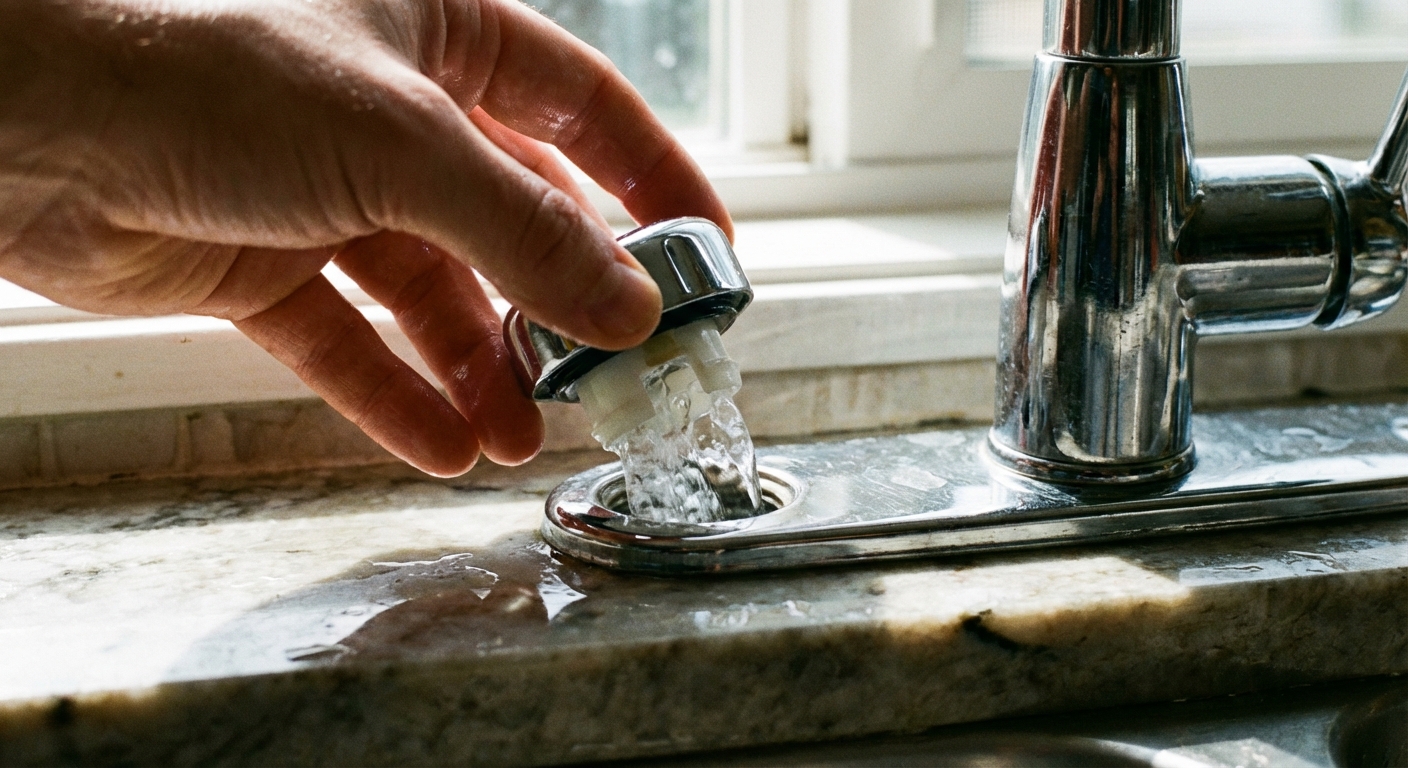
Some kitchens have a small cylinder mounted on the sink or countertop near the faucet. That is the dishwasher air gap. When it clogs, water may back up into the dishwasher or spill onto the sink during draining.
Signs it is clogged
- Water spills out of the air gap onto the sink during the drain cycle.
- Dishwasher drains slowly and you notice gurgling at the sink.
How to clear it
- Remove the air gap cap. Many pull straight up, some twist off.
- Look inside for debris. Clean it with a small brush and rinse.
- If there is a removable inner cover, pop it out and clean underneath.
- Check the hose from the air gap to the disposal or tailpiece for a clog or kink.
If you do not have an air gap, skip this step and focus on the high loop under the counter and the drain hose connection.
Fix 4: Check the disposal plug
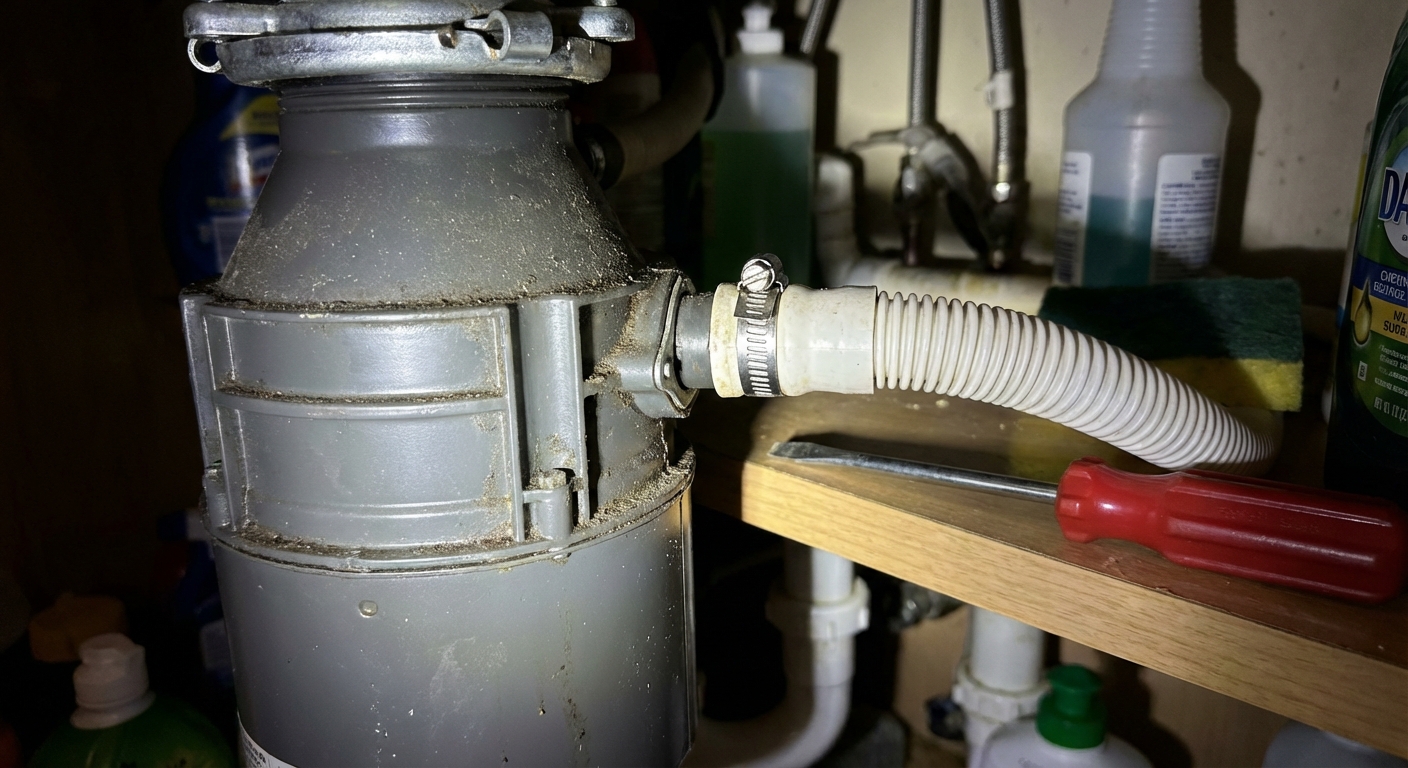
This one gets a lot of people after a new disposal install. Most disposals ship with a solid plastic knockout plug blocking the dishwasher inlet. If you connect the dishwasher hose without removing that plug, the dishwasher cannot drain at all.
When to suspect this
- The disposal is new or was recently replaced.
- The dishwasher suddenly stopped draining right after plumbing work.
How to fix it
- Turn off power to the disposal at the breaker (important).
- Remove the dishwasher drain hose from the disposal inlet.
- Look into the inlet. If you see a solid plastic disk, the knockout plug is still in place.
- Put a towel underneath. Use a screwdriver and tap the plug inward with a hammer.
- Reach into the disposal (power off) and remove the loose plug piece so it does not rattle around.
- Reconnect the hose and clamp.
Important: Do not run the disposal to clear it out until you are sure the plug piece is removed.
Fix 5: Check the check valve
If the dishwasher seems to drain, but water returns later (or you keep getting dirty water back in the bottom), a stuck or blocked check valve may be the reason. This is often a small rubber flapper near the drain outlet or pump housing that is designed to prevent backflow.
What to do
- Turn off power.
- Remove the filter and inspect the sump area for debris that could be interfering with a flapper-style valve.
- If your model allows access, check that the flapper moves freely and is not pinned open by a label, toothpick, or food chunk.
- If you cannot see it from inside the tub, check your manual for the check valve location for your exact model.
If you cleared obvious debris and nothing changes, the pump is next.
Fix 6: Test the drain pump

If the filter area, hose, and disposal connection are clear but the dishwasher still will not drain, the drain pump (or something controlling it) is the next suspect. Sometimes the pump is fine but jammed by a label, glass, or a stray piece of food that made it past the filter.
Simple checks you can do
- Listen during the drain portion: If you hear a low hum but no water movement, the pump may be jammed or failing.
- Look for obstructions: With power off, remove the filter and inspect the sump area carefully for debris.
- Check the impeller area: Some models allow access to the pump cover from inside the tub by removing a few screws. If you are comfortable, remove the cover and check if the impeller spins freely. If it is jammed, clear the obstruction.
If there is no sound
If you hear nothing at all during the drain portion (and you know the unit has power), it could still be the pump, but it can also be a wiring issue, a control problem, a door latch logic issue, a float switch, or another safety interlock depending on the design. This is where the manual and any error codes matter.
Replacing a drain pump is doable for many DIYers, but the steps vary widely by brand and model. If your machine is still under warranty, this is a good point to pause before you open up the bottom.
Fast troubleshooting order
- Remove standing water so you can inspect properly (shop-vac if you have one).
- Clean filter and sump area.
- Confirm the sink and disposal are draining well (a disposal can be partially clogged even if the sink seems mostly fine).
- Check drain hose: kinks, high loop, clogs at the connection, clamp and routing.
- Clear air gap (if present).
- Verify disposal knockout plug is removed (if draining into disposal).
- Check the dishwasher check valve for backflow issues.
- Inspect and test drain pump (and consider control or wiring if the pump is silent).
What not to do
- Do not pour chemical drain cleaners into the dishwasher or the dishwasher drain hose. They can damage parts and create a nasty hazard when you disconnect hoses.
- Do not run the dishwasher with the filter removed. That is a fast way to feed debris straight into the pump area.
- Do not reach into the garbage disposal without confirming power is off at the breaker.
When to call a technician
I am all for saving money, but I am also all for sleeping at night without wondering if a slow leak is soaking the cabinet floor. Call a pro if you see any of the following:
- Water under the dishwasher or wet insulation on the unit’s bottom panel.
- Electrical smell, tripped breaker, or burning odor during a cycle.
- Error codes that return immediately after basic cleaning and hose checks (write the code down and check the manual).
- Repeated pump failures or the unit is noisy enough that it sounds like gravel.
- You are not comfortable pulling the dishwasher out or accessing components underneath.
Good news: If you have already cleaned the filter and checked the hose routing, you can tell the tech exactly what you tried. That often shortens the visit and can save you money.
Habits that prevent clogs
- Clean the filter monthly if you run the dishwasher often (or check your manual if you have a self-cleaning filter system).
- Scrape plates well, especially rice, pasta, and fibrous veggies.
- Run hot water at the sink for 20 to 30 seconds before starting the cycle if your kitchen is far from the water heater.
- Use a normal cycle more often than quick cycles. Quick cycles can leave more debris behind.
- If a cycle was interrupted or canceled, run a drain or cancel-drain function if your model has it, since some units will stop and hold water when they error out.
If you have worked through these fixes and still have standing water, check your manual for model-specific drain paths and error codes, or contact the manufacturer with your brand and model number. That little detail usually points straight to the problem.
About Marcus Vance
Content Creator @ Grit & Home
Marcus Vance is a lifelong DIY enthusiast and self-taught home renovator who has spent the last decade transforming a dilapidated 1970s ranch into his family's dream home. He specializes in budget-friendly carpentry, room-by-room renovations, and demystifying power tools for beginners. Through his writing, Marcus shares practical tutorials and hard-learned lessons to help homeowners tackle their own projects with confidence.