A dripping bathroom faucet is one of those tiny annoyances that somehow gets louder at night. The good news is leaks often come down to one worn part (or one worn part plus a little grit on the sealing surfaces), and you can usually fix it with basic tools and a small repair kit. I have replaced enough cartridges and rubber washers in my 1970s ranch to know this: if you go slow, take a couple photos as you disassemble, and keep parts in order, you can absolutely handle this.
Below is my no-panic, under-30-minute method that works for the most common faucet styles.
Before you start
What this guide covers
- How to identify your faucet (single-handle, two-handle, or widespread)
- How to shut off water safely
- How to replace the usual suspects: cartridge, washers, O-rings, and seats
- How to test and fine-tune so the leak stays gone
30-minute reality check
If your shutoff valves under the sink turn easily and you have the right replacement part on hand, this is typically a 15 to 30 minute job. If the valves are stuck, corroded, or the faucet is an oddball brand with hard-to-find parts, budget a little more time.
Safety and prep
- Plug the drain (or cover it with a rag). Tiny screws love to disappear.
- Stuff a small rag into the overflow opening too if your sink has one. It helps catch runaway parts.
- Put a towel in the sink to protect the finish and catch parts.
- After you shut the water off, open the faucet to drain residual water and relieve pressure.
- Take a quick photo before each part comes off. Your future self will thank you.
- Optional but smart: wear eye protection when pulling retaining clips or springs.
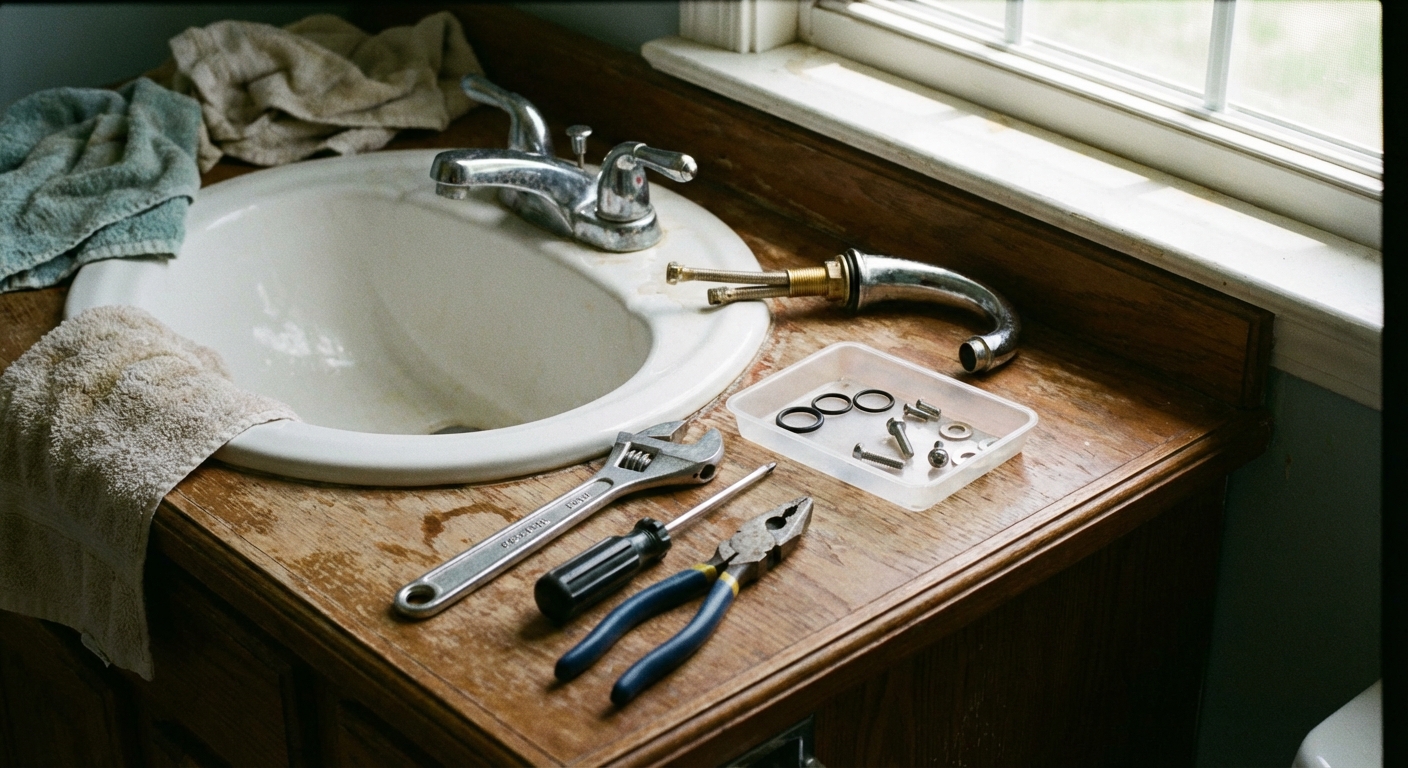
Tools and supplies
Tools
- Adjustable wrench or channel-lock pliers
- Phillips and flathead screwdrivers
- Hex key (Allen wrench), commonly 3/32 in or 1/8 in (or 2.5 mm or 3 mm) for handle set screws
- Needle-nose pliers (helpful for clips and O-rings)
- Utility knife (for gently scoring old caulk around an escutcheon if needed)
- Flashlight
- Optional: cartridge puller (if the cartridge is really stuck)
Supplies
- Replacement cartridge OR a faucet repair kit (washers, seats, O-rings) matched to your faucet
- Silicone plumber’s grease (not petroleum jelly)
- White vinegar (for mineral buildup)
- Old toothbrush (perfect for scrubbing mineral scale)
- Small bowl or parts tray
- Optional: plumber’s tape (Teflon tape) for tapered pipe-thread connections only, not for compression fittings or gasketed braided supply lines

Step 1: Identify your faucet
You do not need the exact model number to start, but you do need to know the general style. That tells you what part usually fails.
Common faucet types
- Single-handle faucet: One lever controls both temperature and flow. Most leaks are from a worn cartridge or O-rings.
- Two-handle faucet: Separate hot and cold handles. Some are older compression-style (washers and seats). Many newer ones are quarter-turn and use ceramic disc cartridges that you replace as a unit.
- Widespread faucet: Two handles spaced apart with a separate spout. Internals usually match a two-handle setup, just arranged differently under the sink.
Quick clue: If the drip stops when you barely nudge the handle tighter, the sealing surfaces are worn or dirty. If the faucet squeals or feels gritty, mineral buildup is often involved too.
Step 2: Turn off the water
- Locate the shutoff valves under the sink (hot on the left, cold on the right in most homes).
- Turn both valves clockwise until they stop.
- Open the faucet to relieve pressure and confirm the water is off.
If your shutoffs are stuck
Do not force them like you are opening a pickle jar. Old valves can snap or start leaking. Try a gentle wiggle back and forth. If they will not move, shut off the main water for the house and plan to replace those valves soon.

Step 3: Find the leak
These are the two most common leak locations, and they usually tell you what to replace.
Drip from the spout tip
This is the classic “drip... drip... drip” into the sink. It usually means a worn cartridge (single-handle) or a worn washer and seat (two-handle). Debris on the sealing surface can cause this too, so cleaning helps.
Leak from under the handle
If water shows up around the base of the handle when the faucet is on, that points to worn O-rings, a loose packing nut, or a cracked cartridge housing.
Leak at the spout base
If water pools around where the spout meets the faucet deck (especially on widespread faucets), it is often spout O-rings. That is usually a separate, simpler fix than a dripping spout tip.
Step 4: Remove the handle
This part looks intimidating the first time. It is usually just one hidden screw.
- Find the set screw (often on the back or underside of the handle). It may be under a small cap you can pop off with a flathead screwdriver.
- Loosen the set screw with an Allen key or screwdriver.
- Lift the handle straight up. If it is stuck, wiggle gently. If mineral buildup has glued it in place, a little vinegar on a rag around the base can help.
My most common mistake: I used to pry too aggressively and chip finishes. If a handle is stuck, patience beats leverage.
Step 5A: Single-handle faucet
If you have one handle, the cartridge is the usual culprit. Cartridges wear out, and hard water speeds that up.
- Remove any decorative sleeve or escutcheon plate if it blocks access.
- Look for a retaining nut (unscrews) or a retaining clip (pulls out with pliers). Remove it.
- Pull the cartridge straight out. Some twist out, some pull. If it is stubborn, rock it gently side to side. If it is really stuck, this is where a cartridge puller earns its keep.
- Inspect and clean the valve body. Wipe out grit and mineral scale (vinegar plus a toothbrush works great).
- Lightly coat new O-rings with silicone plumber’s grease.
- Insert the new cartridge in the same orientation as the old one. Line up tabs and notches.
- Reinstall the clip or nut, then reassemble the handle.
Buying the right cartridge
Bring the old cartridge to the hardware store. Matching by sight is faster than guessing brand names. If you see a logo on the faucet, snap a photo too.

Step 5B: Two-handle faucet
Two-handle faucets come in two common “guts” styles. The fix depends on which one you have.
If you see a stem with a rubber washer
This is the classic compression-style setup. A worn washer (and sometimes a worn seat) causes the spout to drip.
- Remove the handle (same method as above).
- Use an adjustable wrench to loosen the packing nut or bonnet nut under the handle.
- Pull out the stem assembly.
- Check the bottom of the stem for a rubber washer held by a screw. Replace the washer.
- Inspect the seat inside the faucet body. If it is pitted or rough, replace it (many seats unscrew with a seat wrench). If the seat is pressed in and not removable, that can mean the practical fix is replacing the faucet or valve body.
- Replace any worn O-rings on the stem and grease them lightly with silicone grease.
- Reinstall the stem, snug the nut, and reassemble.
If you do not see a rubber washer
Many newer two-handle faucets are quarter-turn and use ceramic disc cartridges. In that case, you usually remove a retaining nut or clip, pull the cartridge out, and replace it as a unit. If you opened it up expecting a washer and found a cartridge instead, you are not doing anything wrong. You just have a modern style.
When to replace the whole stem
If the stem is heavily corroded, or the threads are chewed up, replacing the entire stem assembly is often easier and more reliable than piecing it together.

Step 6: Turn water on and test
- Make sure the handle is installed and the faucet is in the off position.
- Turn the shutoff valves back on slowly (counterclockwise).
- Run the faucet for 30 seconds, hot and cold, and check for leaks at the spout tip, under the handle, and under the sink around supply lines and shutoff valves. Be careful with hot water while testing.
If it still drips
- Cartridge not seated: Shut water off and confirm it is fully inserted and aligned.
- Wrong part: Cartridges can look similar. Compare the old and new closely.
- Damaged seat (compression two-handle): A new washer will not seal against a pitted seat.
- Debris in the valve: A tiny grain of grit can prevent a good seal. Clean and reassemble.
Fast troubleshooting
- Drip only on cold: Cold-side washer, seat, or cartridge is worn (or has debris).
- Drip only on hot: Hot-side washer, seat, or cartridge is worn (or has debris).
- Drip gets worse when you run water: Seat or cartridge sealing surface is likely damaged, or debris is stuck.
- Leak at handle when on: O-ring issue, loose packing nut, or cracked cartridge housing.
- Water at spout base: Spout O-rings (common on widespread faucets).
- Handle hard to turn: Mineral buildup. Clean parts with vinegar, then grease O-rings.
My thrifty parts strategy
If you are trying to keep costs down, do this in order:
- Two-handle faucet: If it is compression-style, start with a washer and O-ring kit. Cheap and often solves it.
- Two-handle faucet: If it is quarter-turn/ceramic, plan on a cartridge per handle.
- Single-handle faucet: Plan on a cartridge. It costs more than a washer, but it is usually the right fix.
- Only replace the whole faucet if the body is cracked, badly corroded, or parts are discontinued and you are stuck.
When to call a plumber
DIY is great, but here are the moments I stop and bring in backup:
- Shutoff valves will not close and you are not comfortable shutting off the main
- Water is leaking inside the cabinet and you cannot pinpoint the source
- The faucet or valve body is cracked
- You have galvanized pipes or very old plumbing that is starting to crumble when touched
- Your faucet has a pressed-in seat that cannot be replaced and the drip will not stop
Quick checklist
- Plug drain and cover overflow
- Shut off hot and cold valves
- Open faucet to drain residual water
- Remove handle and retaining hardware
- Replace cartridge or washer, seat, O-rings (as your faucet style requires)
- Grease O-rings with silicone grease
- Reassemble and turn water on slowly
- Test for leaks at spout tip, spout base, and handle
If you want, tell me whether your faucet has one handle or two and whether the leak is from the spout tip, the spout base, or the handle. I can help you zero in on the exact part to buy before you make a hardware store run.
About Marcus Vance
Content Creator @ Grit & Home
Marcus Vance is a lifelong DIY enthusiast and self-taught home renovator who has spent the last decade transforming a dilapidated 1970s ranch into his family's dream home. He specializes in budget-friendly carpentry, room-by-room renovations, and demystifying power tools for beginners. Through his writing, Marcus shares practical tutorials and hard-learned lessons to help homeowners tackle their own projects with confidence.