When a freezer ices up, it is most often because warm, moist air is getting in and then freezing on the coldest surfaces. Sometimes it is as simple as a door not sealing. Other times it is a failed defrost component that is letting frost build up until airflow gets choked off. Less commonly, a weak or restricted fan, a stuck air damper (on some designs), or even certain sealed-system issues can create strange frost patterns too.
I have dealt with this in my own garage freezer, and the big lesson is this: fix the cause first, then defrost. If you only chip out the ice, it will be back in a week.
Quick symptoms and what they usually mean
- Frost mainly around the door opening: gasket leak, door alignment issue, or door being left cracked.
- Snowy frost on the back wall (inside) and warm fridge section: blocked evaporator airflow, evaporator fan problem, or defrost system problem.
- Ice sheet on the freezer floor: defrost drain blocked (common on fridge-freezer combos).
- Frost builds up fast after grocery day: lots of door opening, warm food, or frequent restocking.
Before you start: safety and a quick check
What to do first
- Unplug the unit before opening panels or messing with wiring.
- Turn off the ice maker if you have one.
- Check the temperature settings: freezers are typically happiest around 0°F (-18°C). Setting it colder does not create moisture on its own, but it can make frost buildup look worse if humid air is already getting in, because the unit may run longer and keep surfaces colder.
- Listen for the evaporator fan (often inside the freezer): on many models, if you open the door and press the door switch, you should hear it. If you do not, it may be normal for that model or that moment in the cycle, so check your manual, but a failed fan can definitely mimic an icing problem.
If you smell electrical burning, see damaged wiring, or your breaker trips, stop and call a pro.
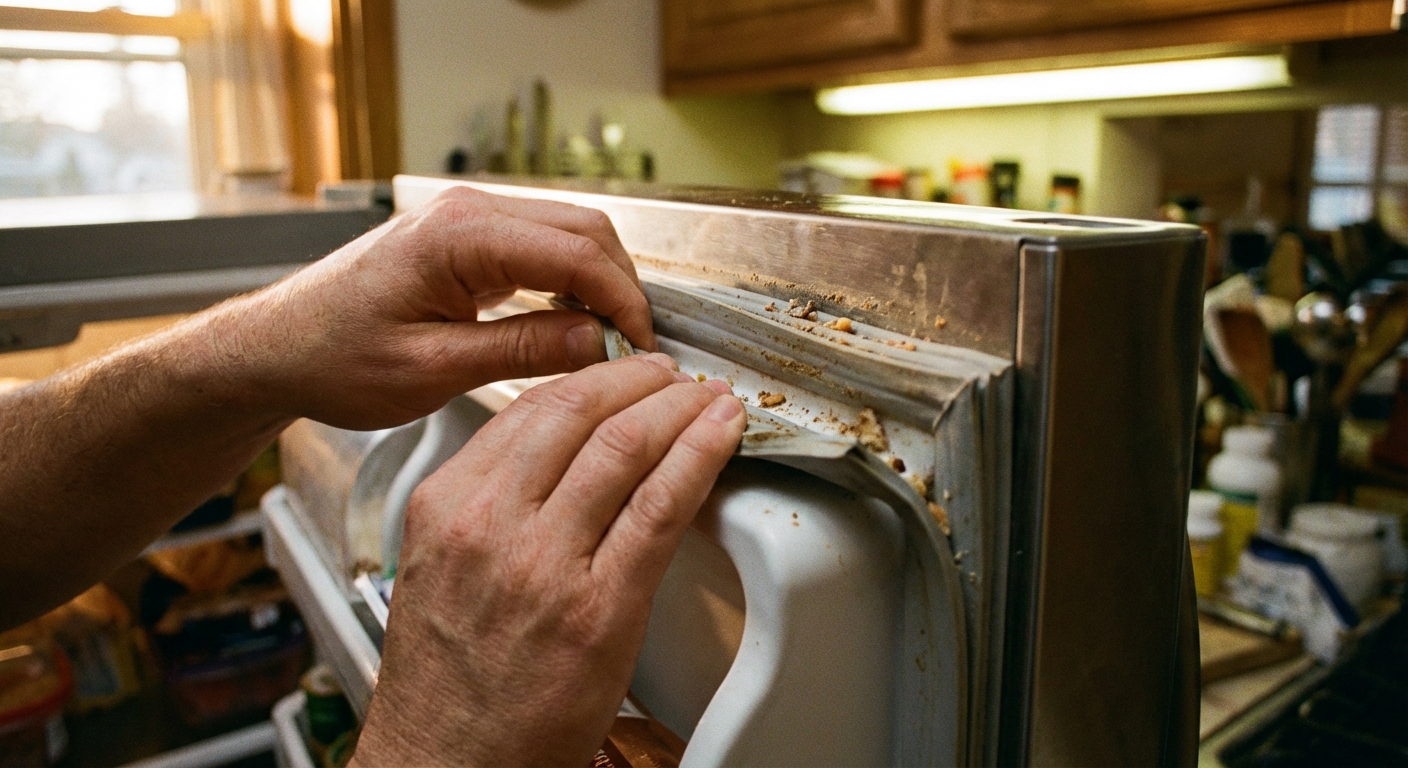
Most common cause: a leaky door gasket
A bad seal is the number one reason I see for frost near the front of the freezer. Warm air sneaks in, moisture condenses, and you get that crunchy frost line that keeps growing.
How to test the seal (the paper test)
- Close the freezer door on a strip of paper (or a dollar bill).
- Gently pull it out.
- Good seal: noticeable resistance.
- Bad seal: the paper slides out easily, especially in one corner.
Fixes to try before buying a gasket
- Clean the gasket: warm soapy water and a toothbrush for the folds. Dried syrup and crumbs can hold it open.
- Warm and reshape: if the gasket is stiff or kinked, carefully warm it with a hair dryer on low, then press it flat and let it cool in position.
- Check door alignment: overloaded door bins or a sagging door can prevent a full seal. Tighten hinge screws if they are loose.
- Remove obstructions: a bin, pizza box, or ice bucket slightly out of position can keep the door from closing fully.
- Check leveling: if the fridge is not level, some doors will not self-close consistently. A small tilt back (follow your manual) often helps the door settle and seal.
When you should replace the gasket
- Cracks, tears, or missing chunks
- Gasket is hardened and will not rebound
- Repeated leaks after cleaning and reshaping
Tip from my own mistakes: order using your exact model number. “Close enough” gaskets often seal like “close enough” roofing, which is to say not at all.
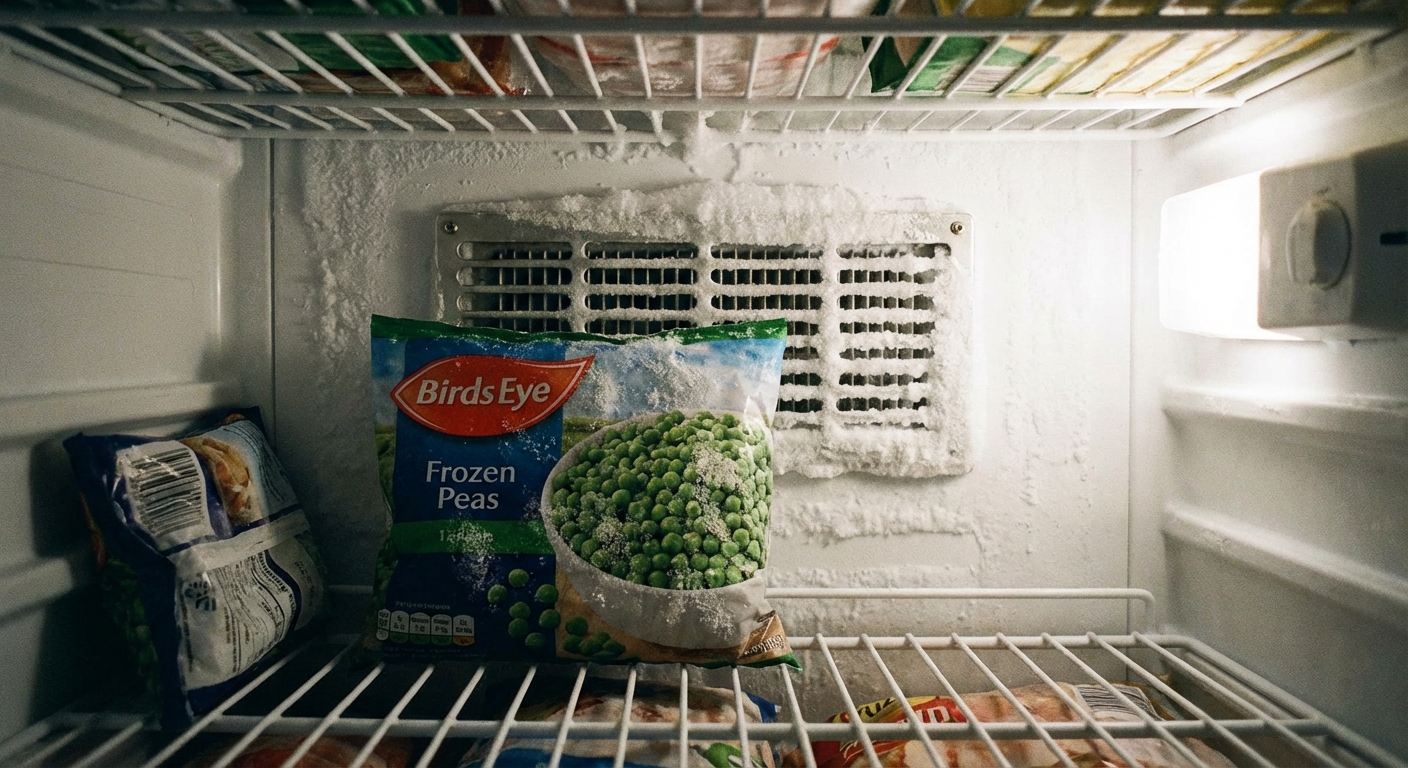
Blocked vents and airflow issues
Many units circulate cold air through vents between the freezer and fridge sections, and through channels inside the freezer. If those vents get blocked by food packages, ice forms around the restriction and the problem snowballs. A weak or failed evaporator fan can also leave cold air stuck in the wrong place, which sometimes looks like an icing problem and sometimes causes the fridge side to warm up.
What to check
- Inside the freezer: do not pack items tight against the back wall. Leave a little breathing room.
- Vent grilles: look for frost-packed louvers that reduce airflow.
- Evaporator cover area (rear interior panel): heavy frost behind that panel often points to a defrost failure, not just a packing issue.
- Air damper (some fridge-freezer designs): if the damper is stuck closed, the fridge warms. If it is stuck open, you can get odd cold spots and airflow problems. Access and checks vary a lot by model.
Defrost system problems
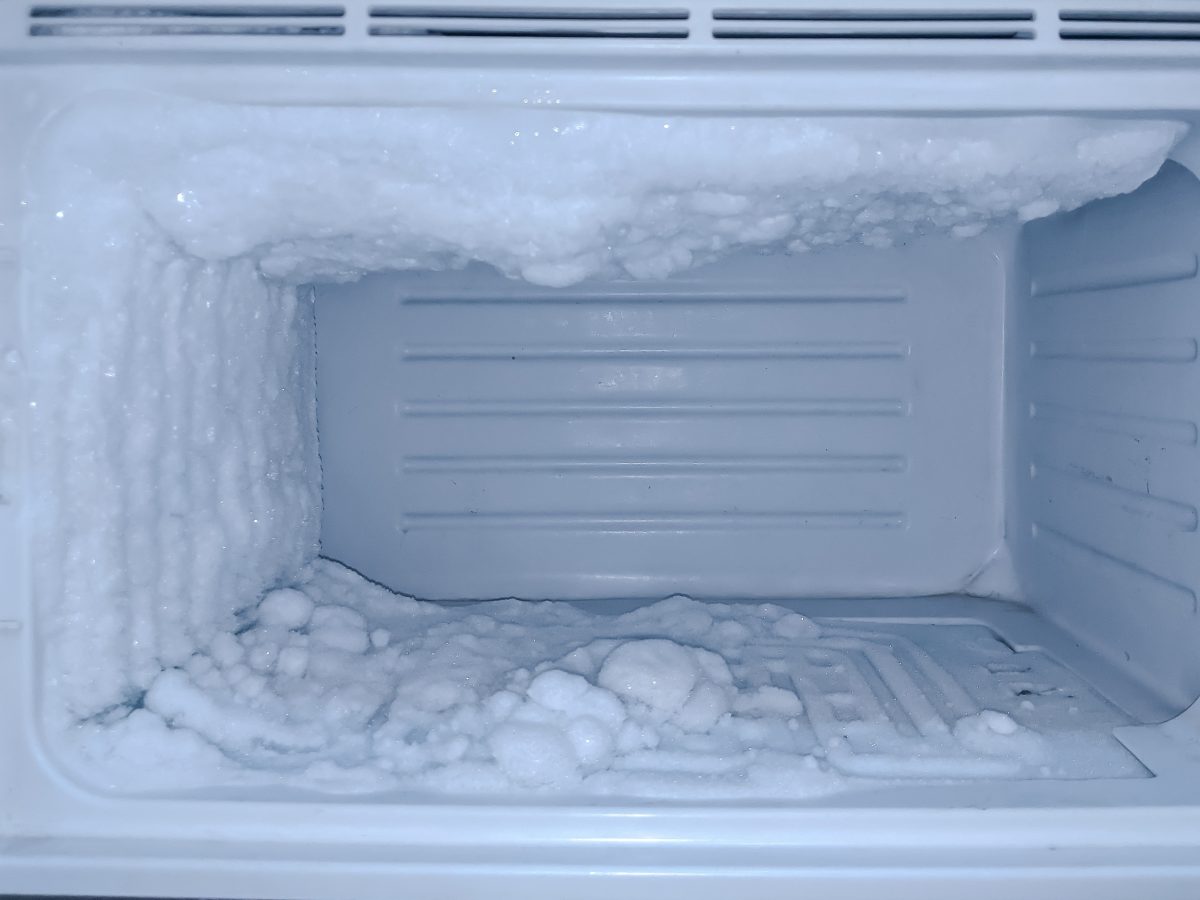
Frost is normal on the evaporator coils. Your freezer is designed to melt it off during defrost cycles. When that system fails, frost thickens until air cannot move well and temperatures fluctuate, often with a warm fridge section and a freezer that still seems cold.
Signs the defrost system is the issue
- Thick frost blanket on the back interior wall
- Freezer seems cold but fridge side gets warm
- Fan noise changes, or airflow from vents is weak
- Unit temporarily works better after you manually defrost
How the defrost system works
- Defrost heater: warms the evaporator coil to melt frost.
- Defrost thermostat (or sensor): tells the heater when to turn on or off based on temperature.
- Defrost timer or electronic control board: decides when to enter defrost mode.
DIY checks you can do
- Look behind the rear freezer panel (only if you are comfortable): if the evaporator area is a solid block of white frost, suspect defrost failure.
- Test the heater and thermostat with a multimeter: many heaters should show continuity when disconnected. Many bi-metal defrost thermostats show continuity when cold, but sensor types vary, so use your service manual when possible.
- Find a manual defrost timer (some older models): it may have a small dial you can turn with a flathead screwdriver to advance into defrost. If advancing it causes the heater to kick on, the timer may be failing to advance on its own.
Thrifty reality check: if your unit uses an electronic control board and you are not used to electrical diagnostics, this is a good point to call an appliance tech. Guessing gets expensive fast.
Frequent door opening and warm loads
Sometimes the freezer is fine and your habits are the culprit. Every door opening is a humid air refill. Add in warm leftovers or unfrozen groceries and you create moisture that has to go somewhere.
How to reduce moisture load
- Cool food before freezing: cover it, let it cool in the fridge first when appropriate.
- Group items: keep commonly grabbed items in one bin so you are not hunting with the door open.
- Check the door closes fully: some doors need a gentle push. Teach the household “close it until it seals.”
- Avoid overstuffing: packed tight means longer door open time and poorer circulation.
Garage and room conditions
If this is a garage freezer, check the manual for its rated operating range. High humidity can increase frost, and extreme garage temperatures can make performance unpredictable on some models.
Manual defrost: the safe method
If you already have heavy ice buildup, you will usually need to manually defrost once. This is also a great diagnostic step: if the freezer works great for a few days after a full defrost and then ices up again, it strongly suggests an air leak, airflow issue, or defrost system problem.
What you need
- Towels and a shallow pan
- Cooler (optional but helpful)
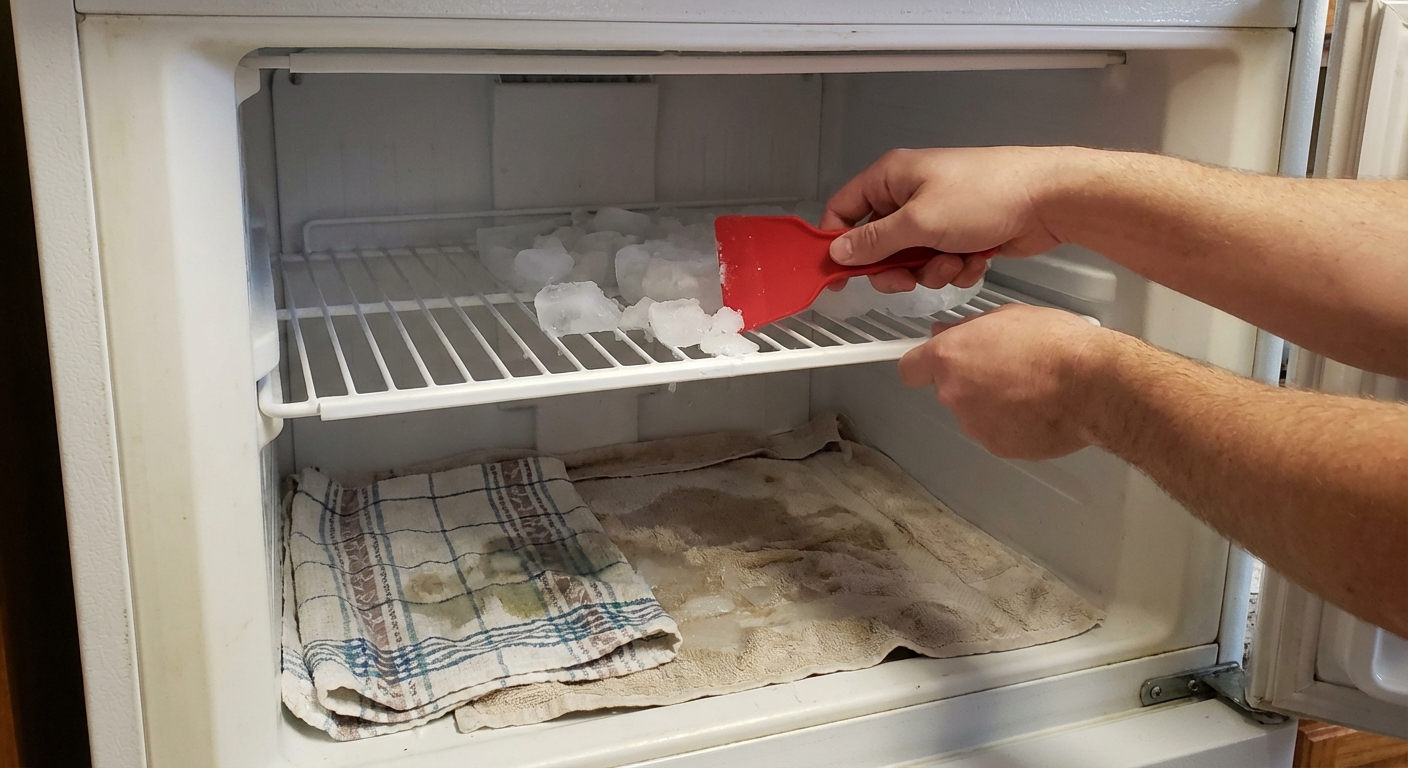
- Plastic scraper or an old plastic spatula
- Hair dryer (optional) or bowls of hot water
Step-by-step manual defrost
- Move food into a cooler, insulated bags, or your fridge. Keep the door shut as much as possible.
- Unplug the freezer or switch it off at the breaker if it is hardwired.
- Open the door and lay towels at the base to catch meltwater.
- Speed it up safely:
- Place bowls of hot water on a towel inside the freezer and close the door for 10 minutes at a time.
- Or use a hair dryer on low, held several inches away, moving constantly. Keep it away from standing water, plug into a GFCI outlet if possible, and do not overheat plastic liners or wiring covers.
- Remove loose ice with a plastic scraper as it releases.
- Dry everything thoroughly once ice is gone.
- Plug it back in and let it cool back down before reloading. Best practice is to wait until it is near 0°F (-18°C) (or the “ready” indicator turns off, if your model has one). On many units this takes a few hours, and longer if the room is warm.
What not to do
- Do not chip ice with a knife or screwdriver. It is extremely easy to puncture the evaporator coil, and that can mean a dead freezer.
- Do not use heat guns. Too hot, too risky for plastic liners and wiring.
If you see ice on the bottom: check the defrost drain
On many fridge-freezer units, defrost meltwater drains through a small hole and tube to a pan underneath. If that drain clogs, water refreezes and turns into a growing skating rink on the freezer floor.
Basic drain clear steps
- Unplug the fridge.
- Remove the lower freezer basket or panel as needed.
- Find the drain hole or trough under the evaporator area.
- Flush with warm water using a turkey baster or squeeze bottle.
- If it is stubborn, gently feed a zip tie or flexible plastic tubing down the drain to break up gunk. Avoid anything sharp or metal that could puncture the drain tube.
If you cannot access the drain without major disassembly, that is a fair moment to bring in a tech. Some designs make access surprisingly painful.
When to call a pro
- You suspect a control board issue and do not have diagnostic experience
- Wiring looks damaged or connectors are burned
- The evaporator coil is encased in ice repeatedly even after gasket and vent checks
- You hear hissing or see oily residue (possible sealed system problem)
My rule of thumb: I will happily replace a gasket and clear a drain. Once troubleshooting turns into “guess-and-buy electrical parts,” I slow down and consider a service call.
Prevent frost from coming back
- Wipe the gasket and door frame monthly
- Do a quick paper test on the seal when seasons change
- Keep vents clear and avoid packing against the back wall
- Let hot foods cool before freezing when safe
- Make sure the door fully closes every time
Fix the air leak, airflow issue, or the defrost problem, and your freezer should go back to being boring, which is exactly what you want from an appliance.
About Marcus Vance
Content Creator @ Grit & Home
Marcus Vance is a lifelong DIY enthusiast and self-taught home renovator who has spent the last decade transforming a dilapidated 1970s ranch into his family's dream home. He specializes in budget-friendly carpentry, room-by-room renovations, and demystifying power tools for beginners. Through his writing, Marcus shares practical tutorials and hard-learned lessons to help homeowners tackle their own projects with confidence.