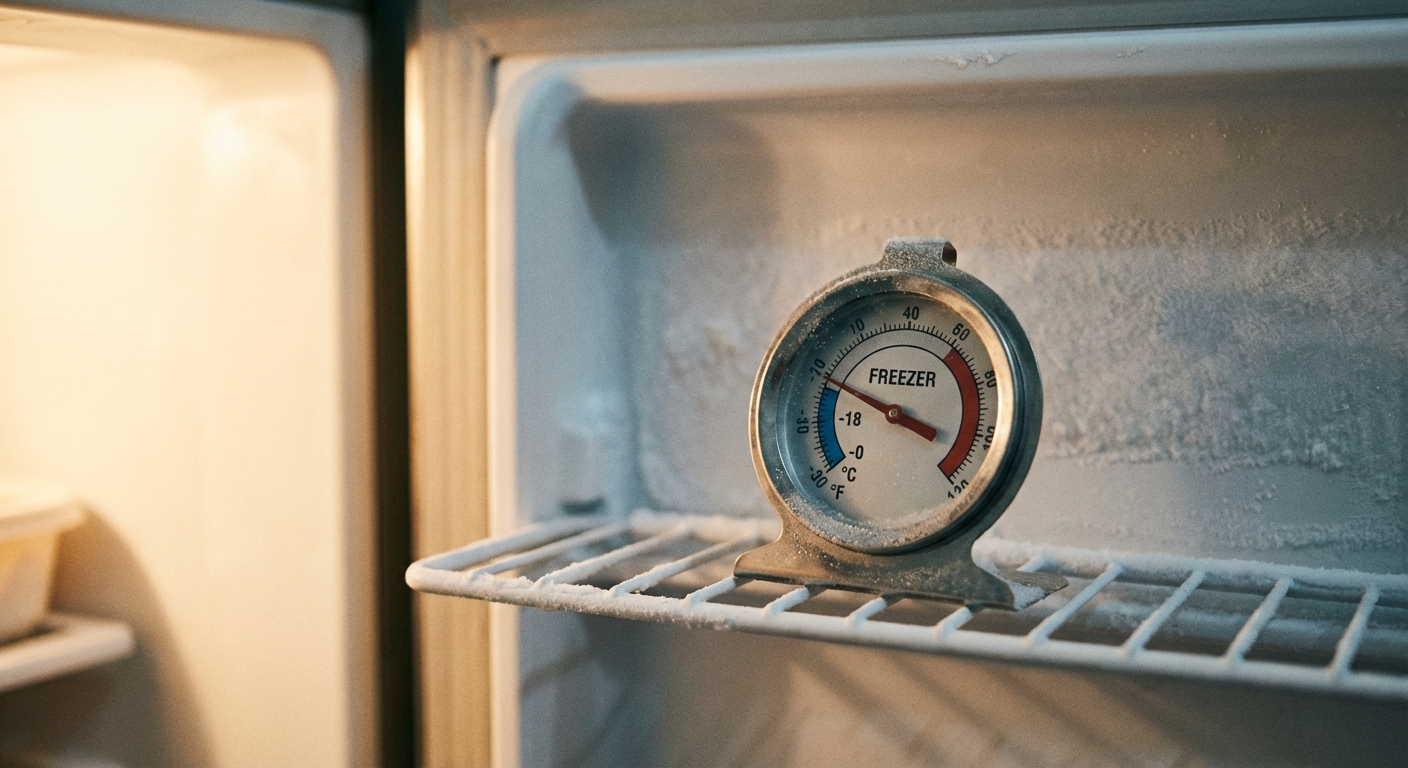
Before you start: confirm it is truly not freezing
When someone tells me their freezer “quit,” the first thing I do is slow down and verify the symptoms. A freezer can feel cold but still be too warm to safely hold food. Soft ice cream, sweating packages, or condensation on containers are all clues you are not at true freezer temps.
- Target temp: 0°F (minus 18°C).
- Best test: Put a freezer thermometer in the center of the freezer and leave it for several hours (ideally overnight) for a true steady reading. Read it quickly so you are not warming the box with a long door-open moment.
- Food safety note: If perishable foods have been above 40°F for 2+ hours, discard. If items are still hard frozen or still have ice crystals, they can often be safely refrozen.
If the temp is high (or rising), work through the fixes below from top to bottom. They go from easiest and most common to more involved.
Safety first
Unplug the appliance before removing panels or touching wiring. For fridge-freezer combos, unplugging the whole unit is the safest move. Wear work gloves around sharp sheet metal edges, and keep a towel handy. Melting frost turns into floor puddles fast.
Fix 0: Check power and placement
It is boring, but it is also fast and it catches a surprising number of “dead freezer” situations.
- Outlet power: Confirm the outlet works (plug in a lamp), check the breaker, and make sure a GFCI outlet has not tripped.
- No extension cords: If it is on one, remove it. Low voltage can cause weak starts and warm temps.
- Clearance: Make sure the back and bottom area can breathe. If the condenser area cannot shed heat, freezing suffers.
- Garage reality check: Some fridge-freezer combos struggle in cold garages because the fridge side never calls for cooling. If your garage is cold, look up whether your model is “garage-ready,” or test it indoors.
Fix 1: Clean dirty condenser coils
This is the classic “my freezer is warm” culprit, especially if you have pets. Condenser coils dump heat out of the system. When they are wrapped in dust, the freezer cannot get rid of heat efficiently, so everything runs longer and cools worse.
Where the coils are
- Fridge-freezer combo: Usually behind a toe-kick grille at the bottom front, or on the back.
- Upright freezer: Often on the back or underneath.
- Chest freezer: Frequently under the cabinet skin and not user-accessible, but the compressor area still collects dust.
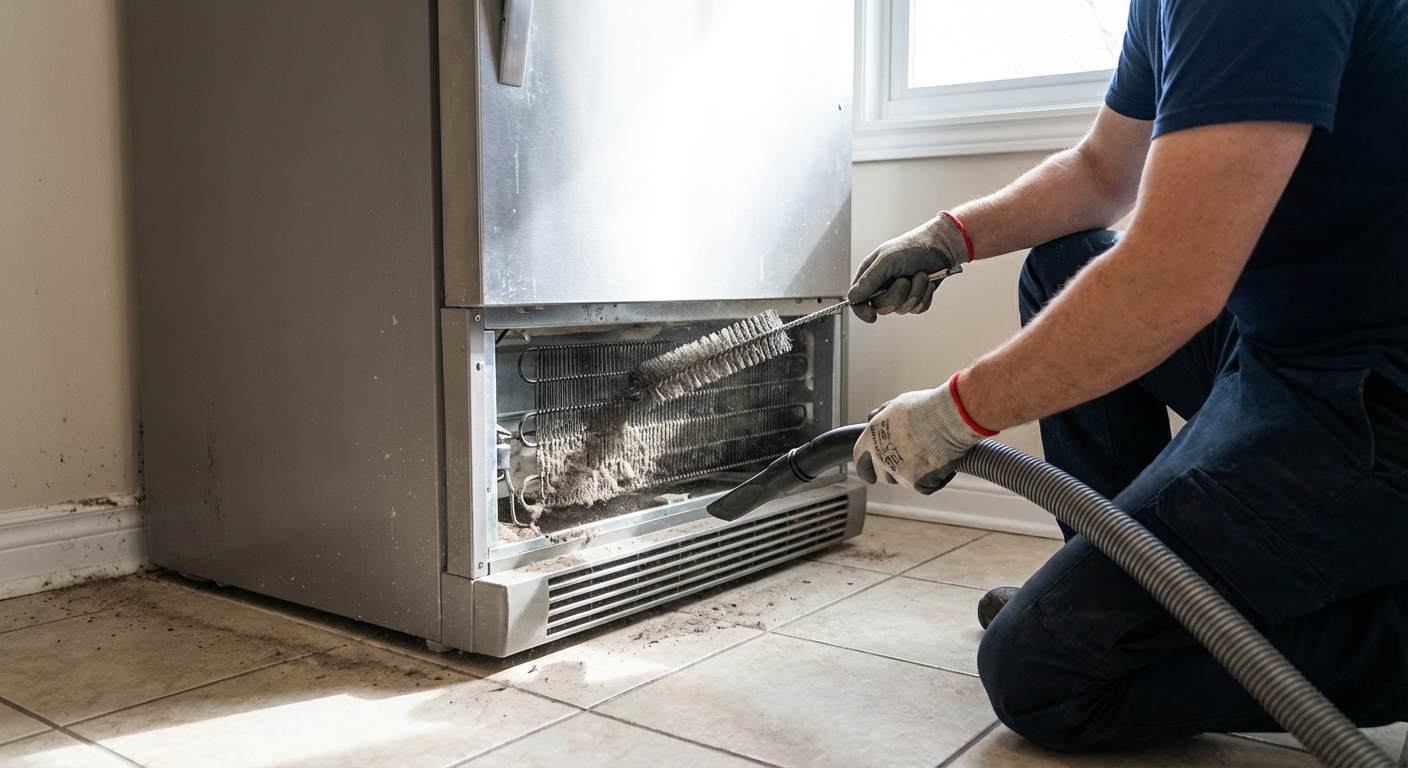
How to clean them
- Unplug the unit.
- Remove the front grille or rear cover (usually a few screws).
- Vacuum loose dust first.
- Use a coil brush to loosen packed lint, then vacuum again.
- If equipped: Check the condenser fan in the same area. It should spin freely and not be packed with fuzz.
- Plug back in and give it time to stabilize.
What to expect: If coil buildup was the issue, you will often hear the unit settle into a smoother run cycle and see temps improve within several hours to a day.
Fix 2: Check the evaporator fan (and the condenser fan)
Fans are the quiet workhorses of cooling. In most fridge-freezer combos and many upright freezers, an evaporator fan moves cold air across the evaporator coils and circulates it through the freezer (and sometimes the fridge section too).
Signs a fan is the problem
- Freezer is warmer at the top than the bottom, or the opposite, with weird hot spots.
- You do not hear the usual gentle fan noise when the compressor is running.
- You hear clicking, scraping, or a loud growl like the blades are hitting ice.
Simple fan checks you can do
- Door switch test (most combos): Open the freezer door and locate the door switch. Hold it down and listen. The fan should run when the switch is pressed, but some models delay, run only with the compressor, or pause in certain modes.
- Look for ice contact: If the fan is hitting frost, you may have a defrost issue (see Fix 6).
- Back-of-unit fan (condenser fan): If your unit has one near the compressor, it should spin when the compressor runs. A stalled condenser fan can also cause poor freezing.
If the fan is not spinning: The quickest homeowner win is clearing ice and debris. If it still will not run, you may be looking at a bad fan motor, a bad door switch, or a control board issue. At that point, decide whether you want to troubleshoot with a multimeter or call for service.
Fix 3: Make sure settings make sense
I have absolutely been the guy who bumped a dial while unloading groceries and spent a day wondering why ice cream turned to milkshakes. Controls get nudged, kids spin knobs, and some digital models reset after a power flicker.
What to check
- Setpoint: Aim for 0°F. If you have a dial (1 to 7), move it one step colder and recheck temps the next day.
- Modes: Look for “Sabbath,” “Showroom,” “Demo,” “Vacation,” or “Energy Saver” settings. Some reduce cooling or fan operation.
- Freezer vs fridge balance (some combos): A control labeled “Freezer” and “Refrigerator” can shift airflow. If the freezer is warm and the fridge is okay, increase freezer cooling.
- After a big restock: If you just loaded a lot of room-temp groceries, give it a full 24 hours to pull everything down to 0°F.
Easy clue
If the compressor never seems to run, or it runs in very short bursts, the thermostat (or temperature sensor on digital models) can be misreading. This is where a thermometer inside the freezer is your best reality check.
Fix 4: Clear vents and air paths
Cold air has to move. When vents are blocked by food packages, baskets, or a glacier of frost, you can have a cold spot near the coils and a warm freezer everywhere else.
What to do
- Move food away from vents: Give vents a few inches of breathing room. As a simple rule, do not pack food tight against the back wall.
- Find the intake and return vents: In combos, vents may be on the back wall or floor of the freezer.
- Melt light frost safely: Unplug, open the door, and let it thaw. Speed it up with bowls of hot water placed inside. Avoid heat guns and hair dryers near plastic liners and wiring.
Thrifty tip: Put frozen food in a cooler with towels and a bag of ice while you thaw. If it is winter, a shaded garage can work for a short stretch, but keep an eye on food temps.
Fix 5: Inspect and clean the door seal
A leaky door gasket is like leaving a window cracked all day. Warm, moist air sneaks in, which raises temps and creates frost. That frost then causes more airflow problems. It is a domino effect.
Two quick tests
- Dollar-bill test: Close the door on a dollar bill. If you can pull it out with almost no resistance, the seal is weak in that spot.
- Flashlight test: In a dim room, put a flashlight inside the freezer and close the door. Look for light leaking around the perimeter.
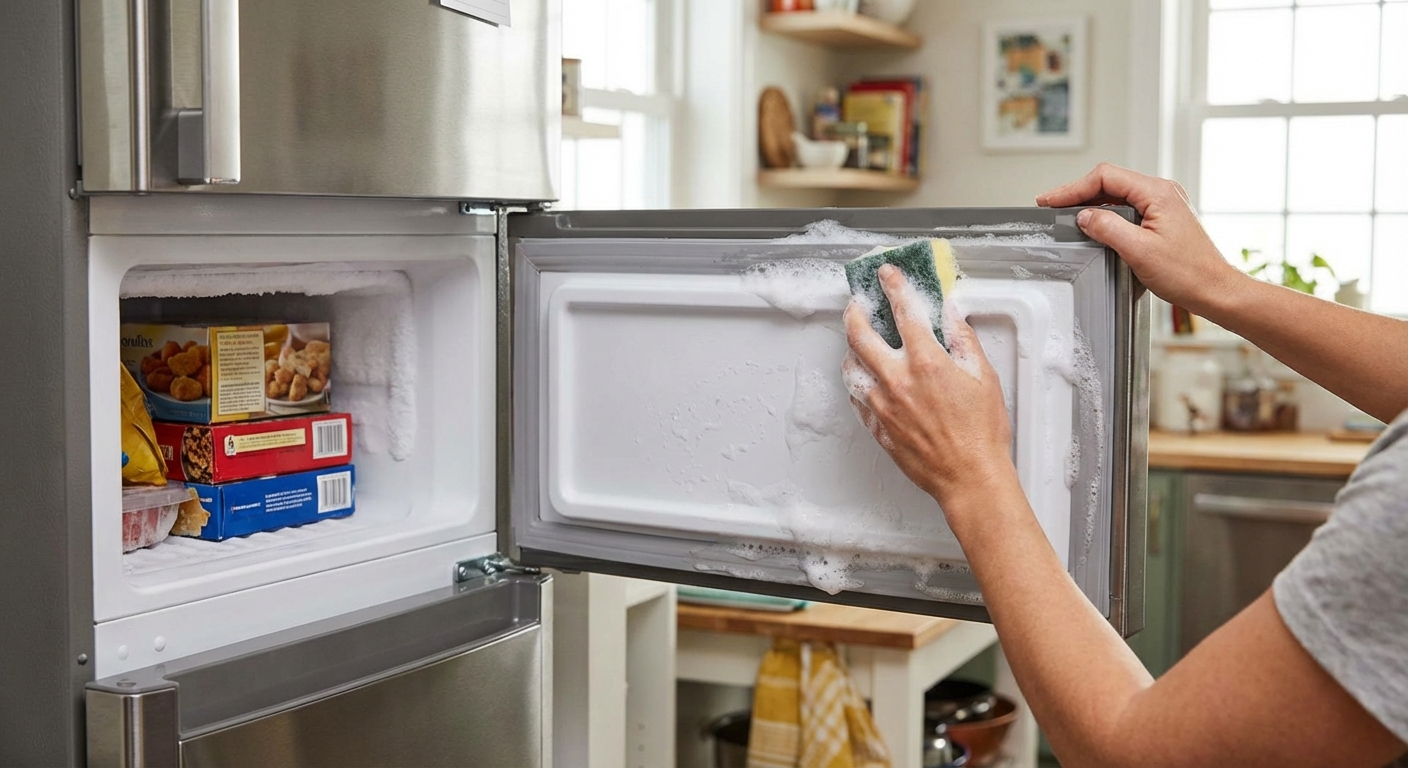
Fixes that often work
- Clean it: Warm soapy water and a soft cloth. Gunk and sticky spills can hold the gasket open.
- Warm and reshape: If the gasket is warped, gently warming it with a hair dryer on low from a safe distance can help it relax back into shape. Keep the heat moving and do not overdo it.
- Level the unit: Level it side-to-side. Many manufacturers also recommend a slight backward tilt so doors self-close. Use your manual as the final word.
If the gasket is torn or hardened, replacement is usually straightforward and often cheaper than you think. Get the model number from the inside wall and match the exact gasket.
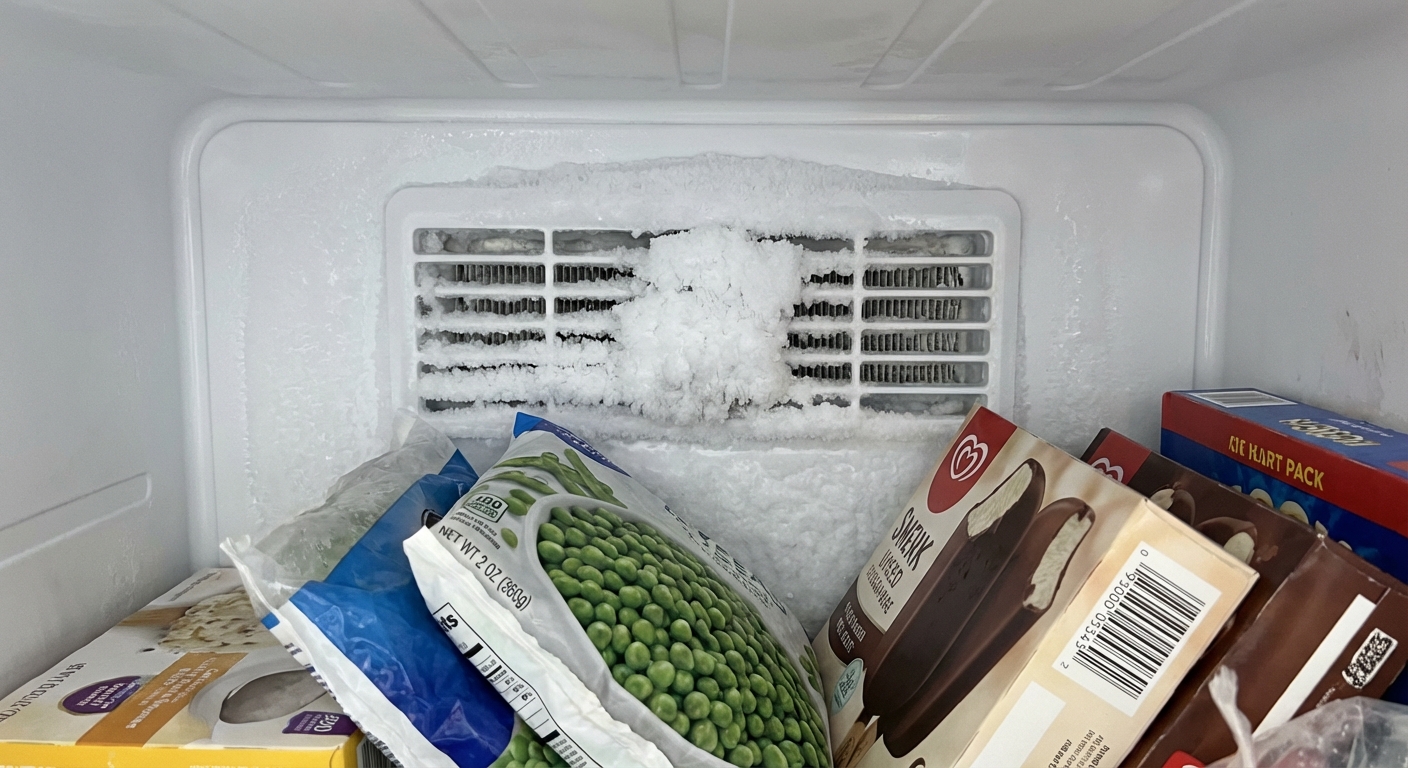
Fix 6: Check for defrost failure
If your freezer is cooling poorly and you see heavy frost on the back interior panel, the defrost system may not be doing its job. Modern frost-free units periodically heat the evaporator coil to melt ice, then drain the water away. When that cycle breaks, ice builds up until airflow is choked off.
Classic symptoms
- Thick frost or a solid ice sheet on the back wall inside the freezer.
- Fan noise changes, or fan stops because blades hit ice.
- Freezer gradually gets warmer over days or weeks, not all at once.
What you can do without parts
- Full manual thaw test: Unplug the unit and fully thaw it. Plan on 12 to 24 hours with towels down and doors open.
- Restart and monitor: If it freezes well for a few days and then repeats the same frost buildup, that strongly points to a defrost failure.
What usually fails
- Defrost heater
- Defrost thermostat or thermistor
- Defrost timer or control board
- Clogged defrost drain that refreezes into a blockage
Replacing defrost parts can be a solid DIY repair if you are comfortable removing interior panels and testing continuity with a multimeter. If not, this is a good “call a pro” point because misdiagnosing parts gets expensive fast.
Standalone vs combo: what changes?
Chest freezers
- Often have fewer fans and simpler controls.
- If it is warm, look hard at power, dirty compressor area, lid seal, and overstuffing that blocks natural circulation.
- Many are manual defrost, so frost buildup is normal, but too much frost still reduces performance.
Upright freezers and fridge-freezer combos
- Airflow matters more. Vents, fans, and defrost systems cause a lot of “not freezing” complaints.
- A freezer problem can also be caused by an issue in the fridge section on some designs, because they share airflow and sensors.
When to call for service
Here are the signs you are likely beyond the easy fixes:
- Compressor is not running and you have confirmed power at the outlet.
- Clicking every few minutes from the back, but it never truly starts cooling (often a start relay or capacitor issue, sometimes the compressor).
- Burning smell or visible melted wiring.
- Oily residue near tubing, which can indicate a refrigerant leak.
Those are “protect the appliance and the house” moments. Unplug it and get a professional diagnosis.
My quick checklist
If you want the quickest path to a win, here is the order I use in my own house:
- Thermometer check, confirm actual temperature (ideally overnight).
- Confirm power, clearance, and not running on an extension cord.
- Clean condenser coils and the compressor area. Check the condenser fan (if equipped).
- Listen for evaporator fan operation and confirm airflow.
- Clear vents and move food off the back wall. Remove frost blocking airflow.
- Check door seal with the dollar bill test. Confirm the unit is level side-to-side with a slight backward tilt if your manual calls for it.
- Full thaw test and monitor for defrost failure patterns.
Work through those and you will solve a big chunk of freezer-not-freezing problems without buying a single part. And if you do end up calling a tech, you will be able to describe symptoms clearly, which usually saves time and money.
About Marcus Vance
Content Creator @ Grit & Home
Marcus Vance is a lifelong DIY enthusiast and self-taught home renovator who has spent the last decade transforming a dilapidated 1970s ranch into his family's dream home. He specializes in budget-friendly carpentry, room-by-room renovations, and demystifying power tools for beginners. Through his writing, Marcus shares practical tutorials and hard-learned lessons to help homeowners tackle their own projects with confidence.