
When the sensors are the problem
If your garage door starts down, then pops back up, or it refuses to close unless you hold the wall button, you are often dealing with the safety sensors, also called photo eyes. These little eyes sit near the bottom of the tracks and “watch” for anything crossing the opening. If they cannot see each other clearly, the opener assumes something is in the way and stops the door.
That said, the “hold the wall button to close” symptom is not exclusive to sensors. Mis-set travel limits, force settings, or even an intermittent wiring issue can cause similar behavior. The steps below still start with sensors because they are the most common and easiest fix.
This is a different issue than broken springs, stripped gears, or a failing opener motor. Those problems can cause grinding noises, a heavy door, or a door that will not lift at all. Sensor problems are more specific: the door wants to close, but it will not commit.
Quick safety notes
- Keep hands clear of rollers and hinges while the opener is plugged in.
- Do not bypass sensors permanently. They are a required safety feature. If you must hold the wall button to get the door down, treat it as a safety fault and fix it before you make it a habit.
- If you see damaged low-voltage wires with exposed copper, unplug the opener before touching anything.
- Do not adjust torsion springs, lift cables, or drums. If you suspect a spring or cable issue, call a pro.
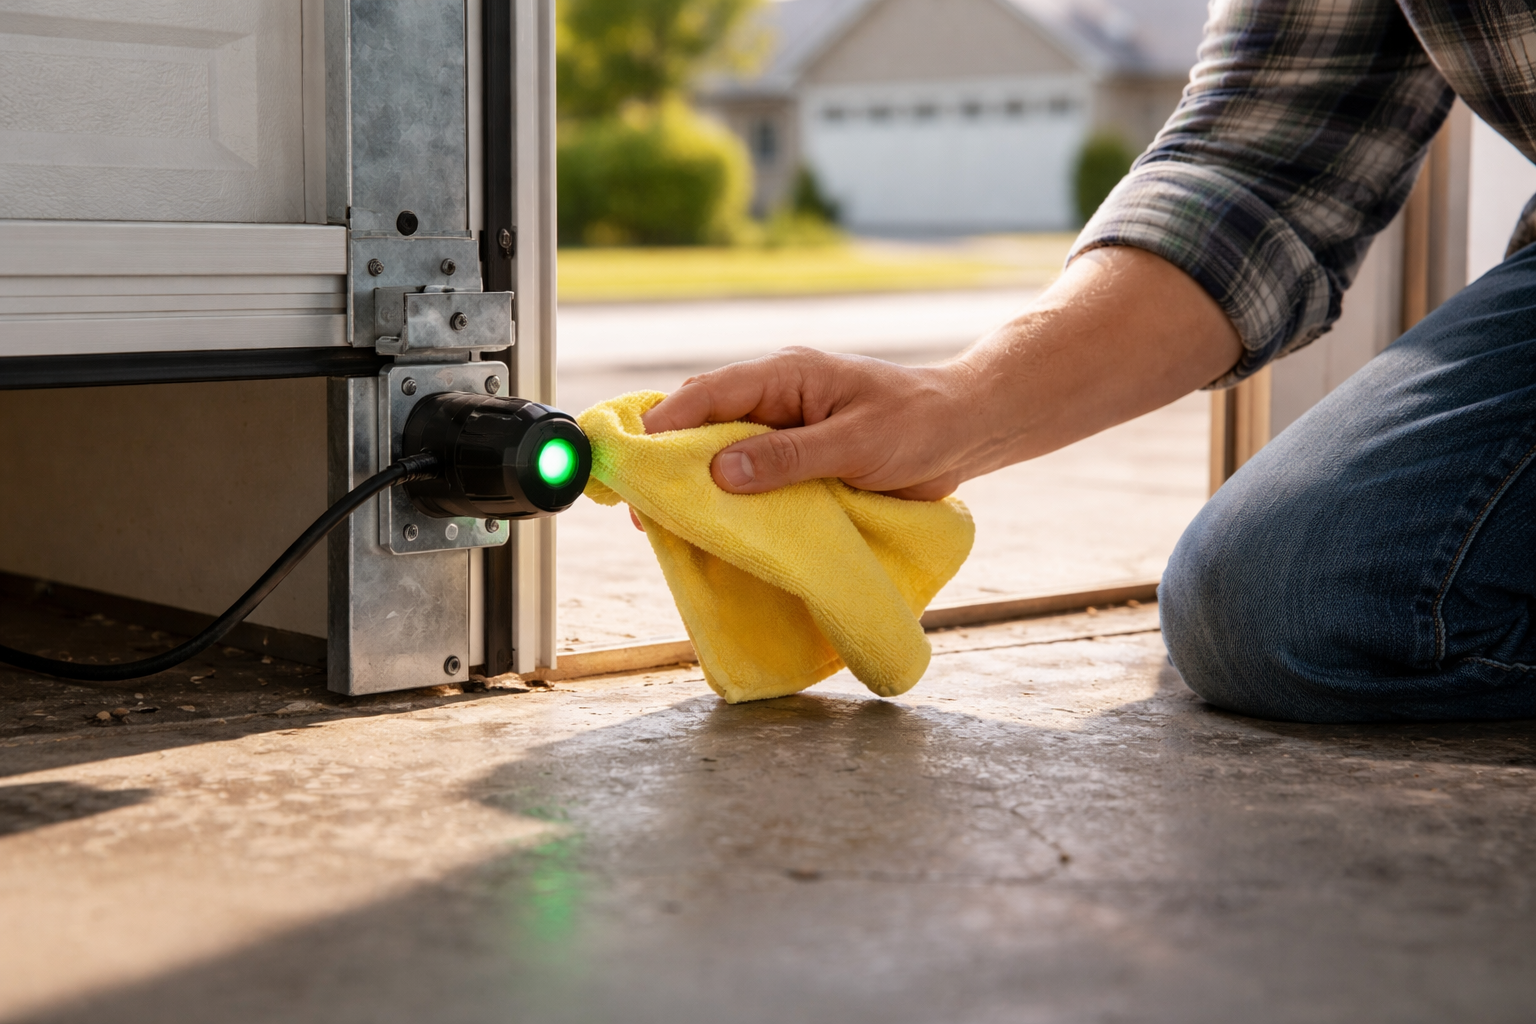
What the sensor LEDs mean
Most systems have one sensor that sends the beam (often called the sender) and one that receives it (the receiver). Each has a small LED. Exact colors and blink codes are brand-dependent (common combos are amber and green), so treat the notes below as general guidance and check your opener manual for the official codes.
Common light patterns
- Both LEDs solid: Sensors are aligned and powered. Look elsewhere if the door still will not close.
- One LED solid, the other blinking or off: The powered side is likely fine. The other is misaligned, dirty, blocked, getting glare, or not getting a good connection back to the opener.
- Both LEDs off: No power to the sensors, a wiring issue, or a problem at the opener terminals or logic board.
- LEDs flicker when the door vibrates: Loose brackets or a slightly twisted track that lets a sensor shift during movement.
Also common: some openers flash the overhead light a certain number of times when the sensors are blocked or misaligned. If you notice a repeating flash pattern, look it up in your manual. It can save you time.
Tip from my own garage: I once chased “bad sensors” for an hour before realizing a storage tote had inched forward and was just barely interrupting the beam. Do the obvious sweep first.
Tools and supplies
- Microfiber cloth or soft rag
- Mild glass cleaner (spray onto cloth, not directly into the sensor)
- Phillips screwdriver or nut driver (commonly 1/4 inch)
- Tape measure
- Level (helpful but optional)
- Flashlight
- Zip ties (for tidying loose wire runs)
- Cardboard, small piece of PVC, or a purpose-made sun shield (for glare issues)
Step 1: Clean and clear
Dirty lenses are the simplest fix, especially if you park close to the sensors, do woodworking in the garage, or live where wind blows dust in.
How to clean them
- Wipe each lens gently with a dry microfiber cloth.
- If needed, lightly dampen the cloth with mild glass cleaner or water.
- Remove cobwebs from the bracket and surrounding track area.
- Check the “beam lane” for anything low: bikes, trash cans, tool handles, even tall weeds outside.
Step 2: Tighten brackets
These sensors live in the line of fire for bumping, sweeping, shoveling snow, and rolling trash bins. A tiny twist can break the beam.
What to check
- Grab each sensor bracket and gently wiggle it. If it moves, tighten the fasteners.
- Make sure the sensor is not rotated inward or outward. It should aim straight across to its partner.
- Look for a bent bracket. If it is kinked, you can often straighten it with pliers or replace it cheaply.
After tightening, watch the LEDs while you tap the track lightly with your hand. If the light flickers, keep adjusting until it stays steady.
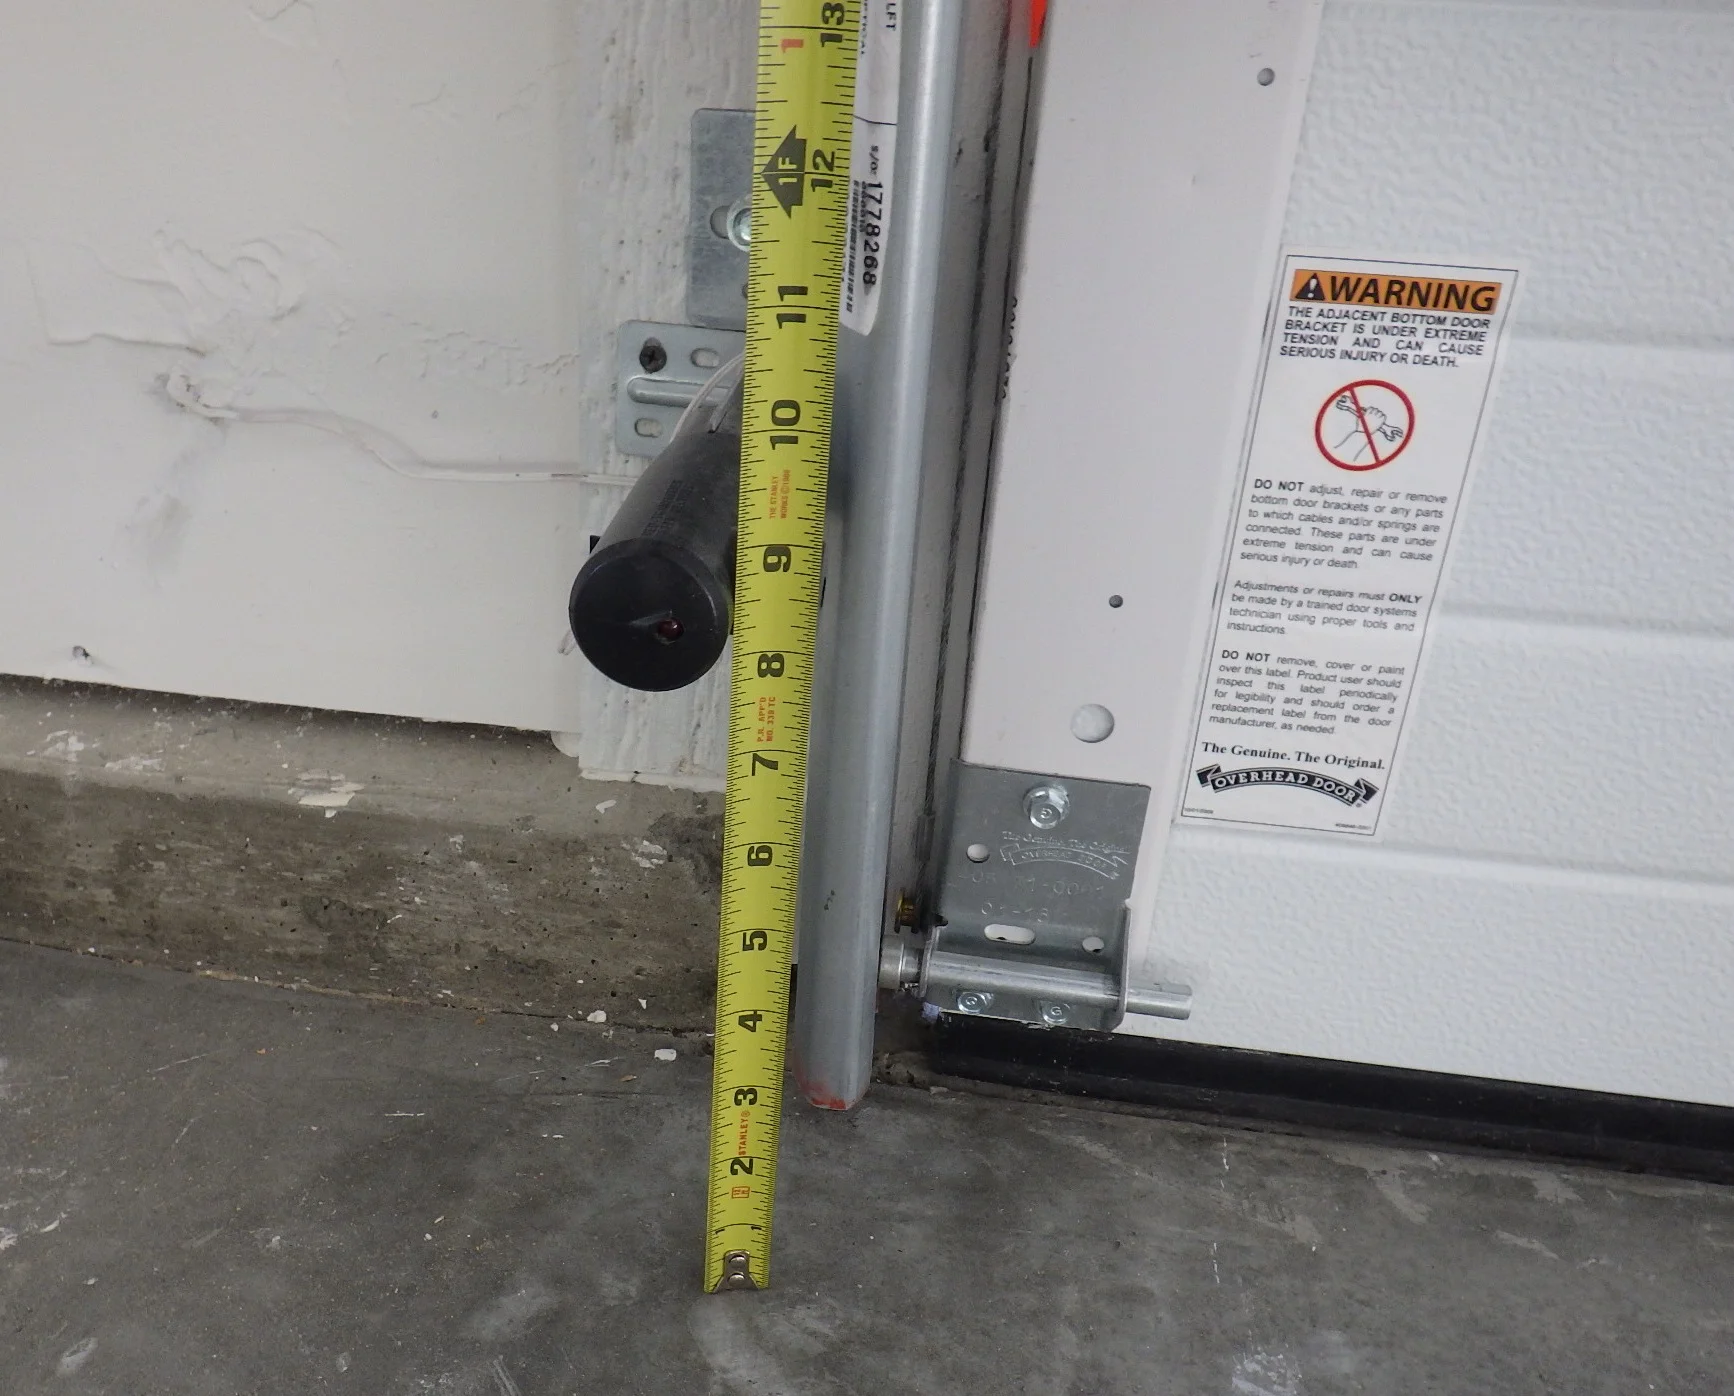
Step 3: Align by height
Alignment is easier than it sounds. You are just getting two small lenses to “stare” at each other at the same height.
Set the height first
- Measure from the floor to the center of the lens on the left sensor.
- Adjust the right sensor to match that measurement.
- Sensors are typically installed within about 6 inches of the floor (often 4 to 6 inches). The real key is matching heights and following your manufacturer’s guidance.
Fine-tune the aim
- Loosen the wing nut or screw just enough so the sensor can pivot.
- Move it slowly until the “problem” LED turns solid.
- Tighten the hardware while holding the sensor in position.
If you have one solid light and one blinking light, focus on the blinking side. It is usually the receiver complaining that it cannot see the beam.
Step 4: Check wiring
If cleaning and alignment do nothing, treat it like a simple low-voltage connection problem. Each sensor needs a solid connection back to the opener terminals.
Start with what you can see
- Look for staples driven too tight into the thin sensor wire.
- Check for pinched wire where it crosses the track or gets close to hinges.
- Inspect for chewed insulation if you have rodents in the garage.
Then check the opener terminals
- Most openers have sensor wires landing at terminals on the motor unit (often screw terminals, sometimes push-in).
- With the opener unplugged, confirm each wire is fully seated and the connection is snug.
- If your wires are oxidized or frayed at the end, snip back about 1/4 inch and re-strip clean copper.
If both LEDs are off, a loose terminal or broken wire is a top suspect. If only one side is dark, you may have a break in that run or a failed sensor. If you suspect damage inside the wall, ceiling, or opener head unit wiring, stop here and call a pro.
Step 5: Fix sun glare
This one fooled me the first summer we lived in our place. Certain times of day, direct sun can hit the receiver lens and drown out the beam. The sensors are fine, but they are effectively blinded.
Signs glare is the issue
- Sensors align perfectly, but the door will not close when the sun is low.
- You see the receiver LED flicker or go out only during bright light.
Simple fixes
- Add a small shade: a short piece of PVC pipe, a bent strip of thin metal, or a purpose-made sensor sun shield.
- Reposition slightly: sometimes rotating the sensor a hair or moving the bracket location on the track keeps sun off the lens while still maintaining alignment.
- Clean again: a dusty lens makes glare worse.

Step 6: Test it
Once the LEDs look correct, do a quick safety test.
- Close the door using the remote or wall button.
- Wave a broom handle or your leg through the sensor beam path while the door is closing.
- The door should stop and reverse immediately.
If it does not reverse, stop and troubleshoot again. A door that closes without the sensors responding is not just annoying. It is dangerous.
If it is not sensors
Misaligned sensors are a top cause of “won’t close” behavior, but not the only one. Look beyond the photo eyes if you notice any of the following:
- Door is extremely heavy or will not lift manually: likely spring or cable issues.
- Grinding, popping, or loud bang: could be a broken spring or failing opener gear.
- Door closes, hits the floor, then reverses with sensors solid: may be travel limits or force settings, or an obstruction on the track.
- Door is crooked while moving: track, roller, or cable problem.
One more oddball: if the sensors look perfect but you get random reversals, check for anything that can confuse the beam path, like highly reflective surfaces at just the wrong angle, or electrical noise from nearby wiring. It is not common, but it is real. Your opener’s diagnostic light or flash codes can help confirm what the opener thinks is happening.
Those issues fall into broader garage door repair territory and can get risky fast, especially anything involving springs.
When to call a pro
- You see damaged or exposed wiring you cannot safely repair.
- The sensor brackets are torn from the track or the track itself is bent.
- You suspect spring, cable, or drum issues.
- You replaced sensors and still cannot get stable LEDs, which can point to an opener logic board issue.
My fast-fix checklist
- Clear the opening, then wipe both lenses.
- Check the opener for any diagnostic flashes and look them up in your manual.
- Verify one LED is solid and the other becomes solid after adjustment.
- Match sensor heights with a tape measure.
- Tighten brackets so vibration cannot knock them out of alignment.
- Check wires at the sensors and at the opener terminals.
- Add a shade if sun glare is a repeat offender.
Do those in order and you will fix the majority of sensor-related garage door headaches without buying parts you do not need.
About Marcus Vance
Content Creator @ Grit & Home
Marcus Vance is a lifelong DIY enthusiast and self-taught home renovator who has spent the last decade transforming a dilapidated 1970s ranch into his family's dream home. He specializes in budget-friendly carpentry, room-by-room renovations, and demystifying power tools for beginners. Through his writing, Marcus shares practical tutorials and hard-learned lessons to help homeowners tackle their own projects with confidence.