If you heard a loud bang in the garage and now the door will not lift, or you can see a gap in a spring, treat it like a real safety issue. A typical double garage door can weigh 150 to 400+ pounds depending on size and materials (and some wood doors can be heavier). The springs are what make that weight manageable. When a spring breaks, the door can become unpredictable very quickly.
I love DIY, but I am going to be very direct here: do not try to force the door up with the opener, and do not start loosening hardware to investigate. Your goal is to keep the door from moving until a professional can repair it.
Do this first (the safe 5-minute checklist)
- Stop using the opener immediately. Pressing the button can burn out the opener, pull the door crooked, or lead to cable damage (including cables coming off the drums).
- Keep people and pets away from the door. Especially kids who might hit the wall button.
- Unplug the opener. If it is plugged into a ceiling outlet, unplug it. If it is hardwired, turn off the breaker labeled for the garage door opener.
- Do not pull the emergency release cord if the door is even partially open. With a broken spring, the door can slam down. If the door is open and you think you must disconnect it, that is a situation for a pro with the door properly supported and secured.
- Only operate the door by hand if it is fully closed and you truly must open it to get a car out. Even then, plan for the full weight and use multiple adults. If you are unsure, do not attempt it.
If the door is stuck half open: treat it like a suspended load. Keep clear and call a garage door company for an urgent service call. Do not stand under the door and do not try to lower it yourself.
How to secure the door while you wait
Securing the door is about preventing surprise movement. Choose the steps that match your situation.
If the door is fully closed
- Lock the door if you have a manual lock (common on older doors). Slide it into the track.
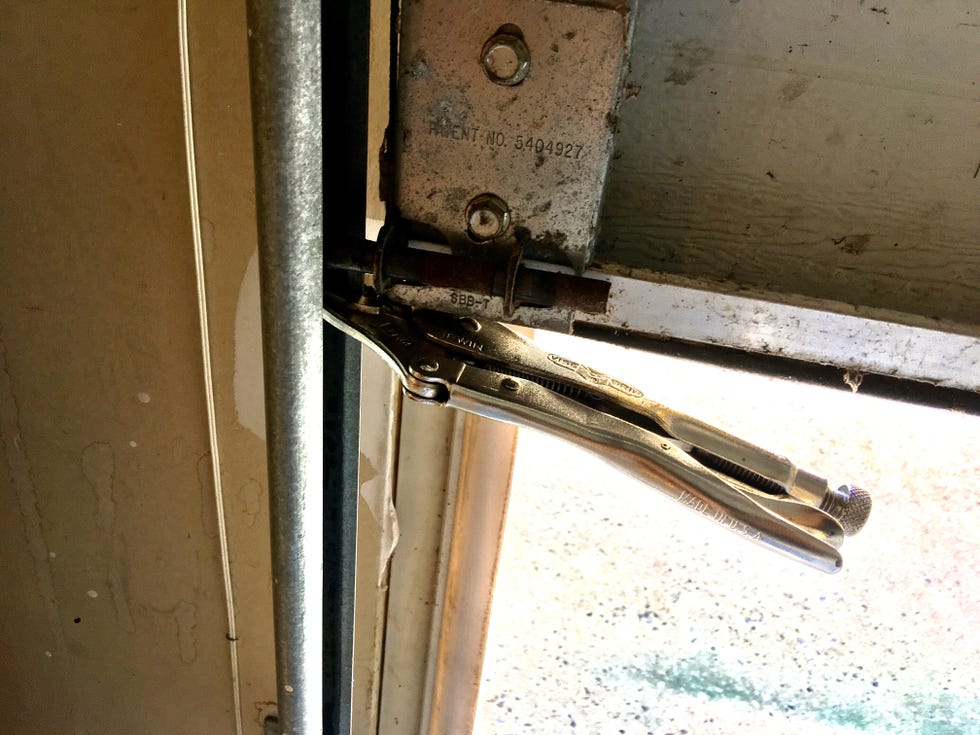
- Clamp the tracks above a roller using locking pliers or a C-clamp on both sides. This helps prevent the door from lifting. Place the clamp just above a roller so it has something solid to catch.
- Leave the opener unplugged so nobody tries it again.
If the door is partially open
- Do not attempt to clamp and force it down if you do not already know what you are doing. A jammed or racked door (twisted or crooked in the tracks) can bind, then drop.
- Block off the area so nobody walks under it.
- Call for same-day service and tell them the door is stuck open.
Quick security note: If the door cannot close and you need to secure the garage, move valuables out of sight, lock the interior door to your house, and consider parking a vehicle tight to the opening only if it can be done safely. The real fix is getting the spring repaired.
Torsion vs extension springs
Most residential doors use one of two spring systems. Knowing which one you have helps you describe the problem and get the right parts on the truck.
Torsion springs (above the door)
- Mounted on a steel shaft above the top of the door opening.
- Common sign of failure: a clean gap in the coil, often a visible gap of a few inches.
- When it breaks, the door often feels impossibly heavy and may only lift a few inches before stopping.
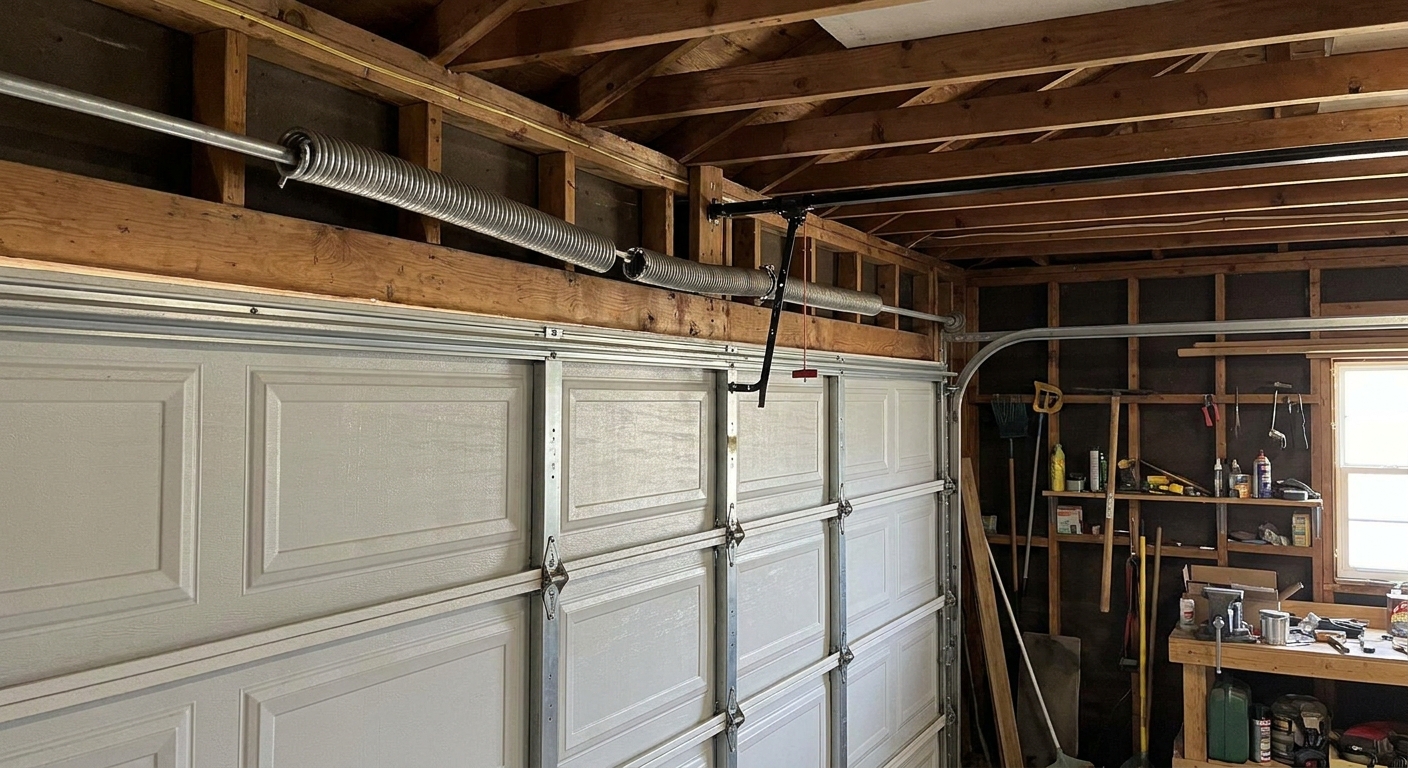
Important: Some doors have two torsion springs. If one breaks, the other may still look intact, but the door is still unsafe and will be extremely heavy.
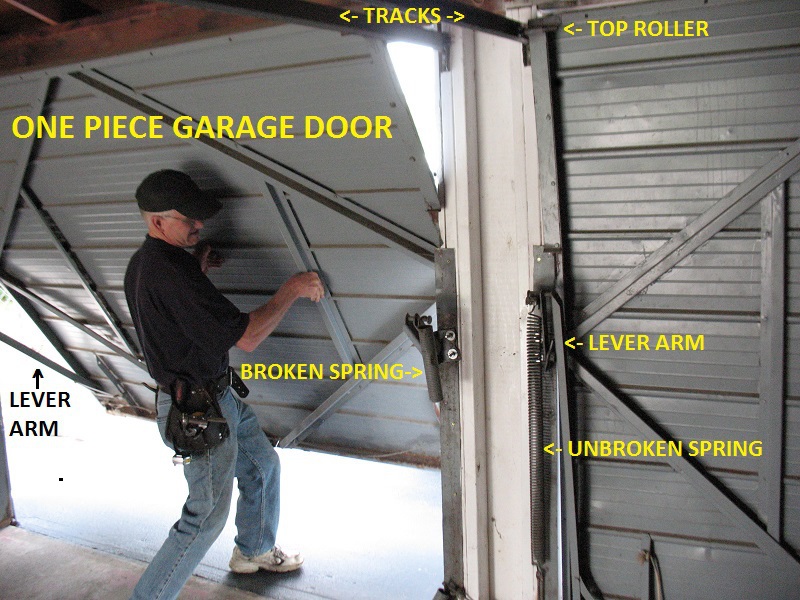
Extension springs (along the tracks)
- Long, stretched springs running parallel to the horizontal tracks, usually one on each side.
- Common sign of failure: one side looks slack, stretched out, or hanging.
- These should have safety cables running through the springs to prevent whipping if a spring breaks.
If you are not sure which you have, take a photo from a safe distance with the door closed if possible. A tech can usually identify the system in seconds.
Is it really the spring?
Grit & Home has dedicated pages for opener and sensor troubleshooting, so I will keep this focused on quick, spring-specific clues that help you avoid chasing the wrong problem.
Strong signs the spring is the issue
- You heard a sharp bang like a firecracker or a 2x4 snapping.
- You can see a broken spring (gap in torsion spring, dangling extension spring).
- The opener tries, the door moves 1 to 6 inches, then stops or reverses.
- The door feels extremely heavy when lifted by hand (only test this with the door fully closed, and only if you can do it safely).
- Cables look loose on one side because the door lifted unevenly after the spring failed.
More likely opener or sensor related
- The door moves smoothly by hand, feels normal weight, but the opener does not respond.
- The door closes then immediately reverses with the bottom seal touching the floor, and the spring looks intact.
- You see blinking lights on the opener and the photo eyes are misaligned or blocked.
If the door feels normal by hand and springs look intact, you are probably in opener territory. If the door feels like a deadlift and the spring looks damaged, assume spring failure and stop.
Why DIY spring replacement is risky
I am all for learning tools and building confidence. I am also honest about where the risk is not worth the savings. Springs store a lot of energy, and mistakes can cause serious injury.
- Torsion springs are wound under high torque. Proper winding bars, correct stance, and a controlled process are essential.
- Wrong spring size can damage the door and opener. The door can shoot up, slam down, or never balance right.
- Cables, drums, and brackets are part of the system. Spring failure sometimes reveals worn bearings, frayed cables, or a bent track that needs attention.
- Many doors have two springs. If one breaks, the other is often near end-of-life. Pros commonly replace both so you do not pay twice.
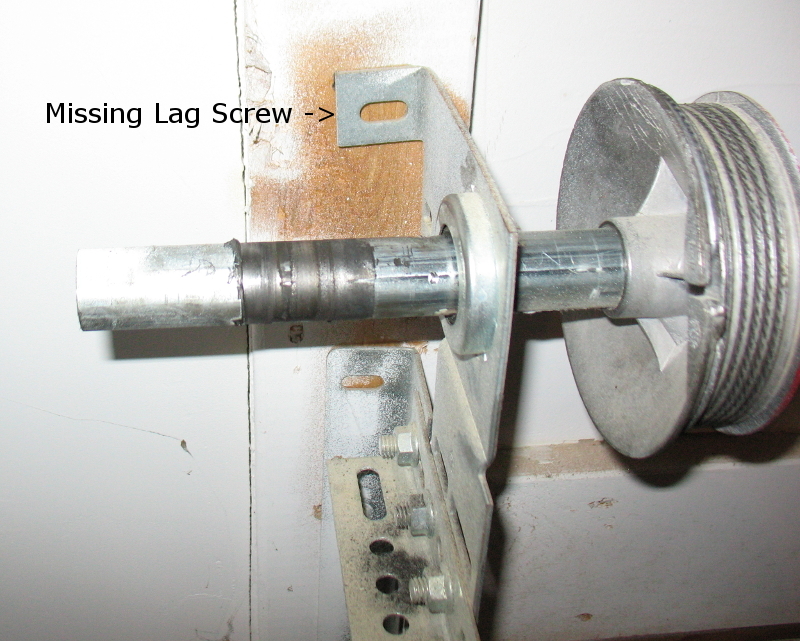
Extra warning: Do not loosen bottom brackets or cable drums. Those parts can be under serious tension and are a common source of injuries when people start taking things apart.
Could an experienced DIYer replace a spring? Yes. Should a beginner? In my opinion, no. This is one of those jobs where paying for expertise is also paying for a safer outcome.
What to tell the installer
A good service company can quote and prepare faster if you can share a few details. You do not need to measure everything, just give what you can safely gather.
- Door type and size: single or double, approximate width (8, 9, 16 feet), and material if you know it (steel, wood, insulated).
- Spring type: torsion above the door or extension along the tracks.
- What happened: loud bang, door stuck, opener straining, door crooked.
- Current position: fully closed, half open, or fully open.
- Any visible issues: spring gap, hanging cable, bent track, loose hardware.
- Photos: one wide photo of the whole door, and one of the spring area from a safe distance.
Helpful question to ask: “Do you replace both springs and include a door balance test and safety inspection?” The balance test matters because it tells you the door is properly counterweighted after the repair.
What it may cost
Pricing varies a lot by region, door size, and whether you have one or two springs. As a broad homeowner ballpark, many spring replacements land in the $200 to $600 range, and heavier doors, specialty parts, or premium springs can push higher. The fastest way to get a real number is to share your door size, spring type, and a photo.
Most pro spring repairs often include:
- Correct replacement spring(s) matched to the door weight
- Labor to safely unwind and rewind (torsion) or swap (extension)
- Door balance check and opener force check
- Basic hardware inspection (cables, rollers, bearings, drums)
If your household uses the garage door as the main entry, ask whether upgrading to high-cycle springs is an option. It is a smart buy-once move if you want a longer cycle rating than standard springs.
After the repair
- Listen for new noises like squealing rollers or grinding bearings, since extra friction makes the system work harder.
- Lubricate the right parts a couple times a year using a garage-door rated lubricant on rollers (if metal), hinges, and springs. Avoid soaking the tracks with grease.
- Do a quick balance check once or twice a year if you are comfortable: with the door closed, pull the release cord, lift the door to about knee to waist height, and see if it stays put. Keep a firm grip and stay clear of pinch points. If it drops or shoots up, call for adjustment.
If you only remember one thing from this page, make it this: if a spring is broken, stop using the door and call a pro. It is not you being “not handy.” It is you being smart and keeping a heavy door from becoming a hazard.
About Marcus Vance
Content Creator @ Grit & Home
Marcus Vance is a lifelong DIY enthusiast and self-taught home renovator who has spent the last decade transforming a dilapidated 1970s ranch into his family's dream home. He specializes in budget-friendly carpentry, room-by-room renovations, and demystifying power tools for beginners. Through his writing, Marcus shares practical tutorials and hard-learned lessons to help homeowners tackle their own projects with confidence.