When a garbage disposal won’t turn on, it usually looks dramatic but it’s often a simple fix. Common causes include a tripped reset, a jam from a spoon-sized scrap, or a power issue at the outlet, GFCI, switch, or breaker.
I’ve been there. My first disposal issue had me pricing replacements before I realized the reset button was staring me in the face. Let’s walk through the fastest, safest troubleshooting path so you can get back to a quiet, working sink.
Safety first (do this before anything else)
- Turn the disposal switch OFF.
- Cut power before you touch anything under the sink: unplug the disposal if it has a cord and plug. If it’s hardwired, turn OFF the breaker that feeds it.
- Never put your hand inside the disposal chamber. Not for a second, not even if it “can’t possibly turn on.”
- If you need to check for a jam, use tongs or pliers, not fingers.
If you smell burning, see smoke, or the unit hums loudly and then goes silent, stop and follow the steps below in order.
Tip: If it hums but won’t spin, don’t keep flipping the switch. That can overheat the motor fast and trip the internal reset.
Quick diagnosis: what exactly is it doing?
- Totally silent when you flip the switch: likely a power issue, tripped reset, or bad switch.
- Hums but won’t spin: classic jam or seized impeller plate.
- Stops mid-use: overheated and tripped the reset, or hit a jam and shut down.
- Turns on but drains slowly: not an electrical problem, more of a clog or buildup issue.
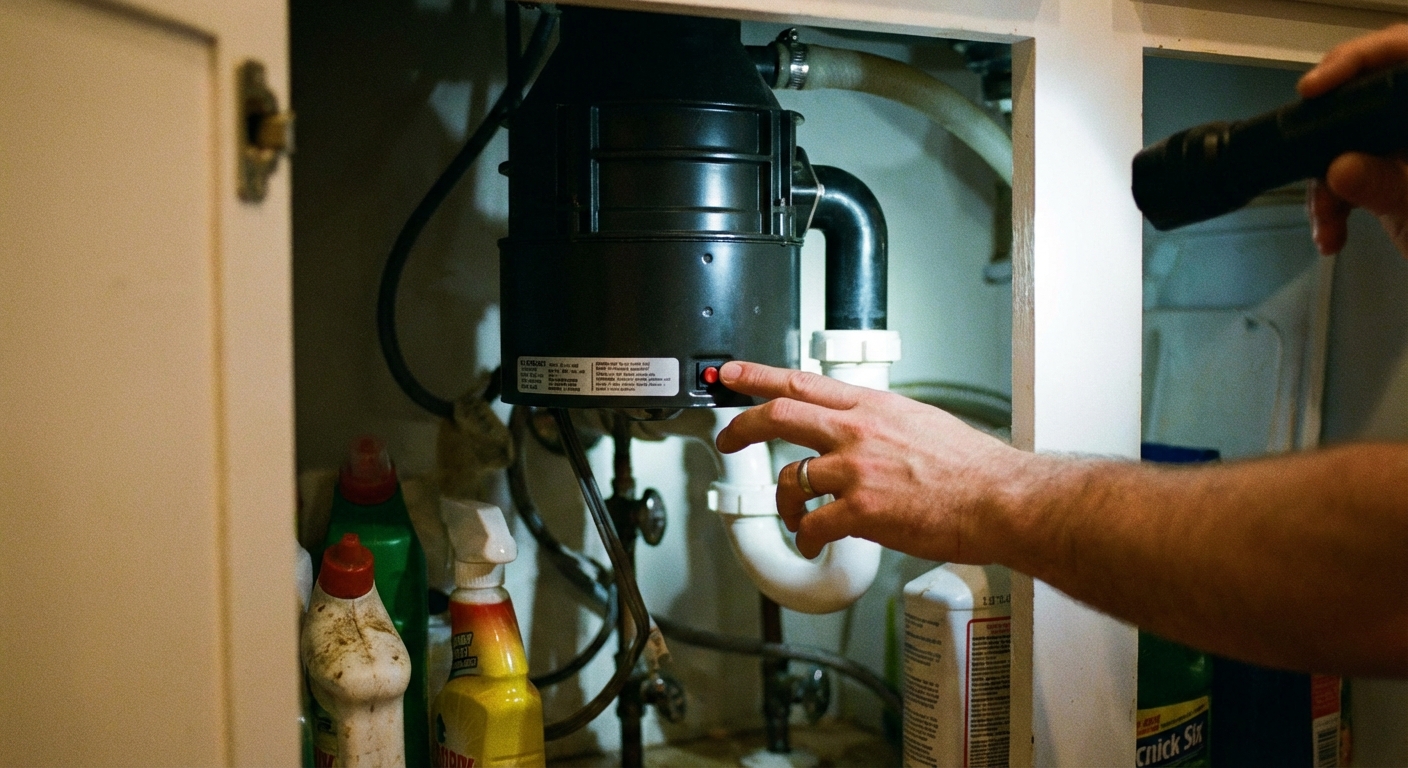
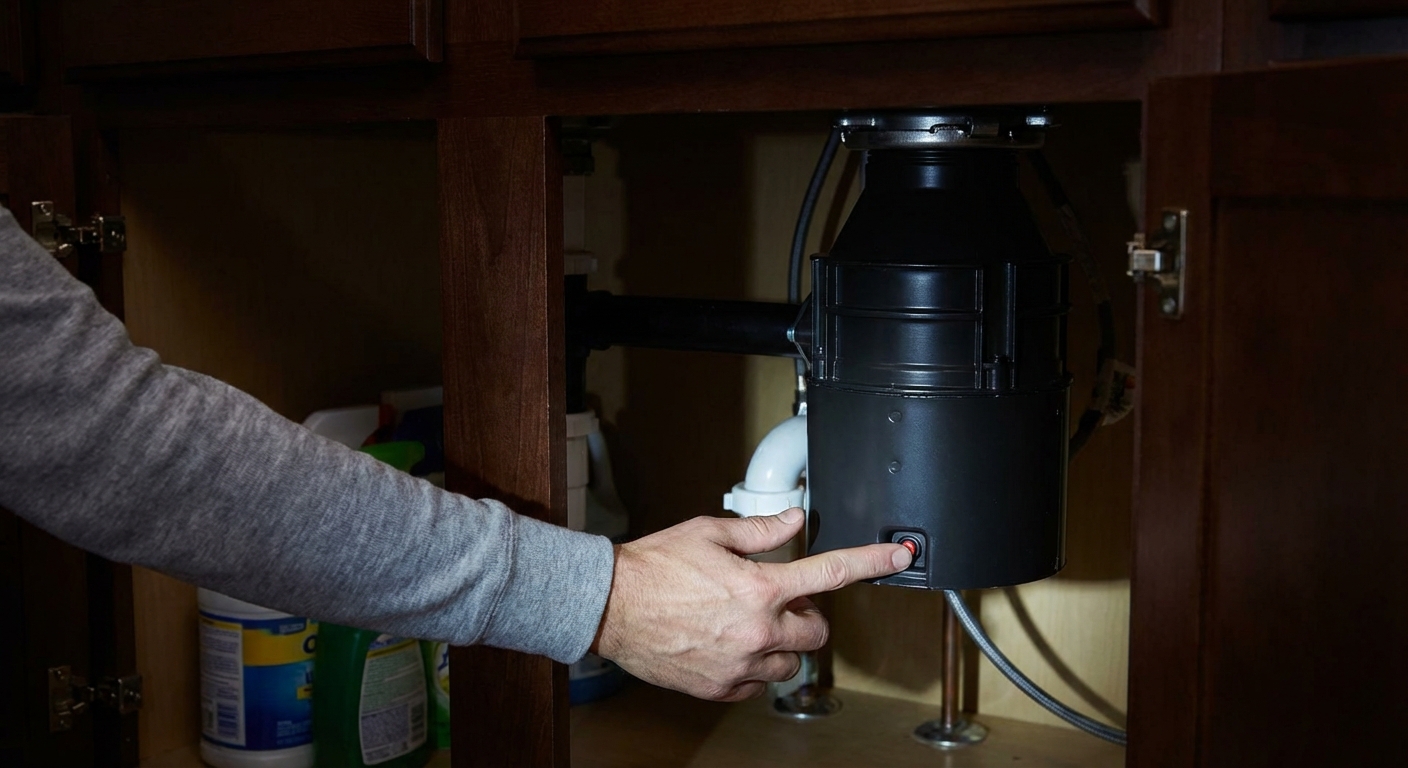
Step 1: Press the reset button (most common fix)
Under the disposal, you’ll usually see a small red or black reset button. If the unit overheats or jams, an internal breaker trips to protect the motor.
How to reset it
- Make sure the switch is OFF.
- Look underneath the disposal and press the reset button firmly.
- If it was tripped, you’ll often feel a click and the button will stay in.
- Restore power (plug it back in, or turn ON the breaker) and try the switch.
If the reset immediately pops back out, that’s a clue the disposal is still jammed or the motor is failing. Move on to the unjamming step.
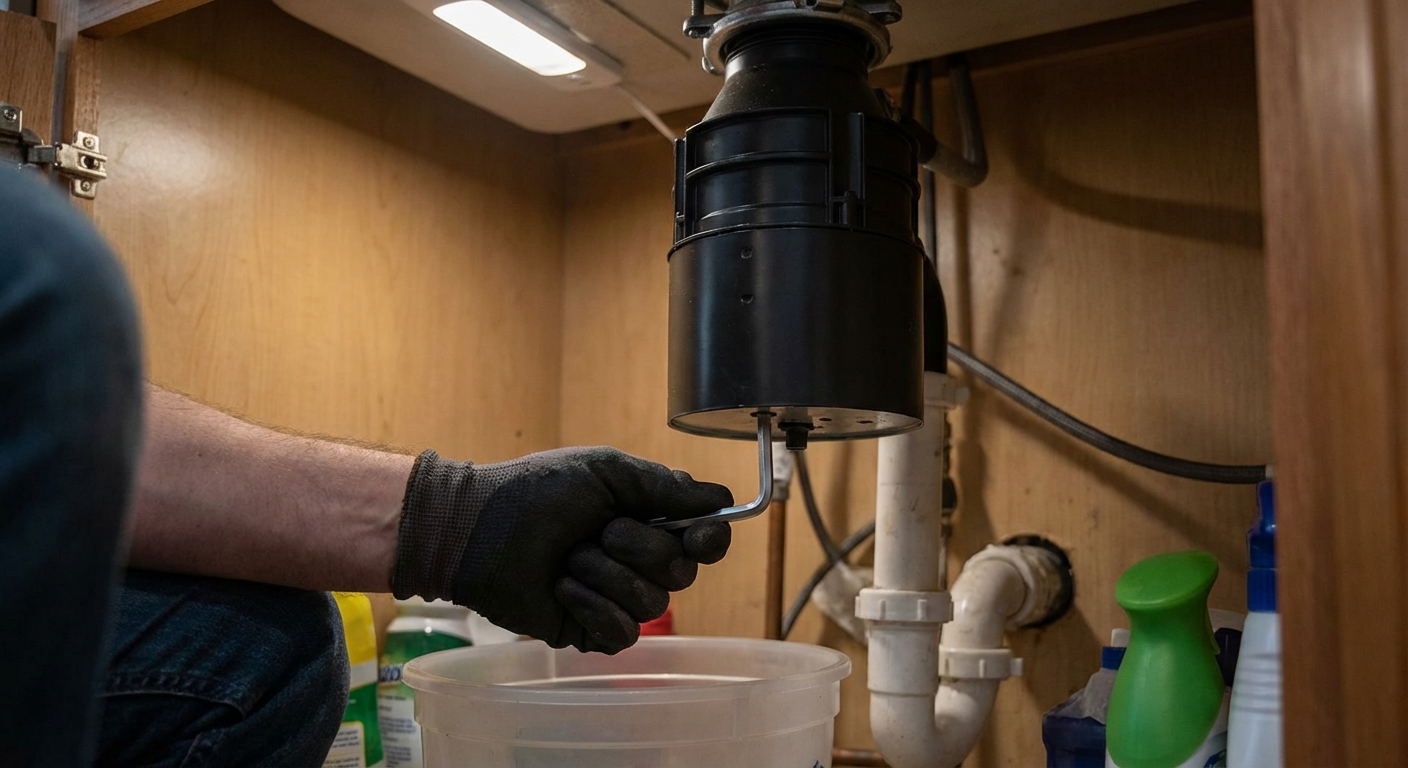
Step 2: Unjam it with a hex wrench (the 5-minute rescue)
If the disposal hums but doesn’t spin, something is preventing the impeller plate from turning. Many units have a hex-shaped socket on the very bottom specifically for this fix.
What you’ll need
- A hex wrench (Allen key), often 1/4 inch, but it varies by brand, so check your manual if you have it
- Flashlight
- Tongs or needle-nose pliers
Unjamming steps
- Cut power (unplug it, or turn OFF the breaker).
- Insert the hex wrench into the socket on the bottom of the disposal.
- Work the wrench back and forth until the resistance breaks free and it spins more smoothly.
- Look down into the disposal with a flashlight and remove any visible object using tongs or pliers.
- Press the reset button again.
- Restore power and test with a steady stream of cold water.
No hex socket? Some disposals can be freed from the top using a wooden spoon handle to nudge the impeller plate, but only do this with power off and keep your hands out of the chamber.
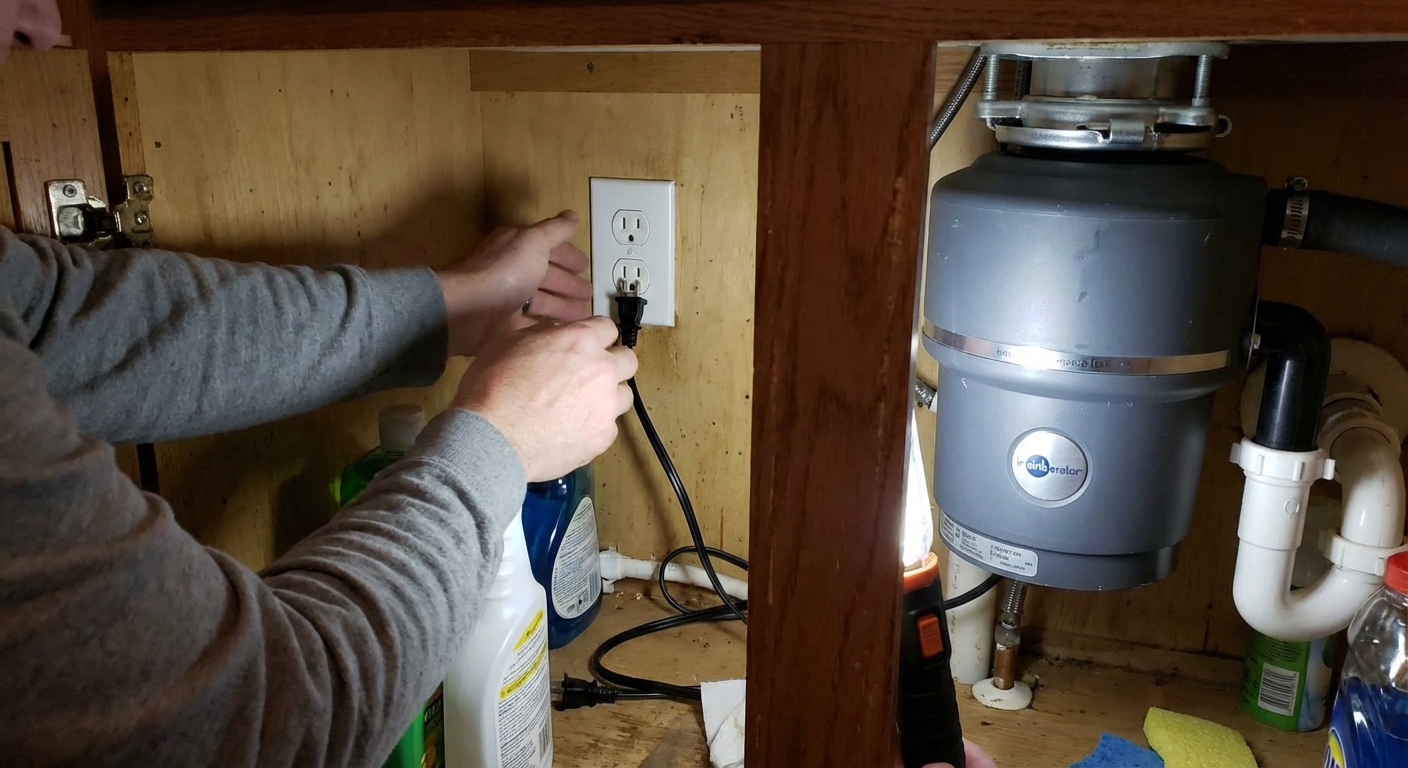
Step 3: Check the outlet under the sink
If the disposal is totally silent and the reset didn’t help, confirm it’s actually getting power.
What to check
- Is it plugged in? Sounds obvious, but stuff gets bumped under sinks.
- Is the outlet controlled by a wall switch? Many are, and sometimes the switch is the real problem. Some kitchens use a split receptacle, where one half is switched and the other is always on.
- Is the outlet a GFCI? If there’s a GFCI outlet under the sink or nearby (sometimes in an adjacent cabinet or on the backsplash), press Reset on that outlet.
Fast test
If your disposal has a plug, unplug it and plug in a small lamp or phone charger to see if the outlet is live. If the outlet is dead, go to the breaker step next.
If your disposal is hardwired, skip the lamp test and move to the breaker and GFCI checks (or use a non-contact voltage tester if you have one). Do not open the wiring compartment unless you’re qualified.
Step 4: Check the breaker (and any tripped GFCI upstream)
Disposals are sometimes on a dedicated circuit, but not always. A trip can happen after a jam, a splash, or a motor that’s working too hard.
- At your electrical panel, find the breaker labeled for the kitchen, disposal, or outlets.
- Flip it fully OFF and then back ON. A tripped breaker can sit in a middle position.
- If it trips again immediately, stop and investigate further. Repeated trips can indicate a wiring issue, a failing motor, or a short.
Important: If you have to reset a breaker more than once, don’t keep forcing it. That’s how small problems turn into big ones.
Quick clue: If other outlets in the kitchen are also out, the disposal may be on the same circuit. Check for a tripped GFCI on the backsplash or another nearby outlet.
Step 5: If it still won’t turn on, check the switch and wiring (basic level)
If the outlet has power and the disposal is plugged in but nothing happens, the issue could be the switch, an air switch, a loose connection, or the disposal itself.
Simple checks that don’t require opening electrical boxes
- Try toggling the switch a few times. If it feels loose or “mushy,” it may be failing.
- If you have an air switch (a push button on the countertop), check for a disconnected air tube under the sink.
- Listen closely: no hum, no click, no sound at all often points back to power delivery or a failed motor.
If your disposal is hardwired, do not open the wiring compartment unless you’re comfortable and qualified to work on household wiring. A licensed electrician or plumber is the smart call if you suspect a loose connection, damaged wiring, or a failing switch.
When you should replace the disposal
I’m all for fixing what you’ve got. But disposals do wear out, especially if they’ve been fighting through grease, fibrous scraps, and years of hard starts.
Replacement is usually the right move if:
- The disposal is 8 to 12+ years old and acting up frequently.
- You see leaks from the housing or corrosion around the bottom. Cracked housings are not worth repairing.
- The unit hums but jams repeatedly even after clearing obstructions.
- The reset trips constantly or the breaker trips even with no load.
- You hear metal-on-metal grinding that wasn’t there before.
If you’re debating repair vs replace, here’s my rule: if you’ve cleared the jam, confirmed power, reset it, and it still won’t run reliably, replacement often costs less than the time and frustration of chasing intermittent problems.
Common jam culprits (what to look for)
- Silverware, bottle caps, and small bones
- Fruit pits (peach, avocado) and corn cobs
- Fibrous foods like celery, onion skins, and artichoke leaves
- Starchy foods like potato peels and pasta
- Eggshells and coffee grounds (they can contribute to gritty sediment in the trap over time)
One hard-learned lesson from my own kitchen: a disposal is not a trash can. It’s a convenience for tiny scraps, not a meal cleanup system.
Maintenance tips to prevent future jams
Most disposal problems are preventable with a few habits that cost nothing and take seconds.
Use it the right way
- Run cold water before, during, and 10 to 20 seconds after using the disposal. Cold water helps keep fats more solid so they move through instead of coating pipes.
- Feed small amounts gradually. Don’t dump a whole plate of scraps at once.
- Let it reach full speed before adding food.
Keep it clean without wrecking it
- Once a week, grinding a handful of ice cubes can help dislodge residue and freshen the chamber.
- For odors, grind a few citrus peels (lemon or orange) occasionally.
- Use a disposal brush to clean the underside of the rubber splash guard.
Avoid these
- Grease, oil, and fat
- Fibrous and starchy scraps in large quantities
- Harsh drain chemicals that can damage components and seals
What not to do
- Do not put your hand inside the disposal, even if it is unplugged
- Do not keep flipping the switch if it hums but will not spin
- Do not keep resetting a breaker that trips repeatedly
- Do not pour chemical drain cleaners into a disposal or the sink drain connected to it
Troubleshooting checklist
- Switch OFF, then cut power (unplug or breaker OFF)
- Press reset button
- If humming, unjam with hex wrench
- Remove obstruction with tongs
- Press reset again
- Check outlet power and GFCI (skip lamp test if hardwired)
- Check breaker (OFF then ON)
- Consider wall switch or air switch issues
- If leaking or repeatedly tripping, plan replacement
When to call a pro
Call a plumber or electrician if any of these are true:
- You see water leaking from the disposal body or wiring area
- The breaker keeps tripping after you’ve cleared jams and reset
- You have a hardwired disposal and you’re not comfortable working around electrical connections
- The disposal is seized and won’t free up with the hex wrench
There’s no shame in tapping in help. The goal is a safe fix, not a heroic story.
About Marcus Vance
Content Creator @ Grit & Home
Marcus Vance is a lifelong DIY enthusiast and self-taught home renovator who has spent the last decade transforming a dilapidated 1970s ranch into his family's dream home. He specializes in budget-friendly carpentry, room-by-room renovations, and demystifying power tools for beginners. Through his writing, Marcus shares practical tutorials and hard-learned lessons to help homeowners tackle their own projects with confidence.