🚨 In a DIY emergency or rush?
Skip the details and jump straight to our 30-second cheat sheet for the most crucial info.
There are a lot of weeds I will pull barehanded without thinking twice. Poison ivy, poison oak, and poison sumac are not in that category. These plants are basically tiny oil factories, and the oil (urushiol) is what causes the blistering rash. It gets on your gloves, your shovel handle, your shoelaces, and your dog’s fur, then it keeps on causing problems long after the plants look “gone.”
The good news: you can absolutely get rid of them with a plan that is safe, thorough, and realistic for a weekend DIYer. Below I will walk you through identification, the right protective gear, removal options that actually work, and the cleanup steps most people skip (then regret).
First, make sure you are fighting the right plant
If you misidentify these, you either (1) leave the real problem behind, or (2) destroy a harmless native plant you actually want. Use a couple of cues together, not just one.
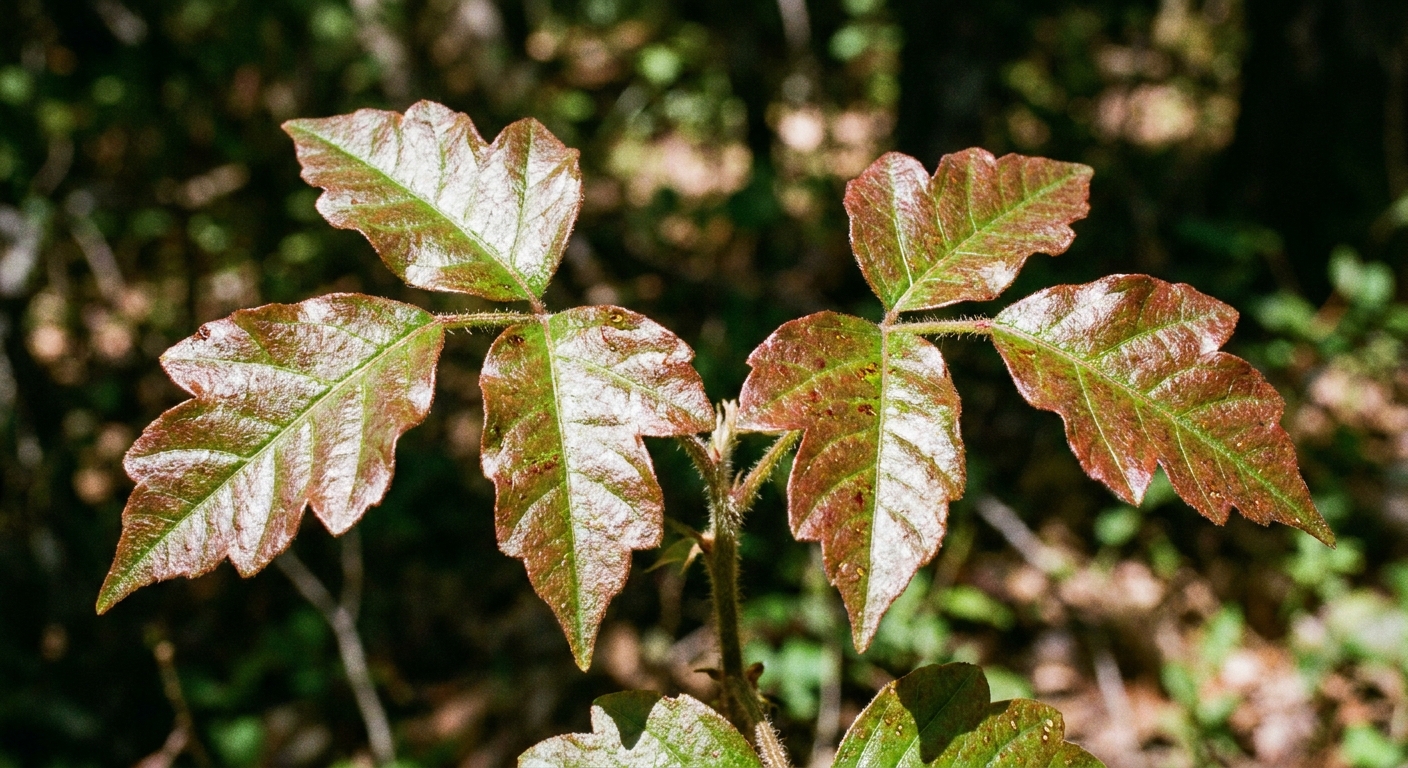
Poison ivy (Toxicodendron radicans)
- Leaf pattern: Usually three leaflets, with the center leaflet on a longer stem. Edges can be smooth or slightly toothed.
- Growth habit: Can be a groundcover, a shrub, or a climbing vine.
- Vines: Mature vines on trees often look like thick, hairy ropes.
- Season clues: New growth can be reddish. Fall color can be yellow, orange, or red. White or off-white berries are common.
Poison oak (Toxicodendron diversilobum in the West, Toxicodendron pubescens in the East/South)
- Leaf pattern: Also typically three leaflets, but the edges are more lobed, kind of like an oak leaf.
- Growth habit: Often a shrub, sometimes a vine depending on region.
- Texture: Leaflets can look slightly “quilted” or textured.
Poison sumac (Toxicodendron vernix)
- Leaf pattern: 7 to 13 leaflets on one stem (not groups of three). Leaflets are smooth-edged and oval.
- Where it grows: Wet areas, boggy edges, ditch lines, swampy woods. If your yard is dry, this one is less likely.
- Berries: Whitish or pale green berries that hang in loose clusters.
Common look-alikes (worth a quick check)
- Virginia creeper: Usually five leaflets (sometimes three on young growth). Has tendrils with little suction-cup pads. Not an urushiol plant, but can irritate some people.
- Boxelder seedlings: Can show three leaflets. Look for opposite branching on the stem (ivy is alternate).
- Fragrant sumac or staghorn sumac: These are not poison sumac. They often have red berry clusters and are typically in drier sites.
If you are unsure, snap a few close, well-lit photos of the leaves and the way they attach to the stem and compare against your state extension office site. When in doubt, treat it as poisonous and suit up.
Urushiol sticks around
Urushiol is a sticky oil. It is not the fluid from blisters that spreads the rash. It is oil transfer from plant to skin or from contaminated items to skin.
- On skin: It can bind fast. Wash as soon as possible. Minutes matter, but washing even later can still help, especially if you do it thoroughly.
- On tools, shoes, gloves, pet fur: It can remain potent for a long time, especially on items stored dry. Think months, and it can be even years on certain surfaces.
- In dead plant material: Urushiol can still be active on dead vines and leaves. “It’s brown, so it’s safe” is a classic mistake.
This is why removal and cleanup have to be treated like one project, not two separate chores.
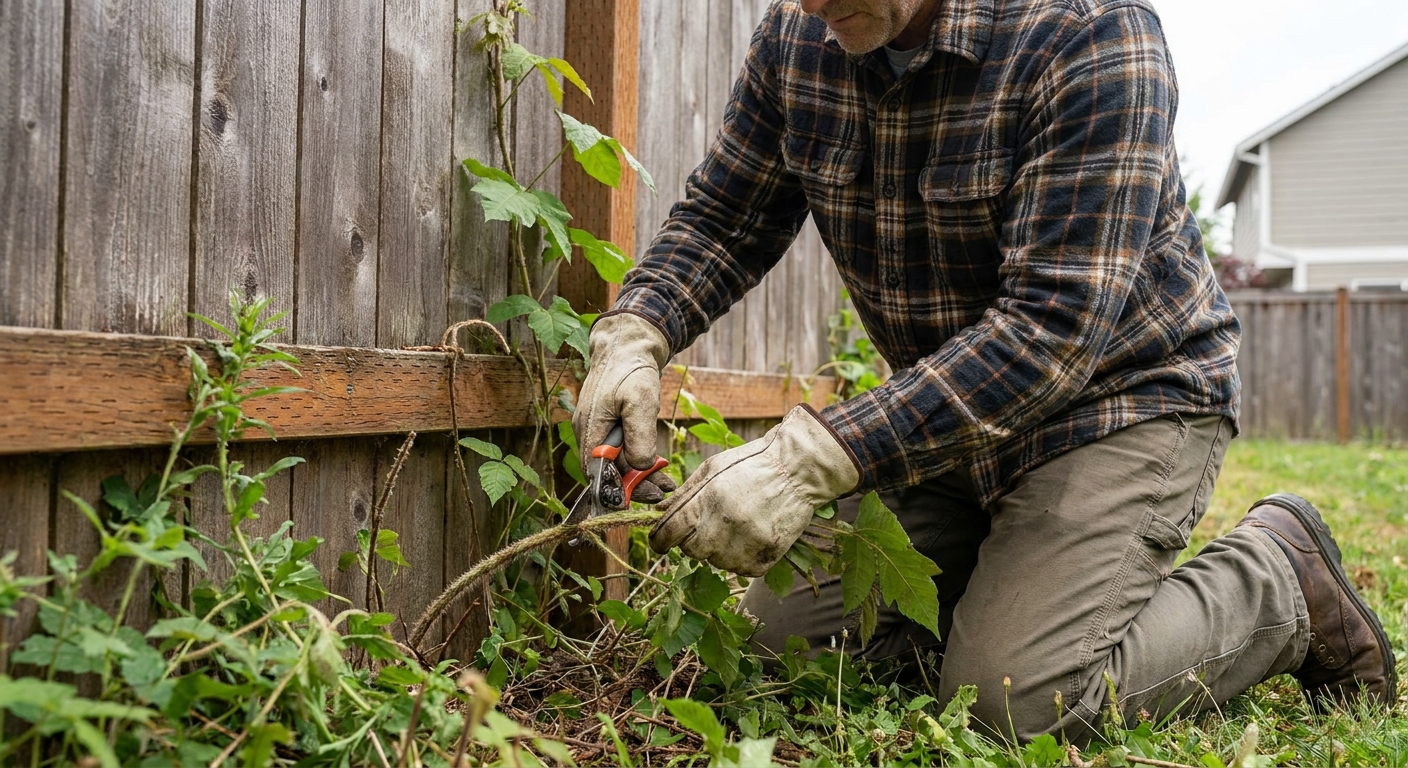
PPE: what I wear so I do not pay for it later
I learned this the hard way early on in our fixer-upper years. I yanked a vine, felt proud, then scratched my wrist with a contaminated glove cuff while packing up. Two days later, my wrist looked like I tried to arm-wrestle a nettle bush.
Minimum protection for removal work
- Gloves: Heavy-duty nitrile gloves (chemical-resistant) are best. If you need work gloves for thorns, wear nitrile gloves underneath and treat the outer gloves as contaminated. I also like double-gloving if I am in a dense patch or doing a lot of pulling, because tears happen.
- Long sleeves and long pants: Smooth, tightly woven fabric is easier to wash clean than fuzzy fleece.
- Socks and closed shoes or boots: No ankles exposed.
- Eye protection: Especially if cutting vines or using herbicide.
- Optional but smart: Disposable coveralls if you are wading into a dense patch.
Two rules that prevent most accidental exposure
- Do not touch your face, phone, or car keys with gloved hands. Set up a clean zone for your water bottle and tools you are not using.
- Peel gloves off correctly. Turn them inside out as you remove them and toss them straight into a trash bag.
Big safety note: Never burn poison ivy, oak, or sumac. The oil can hitch a ride on smoke particles and irritate lungs and airways. That can become a medical emergency. Also, do not toss “dead-looking” vines onto a brush pile you plan to burn later, and do not burn firewood with dead vines attached. That is a common way people accidentally inhale vaporized urushiol.
Pick your removal method
The best approach depends on how much you have, where it is (open yard vs. fence line vs. up a tree), and whether you can tolerate some regrowth while you win the long game.
Option 1: Cut and bag (best for small patches, seedlings, and isolated plants)
This is the method I use when I can clearly see the plant and physically remove it without turning the whole area into a wrestling match.
- Wait for calm weather. Less plant material whipping onto you, and easier control of what touches your clothes and skin.
- Water the area lightly the day before. Damp soil releases roots easier.
- Cut vines at the base first. For climbing vines, cut a section out (two cuts several inches apart) so the top dies back. Do not yank on tree-climbing vines, you can damage bark.
- Dig out the root crown. Use a shovel or digging fork. Poison ivy spreads by rhizomes, so remove as much of the main root mass as you can.
- Bag immediately. Use heavy contractor bags. I like to double-bag if the material is wet or messy.
- Mark the spot. Expect a few resprouts. You will want to find the exact area quickly later.
Tip: If the patch is big, do not drag vines across the yard. Carry the bag to the plant, not the plant to the bag.
One more watch-out: Avoid weed whackers and mowers for removal. They can fling contaminated plant bits onto your legs, shoes, and tools, turning a small patch into a cleanup problem.
Option 2: Smothering (best for groundcover poison ivy where you want to avoid chemicals)
Smothering works by denying light and exhausting the plant over time. It is slower, but it is very kid and pet friendly once the area is covered and secured.
- Cut the growth down low with pruners or loppers.
- Cover the entire patch with overlapping cardboard (remove tape) or heavy landscape fabric.
- Seal the edges. Use rocks, bricks, or stakes so wind and critters do not open gaps.
- Add 3 to 6 inches of mulch on top to keep it in place and improve looks.
- Leave it in place long enough. Plan on a full growing season. Two is better for stubborn patches.
Watch-out: Shoots can creep out from the edges. Make the covered area larger than the visible plants by a couple of feet if you can.
Option 3: Targeted herbicide (best for large infestations and viney fence lines)
I am budget-minded and I prefer mechanical removal when possible, but there are times herbicide is the most practical tool, especially where roots are woven through a hedge, a chain-link fence, or a big slope you cannot safely dig.
What products typically work
- Glyphosate: Non-selective. It will kill grass and most plants it touches.
- Triclopyr: Often more selective for woody vines and broadleaf plants, and can spare grasses depending on formulation and use. Read the label carefully.
Timing matters: Follow the product label. In general, applications work best when the plant is actively growing and not drought-stressed. Many pros like late summer to early fall because the plant is sending energy back to roots, which helps move herbicide down where you want it.
Two application methods that reduce collateral damage
- Cut-stump treatment: Cut the vine or stem near the base and apply herbicide to the fresh cut surface as directed on the label. Great for thick vines on fences and trees.
- Wipe-on application: Use a foam brush or sponge applicator to coat leaves, instead of spraying and drifting onto your garden.
Kid and pet safety: Keep children and pets away during application and until the product is dry or for whatever re-entry time the label specifies. Store concentrates locked up. Do not use “extra strong” mixes beyond label directions.
My honest caution: Spraying a big leafy mess feels satisfying, but drift happens. If you are near vegetable beds, roses, or a neighbor’s prized landscaping, switch to cut-stump or wipe-on.
Best times of year
- Early spring: Great for spotting new red-tinged growth and pulling small plants before they establish. Soil is often softer.
- Summer: Fast growth means fast results, but also more leaf surface to contaminate you. Wear full personal protective equipment (PPE).
- Late summer to fall: Excellent for systemic herbicide effectiveness on roots when the plant is healthy and growing (check label, and avoid drought-stressed plants).
- Winter: You can cut woody vines and reduce future growth, but remember: dead vines can still have urushiol. Gloves still matter.
Whatever season you choose, plan on follow-up. These plants are persistent, and your real win is consistency.
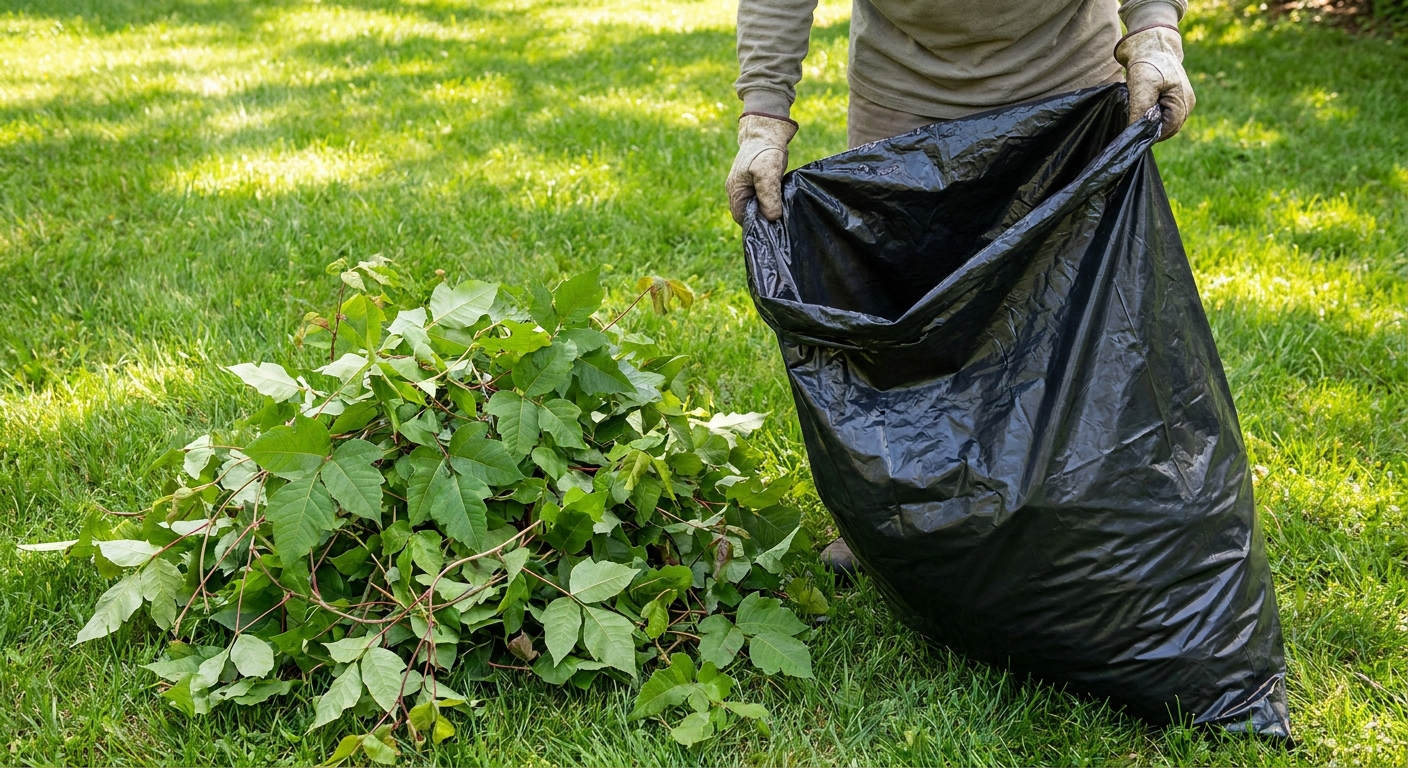
Safe disposal
Disposal rules vary by city and county, so check your local guidance. In general:
- Do bag it. Seal it tight. Label the bag with a marker if that helps you remember to handle it carefully.
- Do not compost it at home. Typical compost piles do not reliably break down urushiol fast enough to be safe.
- Do not burn it. This is worth repeating.
- Do not chip it for mulch. You do not want urushiol spread across the yard.
If your area offers yard waste pickup, they may allow bagged poison ivy material in yard waste, or they may require it to go with trash. When in doubt, bag it and put it with trash for landfill disposal.
Cleanup (the step that prevents round two)
This is the part that keeps poison ivy from “mysteriously” coming back as a rash next weekend.
Tools
- Wash hard tools (shovels, pruners, loppers) with dish soap and cool water. Soap helps lift oils.
- Wipe handles thoroughly. Handles are where oil hides.
- Consider rubbing alcohol on metal parts and handles as a final wipe, then wash again. Do this outdoors and away from flames.
- Sharpen and oil tools after if you used a lot of water and soap.
Clothes
- Do not hug the laundry basket. Put clothes directly into the washer.
- Wash separately from other laundry on hot if fabric allows, with a full detergent dose.
- Run an empty rinse cycle afterward if you are worried about transfer.
Shoes and gloves
- Disposable gloves: Toss them, bagged.
- Reusable gloves: Wash with soap and water, then air dry. If they are heavily contaminated and cheap, I treat them as disposable.
- Shoes/boots: Scrub soles and uppers with soapy water. Laces are surprisingly guilty. Replace laces if needed.
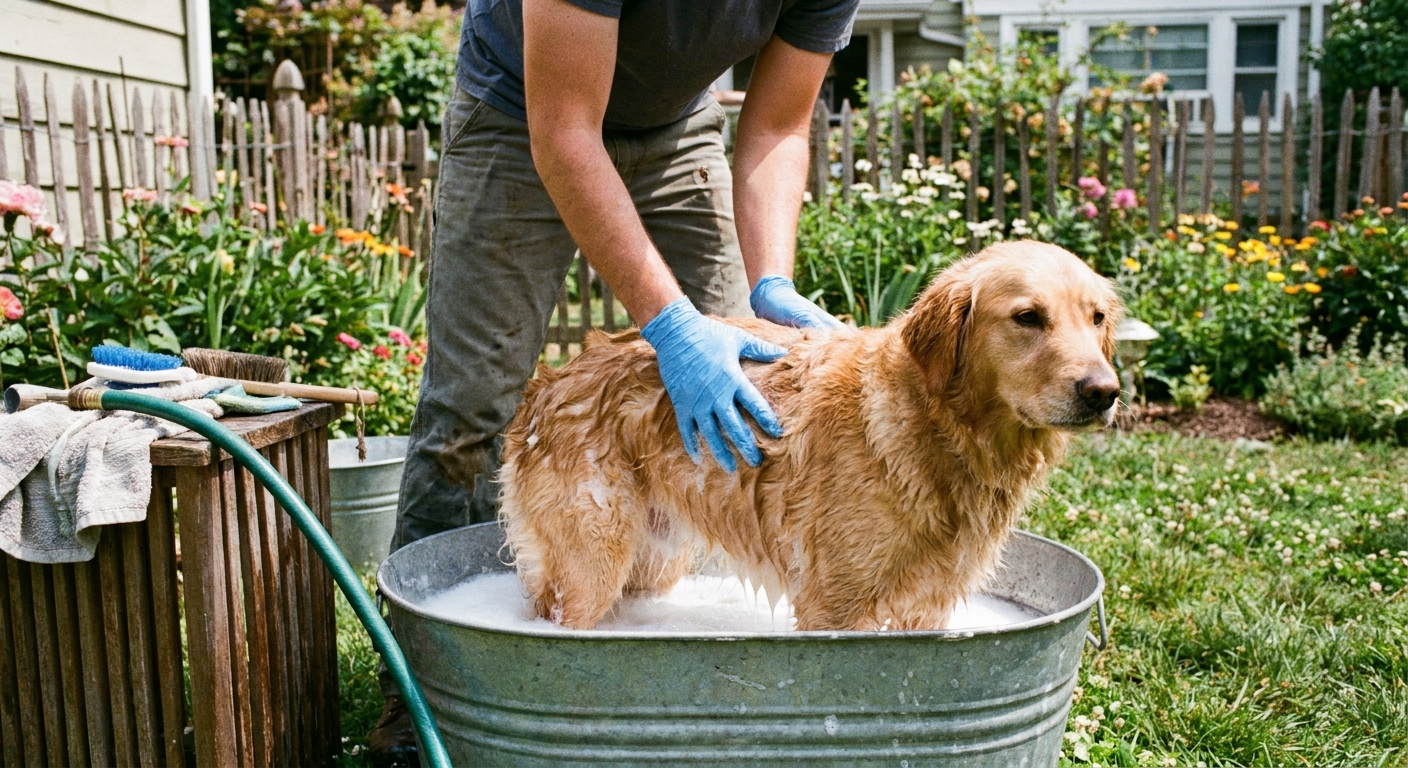
Pets
Dogs and outdoor cats can carry urushiol on fur without reacting to it, then transfer it to you.
- Bathe pets with pet shampoo after they have been in the area.
- Wear gloves while bathing if you suspect exposure.
- Wash collars and leashes too.
Keep it from coming back
Poison ivy and friends are opportunists. They love neglected edges, thin turf, brush piles, and sunny fence lines.
- Patrol the edges. Walk fence lines, sheds, wood piles, and tree lines every couple weeks during growing season.
- Fix bare soil. Reseed grass or plant groundcover so you do not leave open real estate.
- Control vines on trees. Cut at the base and let the upper vine die and weather off naturally. Do not rip it.
- Keep mulch tidy. A maintained mulch bed is harder for seedlings to establish in than a weedy, thin layer.
- Expect a second pass. Set a calendar reminder for 2 to 4 weeks after removal to check for resprouts.
When to call a pro
There are situations where I recommend hiring a licensed, insured vegetation or tree care pro:
- Vines high in trees where removal involves climbing or ladder work.
- Huge infestations that will take multiple weekends and create a lot of contaminated debris.
- Severe past reactions or household members who are highly sensitive.
- Hard-to-reach slopes where falls are a real risk.
- Near waterways or wetlands, where herbicide choice and application has extra rules.
If you do hire it out, ask what method they use (cut-stump, foliar, mechanical), how they handle disposal, and how they prevent spreading contamination to your driveway and entryways.
If you think you were exposed
I am not a doctor, but these first steps are widely recommended and can make a big difference:
- Wash skin ASAP, with friction. Use cool water and plenty of soap, and scrub with a washcloth (including under nails). Urushiol behaves like sticky mechanic’s grease. A quick rinse often is not enough.
- Consider a specialized wash. Products like Tecnu or Zanfel can be helpful, especially if you cannot get to a real scrub right away, or if you suspect oil is still on your skin.
- Wash clothing and gear as described above.
- Seek medical care for facial or genital involvement, widespread rash, signs of infection, or any breathing issues (especially if smoke exposure occurred).
Basic itch relief (while it heals)
- Cool compresses can help take the edge off.
- Calamine lotion or colloidal oatmeal baths can soothe itchy skin.
- Oral antihistamines can help some people sleep through the itch, but they do not remove urushiol or “cure” the rash.
Quick references (worth bookmarking)
- Your state extension office plant ID and control guides (search: “[state] extension poison ivy”).
- CDC and major dermatology organization guidance on poison ivy/oak/sumac exposure and rash care.
The 30-Second Cheat Sheet
Essential takeaways for: Get Rid of Poison Ivy, Oak, and Sumac
Identify it fast
- Poison ivy: 3 leaflets, can be groundcover or vine, older vines look like hairy rope.
- Poison oak: 3 leaflets with lobed, oak-like edges.
- Poison sumac: 7 to 13 leaflets on one stem, smooth edges, usually in wet areas.
Protect yourself
- Wear heavy-duty nitrile gloves (consider double-gloving), long sleeves, long pants, closed shoes, and eye protection.
- Never burn poison ivy, oak, or sumac. Smoke can seriously injure lungs. Do not burn firewood with dead vines attached.
- Avoid weed whackers and mowers on it. They can pepper you with contaminated plant bits.
Choose a removal method
- Small patch: Cut, dig the root crown, and bag immediately.
- Large ground patch: Smother with overlapping cardboard plus 3 to 6 inches of mulch for at least one full season.
- Fence lines and big infestations: Use targeted herbicide (glyphosate or triclopyr) via cut-stump or wipe-on to avoid drift.
Dispose and decontaminate
- Bag plant material. Do not compost, chip, or burn.
- Wash tools and handles with dish soap and cool water. Consider an alcohol wipe, then wash again.
- Wash clothes separately. Scrub shoes and laces.
- Bathe pets if they have been in the area, and wash collars and leashes.
If you think you were exposed
- Wash skin as soon as possible. Use soap plus friction (a washcloth) and rinse well. Specialized washes like Tecnu or Zanfel can help.
- Seek care for facial or genital involvement, widespread rash, signs of infection, or any breathing issues (especially after smoke exposure).
Remember
- Urushiol oil can stay active on tools, shoes, and dead vines for a long time, even years. Cleanup is half the job.
- Call a pro for vines high in trees, steep slopes, huge infestations, or if your family has severe reactions.
💡 Tip: Scroll up to read the full article for detailed, step-by-step instructions.
⬆️ Back to topAbout Marcus Vance
Content Creator @ Grit & Home
Marcus Vance is a lifelong DIY enthusiast and self-taught home renovator who has spent the last decade transforming a dilapidated 1970s ranch into his family's dream home. He specializes in budget-friendly carpentry, room-by-room renovations, and demystifying power tools for beginners. Through his writing, Marcus shares practical tutorials and hard-learned lessons to help homeowners tackle their own projects with confidence.