
When a hot water recirculating pump is working, you barely think about it. You crack the tap, and the hot water shows up fast. When it is not working, you are right back to the old routine: run the faucet, watch gallons go down the drain, and wonder if the pump died overnight.
I have been there. In my old 1970s ranch, I spent more than a few mornings troubleshooting why the far bathroom went lukewarm forever even though the recirc pump was "on." The good news is most failures are simple: power, settings, a stuck valve, or air in the line. Let’s walk through the fixes in the order that saves the most time.
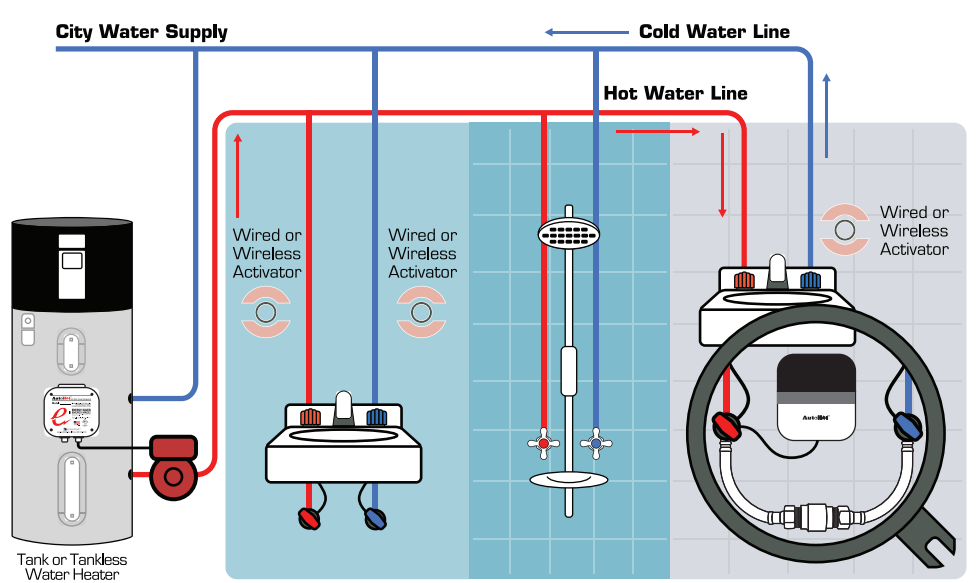
First: Identify your system
The troubleshooting is similar, but the system type changes where you look for the return path, valves, and check valves.
- Dedicated return-line system: A separate return pipe brings water back to the water heater. The pump is commonly at the water heater, but it can also be installed at the farthest fixture area (often under a sink or in a nearby access area). These systems usually have a true hot-water loop and may include a balancing valve.
- Under-sink “comfort” system (cross-over valve kit): A thermostatic cross-over valve under the far sink lets water “borrow” the cold line as a temporary return until the hot line warms up. Depending on the kit, the pump may be at the water heater or under the sink near that valve.
If you are not sure, look under the farthest sink. If you see a small valve connecting the hot and cold supplies, you likely have an under-sink cross-over setup.
Safety first
- Electric shock risk: Many pumps plug into an outlet. Keep the cabinet dry and unplug before touching wiring or the pump body.
- Scald risk: Hot water lines can be very hot. Let things cool before handling valves or piping.
- Protect the heater: If you shut off valves, open a faucet briefly to relieve pressure.
- Know when to stop: If you smell gas, see active leaks, or feel unsure, stop and call a pro.
Step-by-step fixes
1) Confirm the pump has power
This sounds almost too basic, but it is the most common issue I run into after a weekend project or a cleaning spree in the utility area.
- Check the outlet: Plug in a lamp or phone charger to confirm the outlet is live.
- Look for a switched outlet: Some homes have an outlet controlled by a wall switch. Make sure the switch is on.
- Reset GFCI: Under-sink outlets and utility outlets are often GFCI protected. Press reset on the outlet. Also check upstream GFCIs that might feed that circuit.
- Breaker: Confirm the breaker did not trip.
Quick test: If your pump is plug-in style, unplug it for 10 seconds and plug it back in. Some models “wake up” with a gentle hum or vibration.
2) Verify timer, smart plug, or controller settings
A lot of recirc pumps are perfectly healthy but are simply not being told to run.
- Mechanical timer: Make sure the current time is set correctly, and the on-tabs are actually pushed down (or up, depending on style).
- Digital timer: Confirm it is not in “random,” “vacation,” or an old schedule that no longer matches your routine.
- Smart plug: Check Wi‑Fi connection, schedules, and any “away mode.” After power outages, some smart plugs default to off.
Simple isolation move: Temporarily bypass the timer and plug the pump straight into a working outlet for 10 to 15 minutes. If hot water starts arriving quickly again, your timer or controller is the culprit.
3) Check aquastat or temperature sensor behavior
Some pumps use an aquastat (temperature control) so the pump runs only when the loop cools down. If the setpoint is too low, the sensor is loose, or the control differential is too narrow, the pump may never run long enough to deliver hot water.
- Strap-on aquastat: Confirm it is snug against the pipe with good contact. If it is loose, it reads wrong.
- Setpoint: If adjustable, try nudging it slightly higher so the pump runs longer. Make small changes and wait a full cycle.
- Sensor placement: On return-line systems, the sensor should read loop temperature, not just the hottest spot right at the tank outlet.
If your pump only runs for a few seconds and quits repeatedly, that is often a control or sensor issue, not a “bad pump.”
4) Make sure the isolation valves are open
Many pumps are installed with valves for service. If someone partially closed one, the pump can cavitate (spin without moving water) or barely move flow.
- At the water heater, look for a valve on the hot outlet, the return line (if present), and sometimes on the cold inlet.
- Make sure handles are parallel to the pipe (typical “open” position for ball valves).
5) Check for flow limits in the loop
If you have a dedicated return loop, there may be one extra “gotcha” that makes a healthy pump look useless.
- Balancing valve: Some loops have a balancing valve to control flow. If it is mostly closed, hot water can take forever to arrive.
- Strainer or screen: Some systems have a small inline strainer, or the pump has a screen that can clog with debris after plumbing work. Follow the manufacturer instructions for cleaning.
6) Listen and feel for pump operation
With the pump powered and “called to run” by the timer or aquastat:
- Feel: Place your hand on the pump motor housing. A running pump usually has a gentle vibration.
- Listen: A smooth hum is normal. Loud buzzing, rattling, or a gravelly sound can indicate air, a stuck impeller, or a failing motor.
Common failures and fixes
Check valve stuck or failed
Recirc systems rely on check valves to keep water flowing the right direction and prevent backflow. When a check valve sticks open or closed, you can get weird symptoms: hot water migrating into the cold line, slow hot delivery, or a pump that runs but does not seem to help.
Symptoms of a check valve problem:
- Cold tap runs warm for a long time.
- Hot water at distant fixtures never really arrives faster, even though the pump runs.
- In under-sink cross-over systems, the cold line stays warmer than normal near the fixture.
Fixes to try:
- Identify where the check valve is: It may be built into the pump flange, on the return line, or part of the under-sink thermostatic valve assembly.
- Exercise the valve: If accessible, gently tapping the valve body (not hard enough to dent) sometimes frees a sticky internal poppet.
- Replace the valve: Check valves are relatively inexpensive compared to a pump and are often the true point of failure.
Air in the loop
Air in the line can stop circulation cold. Pumps are better at moving water than moving air, and an air pocket can act like a plug.
Signs of air issues:
- Gurgling sounds near the pump or in the line.
- Intermittent hot water delivery after plumbing work or after the water was shut off.
- Pump sounds louder than usual, like it is spinning too freely.
How to purge air (homeowner-friendly):
- Turn the pump off.
- Open the hot faucet at the farthest fixture and let it run until flow is steady.
- If you have a dedicated return loop, look for a purge point, bleeder, or service valve near the heater or pump. Some air pockets will not clear from a faucet alone. Follow the manufacturer instructions for your pump and piping layout.
- Turn the pump back on and re-test.
If you recently drained the water heater or had plumbing work done, I would put “air” near the top of your suspect list.
Under-sink cross-over valve problems
On comfort systems, the under-sink valve is the traffic director. If it is installed backward, clogged with debris, or stuck, the pump may run all day and still not deliver results.
- Confirm orientation: Many valves have arrows or markings for hot and cold sides.
- Check the fixture stops: Ensure both hot and cold shutoff valves under the sink are fully open.
- Debris cleanup: If you recently worked on pipes, sediment can lodge in the valve. Replacement is often faster than trying to rebuild a small thermostatic cartridge.
Reality check: These systems intentionally warm the cold line during operation. That is normal. What is not normal is the cold staying warm for hours when the pump should be off, or multiple cold fixtures across the house running warm for a long time. That points to a stuck-open cross-over valve, a failed check valve, or a plumbing cross-connection.
Pressure or expansion symptoms
Not as common, but if you see dripping at the temperature and pressure relief valve, frequent pressure swings, or banging pipes, you are probably dealing with a broader pressure or thermal expansion issue (like an expansion tank or pressure reducing valve problem). A recirc complaint can show up at the same time, but those symptoms deserve a separate, careful look. If that is happening, it is worth calling a plumber.
When the pump is the problem
If power is good, controls are calling for operation, valves are open, and you still have no circulation, the pump may have failed mechanically.
Clues your recirc pump is failing:
- No hum or vibration even with confirmed power and a working outlet.
- It hums but does not move water and gets hot to the touch.
- Repeated tripping of a GFCI or breaker when the pump tries to run.
- Visible leaks at the pump body, flanges, or weep points.
Before you replace it: Some pumps have a small screw or plug on the face that allows you to free a stuck rotor. Follow the manufacturer instructions exactly and shut off power first. If you are not 100 percent sure, do not poke around inside a motor housing.
Replacement notes
Under-sink comfort systems
- Do not forget the valve: If the pump is old, the under-sink thermostatic valve may be near the end of its life too. A weak valve can make a new pump look bad.
- Match the setup: Some kits pump at the heater, others at the far sink. Replace like-for-like unless you are intentionally redesigning the system.
- Noise matters: A slightly pricier pump can be noticeably quieter in a closet or utility room.
Dedicated return-line systems
- Size to your loop: You want enough flow to circulate the loop, not a monster pump that wastes energy and erodes comfort.
- Look for an ECM motor: Modern ECM circulators are typically more efficient and quieter than older designs.
- Check valves and balancing: A new pump will not fix a bad check valve, a clogged strainer, or a mostly closed balancing valve. Plan to inspect those during the swap.
Do not ignore insulation
If your loop cools down quickly, the system can feel like it “doesn’t work” even when it does. Insulating accessible hot lines and the return loop reduces standby losses and often improves the real-world wait time.
My thrifty rule: If your pump is more than 8 to 10 years old and you are already draining, unbolting, and fighting crusty fittings, it is usually worth replacing the pump and any easy-to-reach check valves at the same time. Labor is the expensive part, even when the labor is you on a Saturday.
Quick checklist
- Confirm outlet power, GFCI, breaker, and plug connection.
- Bypass timer or smart plug to test the pump directly.
- Verify timer schedule, or aquastat setpoint and sensor contact.
- Ensure isolation valves are fully open.
- On dedicated loops, check any balancing valve and any strainer or screen.
- Feel for vibration and listen for abnormal noise.
- Suspect check valve failure if cold water runs warm or circulation is inconsistent.
- Try purging air, and use the system purge point if you have one.
- If the pump trips power, leaks, or runs hot with no flow, plan for replacement.
When to call a pro
I am all for DIY, but plumbing is one of those trades where a small mistake can become a big water bill quickly. Consider calling a licensed plumber if:
- You see leaks at the water heater connections or corrosion that looks ready to crumble.
- You need to solder copper, modify gas appliance venting, or alter the water heater piping layout.
- The system involves a mixing valve, multiple zones, or you suspect a pressure problem.
- You have a tankless heater and are not sure the recirc setup is approved by the manufacturer. Some tankless units have built-in recirc modes and specific pump requirements that change the troubleshooting steps.
A final tip
If you only change one thing today, make it this: bypass the timer and run the pump plugged straight into a working outlet for a short test window. That single move separates “control issue” from “plumbing issue” in minutes, and it keeps you from buying a new pump when the real problem is an inexpensive timer that lost its settings after a power flicker.
If you want to go a step further, snap a quick photo of your setup at the water heater and under the far sink before you loosen anything. I cannot tell you how many times that simple photo has saved me from reconnecting a valve backward after a long day.
About Marcus Vance
Content Creator @ Grit & Home
Marcus Vance is a lifelong DIY enthusiast and self-taught home renovator who has spent the last decade transforming a dilapidated 1970s ranch into his family's dream home. He specializes in budget-friendly carpentry, room-by-room renovations, and demystifying power tools for beginners. Through his writing, Marcus shares practical tutorials and hard-learned lessons to help homeowners tackle their own projects with confidence.