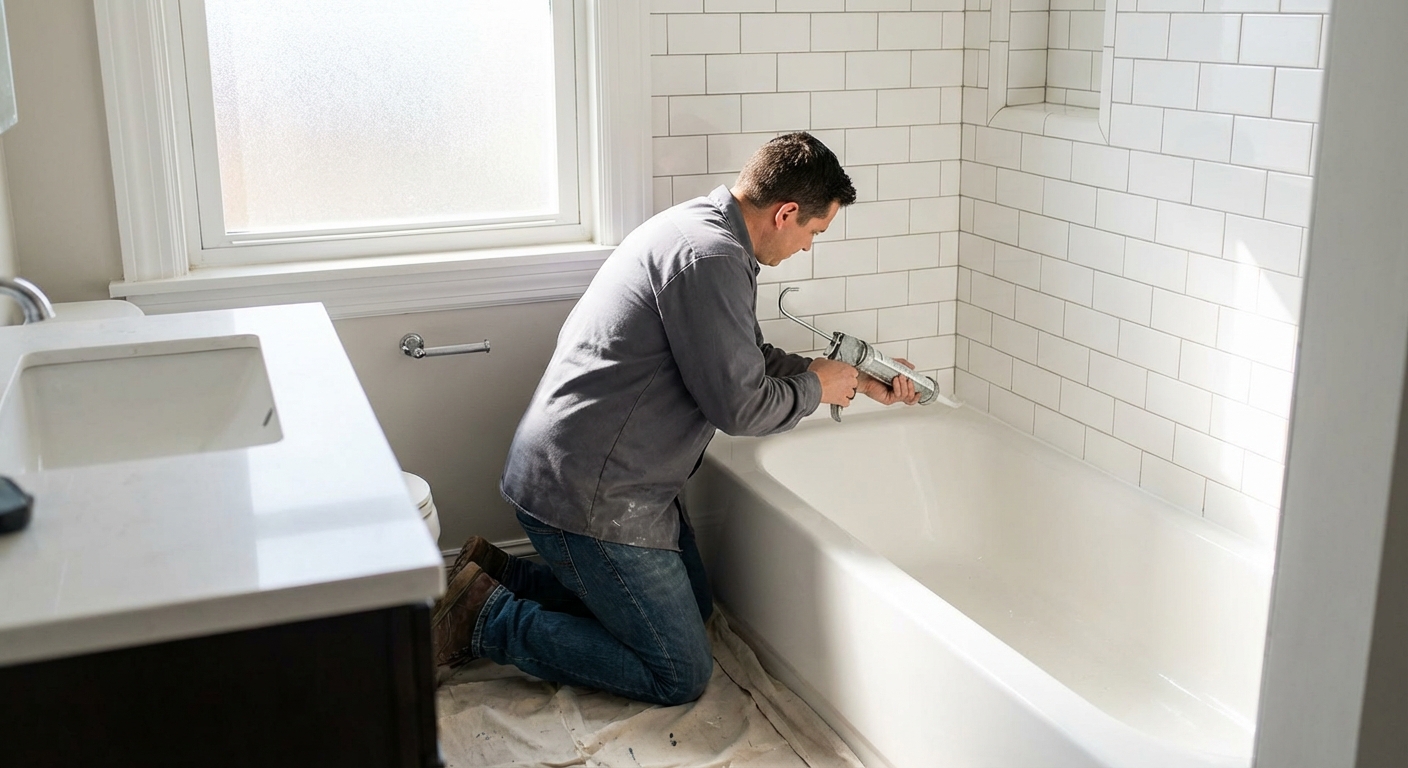
I still remember the first tub I ever re-caulked. I cut the tip too big, tried to fix it by adding more caulk, and ended up with a wavy mess that collected hair and soap scum like it was its job. The good news is caulking is not hard. It is just fussy. The difference between “DIY obvious” and “pro clean” is almost all prep and a few small technique choices.
This guide walks you through removing old caulk, prepping the joint, choosing the right product, taping for crisp lines, laying a smooth bead, tooling it, and letting it cure so it actually lasts.
What you need (and what you can skip)
Tools
- Caulk gun (basic is fine, dripless is nicer)
- Utility knife with a fresh blade
- Caulk removal tool or plastic scraper
- Rags or paper towels
- Shop vacuum (optional but handy)
- Spray bottle (for your tooling liquid)
Supplies
- Painter’s tape (blue or green)
- Bathroom cleaner and/or degreaser
- Isopropyl alcohol (70% or higher) for final wipe
- Mildew-resistant 100% silicone labeled “Kitchen & Bath” or “Tub & Tile” (my default for tub and shower seams)
- Optional: acrylic latex “kitchen and bath” caulk for lower-splash, paintable areas (more on this below)
Nice-to-haves
- Caulk finishing tool set (helpful, not required)
- Disposable nitrile gloves
- Foam backer rod (if your gap is wide)
Skip: re-caulking over old caulk “to save time.” It is one of the most common reasons new caulk peels.
Choose the right caulk: silicone vs. latex
Bathrooms are wet, steamy, and constantly moving a little. Your tub flexes when you stand in it. Your shower walls expand and contract with temperature. The right caulk needs to stick, stretch, and resist mildew.
Use 100% silicone when:
- You are sealing a tub-to-tile joint or shower pan-to-tile joint
- The area gets direct water regularly
- You want the longest-lasting seal
Pros: best water resistance, best flexibility, best longevity. Cons: messier, harder to tool, cannot be painted, needs clean surfaces.
Use acrylic latex (kitchen and bath) when:
- The joint is in a lower-splash area (trim, corners that do not get drenched)
- You need paintable caulk
- You want easier cleanup (water cleanup)
Pros: easy to apply and tool, paintable, easy cleanup. Cons: generally shorter lifespan in constantly wet zones, and it can shrink or crack sooner. It is best for intermittent moisture, not areas that stay wet.
My default for tub and shower seams: a quality 100% silicone labeled “Kitchen & Bath” or “Tub & Tile” with mildew resistance.
Where caulk goes (and where it does not)
Quick rule that saves a lot of redo work: changes of plane get caulk (corners, tub-to-tile, pan-to-tile). Flat wall joints are typically grout, not caulk.
Step 1: Remove all the old caulk
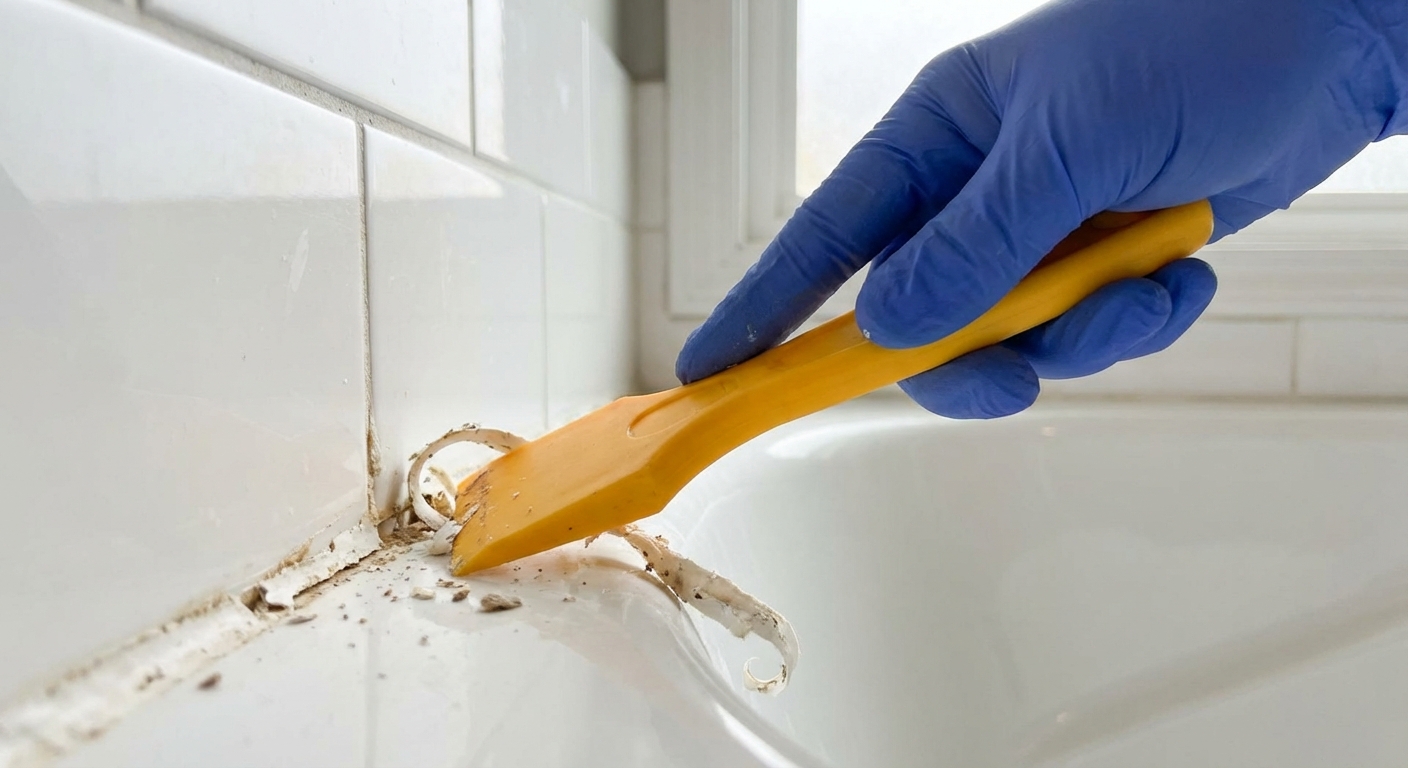
This is where most of the job happens. New caulk bonds to the surface, not to a dusty, soapy, half-removed bead from 10 years ago.
How to remove it cleanly
- Score the edges. Run a sharp utility knife along both sides of the old bead. Light pressure. Let the blade do the work.
- Lift and pull. Use a caulk removal tool or plastic scraper to get under the bead and pull it out in strips.
- Scrape residue. Keep going until you are down to clean tile, fiberglass, acrylic, or enamel.
- Vacuum crumbs. Old caulk bits love to hide in corners. A quick vacuum saves you from smearing them into your new bead later.
If it is stubborn: a dedicated caulk remover gel can soften silicone. Follow the label, ventilate the room, and make sure it is safe for your surface (some acrylic and fiberglass finishes do not love harsh chemicals). Then scrape again.
Step 2: Clean and prep the joint
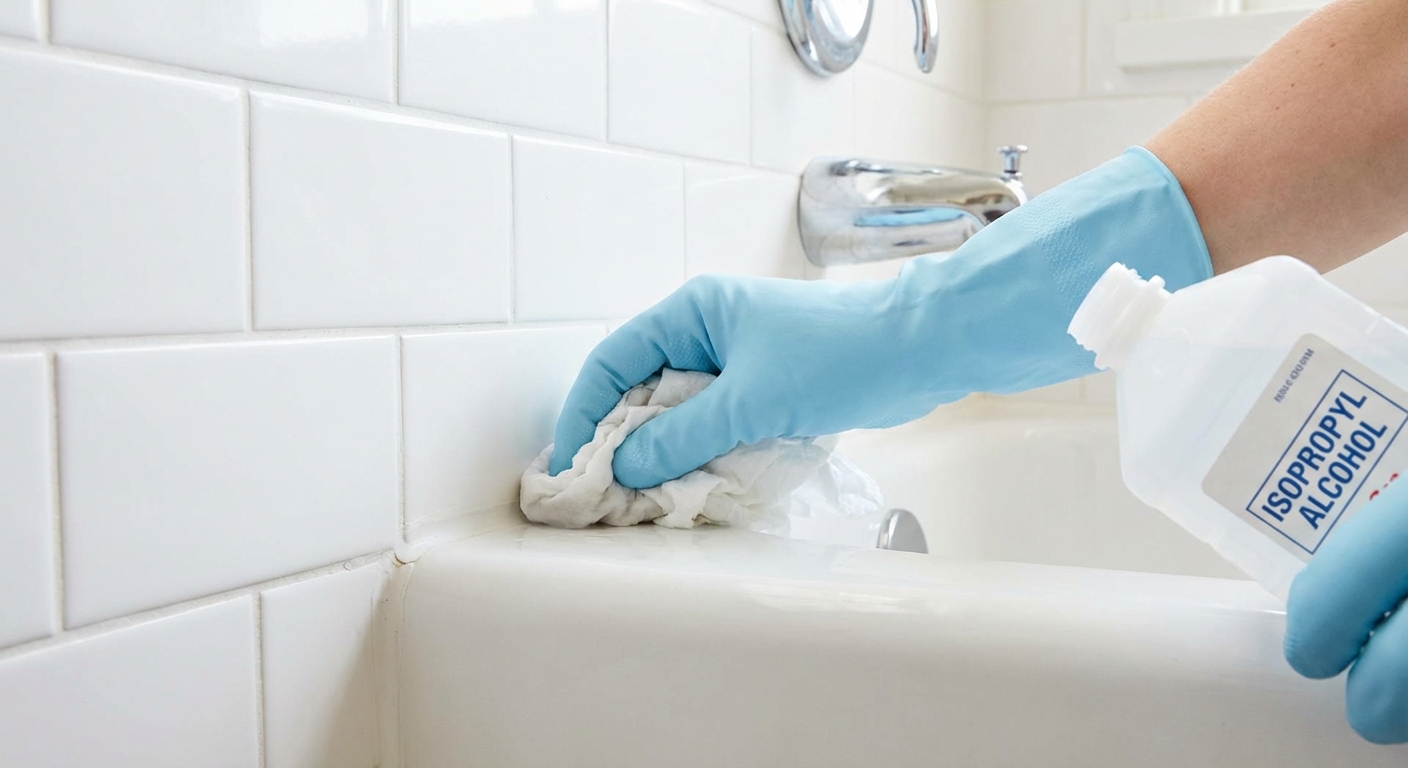
Caulk fails when it cannot grab the surface. Bathrooms are full of two things that ruin adhesion: soap film and moisture.
Prep checklist
- Remove soap scum. Wash the joint with a bathroom cleaner or degreaser and rinse well.
- Kill mildew stains. If you have black spots, treat them now. Caulk over mildew is like painting over rot.
- Final wipe. Wipe the joint with isopropyl alcohol to remove residue and speed drying.
- Dry completely. Give it time. If you can, let it air-dry for several hours or overnight.
Safety note: Never mix cleaners (especially bleach and ammonia). Rinse between products and ventilate the room.
Real talk: If you have soft drywall, loose tile, a spongy surround, or recurring mold that seems to be coming from behind the wall, caulk is not a fix. It is just a cover. Solve the underlying leak or damage first.
Step 3: Size the joint (backer rod)
If your gap is wider than about 1/4 inch, or it is deeper than it is wide, do not try to fill it with a mountain of caulk.
- Use foam backer rod to take up space so the caulk bead is the right shape.
- It helps the bead stay flexible and reduces cracking and sinkholes.
Pick a backer rod slightly larger than the gap so it fits snugly, then press it in with a blunt tool. You want room for caulk on top, not a packed-to-the-surface joint.
Step 4: Weight the tub (sometimes)
This is the “pro” move most DIY guides skip, but it is not one-size-fits-all.
For flexible tubs (many fiberglass and acrylic tubs): it is often recommended to add weight before caulking the tub-to-tile joint. You can fill the tub about halfway to three-quarters with water, or stand in the tub while someone else runs the bead. The point is to seal the tub in its “in use” position so the bead is not stressed the first time you take a bath.
For rigid tubs (cast iron, heavy steel): the tub usually does not flex much, so this step may be unnecessary. When in doubt, check the tub or surround manufacturer guidance.
After you caulk: keep the weight in place until the caulk has skinned and set up per the label (often several hours). Then drain later, and avoid using the tub or shower until the full water-ready time on the tube.
Step 5: Tape for clean lines

If you want that crisp, straight bead, tape is your best friend. It also keeps you from smearing caulk all over textured tile.
How to tape a tub or shower joint
- Run tape on the tile side and the tub side, keeping the gap between them consistent.
- Aim for a gap around 1/8 inch for many tub-to-tile seams, but match the tape gap to your actual joint width. Do not try to force a tiny bead into a wide joint.
- Press the tape edge down firmly, especially in grout lines, so caulk cannot bleed under it.
Tip: In inside corners, use short tape pieces so you can follow the shape without wrinkles.
Step 6: Cut the tip and prep the tube
This is where clean beads start. Most beginners cut the nozzle too big, which forces a fat bead and messy tooling.
How to cut the nozzle
- Cut at a 45-degree angle.
- Start small. You can always cut more off. You cannot put it back on.
- Match the opening size to your tape gap. For a 1/8-inch gap, cut a small opening.
- Puncture the inner seal (many caulk guns have a built-in poker).
My mistake to save you from: I used to cut a big opening to “make it go faster.” It does go faster. Straight into cleanup time.
Step 7: Lay a consistent bead

Technique that works
- Hold the gun steady. Keep the nozzle angle consistent and the cut face of the nozzle riding along the joint.
- Pull or push, but commit. Many people like to pull because you can see the bead forming. Some prefer to push because it can help force caulk into the gap. Either works if the nozzle stays tight to the joint and your pressure is steady.
- Move at a walking pace. Too slow makes blobs. Too fast makes gaps.
- Use consistent trigger pressure. The goal is an even rope of caulk, not a series of bursts.
One bead per section
Work in manageable lengths, about 2 to 4 feet. Silicone skins over quickly, and tooling gets harder once that happens.
Step 8: Tool it smooth
Tooling is just shaping the bead so it seals the joint and looks clean. You can use a caulk tool or your finger. Both work if you keep it simple.
Choose the right tooling liquid
For 100% silicone, plain water usually is not very effective because silicone repels it. A very mild soapy water mix (a couple drops of dish soap in a spray bottle), glass cleaner, or denatured alcohol can help keep silicone from sticking to your finger or tool.
Important: Check your caulk label. Some manufacturers recommend dry tooling only, and some do not love surfactants. If you use a helper liquid, keep it minimal. You want to shape the bead, not wash the surface.
Tooling with a finger
- Put on a glove if you want easy cleanup.
- Lightly mist your finger or tool with your chosen tooling liquid.
- With gentle, steady pressure, run your finger down the bead in one smooth pass, in the same direction you applied the caulk.
- Wipe excess onto a rag each pass so you are not smearing it back on the wall.
Tooling with a caulk tool
- Choose a radius that fits your joint.
- Pull the tool steadily. Do not stop and start every inch.
- Clean the tool often.
Big rule: Do not overwork it. More passes usually makes it worse, not better.
Step 9: Pull the tape
Pull the tape immediately after tooling, while the caulk is still wet.
- Pull slowly at a 45-degree angle away from the bead.
- If you see a spot that needs help, touch it up lightly and stop. Chasing perfection can tear the surface.
Step 10: Let it cure
Caulk that looks dry is not always cured. If you shower too soon, you can weaken the bond, trap moisture, or mess up the finish.
Typical cure times (check your tube)
- Silicone: “water-ready” can range from about 30 minutes to 24 hours depending on the product. Full cure is often 24 hours to several days depending on humidity and bead size.
- Acrylic latex: may skin fast, but still needs time before exposure to heavy water. Many are not meant for areas that stay wet.
My rule: plan for 24 hours without using the tub or shower unless your product specifically says otherwise.
Common mistakes that make caulk peel
- Caulking over old caulk. New caulk bonds poorly to old silicone and fails early. Remove it all.
- Applying to a damp joint. Moisture blocks adhesion. Dry thoroughly.
- Skipping the final alcohol wipe. Soap residue and body oils are real. Alcohol helps.
- Using the wrong product. Acrylic latex in a constantly wet tub-to-tile seam often does not last like silicone.
- Cutting the nozzle too large. Oversized bead means more tooling and more mess.
- Over-tooling. Too many passes pull caulk thin and can lift edges.
- Waiting too long to pull tape. If it skins, tape can tear the edge and leave jagged lines.
- Using the shower too soon. Water exposure before cure can cause bubbling, washout, or mildew later.
- Caulking a moving or failing surface. Loose trim, flexing panels, or crumbling grout will break the seal.
Quick troubleshooting
My bead has gaps
Stop and fill them right away, then tool once. Gaps left behind become leak paths and mildew pockets.
It looks lumpy after tooling
Usually too much caulk or too many passes. Next time cut a smaller nozzle and tool once with steady pressure.
Caulk is pulling away from one side
That side likely had residue or moisture, or the joint is moving. Remove and redo after better cleaning and drying. If movement is severe, check for damage or structural issues.
My simple “pro” checklist
- Remove every bit of old caulk
- Clean, alcohol wipe, and dry
- Use backer rod if the gap is wide
- Weight flexible tubs before caulking (if applicable)
- Tape both sides for clean lines
- Cut a small nozzle opening
- Lay a steady bead in short sections
- Tool once, pull tape immediately
- Let it cure before using
If you do those things, you are not just “putting caulk down.” You are building a seal that stays put and looks sharp every time you walk into the bathroom.
FAQ
Should I caulk the bottom edge of a shower surround?
In many one-piece fiberglass or acrylic surrounds, the manufacturer wants the seams sealed, but some designs have weep paths. If your surround or tile system includes weep holes or channels, do not block them with caulk. When in doubt, check the installation manual for your surround or pan.
Can I caulk over grout cracks in a shower corner?
Changes of plane, like wall-to-wall corners and wall-to-pan joints, are better handled with flexible caulk than rigid grout. If grout is cracking in corners, removing the corner grout and using silicone is often the right move.
What color caulk should I use?
White is classic for tubs. Clear can look great on busy tile but shows uneven beads more easily. Color-matched options exist for tile and grout tones, but double-check it is rated for kitchen and bath and is the type you want (silicone vs acrylic).
About Marcus Vance
Content Creator @ Grit & Home
Marcus Vance is a lifelong DIY enthusiast and self-taught home renovator who has spent the last decade transforming a dilapidated 1970s ranch into his family's dream home. He specializes in budget-friendly carpentry, room-by-room renovations, and demystifying power tools for beginners. Through his writing, Marcus shares practical tutorials and hard-learned lessons to help homeowners tackle their own projects with confidence.