🚨 In a DIY emergency or rush?
Skip the details and jump straight to our 30-second cheat sheet for the most crucial info.
If you’ve got central air, your outdoor unit is doing the heavy lifting in the worst possible place: out in the sun, next to mulch, cottonwood fuzz, lawn clippings, and whatever the wind drags in. The good news is a careful coil cleaning is one of the easiest homeowner maintenance tasks you can do that can help your system run more efficiently and put less strain on the compressor.
This isn’t one of those “my AC is not cooling” rescue articles. Think of this as preventative maintenance, the kind that keeps little problems from becoming expensive ones.
Quick note before you start: This guide is for the outdoor condenser coil (the outside unit). The indoor coil is a different animal. If you’ve got a heat pump, the outdoor coil is similar, but remember that unit can also run during heating season.
When coil cleaning helps
The condenser coil is the radiator-like surface wrapped around most outdoor units. Air has to move through those thin fins to dump heat outside. When the fins get packed with debris, airflow drops. That can mean higher run times, higher electrical use, and a harder-working compressor.
Coil cleaning tends to help most when you see:
- Visible “felt” on the coil fins from cottonwood, dryer lint (yes, it happens), or dust stuck to moisture.
- Grass clippings stuck to the outside after mowing or trimming.
- Leaves and seeds inside the cabinet around the coil and base.
- Longer runtimes than usual during the first hot stretch of the season, even if the system still cools.
Don’t expect miracles if the unit’s clean already, or if the issue is somewhere else (dirty indoor filter, iced indoor coil, low refrigerant, failing capacitor). But when the coil’s visibly clogged, a gentle cleaning can make a noticeable difference.
Safety first: power down
Before you touch anything, kill power. Outdoor units can start automatically if power’s on and the thermostat calls for cooling, even if you’re standing there with your fingers near the fan.
Do this in order:
- Turn the thermostat to OFF so the system isn’t calling for cooling.
- Pull the outdoor disconnect (usually a small gray box mounted near the condenser). Open it and remove the pull-out handle, or flip the switch to OFF depending on style.
- Turn off the breaker for the AC condenser at your main panel if you want the safest belt-and-suspenders approach.
- Wait a few minutes to confirm the fan’s fully stopped and things have settled. Then keep your hands out of electrical panels and compartments.
If any of this feels uncertain, stop and call an HVAC tech. No cleaning’s worth a shock.
Tools and supplies
- Garden hose with a gentle spray nozzle
- Work gloves and eye protection
- Soft brush (nylon bristles) or a coil brush
- Shop vacuum (optional, helpful for the base pan)
- Fin comb (optional, only if fins are bent)
- Coil cleaner labeled condenser-safe (optional for greasy grime)
My thrifty rule: start with the hose and a soft brush. Only step up to a cleaner if you’ve got stubborn gunk that water won’t move.
Step-by-step: clean the coil
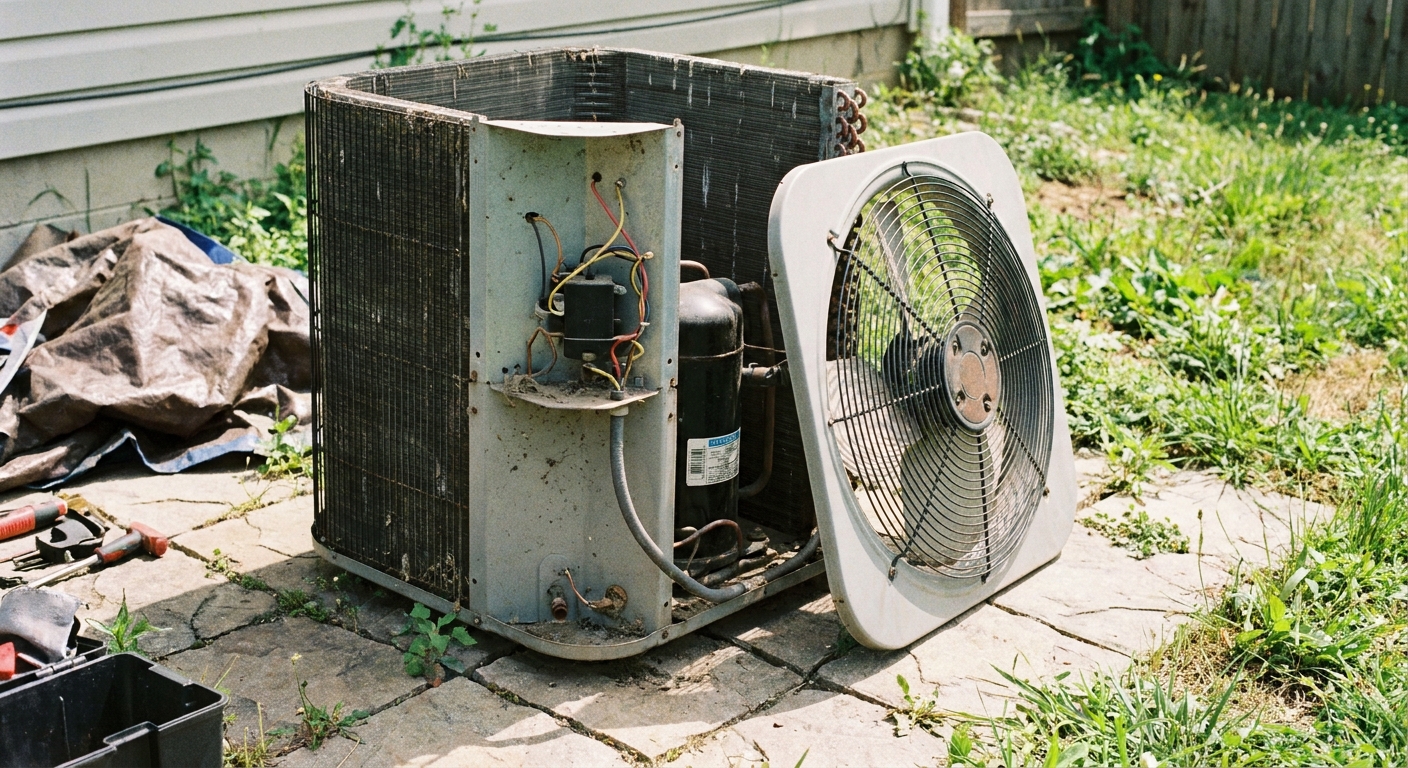
1) Clear the area and remove the top (only if needed)
Trim plants back to give the unit breathing room. Clearances vary by model, but a lot of units call for something like 12 to 24 inches on the sides (and keeping the top clear too). If you can, check your manual. Even 12 to 18 inches is a big improvement if your shrubs have been creeping in.
For a basic rinse, you can often leave the top in place and spray from the outside. For a deeper cleaning, you’ll usually get better results by removing the fan top so you can rinse from the inside out. That said, not every cabinet is homeowner-friendly to open, and that’s okay.
- Pick up sticks, leaves, and mulch around the base.
- If you remove the top, take out the screws and lift the fan assembly straight up and set it gently to the side without yanking the wires.
- Heads up: that fan top can be surprisingly heavy. Set it on a stable surface where it can’t slide and tug the wiring harness.
2) Dry debris first
If the coil’s packed with dry fuzz or leaves, pull that off before you add water. Otherwise you can make a paste that’s harder to remove.
- Use a gloved hand or a soft brush to lift debris off the fins.
- Vacuum leaves from the bottom pan if you can reach them.
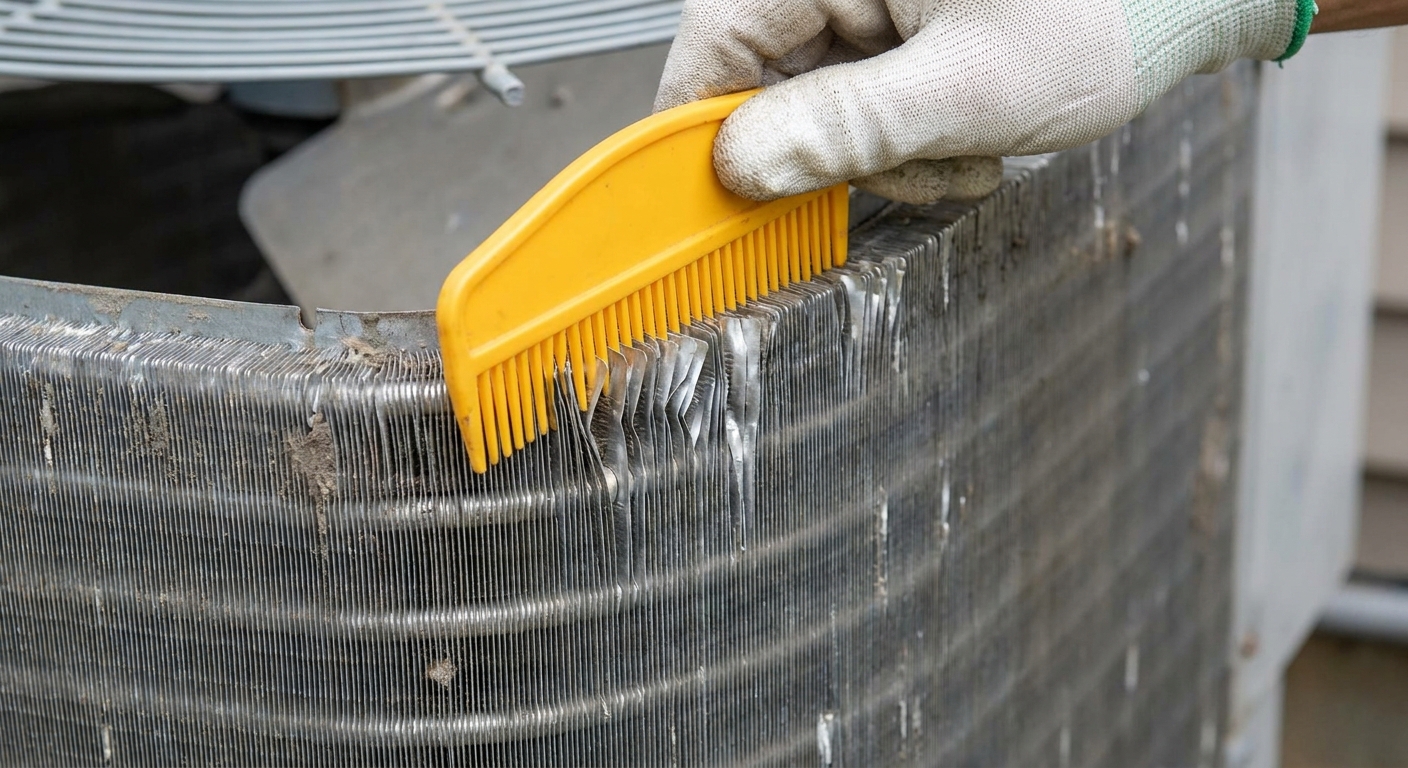
3) Straighten fins gently (optional)
Bent fins restrict airflow. If you’ve got a few mashed spots from a weed trimmer, dog toy, or hail, you can straighten them.
- Use a fin comb that matches the fin spacing if you’ve got one.
- Work slowly. The aluminum’s thin and easy to tear.
- If a section’s badly crushed, it’s fine to leave it and let a pro handle it during a service call.
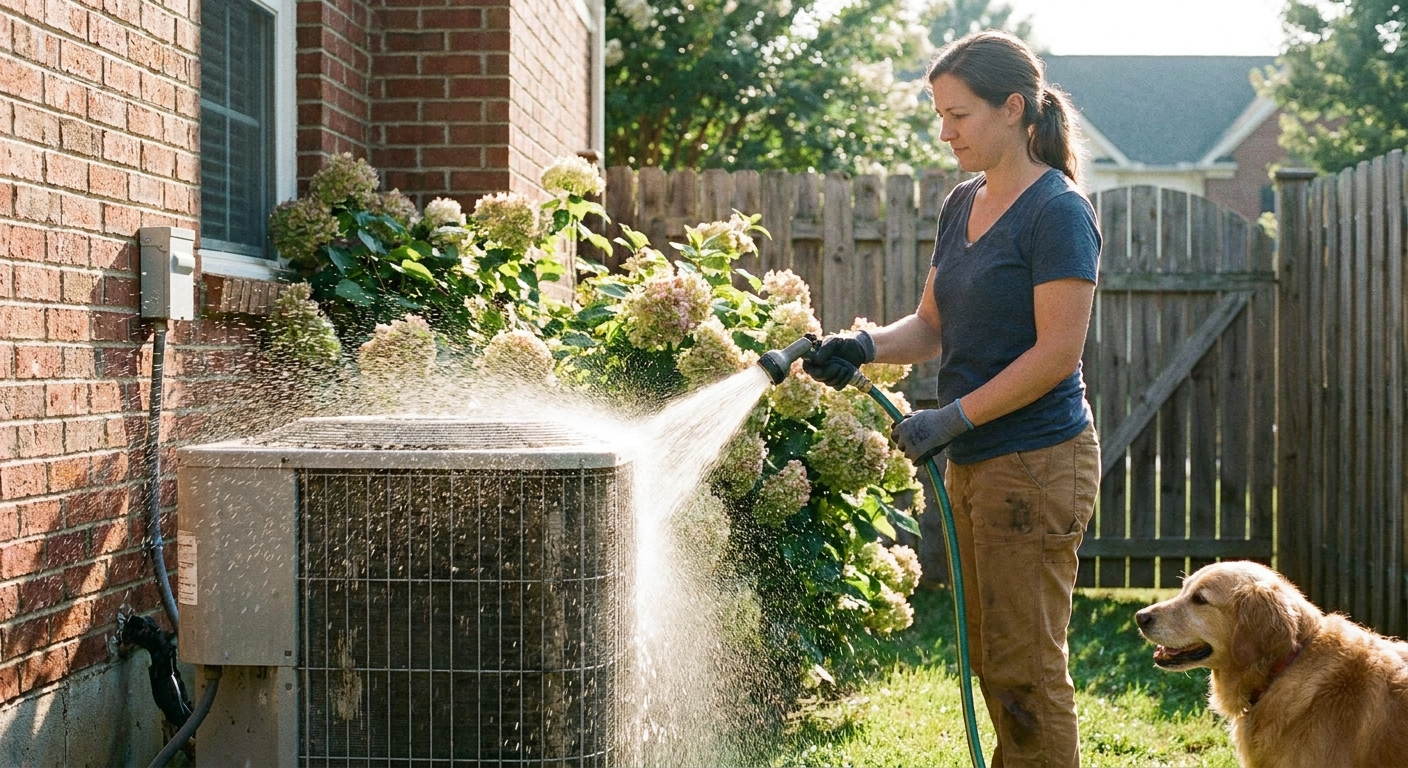
4) Rinse gently (inside-out is best)
If you removed the fan top, spray water from inside the unit outward through the fins. That pushes dirt back the way it came in.
- Use a gentle shower spray, not a jet.
- Spray perpendicular to the fins as much as you can, not at a sharp angle that can fold them over.
- Start at the top and work down in sections.
- Keep the nozzle a few inches away so you don’t mash the fins.
- Avoid spraying the fan motor, wiring harness, and any electrical areas directly. If the top’s still on, don’t flood water down into the fan motor vents.
If you didn’t remove the top, you can still rinse from the outside in. It just isn’t as effective on heavily clogged coils, and some coil guards make it tough to get a perfect rinse pattern.
5) Use coil cleaner only if needed
For greasy buildup (common near driveways, grills, or busy roads), a condenser-safe foaming cleaner can help. Follow the label exactly since some products are “self-rinsing” and others need a full rinse.
- Apply to the coil surface and let it dwell for the recommended time.
- Rinse thoroughly with low pressure if the product calls for it.
- Avoid overspray on plants. Rinse nearby shrubs with clean water afterward.
6) Reassemble and restore power
- Reinstall the fan top and all screws.
- Make sure nothing’s rubbing the fan blade.
- Turn breaker back on (if you shut it off).
- Reinsert the disconnect or flip it to ON.
- Set thermostat back to COOL and lower the temp a couple degrees to confirm it runs normally.
Optional: check the pad
While you’re there, give the unit a quick look for wobble. If the pad’s tilted or the unit’s vibrating like crazy, that’s worth addressing (or flagging for your next service visit).
What not to do
- Don’t pressure-wash the coil. High pressure folds fins over fast and can turn a “quick clean” into an expensive repair.
- Don’t blast water into the electrical compartment. Most units have a side panel where wiring and controls live. Keep water away from it.
- Don’t spray water straight down into the fan motor vents. Even though it lives outdoors, high-volume hose water can get past shields and shorten motor bearing life.
- Don’t use harsh household chemicals like bleach, strong degreasers, or acidic cleaners unless the product’s specifically made for condenser coils.
- Don’t scrub with a wire brush. You’ll flatten fins fast.
- Don’t straighten fins with a screwdriver. It’s tempting. It also tears fins and can puncture the coil.
I learned the pressure-washer lesson the hard way on an old window unit years ago. It looked clean for about five minutes until I realized I’d mashed the fins so badly it could barely breathe. Garden hose only.
How often to clean
Most homes do well with a light rinse and debris check once or twice per cooling season. The “right” schedule depends on your yard and your neighborhood.
A simple rule of thumb:
- Early spring: Quick inspection and gentle rinse to start the season clean.
- Mid-summer (optional): Another rinse if you mow a lot, have cottonwood, or see visible buildup.
- Fall: Clear leaves and make sure the base isn’t packed with debris before winter.
If you’ve got pets that shed near the unit, live near construction dust, or your condenser sits under a tree that drops seeds, plan on more frequent checks. It takes a few minutes to look, and that’s the whole point of preventative work.
Why it matters
Your condenser’s job is to reject heat. When airflow through the coil is restricted, the system can run at higher pressures and temperatures to get the same heat out. That can lead to longer cycles and higher energy use. More importantly, it can mean the compressor’s working harder than it needs to.
You don’t need gauges to understand the basic principle: better airflow equals easier heat transfer. Keeping the coil clean is one of the few DIY tasks that directly supports that.
After-cleaning checks
After you put everything back together, the unit should start and sound normal. Here are a few quick checks if something feels off.
- Fan doesn’t run: Confirm the thermostat’s calling for cooling, the disconnect is fully seated, and the breaker’s on.
- Rattling: A screw might be loose, or the fan shroud isn’t seated flat.
- Water inside unit: A little is normal. Give it time to dry and don’t open electrical panels.
- Breaker trips: Reset it once. If it trips again, stop and call a pro.
- Still running long: A clean coil helps, but it isn’t a cure-all. If performance is still poor, it might be time for a professional checkup.
When to call a pro
I love a good DIY win, but there are times to hand it off.
- You see oily residue on the coil or refrigerant lines.
- Fins are severely crushed across large areas.
- The unit trips the breaker, makes unusual electrical buzzing, or you smell burning.
- You’re not comfortable removing the fan top or working near electrical components.
A routine HVAC service call often includes coil inspection plus checks homeowners can’t do safely, like verifying capacitor health and refrigerant conditions.
The 30-Second Cheat Sheet
Essential takeaways for: How to Clean AC Condenser Coils
Best time to clean
- Spring before the first heat wave, and again mid-summer if you’ve got cottonwood fuzz, grass clippings, or dusty conditions.
Power-down checklist
- Thermostat to OFF
- Pull the outdoor disconnect (or switch it OFF)
- Optional but safest: flip the AC breaker OFF
Fast cleaning steps
- Clear leaves and debris around the unit.
- Dry brush or hand-remove thick fuzz first.
- Rinse coil with a garden hose on gentle spray. Best method is inside-out if you remove the fan top.
- Only use a condenser-safe coil cleaner if water won’t cut through grime (follow the label for rinse vs self-rinse).
- Reassemble, restore power, test run.
Do NOT do this
- No pressure washer.
- No wire brush.
- No bleach or harsh cleaners.
- Don’t soak the electrical compartment or spray water down into the fan motor vents.
How often
- Most homes: 1 to 2 times per cooling season, plus a quick fall leaf cleanup.
Why it matters
- Clean fins = better airflow = easier heat transfer, which can improve efficiency and reduce compressor strain.
💡 Tip: Scroll up to read the full article for detailed, step-by-step instructions.
⬆️ Back to topAbout Marcus Vance
Content Creator @ Grit & Home
Marcus Vance is a lifelong DIY enthusiast and self-taught home renovator who has spent the last decade transforming a dilapidated 1970s ranch into his family's dream home. He specializes in budget-friendly carpentry, room-by-room renovations, and demystifying power tools for beginners. Through his writing, Marcus shares practical tutorials and hard-learned lessons to help homeowners tackle their own projects with confidence.