🚨 In a DIY emergency or rush?
Skip the details and jump straight to our 30-second cheat sheet for the most crucial info.
If your AC has been running longer than usual, struggling to cool, or blowing weak airflow, a dirty indoor evaporator coil might be part of the problem. The catch is that this coil is delicate, usually tucked inside a metal box, and easy to damage if you get too aggressive.
I have cleaned my own coils more than once in our old 1970s ranch, and I have also made the classic beginner mistake of thinking, “If a little cleaner is good, a lot must be better.” It is not. With evaporator coils, gentle and methodical wins.
What it does
Your evaporator coil is the cold indoor coil that absorbs heat from your home’s air. Warm air passes over the coil, the refrigerant inside pulls heat out, and you get cooler air back through the ducts.
Over time, the coil can collect:
- Dust and lint that slips past the filter or gets pulled in when the blower runs
- Pet hair and carpet fuzz, especially with leaky return ducts
- Greasy film (common if the return is near a kitchen or you burn a lot of candles)
- Mildew or biofilm on the damp parts around the coil and drain pan
A light “fuzz blanket” restricts airflow and insulates the coil. That can reduce cooling and, in worse cases, contribute to coil icing.
When cleaning helps
Cleaning helps if
- Weak airflow from vents even with a clean filter
- Long run times and higher electric bills
- Musty smell when the AC starts
- Visible dust buildup on the coil face (after you open the access panel)
Cleaning will not fix
- Low refrigerant from a leak
- A failing blower motor or capacitor
- Major duct issues (collapsed duct, disconnected return)
- A clogged outdoor condenser coil (different job, different location)
Think of evaporator cleaning as “restore airflow and heat transfer,” not “solve every AC problem.”
Stop and call a pro
This is the most important part of the whole article.
Stop and call an HVAC technician if
- The coil is iced over (solid white frost or a block of ice)
- You see oily residue on the coil, copper lines, or in the cabinet (possible refrigerant oil from a leak)
- The copper tubing looks rubbed through, or you see widespread corrosion with pitting, flaking, or heavy buildup that looks severe
- You smell a strong chemical odor beyond normal “dusty AC” smell
- The drain pan is cracked, or the cabinet has water damage and mold
Coil ice can be caused by dirty airflow, but it can also be caused by low refrigerant or metering issues. Cleaning an iced coil without addressing the cause is like mopping while the sink is still overflowing.

Where it is
Most homes have the evaporator coil in one of these places:
- Above a furnace (upflow system) in a sheet-metal box called the coil plenum
- Below a furnace (downflow system)
- Inside an air handler (common with heat pumps, often in a closet, attic, garage, or basement)
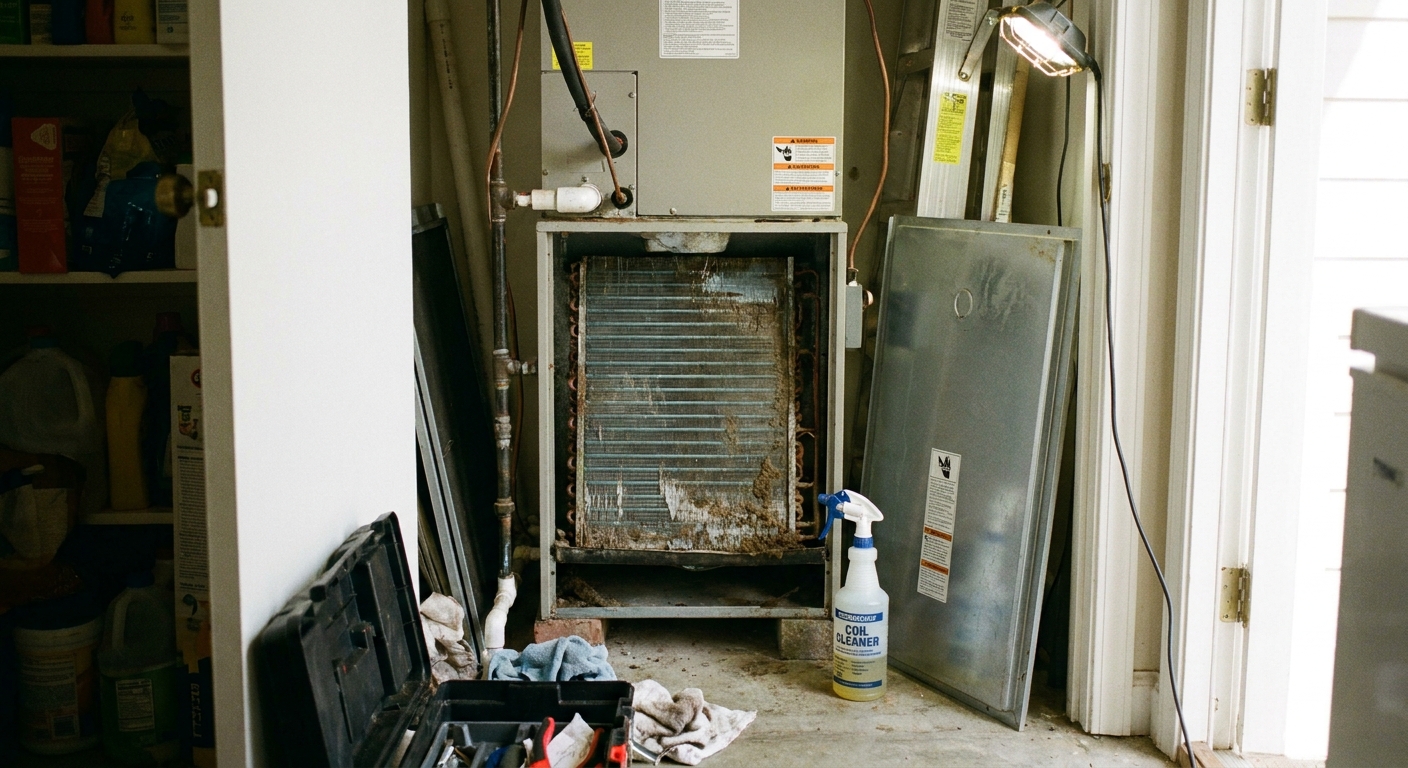
Look for the indoor unit near your filter and blower. The coil is usually on the “supply” side where cooled air leaves the unit. You might also see two copper refrigerant lines entering the coil cabinet.
Tools and PPE
Evaporator coils are made of thin aluminum fins that bend easily. The cleaning products also matter, because some chemicals can corrode aluminum or create nasty fumes in a tight closet.
PPE
- Nitrile gloves
- Safety glasses
- Dust mask or respirator if you are sensitive to dust and mold
Supplies
- Flashlight or headlamp
- Screwdriver or nut driver (often 1/4 inch or 5/16 inch)
- Soft brush (paintbrush works great)
- Shop vac with a soft brush attachment
- Foaming evaporator coil cleaner rated for indoor use (many are no-rinse, some are rinse, follow the label)
- Spray bottle of clean water (only if the label allows rinsing)
- Fin comb (optional but helpful)
- Towels and a shallow tray to catch drips
- UL 181 foil tape (in case your access panel is taped and you need to re-seal it)
What not to use
- Acid-based cleaners not specifically labeled for indoor evaporator coils
- Bleach (corrosive, fumes, and not a reliable solution for HVAC microbial growth)
- Pressure washer (will flatten fins and force water where you do not want it)
- Hard wire brush (fin damage)
If a product does not clearly say it is safe for evaporator coils and indoor use, I pass.
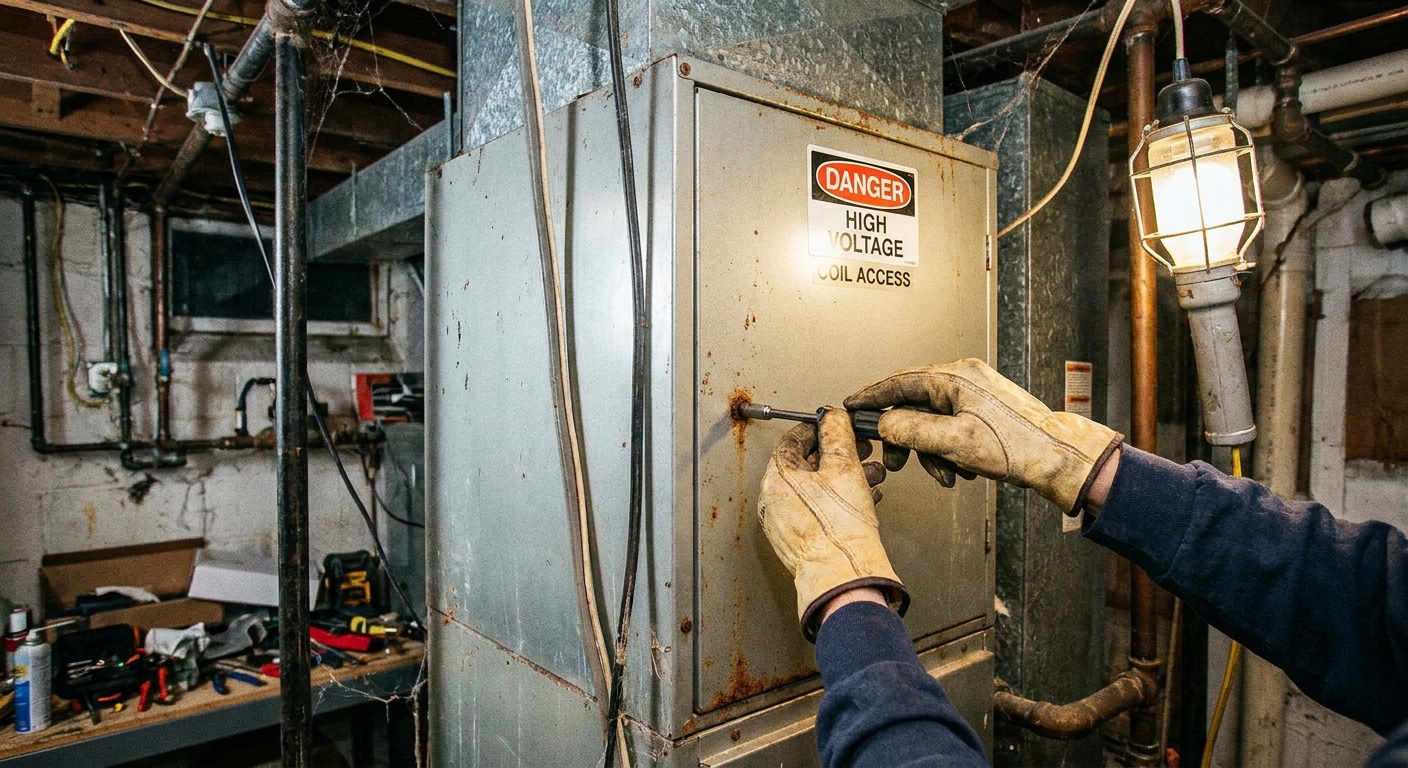
Before you start
- Turn the thermostat to Off.
- Shut off power at the furnace or air handler switch and the breaker. You do not want the blower kicking on while your hands are inside.
- If the unit has been running, giving it a few minutes is fine, but the big goal is this: confirm power is off and plan your spray so you are not soaking insulation or electronics.
- Lay towels under the unit access area.
If you have a gas furnace, do not mess with the gas line or burner area. You are staying in the coil compartment and filter and blower area only.
Step-by-step
1) Open the coil compartment
Remove the screws on the coil access panel. On many setups, this is a separate panel above the blower compartment. Keep the screws in a cup because they love to disappear into the same dimension as 10 mm sockets.
Note: Some coil cabinets are sealed with foil tape or mastic. If yours is taped, you may need to cut the tape neatly and then re-seal it later with UL 181 foil tape after you put the panel back.
Use a flashlight to inspect what you can see: the fin face, any sludge, and the drain pan area.
2) Dry clean first
This is the step that prevents you from turning dust into sticky mud.
- Use a soft paintbrush to loosen surface fuzz.
- Hold the shop vac nozzle nearby to catch what you loosen.
- Brush in the direction of the fins when possible.
- Vacuum tip: Hover the brush attachment and use light contact only. Do not press into the fins.
If your coil is an A-coil, you may only see one face easily. Clean what you can reach without bending anything.
Also, do not try to remove the coil from the cabinet as a DIY project. That is where a “simple cleaning” can turn into a refrigerant problem fast.
3) Apply coil cleaner
Read the label. Seriously. Some are true no-rinse foams that drain into the pan and out the condensate line. Others want a light rinse, or a rinse only when the coil is heavily soiled.
- Shake the can.
- Spray an even coat across the fin surface.
- Let it foam and dwell for the recommended time.
You are aiming for “even coverage,” not “drowning the cabinet.” Also, keep spray away from control boards, wiring, and blower electronics.
One more real-world note: even a no-rinse cleaner can loosen a surprising amount of gunk. That material still has to go somewhere, and sometimes it ends up heading toward the drain. Which brings us to the next step.
4) Check the drain pan and drain line
While the cleaner works, inspect the drain pan under the coil.
- If you see standing water, the drain may be partially clogged.
- If the pan is slimy, wipe what you can reach with a damp rag.
If you can access the drain line cleanout tee, you can gently clear it with a wet and dry vac from the outside termination or use approved methods recommended by your system manufacturer. If you are not sure, stop here and call a tech because water damage is expensive.
After you restore power and run cooling, do a quick sanity check that condensate is draining normally and not backing up.
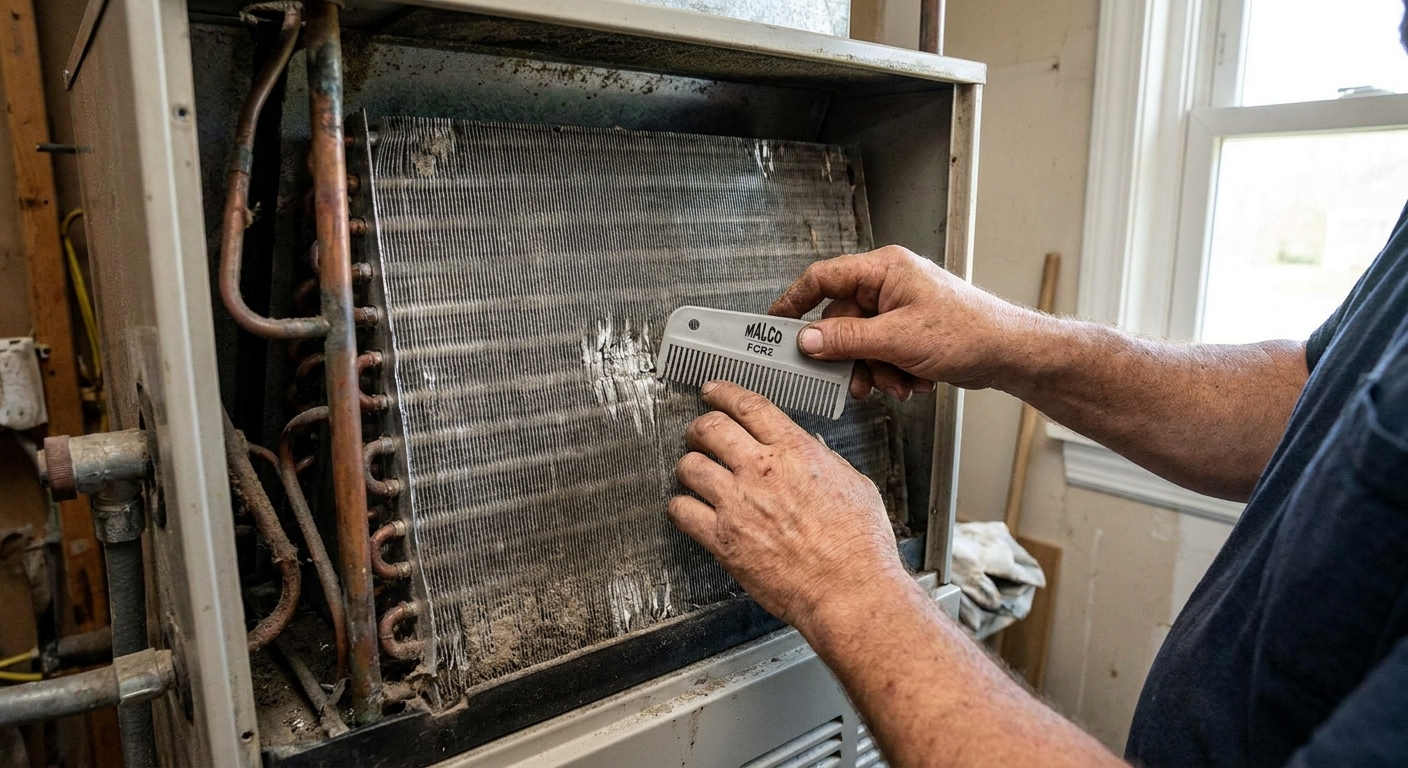
5) Straighten bent fins (optional)
Bent fins reduce airflow. If you see a small area of mashed fins, a fin comb can help.
- Match the fin comb to the fin spacing.
- Work a small section at a time.
- Use light pressure and keep the comb aligned with the fins.
If more than a small patch is flattened, it might be better to leave it for a professional coil service. It is easy to snag and tear fins if you get impatient.
6) Reassemble and re-seal
- Give the coil time to drip and drain into the pan.
- Reinstall the access panel tightly. Air leaks here can pull dusty air right into the coil again.
- If you had to cut foil tape to get in, re-seal the seams with UL 181 foil tape.
- Restore power at the breaker and switch.
- Set the thermostat to Cool and run the system.
For the first cycle, listen for anything unusual, verify normal airflow at vents, and confirm the drain is actually draining.
Cleaner choice
For indoor evaporator coils, I stick with HVAC-specific foaming evaporator coil cleaners designed for indoor use. They are formulated to lift grime and then drain away.
What I avoid for DIY indoor cleaning:
- Strong acid cleaners unless explicitly required and you know the material compatibility. Some acids can accelerate corrosion, especially on aluminum fins.
- Anything with heavy fumes in a closet or attic. You do not want to gas yourself out of your own house.
If you have a coil that is truly impacted deep between the fins, or you cannot really access the coil face without peeling back half the cabinet, that is where a pro cleaning starts to make more sense. They can access and clean more thoroughly without turning it into a mess or a leak.
How often to clean
Most homeowners do not need to clean it every year. A good rule of thumb:
- Inspect yearly at the start of cooling season if you can access it safely.
- Clean as needed when you see visible buildup or you have symptoms like weak airflow.
If you have pets, renovations, dusty returns, or you are in the middle of sanding drywall like I always seem to be, inspections matter more.
Keep it cleaner
- Use the right filter and change it on schedule. A basic pleated filter changed regularly beats an “ultra high MERV” filter that chokes airflow and gets ignored.
- Seal return leaks so the system is not sucking attic dust or crawlspace funk.
- Keep supply vents open and do not block returns with furniture.
- Consider a professional tune-up every few years for deeper cleaning and refrigerant checks.
Common mistakes
- Spraying too much water and soaking insulation or electrical areas
- Using a stiff brush and flattening fins
- Skipping the dry-clean step and creating grimy paste
- Forgetting to reinstall and re-seal panels, which causes dust and air leaks
- Cleaning an iced coil without diagnosing why it iced in the first place
If you take nothing else: be gentle, keep it dry where it should be dry, and do not ignore warning signs.
After cleaning
If airflow is still weak
- Check the filter orientation and size
- Make sure all access panels are seated and sealed
- Look for a closed or crushed duct
- Inspect the blower wheel (dirty blower wheels are sneaky)
If it still is not cooling
- Clean the outdoor condenser coil (different job)
- Check thermostat settings
- If the suction line is icing, or the system still cannot maintain temperature after basic cleaning, call a pro
Note on the suction line: some sweating can be normal in humid weather. Ice is not.
The 30-Second Cheat Sheet
Essential takeaways for: How to Clean an Indoor AC Evaporator Coil
When to clean
- Do it if you have weak airflow, long run times, musty smells, or visible dust on the indoor coil.
- Inspect yearly if you have pets, dust, or ongoing renovation work.
Stop and call a pro
- Ice on the coil (frost or a block of ice)
- Oily residue on the coil or copper lines (possible refrigerant leak)
- Widespread corrosion (pitting, flaking, rubbed-through tubing), or electrical or water damage in the cabinet
What to use (safe DIY)
- Power off at thermostat + breaker
- Gloves and safety glasses
- Soft brush + shop vac (use a soft brush attachment and do not press into fins)
- No-rinse foaming evaporator coil cleaner labeled for indoor coils
- Fin comb for small areas of bent fins (optional)
- UL 181 foil tape for re-sealing panels if yours were taped
What NOT to use
- Pressure washer
- Wire brush
- Bleach
- Harsh acid cleaners not labeled safe for indoor evaporator coils
- Spraying cleaner near control boards, wiring, or blower electronics
Fast steps
- Shut off power.
- Open coil access panel (cut foil tape if needed).
- Dry clean first: soft brush while vacuuming. Hover the brush, do not mash fins.
- Spray coil cleaner and let it dwell per label. Rinse only if the label says to.
- Check drain pan for standing water and wipe reachable slime.
- Confirm condensate is draining after restart.
- Reassemble and re-seal panels, restore power, test cooling.
Keep it clean longer
- Change filters on schedule.
- Seal leaky returns.
- Keep vents and returns unblocked.
💡 Tip: Scroll up to read the full article for detailed, step-by-step instructions.
⬆️ Back to topAbout Marcus Vance
Content Creator @ Grit & Home
Marcus Vance is a lifelong DIY enthusiast and self-taught home renovator who has spent the last decade transforming a dilapidated 1970s ranch into his family's dream home. He specializes in budget-friendly carpentry, room-by-room renovations, and demystifying power tools for beginners. Through his writing, Marcus shares practical tutorials and hard-learned lessons to help homeowners tackle their own projects with confidence.