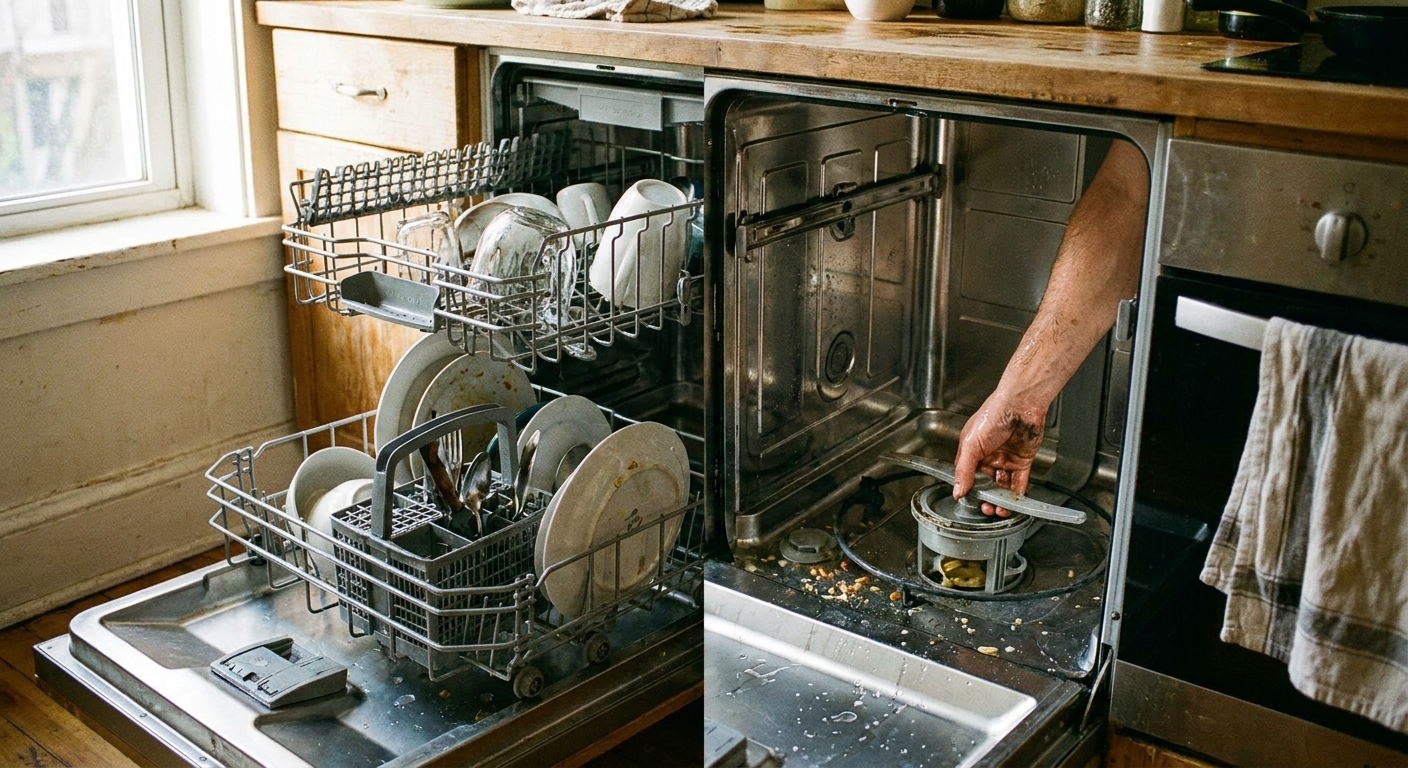
Dishwashers are a little like shop vacs. They do the dirty work quietly until one day they do not. Then you get cloudy glasses, mystery grit on plates, and that swampy smell that hits you when you crack the door.
The good news: a dishwasher is easy to deep clean with basic supplies, and you do not need fancy “dishwasher cleaner” pods unless you want them. Most problems come down to three places: the filter, the spray arms, and the door seals.
What you need
- Dish soap
- White vinegar
- Baking soda
- Old toothbrush or small nylon brush
- Microfiber cloths or paper towels
- Wooden toothpicks or a plastic pick (for spray arm holes)
- A small cup or bowl
- Optional: rubber gloves, headlamp, and a small nut driver or screwdriver (some filters are secured)
Time: 30 to 60 minutes, plus two short cycles.
My thrifty note: If you already have vinegar and baking soda, this job is basically free.
Before you start
1) Empty it and do a quick safety check
- Run the disposal (if you have one) so the sink drain is clear.
- Empty both racks and remove any utensil holders if they lift out.
- Look for obvious debris: labels, glass shards, popcorn kernels, twist ties. Pull them out by hand.
If you suspect broken glass: Use a damp paper towel to grab tiny pieces instead of your fingers. I learned that one the hard way.
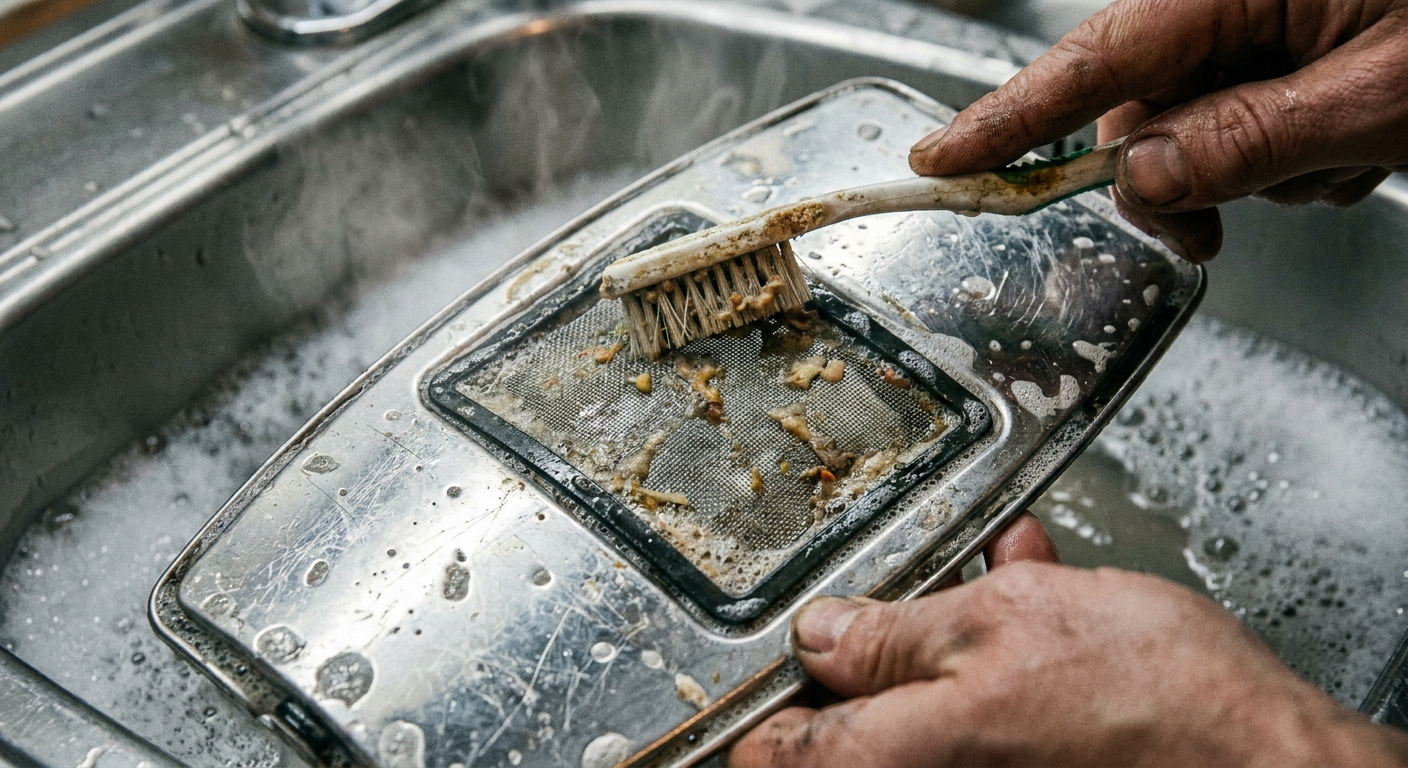
Step 1: Remove and scrub the filter
The filter is the number one culprit for bad smells and gritty dishes. It is usually on the bottom of the tub under the lower spray arm.
1) Pull the bottom rack and locate the filter
Most modern dishwashers have a cylindrical filter that twists out. Some have a flat screen plus a twist lock. If it does not want to turn, do not force it. Check your manual or look for a small retaining screw.
2) Rinse, then wash with hot soapy water
- Rinse the filter under hot water.
- Add a few drops of dish soap and scrub the mesh and seams with a toothbrush.
- Pay attention to the rubber edges and any little corners where grease packs in.
Stubborn gunk tip: Let the filter soak in hot water with a splash of vinegar for 10 minutes, then scrub again.
Step 2: Clean the sump area
With the filter out, you will see a small well or intake area. This is where seeds, bones, and paper labels like to hide.
Why this matters: Anything stuck here can rot, smell, and interfere with draining.
- Wipe the area with a damp cloth.
- Check for debris around the intake and remove it.
- If there is standing water with a smell, blot it up and wipe again.
What not to do: Do not pour drain cleaner into the dishwasher. It can damage seals and parts, and it will not fix a dirty filter anyway.
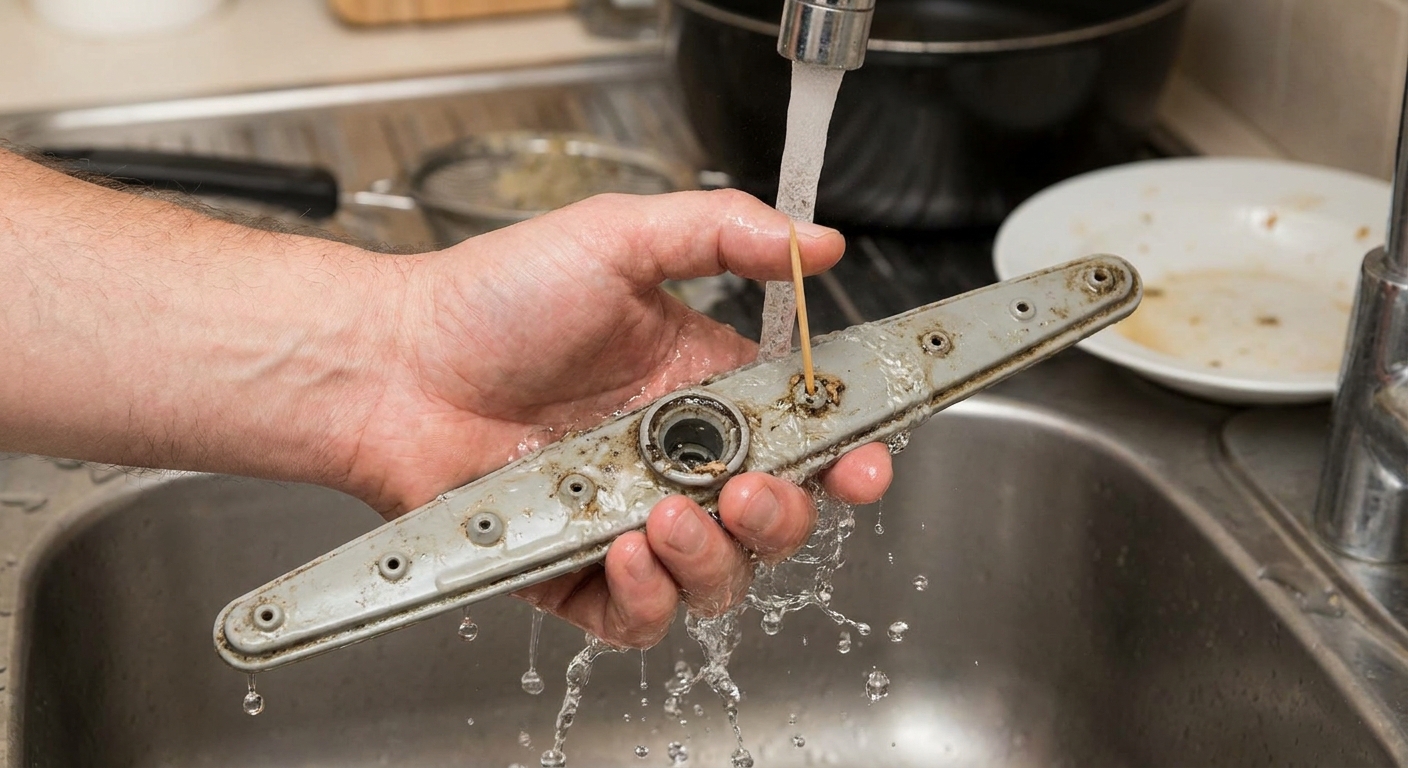
Step 3: Clean the spray arms
If your dishes come out with dry detergent or food stuck on, the spray arms are often partially clogged. Hard water deposits and bits of food block the tiny jet holes and reduce pressure.
Why this matters: Lower pressure means less cleaning and more “why is this still on my fork?” moments.
1) Remove the spray arms (if your model allows)
- Lower spray arm: Often pops off or lifts after twisting a cap.
- Upper spray arm: May be attached under the upper rack. Some unscrew by hand, others need a screwdriver.
If you cannot remove them easily, you can still clean the holes in place, just be gentle.
2) Flush the arms and clear the holes
- Rinse each spray arm under the faucet.
- Use a toothpick or plastic pick to clear each jet hole.
- Shake out any debris and rinse again.
Quick check: Hold the spray arm up to light. You should see clean, open holes.
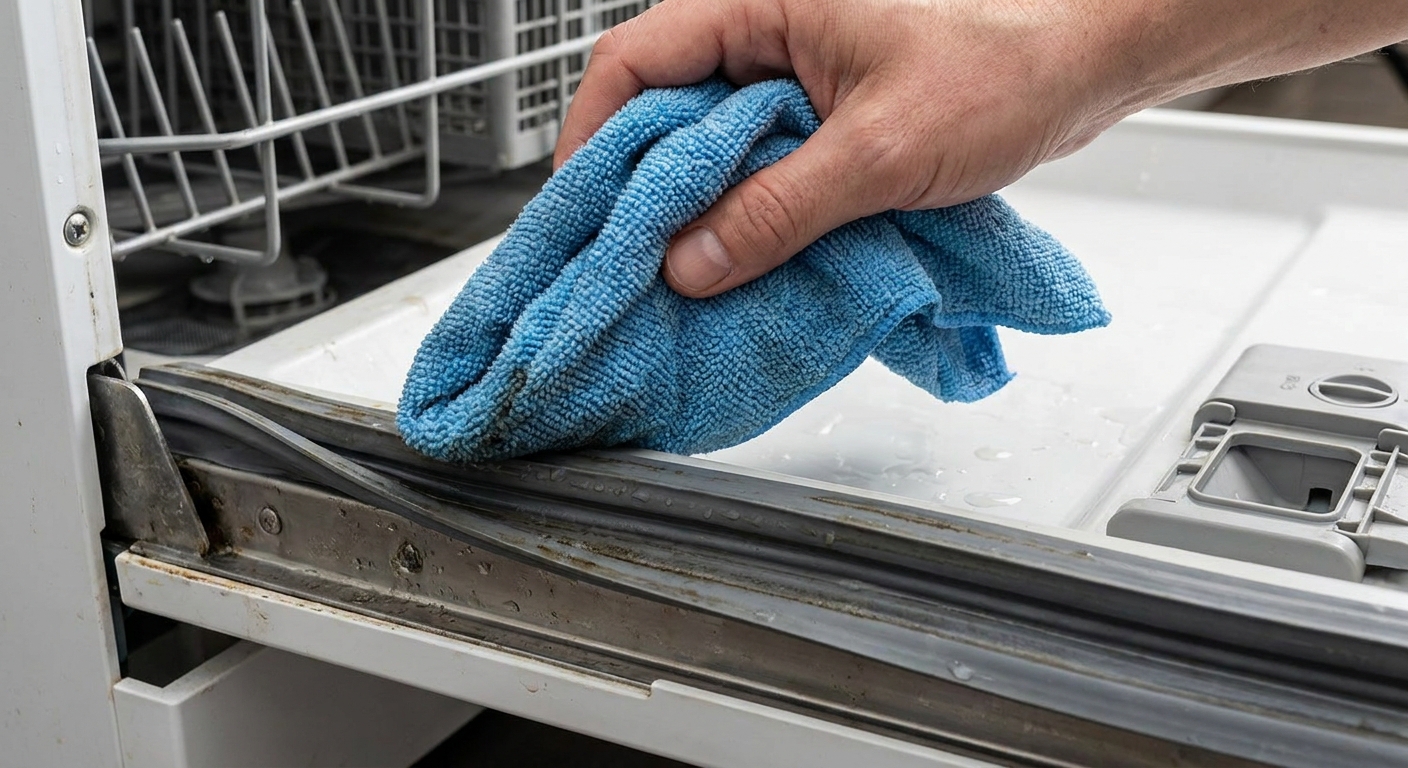
Step 4: Scrub the door gasket
This is the “it smells clean but still stinks” zone. The door gasket and the bottom corners of the door catch grease, detergent scum, and mildew.
Why this matters: Gunk here does not always get blasted by spray, so it just sits and stews.
1) Wipe the gasket seam
- Dip a cloth or toothbrush in warm, soapy water.
- Gently pull back the rubber gasket and wipe inside the folds.
- Work your way around the entire door.
2) Hit the door bottom and hinge area
Open the door and look along the bottom edge and the hinge corners. Wipe those areas well. That is where sludge loves to hide.
If you see mildew: Use vinegar on a cloth and scrub. Avoid bleach unless your manufacturer explicitly allows it, since bleach can degrade rubber and some finishes.
Step 5: Run a vinegar cycle
Vinegar helps break down mineral buildup and soap film, which are big contributors to cloudy glassware and odors.
Quick vinegar note: Some manufacturers advise against frequent use of acidic cleaners. If your manual warns against vinegar, use a dishwasher-approved cleaner instead. Either way, you do not need to do this every week.
1) Reassemble first
- Put the filter back in and lock it.
- Reinstall spray arms and confirm they spin freely.
- Slide racks back in.
2) Run hot with vinegar
- Place a dishwasher safe bowl or measuring cup with 1 to 2 cups of white vinegar on the top rack.
- Run the hottest cycle available (or a “sanitize” cycle if you have it).
- Do not add detergent.
My mistake to help you avoid: I used to pour vinegar directly into the bottom. On many models it drains or dilutes early, so you lose contact time. The cup on the top rack releases it gradually.
Step 6: Baking soda rinse
Baking soda tackles lingering smells and gives the tub a fresh, clean finish.
- After the vinegar cycle completes and the tub cools slightly, sprinkle 1 cup of baking soda across the bottom of the dishwasher.
- Run a short hot cycle.
If your machine has an “express” cycle that still uses hot water, that is perfect here.
Rinse aid and detergent basics
If you want fewer spots, less film, and better drying, rinse aid is the boring hero of the story. Keep it topped off, especially if you have hard water.
- Detergent dosing: More is not more clean. Too much can leave a cloudy film. If you use pods and also fill the pre-wash cup, you may be doubling up.
- Hard water help: Try a detergent made for hard water and use rinse aid consistently. If your dishwasher has a built-in softener with salt, use the salt your manual recommends.
Monthly upkeep that works
You do not need to deep clean every week. A little routine maintenance keeps the stink and cloudiness from creeping back.
- Weekly: Check the filter for visible debris if you cook a lot or do not pre-rinse.
- Monthly: Quick filter scrub plus a vinegar cycle (or a dishwasher-approved cleaner if your manual says no vinegar).
- Every 3 to 6 months: Do the full deep clean, including spray arms and gasket.
Small habit, big payoff: Leave the door cracked open after the last load of the day. Drying out the tub is half the battle against odors.
Troubleshooting
Cloudy glasses (two common causes)
1) Hard water mineral etching: This is permanent and may feel slightly rough or look hazy even when dry.
- Increase rinse aid usage.
- Use a detergent designed for hard water.
- Consider a water softener if your water is very hard.
2) Soap film: This is removable and often looks like a cloudy coating.
- Use less detergent, especially with pods plus pre-wash detergent.
- Run the vinegar cycle to strip buildup.
- Make sure water is hot enough. Check your manual, but many units want at least about 120°F incoming water for best results.
Quick test: Rub a cloudy glass with a cloth dipped in vinegar. If it clears up, you are dealing with film or mineral buildup. If it stays cloudy, it is more likely etching.
Bad smells
- Dirty filter: Clean it first. Always.
- Gasket and door corners: Scrub the folds and hinge areas.
- Standing water: Check the drain path and garbage disposal connection. A clogged disposal or kinked drain hose can cause backup odors.
- Wet dishwasher smell: Crack the door after cycles and use rinse aid to improve drying.
Grit on dishes
- Filter not seated or clogged.
- Overloading blocks spray.
- Spray arm holes clogged.
- Not enough water temperature or not enough wash time for heavy loads.
Detergent not dissolving
- Make sure the spray arm is not blocked by a tall pan.
- Keep the detergent dispenser dry before adding detergent.
- Run the hot water at the kitchen sink for 30 seconds before starting the dishwasher so it fills with hot water right away.
White residue on the tub or racks
- Usually hard water scale. Vinegar cycle helps.
- Check rinse aid level.
- If you use powder, back off the dose. More detergent is not more clean.
Quick exterior wipe (optional)
If you want the whole thing to feel clean, wipe the handle and control panel with a damp microfiber cloth. Use a little dish soap for greasy spots, then wipe again with clean water and dry.
When to call it more than cleaning
If you have done the filter, spray arms, gasket, and vinegar plus baking soda routine and you still have problems, you may be looking at a mechanical or plumbing issue.
- Persistent standing water: Possible drain hose issue, air gap clog, disposal knockout plug still installed, or drain pump problem.
- Loud grinding: Debris in the pump area or a failing pump.
- Not heating: Heating element or thermostat issue. Dishes will come out dirty and wet.
Thrifty pro tip: Before you call for service, write down your brand, model number (usually on the door edge), and the exact symptoms. It saves time, and sometimes it saves you an unnecessary visit.
About Marcus Vance
Content Creator @ Grit & Home
Marcus Vance is a lifelong DIY enthusiast and self-taught home renovator who has spent the last decade transforming a dilapidated 1970s ranch into his family's dream home. He specializes in budget-friendly carpentry, room-by-room renovations, and demystifying power tools for beginners. Through his writing, Marcus shares practical tutorials and hard-learned lessons to help homeowners tackle their own projects with confidence.