If your lawn feels spongy underfoot, stays patchy no matter how much you water, or seems to “fight” fertilizer, there is a good chance you are dealing with thatch. I used to assume thatch was just “dead grass” and that more raking would fix it. What I learned the hard way is that the right kind of dethatching at the right time is what brings a lawn back, and the wrong kind at the wrong time can set it back for weeks.
This guide will help you figure out whether you actually need to dethatch, pick a manual or power approach, and recover quickly afterward.
What thatch is and when it is a problem
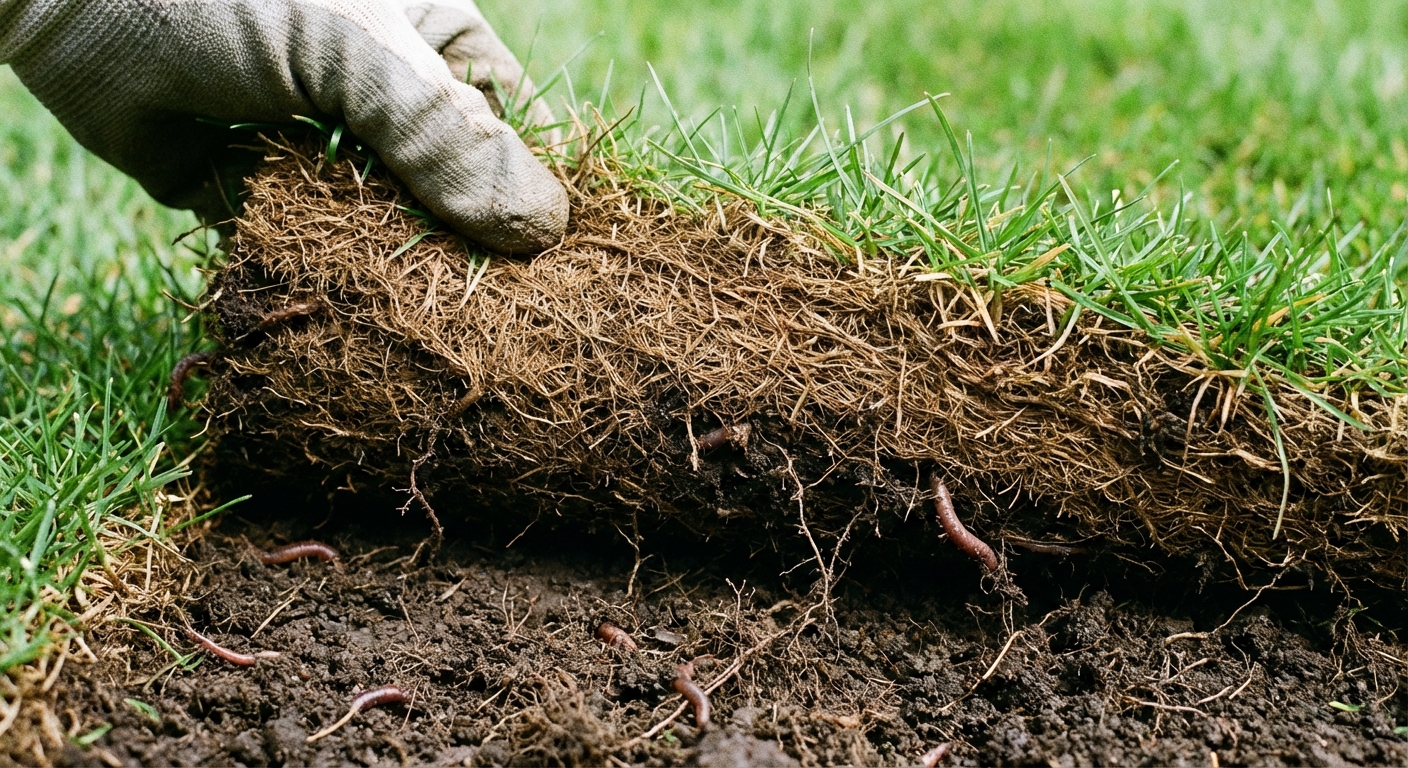
Thatch is a layer of living and dead stems, stolons, rhizomes, and other organic debris that sits between the green grass blades and the soil surface. A little thatch is normal. It can even help cushion the lawn and reduce evaporation.
It becomes a problem when the layer gets thick enough that water, air, and nutrients struggle to reach the soil and grass roots. Thick thatch can also hold moisture near the surface, which invites disease and shallow rooting.
Common signs of too much thatch
- The lawn feels springy or bouncy when you walk on it
- Water runs off instead of soaking in
- You see lots of brown material at the base of the grass even when the lawn is “green” on top
- Fertilizer seems to have less effect than it should
- More insect or disease issues than usual
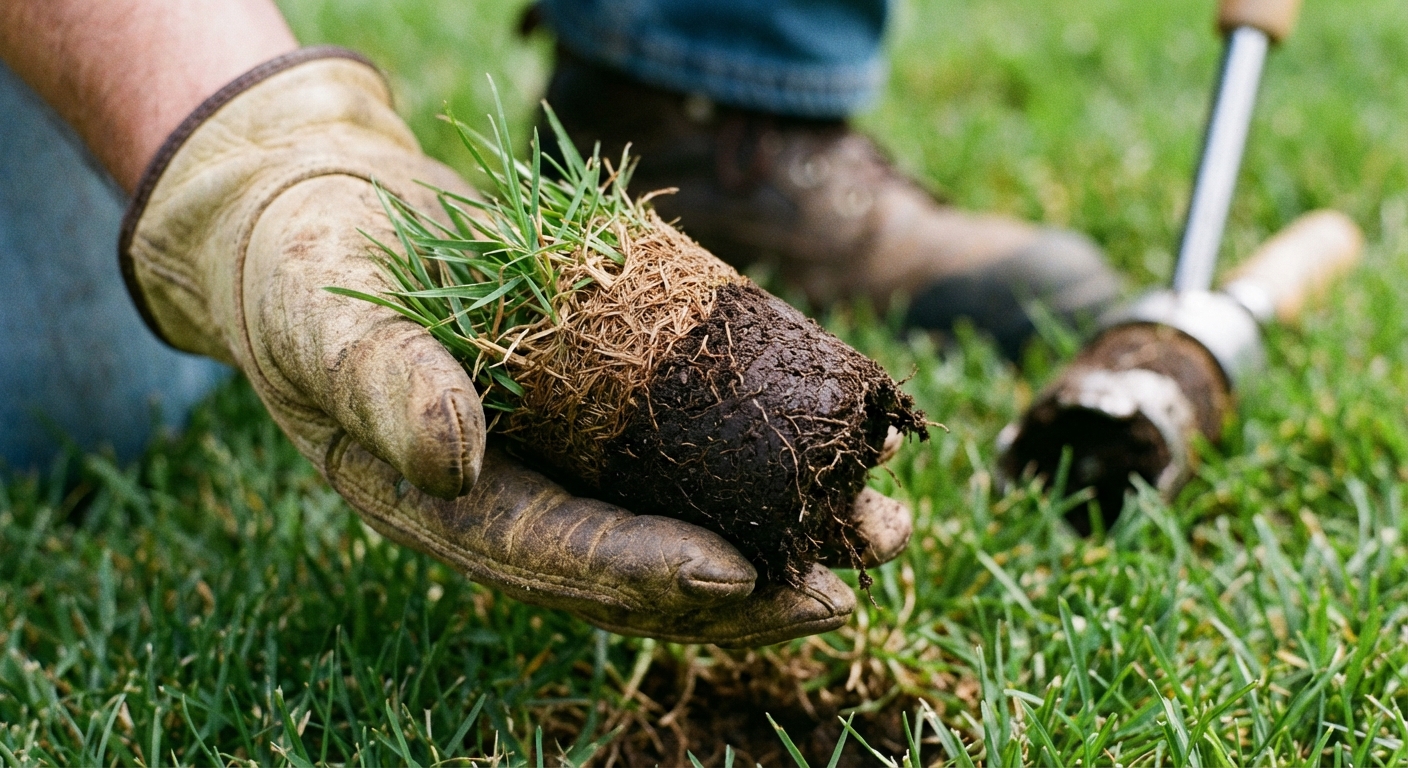
The plug test: measure thatch depth
This is my go-to check because it is fast, free, and beats guessing. Realistically, it takes a few minutes, not magic seconds.
How to do it
Pick a few spots in the yard, especially areas that look stressed.
Cut a small plug with a shovel or hand trowel, about 3 inches wide. Lift it like a flap so you can see the side profile.
Find the thatch layer. It is the brown, stringy layer sitting above the soil and below the green growth.
Measure with your finger or a ruler. Pinch the thatch between your fingers and estimate thickness.
What the results mean
These ranges are rule-of-thumb guidance. Many extension recommendations suggest taking action once thatch is around 1/2 inch or more, but turf type and conditions matter.
- 0 to 1/2 inch: Usually fine. Skip dethatching and focus on mowing, watering, and soil health.
- 1/2 to 1 inch: Consider a light dethatch if you have symptoms, especially before overseeding.
- Over 1 inch: You likely need dethatching, and possibly core aeration too. If the lawn is already struggling, plan on a recovery window.
Dethatching vs raking vs aeration
This is where a lot of homeowners (including me) get tripped up.
- Raking dead grass: Mostly surface cleanup. Useful, but it does not reliably remove a thick thatch layer.
- Dethatching: Pulls up the thatch layer from just above the soil surface. It is more stressful than a basic rake job.
- Core aeration: Removes plugs of soil to relieve compaction and improve airflow and water movement. It does not “remove thatch” the same way, but it helps thatch break down over time and is a great companion to dethatching when compaction is part of the problem.
Best time of year to dethatch
Timing matters because dethatching stresses the lawn. You want the grass to be in active growth so it can heal quickly. Your exact window depends on region, so treat these as the standard starting point.
Cool-season grasses
Examples: Kentucky bluegrass, fescue, ryegrass.
- Best time: Early fall is the sweet spot in most regions. The soil is warm, weeds are slowing down, and grass grows aggressively.
- Second-best time: Spring, but wait until the lawn is fully awake and growing. In far-north climates, the spring window can be short. In hot-summer areas, fall timing is especially important.
Warm-season grasses
Examples: Bermuda, zoysia, St. Augustine, centipede.
- Best time: Late spring to early summer, once the lawn is greened up and growing strongly.
- Avoid: Fall dethatching in warm-season turf, because it may not recover before winter dormancy.
Weather and soil conditions that help
- Soil is slightly moist, not muddy and not bone dry
- Forecast is mild for several days, not a heat wave
- You can water afterward if rain does not show up
Manual vs power dethatching
You can dethatch with a rake or with a machine. The best choice depends on yard size, thatch thickness, and your patience level.
Manual dethatching (thatch rake)
Best for: Small lawns, spot treatment, or light thatch (around 1/2 inch).
Pros: Cheap, no fuel or cords, precise.
Cons: It is real work. Even 500 sq ft is a serious workout if you do it properly. The first time I did it, I underestimated how much debris comes up and how sore my shoulders would be.
Power dethatching (electric or gas dethatcher, sometimes called a scarifier)
Best for: Medium to large lawns, thicker thatch, or when you want consistent results.
Pros: Faster, more uniform, easier on your body.
Cons: Can be aggressive if set too low. Also creates a mountain of debris you need to remove.
Quick rule of thumb
- Under 500 sq ft and light thatch: A thatch rake can be doable.
- 500 to 1,000 sq ft: Manual is possible, but plan for sweat and time. Many homeowners prefer a machine here.
- Over 1,000 sq ft or more than 1/2 inch thatch: Consider renting or buying a dethatcher.
How to dethatch by hand
Tools and supplies
- Thatch rake (spring-tine dethatching rake)
- Leaf rake
- Work gloves
- Yard bags or a tarp
Steps
Mow lower than normal. Lower your mowing height by about 1 setting, usually around 1/2 inch, without scalping. Bag clippings if you can.
Rake in two directions. Pull the thatch rake toward you with firm, even strokes. Do a north-south pass, then an east-west pass.
Stop before you scalp the lawn. You want to pull up the brown layer, not gouge soil. If you are ripping out lots of green plants, lighten up or reduce passes.
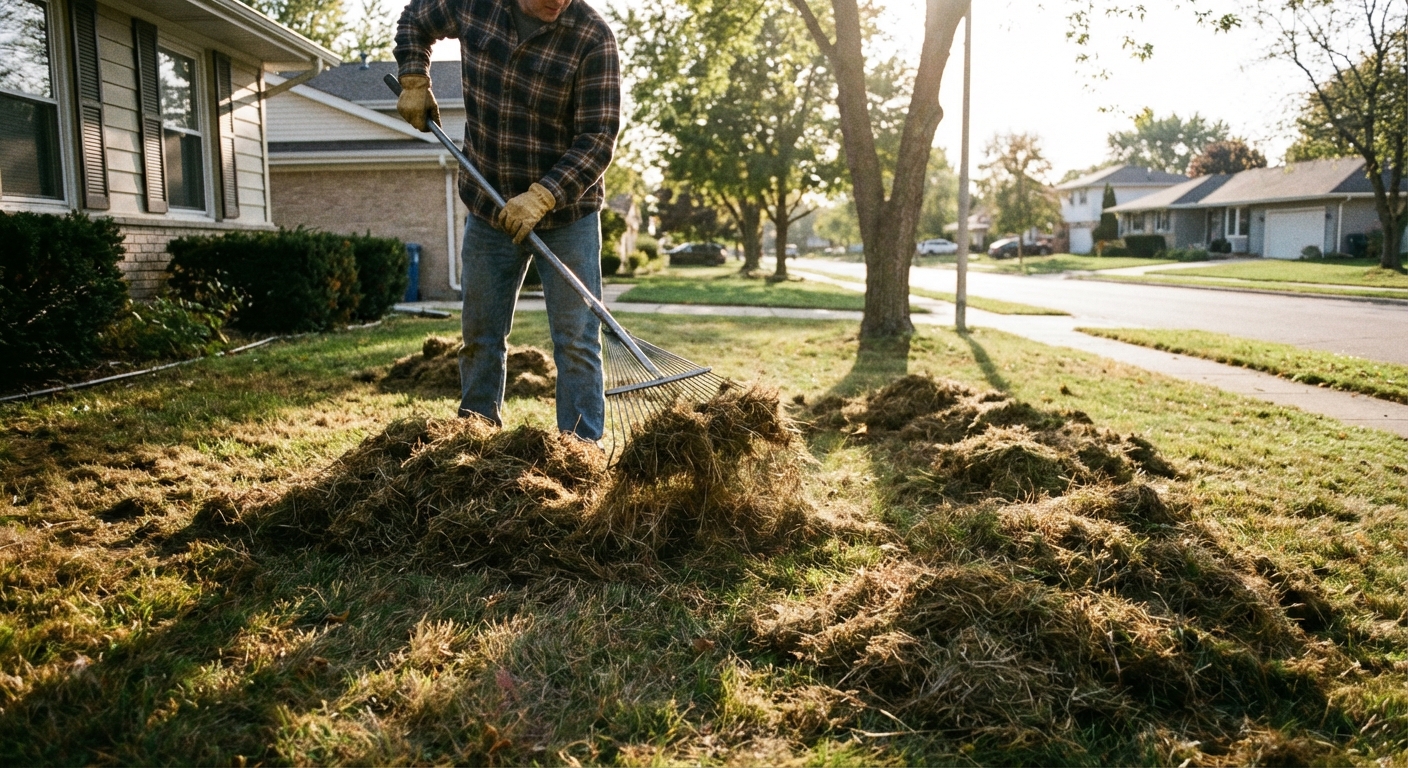
Collect debris. Use a leaf rake to pile and bag. Expect a lot, even from a “pretty good” lawn.
Water lightly if the lawn looks stressed and conditions are dry.
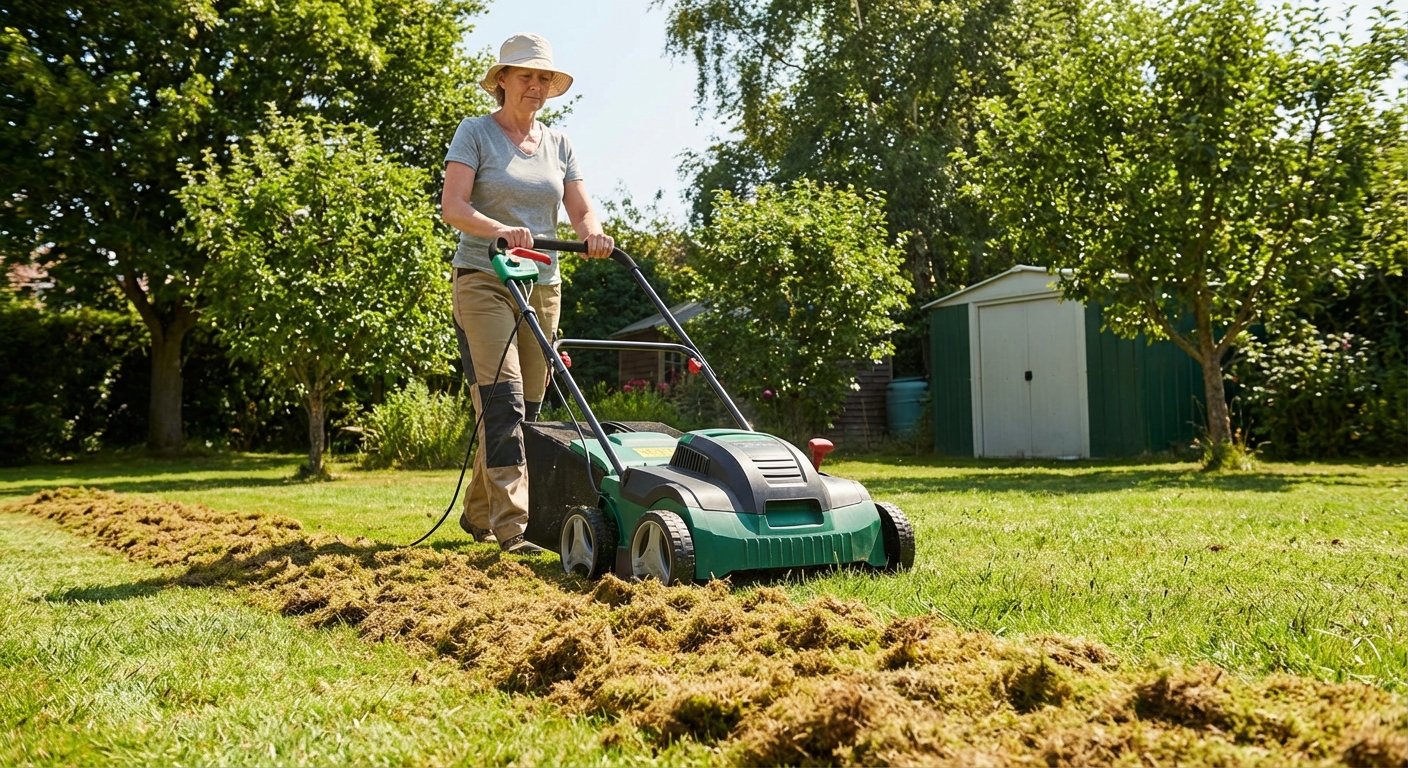
How to dethatch with a machine
Before you start
- Mow first, a bit lower than normal.
- Mark obstacles like sprinkler heads, shallow irrigation lines, and low landscape lighting.
- Clear the lawn of sticks, dog toys, and rocks. A dethatcher will find them.
Set the depth safely
The goal is to comb through the thatch and barely scratch the soil surface. Start shallow. You can always do a second pass a hair deeper, but you cannot undo the damage.
Run it like you mow
Make a test pass in an out-of-the-way corner. Check how much material comes up and whether you are exposing bare soil everywhere.
Dethatch in straight lines with slight overlap, like mowing.
Do a second pass at a right angle only if needed. Many lawns only need one good pass.
Rake and bag everything. Leaving thatch piles on the lawn can smother recovering grass.
After dethatching
Dethatching opens up the lawn surface, which is exactly what you want. Now you need to help the grass fill back in quickly.
1) Clean up thoroughly
Rake and remove debris until you can see the soil through the grass in spots. It can look ugly for a week or two, and that is normal.
Disposal tip: Thatch debris can often be composted or used as a light mulch, but avoid composting if you recently applied herbicides and follow your local yard-waste rules.
2) Consider core aeration (optional but powerful)
If your soil is compacted or your thatch was thick, core aeration after dethatching is a great one-two punch. It improves airflow and helps water move into the root zone.
3) Overseed (cool-season lawns, and some warm-season situations)
Cool-season lawns: Dethatching is a perfect lead-in to overseeding because seed-to-soil contact is much better.
- Spread seed right after cleanup.
- Lightly rake to work seed into the surface.
- Keep the top layer consistently moist until germination.
Warm-season lawns: Many are not typically overseeded with the same species. Bermuda is sometimes seeded, while St. Augustine and zoysia are commonly established via sod or plugs. Some homeowners overseed warm-season lawns with annual ryegrass for winter color, which is a different goal than thickening your permanent turf. If you are unsure, skip seeding and focus on proper watering and feeding during active growth.
Warm-season caution: Zoysia can build thatch quickly, but aggressive dethatching can be rough on lawns like St. Augustine. If you have St. Augustine and the thatch is severe, go lighter and consider core aeration and topdressing as a gentler plan.
4) Fertilize wisely
Use a season-appropriate fertilizer after dethatching, especially if you are overseeding. Avoid overdoing nitrogen in hot weather, which can stress grass.
- Cool-season fall: A starter fertilizer (if seeding) or a balanced fall fertilizer can help.
- Warm-season late spring: A fertilizer suited to warm-season growth can push recovery.
5) Water for recovery
- No seeding: Water a bit deeper, a bit less often, keeping the lawn from drying out while it heals.
- With seed: Water lightly 1 to 3 times per day to keep the surface damp until germination, then gradually transition to deeper watering.
6) Mow after dethatching
- Wait until the lawn is actively growing again.
- If you overseeded, wait until new grass reaches mowing height and the ground feels firm underfoot.
- Use sharp blades. Dull blades shred stressed grass.
Common mistakes
- Dethatching a dormant lawn. It will not bounce back fast, and you can do lasting damage.
- Setting the dethatcher too deep. If you are pulling up chunks of soil everywhere, raise it up.
- Skipping cleanup. Thatch piles left behind block light and smother regrowth.
- Forgetting about pre-emergent herbicides. If you recently applied a pre-emergent weed preventer, dethatching can break that soil barrier and invite a weed explosion. In general, dethatch first, then apply pre-emergent after the lawn recovers and you are done disturbing the soil surface.
- Trying to fix everything in one weekend. If your lawn is in rough shape, plan dethatching, aeration, and overseeding with recovery time in mind.
- Dethatching when the soil is soggy. You will tear turf instead of combing it.
Quick checklist
- Do the plug test and confirm thatch is around 1/2 inch or more, with symptoms
- Dethatch during active growth for your grass type
- Mow slightly lower first, and mark sprinkler heads
- Start shallow, then adjust only if needed
- Rake and remove all debris
- Overseed (especially cool-season), fertilize appropriately, and water for recovery
- Plan pre-emergent timing so you do not break the weed-preventer barrier right after applying it
If you are already planning to overseed, dethatching is one of those jobs that feels like a hassle until you see how much better the seed takes. It is not glamorous work, but it is the kind that builds a lawn you can actually be proud of.
About Marcus Vance
Content Creator @ Grit & Home
Marcus Vance is a lifelong DIY enthusiast and self-taught home renovator who has spent the last decade transforming a dilapidated 1970s ranch into his family's dream home. He specializes in budget-friendly carpentry, room-by-room renovations, and demystifying power tools for beginners. Through his writing, Marcus shares practical tutorials and hard-learned lessons to help homeowners tackle their own projects with confidence.