Roof leaks have a special talent for showing up at the worst possible time. And the drip you see in a ceiling is rarely right below the hole. Water can travel along rafters, nails, plywood seams, and insulation before it finally drops into your living room like it owns the place.
This guide walks you through a calm, methodical way to find the source from the attic, identify the most common entry points, and choose the right fix, from a quick stopgap to a proper repair that lasts.
Before you start: safety and when to call a pro
I love DIY, but roofing is one area where being honest about risk matters. Falls happen fast, and wet roofs are slippery in a way you cannot fully appreciate until your boot tries to moonwalk.
Do not get on the roof if
- It is raining, snowing, icy, or windy. Wait for a dry, calm day.
- Your roof feels too steep for you. Many people consider 6/12 pitch and up “steep,” but the real line is your comfort, experience, and safety gear. If you do not have roof jacks, harness gear, and practice using them, stay off.
- You see widespread damage (many missing shingles, sagging decking, soft spots).
- The leak is near power (wet light fixtures, ceiling fans, attic junction boxes). Turn off the circuit and call an electrician or roofer.
Attic safety basics
- Step only on framing. Walk on joists or truss chords, not drywall. Drywall is not a floor.
- Watch your head and hands. Low clearance, exposed nails, and staples are common.
- Do not disturb old insulation unnecessarily. If your home is older and you suspect asbestos or vermiculite insulation, stop and get professional advice.
Basic gear that makes this safer
- Stable extension ladder rated for your weight, set on firm ground
- Non-slip shoes or boots with good tread
- Work gloves and eye protection
- Headlamp or flashlight for attic work
- Respirator or dust mask for insulation and attic dust
- A helper outside when you are on a ladder
Quick reality check: If your roof is near the end of its life, a “repair” can turn into a string of whack-a-mole patches. Sometimes the thriftiest choice is a professional assessment before you sink time and money into a roof that is simply worn out.
How roof leaks really behave
The stain on your drywall is the symptom, not the source. Here is why tracking matters:
- Water runs downhill. It follows rafters and trusses, then drips where it finds an opening.
- Wind pushes rain upward. Leaks can happen above the stain and even upslope of the obvious problem spot.
- Condensation can look like a leak. Bathroom fans dumping moist air into an attic can wet sheathing and drip.
Our goal is to find the entry point at the roof deck, then confirm what feature above it is failing: flashing, a vent boot, a shingle, a nail, a valley, or a roof vent.
Before DIY: photos, warranty, and insurance
Before you disturb anything, take photos of the ceiling stain, attic wet spots, and any roof damage you can safely see from the ground. If your roof is under warranty, or if this followed a storm, photos help with warranty claims and homeowners insurance. If you think you might file a claim, consider calling your insurer before you start a bigger DIY repair.
Step 1: Confirm it is a roof leak
Before you climb anywhere, take five minutes to rule out the usual imposters. I learned this the hard way after chasing a “roof leak” that turned out to be a sweating AC line.
Clues it might be plumbing or HVAC
- Leak happens when someone showers or uses a fixture, not during rain
- Stain is under a bathroom, laundry, or kitchen
- Drip is near an HVAC register, air handler, or condensate line
- Leak appears during hot humid weather, even with no rain (condensation)
If the leak only shows up during or right after rain, keep going. That is usually the roof.
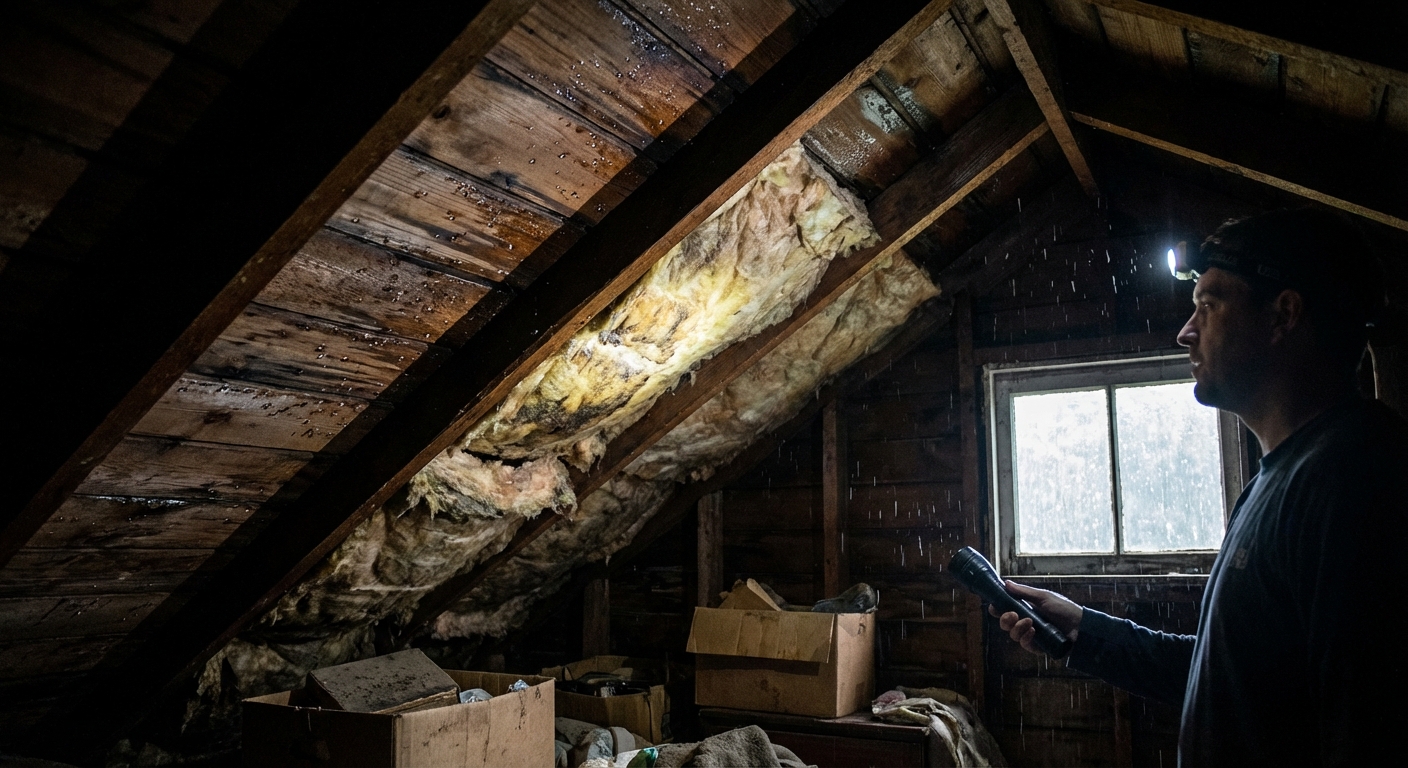
Step 2: Find the leak from the attic
The attic is your best detective station because it lets you trace the water without guessing. The ideal time to look is during a steady rain or right afterward, when everything is still damp.
What to bring
- Headlamp
- Measuring tape
- Chalk or painter’s tape to mark the spot
- Camera or phone
- A piece of plywood to kneel on if you have loose-fill insulation or tricky framing
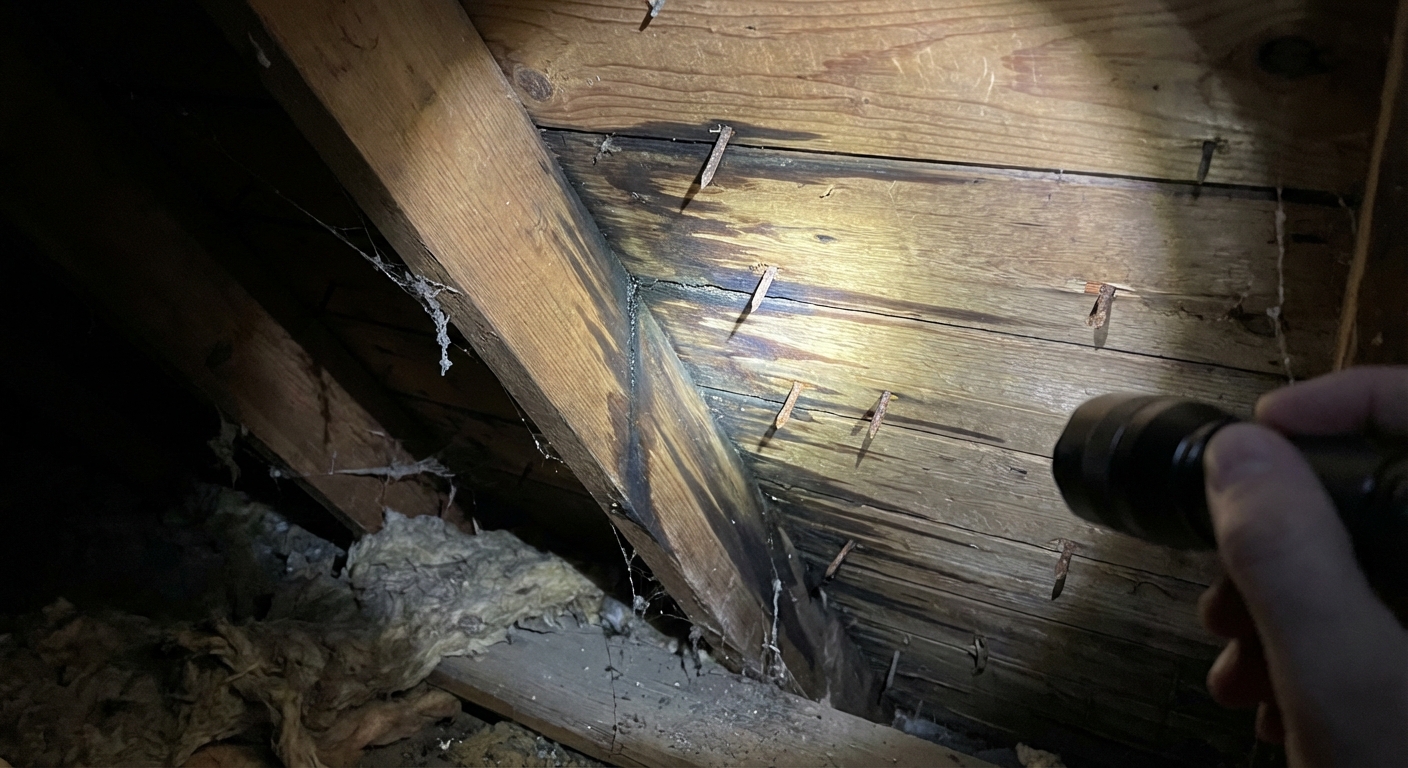
How to track it
- Start above the interior stain. In the attic, locate the general area over the leak.
- Look for dark trails. Water leaves a path on rafters and the underside of roof sheathing.
- Check nail tips. Nails that look shiny, wet, or rusted are often close to the entry point.
- Probe gently. If sheathing looks blackened or swollen, touch it. Soft wood is a red flag for rot.
- Mark it. Put a piece of tape on the nearest rafter and note how far up from the attic access or from a known reference point like a gable vent.
If you cannot find it easily
Leaks can be sneaky. Two methods help:
- Daylight test: On a sunny day, turn off attic lights and look for pinholes of daylight in places that should be solid roof deck. Important: Do not confuse intentional ventilation light from ridge vents, soffit vents, gable vents, or roof vents with a leak path. Focus on unexpected light through the sheathing or around penetrations.
- Hose test (two-person job): One person stays in the attic with a flashlight. The other person runs water on the roof in small sections for 5 to 10 minutes each, starting low and moving up. When the attic person sees water, you just narrowed the source.
Hose test tip: Mimic rainfall. Keep the spray pointed down-roof and avoid shooting water upward under shingles or into flashing seams. Spraying upward can create false positives that would never happen in real rain.
Common leak sources
Most leaks come from penetrations and transitions, not the big open field of shingles. Not always, but often enough that these spots are where you look first.
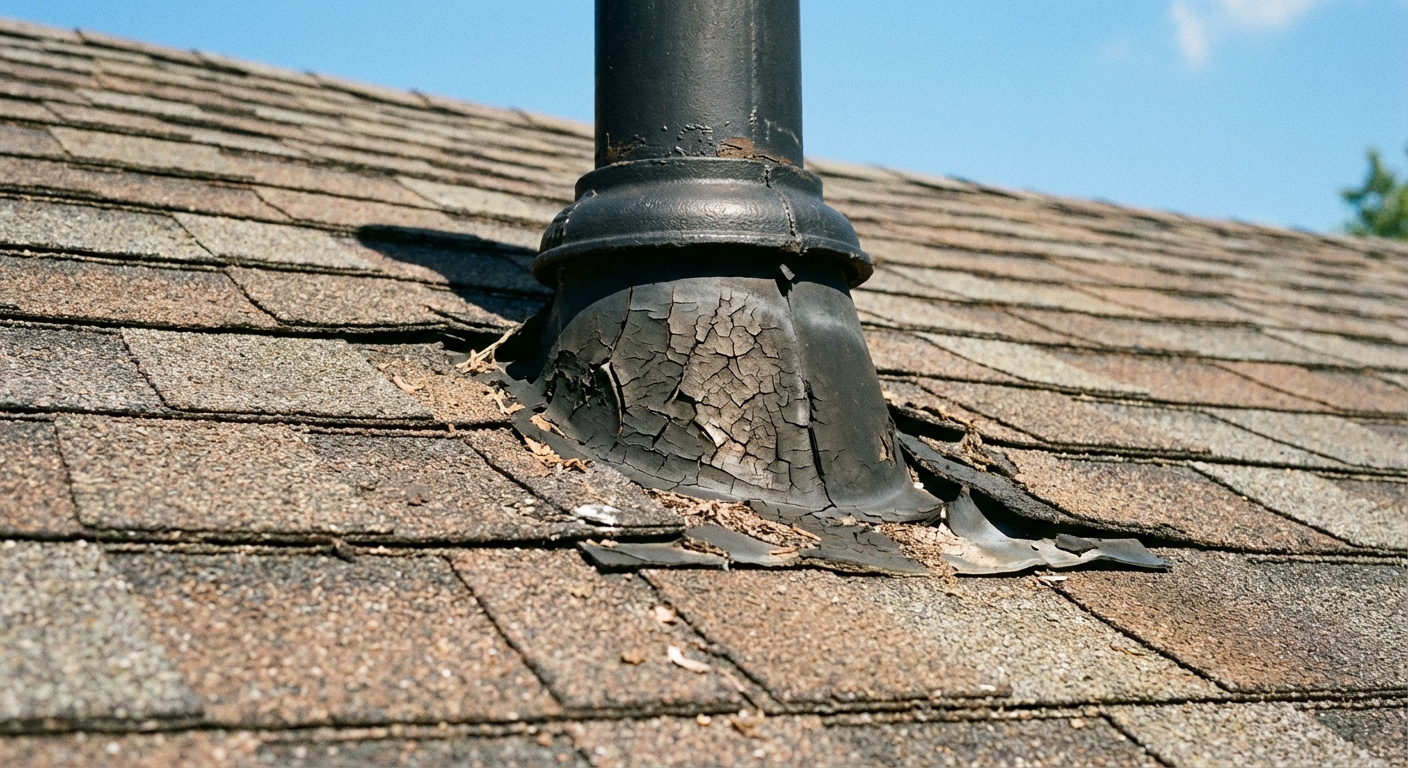
1) Vent pipe boots
Plumbing vents typically have a rubber boot that seals around the pipe. Over time, UV and temperature swings crack that rubber. Water then runs down the pipe or under the flange.
- Cracked, brittle rubber around the pipe
- Gaps between boot and pipe
- Loose or missing nails on the boot flange
2) Chimney flashing
Chimneys are leak magnets because they have multiple flashing pieces working together. If any part fails, water gets behind it.
- Loose metal flashing at the chimney corners
- Cracked mortar where counterflashing is embedded
- Missing cricket on the uphill side of a wide chimney
3) Step flashing at walls and dormers
Where a roof meets a vertical wall, the roof should have step flashing layered with each shingle course. If it was skipped, nailed wrong, or sealed with caulk as a shortcut, it eventually leaks.
- Heavy reliance on caulk where flashing should be
- Water stains in the attic near a wall line
- Rotten trim or peeling paint on the exterior wall near the roofline
4) Kick-out flashing (the small piece that saves big repairs)
Where a roof edge runs into a wall and dumps into a gutter, you want a kick-out flashing at the bottom of the wall. Without it, water can shoot behind siding and rot the wall for years before the leak shows up inside.
- Leak or stains along an exterior wall near the bottom of a roof-to-wall connection
- Peeling paint, swollen trim, or soft wood near that corner
- Gutter overflow marks right where the roof meets the wall
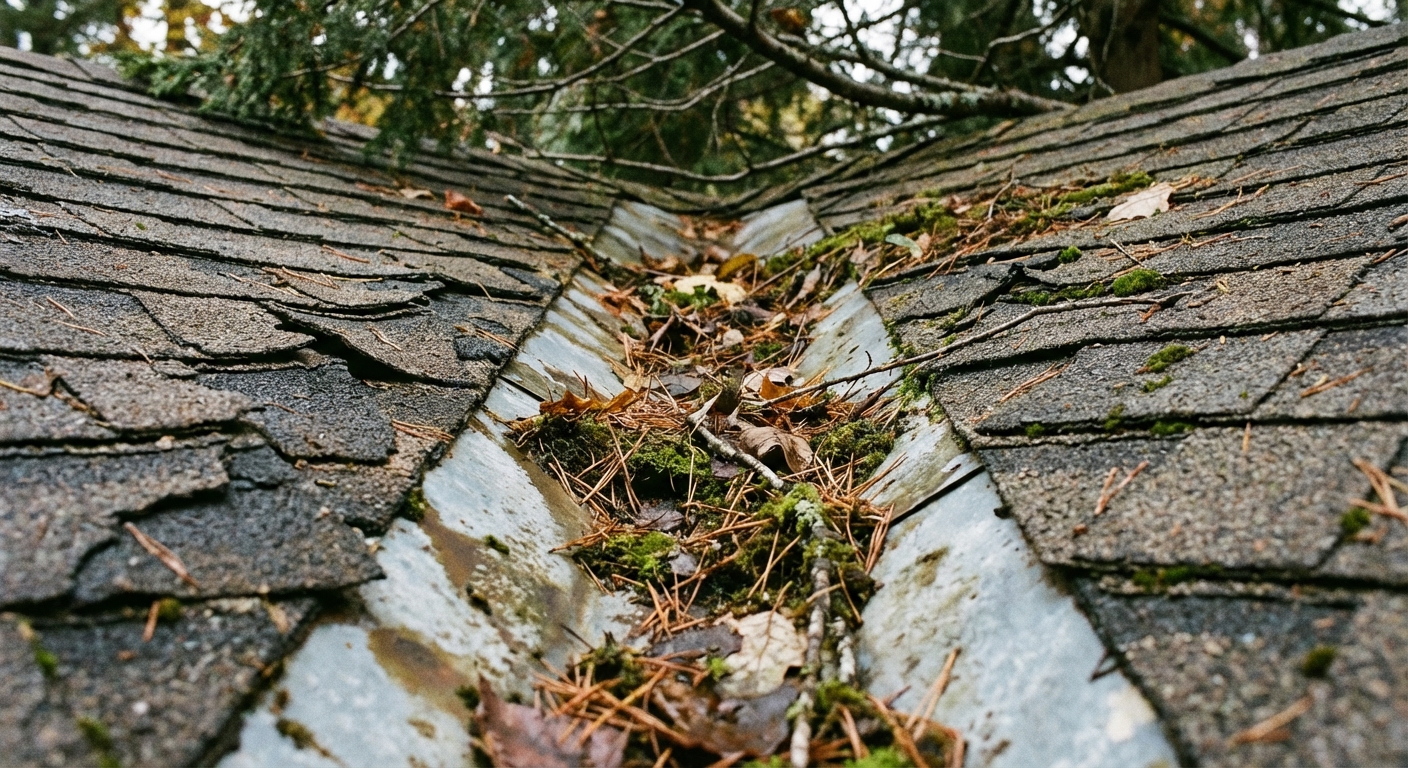
5) Valleys
Valleys carry a lot of water. Debris buildup or worn valley flashing is a common leak source.
- Leaves and pine needles packed in the valley
- Cracked shingles along the valley line
- Exposed nails in the valley area
6) Missing, cracked, or blown-off shingles
Obvious, but still common. Wind can lift shingles and break their seal, letting wind-driven rain underneath.
- Shingles with lifted corners or missing tabs
- Granules collecting in gutters (sign of aging shingles)
- Exposed black asphalt or torn fiberglass mat
7) Nail pops and exposed fasteners
A nail that backs out creates a tiny tent in the shingle. Water can work its way in and follow the nail hole into the attic.
- Raised circles or bumps in shingles
- Visible nail heads
8) Roof vents (ridge vents, box vents, turbines)
Roof vents are necessary, but they are also openings, which means they can leak if flashing is installed wrong, the vent cracks, nails back out, or wind-driven rain gets underneath.
- Water staining centered below a roof vent
- Cracked plastic housings on box vents
- Loose fasteners, lifted shingles, or exposed nail heads around the vent flange
- Ridge vent leaks that show up near the peak, especially after windy rain
9) Skylights
Skylights can leak from failed flashing, failed seals, or condensation issues that drip and mimic a roof leak.
- Stains at skylight corners
- Cracked or missing flashing pieces
- Fogging between panes (seal failure)
Cold-climate leaks: ice dams
If you live where snow sticks around, ice dams deserve their own mention. They happen when heat escaping into the attic melts snow higher on the roof, then that water refreezes at the colder eaves. The meltwater backs up under shingles and leaks inside.
What to look for
- Leaks during snow melt or freeze-thaw cycles, even without rain
- Thick ridges of ice along the eaves or in gutters
- Stains near exterior walls or at the ceiling line close to the eaves
Note: The long-term fix is usually air sealing and insulation improvements plus proper ventilation, not just roof patching. For immediate risk, many homeowners call a pro for safe ice removal.
Temporary fixes
If rain is coming and you need to protect drywall and insulation, a temporary patch is absolutely worth doing. Just treat it like a bandage, not a cure.
Inside: control the damage
- Put a bucket under the drip and protect flooring with towels or a plastic drop cloth.
- If the ceiling is bulging with water, you may be able to drain it, but do it carefully. Turn off power to the area, confirm it is a water bubble in drywall (not a sagging plaster failure), and use eye protection. Poke a small hole at the lowest point and drain into a bucket. If you are unsure, stop and call a pro.
- Move furniture and electronics out of the splash zone.
From the attic: catch and divert
If you can see water coming in, you can often redirect it short-term:
- Staple a heavy plastic sheet to rafters to guide water into a bucket.
- Or set a shallow plastic bin under the drip and check it often.
On the roof: emergency patch options (dry weather only)
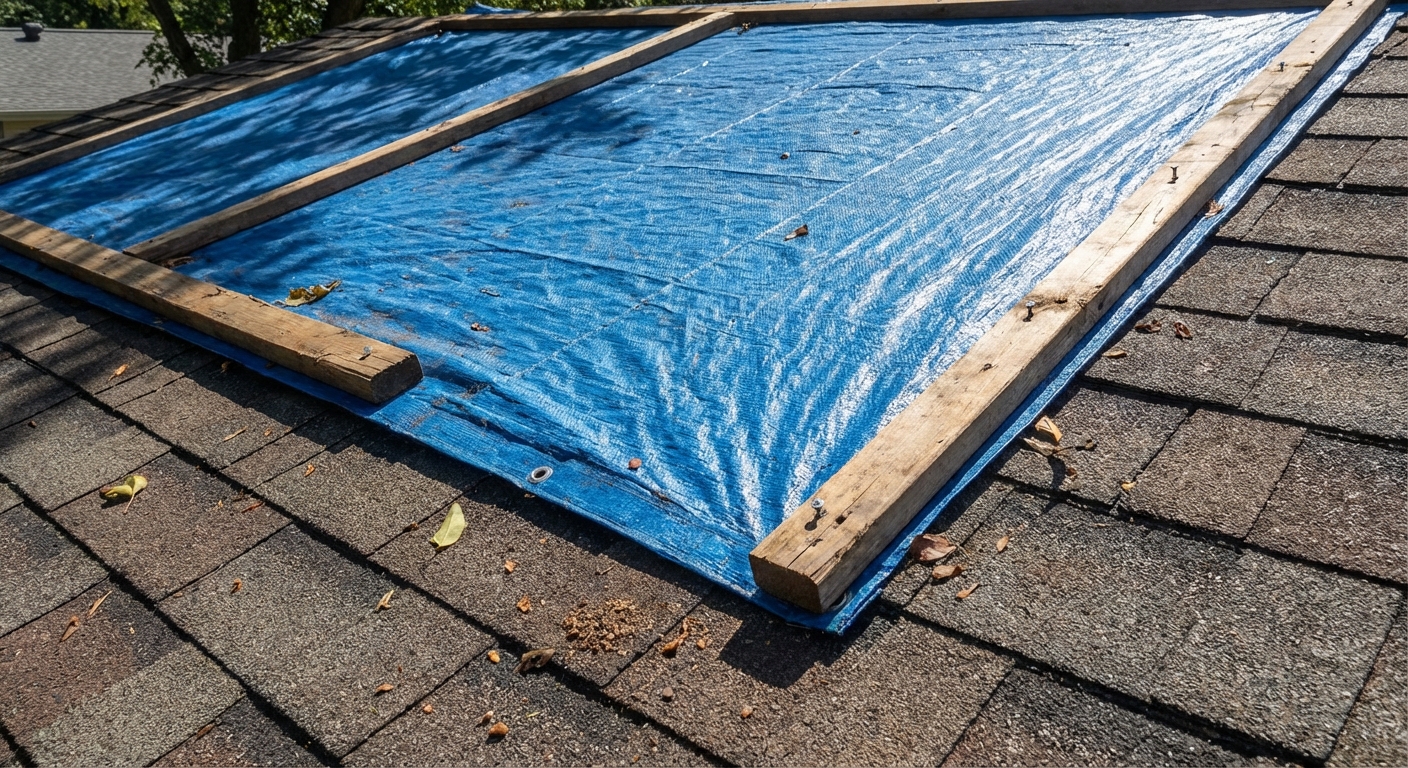
- Tarp: The most reliable temporary fix. Use a large tarp that reaches past the leak area and over the roof peak if possible. Secure it with 1x2 furring strips screwed into the roof, not just nails through the tarp.
- Roofing cement: Can seal small cracks around flashing or nail pops. It is messy and short-lived if used as the only solution.
- Butyl or flashing tape: Useful for a quick seal on clean, dry metal flashing. Not a substitute for proper flashing repair.
Thrifty note: A tarp and a handful of furring strips can save you hundreds in interior damage while you plan the correct repair.
Permanent repairs
The right permanent fix depends on what failed. Below are practical repairs many homeowners can handle on a safe, walkable roof. If your roof is steep or high, consider hiring this part out.
Repair A: Replace a cracked vent boot
Tools and materials
- Replacement vent boot (correct pipe size and roof type)
- Flat bar or shingle ripper
- Hammer or roofing nailer
- Galvanized roofing nails (or manufacturer-approved fasteners)
- Roof sealant or roofing cement (compatible with asphalt shingles)
- Utility knife (optional)
This is one of the most common and satisfying leak fixes because the parts are straightforward.
- Buy the right boot: Match pipe diameter (often 1.5 to 4 inches). Choose a boot designed for your roof type and pitch.
- Lift shingles carefully: Use a flat bar to loosen the shingles above and around the boot. Work slowly to avoid tearing.
- Remove old nails: Pull nails holding the boot flange.
- Slide on the new boot: It should sit flat on the roof deck with the flange under the upper shingles and over the lower shingles, so water sheds correctly.
- Nail correctly: Nail the flange where the manufacturer recommends, typically on the sides and bottom. Avoid nailing where water will run.
- Seal exposed nail heads: Dab roofing cement or roof sealant over nail heads that remain exposed.
Mistake I have made: Rushing the shingle lifting step. If you crack a shingle while prying, replace it instead of hoping it will be fine. Hope is not a roofing material.
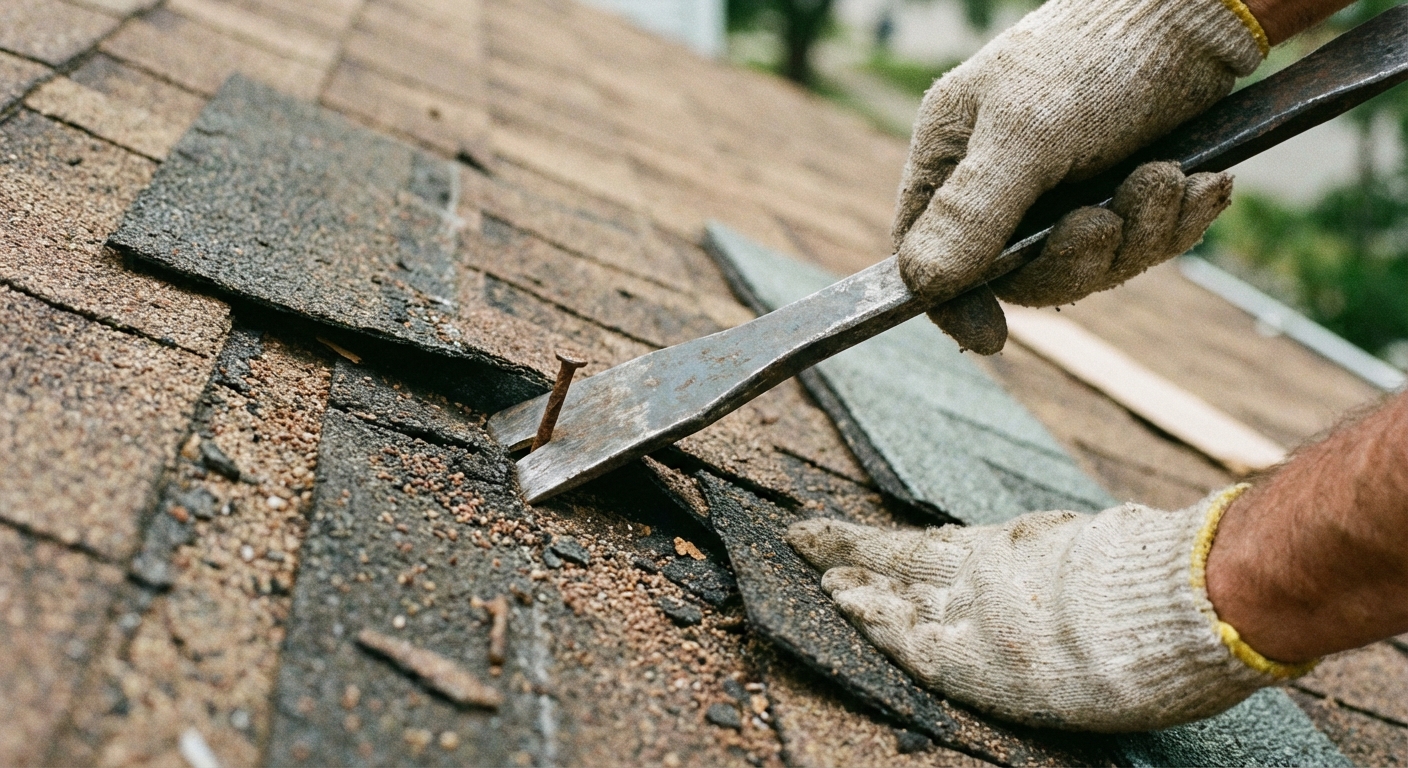
Repair B: Replace a damaged shingle
Tools and materials
- Matching replacement shingles
- Flat bar or shingle ripper
- Hammer
- Galvanized roofing nails
- Roof sealant or roofing cement (for tabs if needed)
- Lift the shingle above the damaged one and remove nails holding the damaged shingle.
- Slide out the damaged shingle.
- Slide in a matching replacement, align it, then nail in the correct nailing strip location.
- Seal the lifted shingle tabs with a small amount of roofing cement if the adhesive strip does not re-bond (common in cooler weather).
Repair C: Fix a nail pop
Tools and materials
- Flat bar
- Hammer
- Galvanized roofing nails
- Roof sealant or roofing cement
- Lift the shingle tab above the pop.
- Remove the popped nail.
- Drive a new roofing nail slightly above the old hole, into solid decking.
- Seal the old hole and the new nail head with roofing cement or roof sealant.
- Press the shingle back down and seal the tab if needed.
Repair D: Reseal or replace flashing
Flashing repair ranges from simple to advanced. The big rule is this: caulk is not flashing. Sealants can be a supporting player, but flashing needs to be layered so water is directed out and down.
- Small gaps: If flashing is intact but a small joint opened, a high-quality roof sealant can buy time.
- Loose step flashing: Proper fix usually involves removing shingles in that area and reinstalling step flashing pieces so each one overlaps the shingle below.
- Kick-out flashing missing: This is one of those “small part, big consequences” details. Often best handled by a roofer or siding pro because it may involve siding and water-resistive barrier details, not just the roof.
- Chimney counterflashing issues: If mortar joints are cracked or counterflashing is loose, this is often a job for a roofer or mason to do right.
If you are seeing rot around a chimney or repeated leaks despite caulking, that is your cue to stop sealing and start rebuilding the flashing system correctly.
Confirm the repair worked
- Wait for the next rain and check the attic area you marked.
- If rain is not in the forecast, do a controlled hose test again, low to high, and keep the water pointed down-roof.
- Once you are confident it is dry, remove wet insulation and let framing and sheathing dry fully.
Important: Do not close everything up too quickly. Trapped moisture breeds mold and can rot roof decking.
Mold and wet insulation
Wet insulation does not just dry and become “fine.” It can hold moisture against wood and grow mold. If insulation is soaked, bag it and replace it after the leak is fixed and the area is dry.
- If you see visible mold growth, smell persistent musty odors, or have widespread wetting, consider professional remediation.
- Do not run fans in a way that blows insulation dust through the house.
Prevent leaks
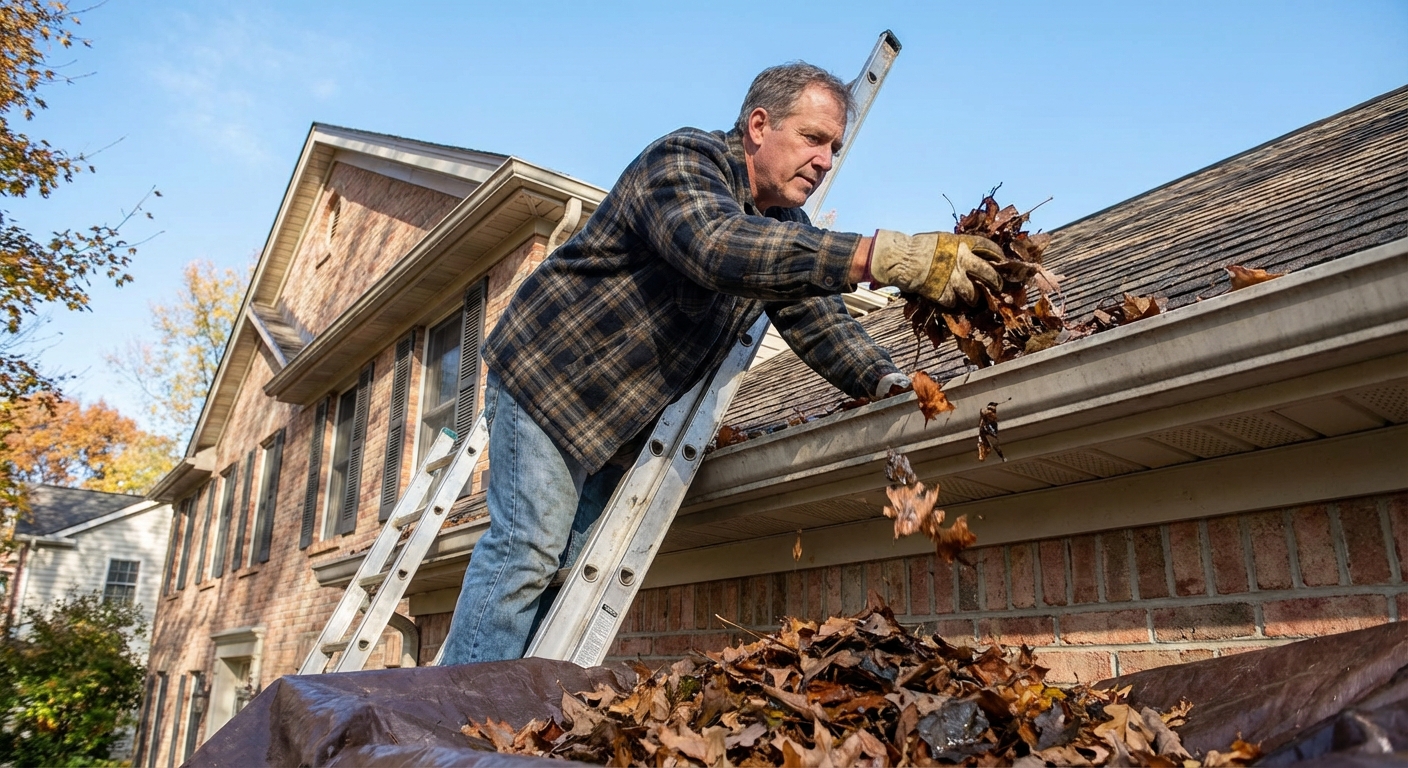
A little seasonal attention saves a lot of emergency buckets.
- Clean gutters: Clogged gutters and overflowing water can back up under shingles and rot fascia.
- Keep valleys clear: Especially after storms.
- Trim overhanging branches: They scrape shingles and dump debris where water needs to flow.
- Check penetrations yearly: Vent boots, roof vents, skylights, and flashing deserve a quick look.
- Maintain attic ventilation: Good ventilation reduces condensation that can mimic leaks and shorten roof life.
- In snow country: Air seal attic leaks and keep insulation up to par to reduce ice dam risk.
Quick troubleshooting
- Leak near bathroom ceiling: could be a plumbing vent boot, a roof vent nearby, or a bath fan venting into the attic.
- Leak near fireplace: often chimney flashing, counterflashing, or a missing chimney cricket.
- Leak along an exterior wall: step flashing at sidewall or kick-out flashing missing near the gutter line.
- Leak after wind-driven rain: lifted shingles, damaged ridge cap, ridge vent issues, or flashing weaknesses.
- Leak in a long line: water traveling along a rafter before dripping.
- Leak during snow melt: possible ice dam or condensation issues.
When it is time to replace the roof
Sometimes you fix one leak and another appears nearby. If you have multiple recurring leaks, widespread granule loss, curling shingles, soft decking, or the roof is near typical lifespan, it may be time to price a replacement.
Rule of thumb: Asphalt shingles often last about 15 to 30 years depending on product, ventilation, and climate. Other materials vary widely. Metal, tile, and slate can last much longer, but they still rely on flashing details that can fail.
If you are unsure, get a couple of roofing quotes and ask them to show you photos of the problem areas. A good roofer will point out failing boots, flashing issues, and shingle wear without pressure tactics.
My no-panic roof leak checklist
- Protect the interior first (bucket, drain bulges carefully, move valuables).
- Check attic for trails, wet nails, and the highest wet point. Step only on framing.
- Mark the spot and measure its location.
- Inspect above that spot for boots, vents, flashing, valleys, and shingle damage.
- Tarp if needed, then plan a proper repair on a dry day.
- Confirm with rain or a controlled hose test.
If you want to tackle the repair yourself but feel unsure on the roof portion, you can still do the detective work in the attic and hand a roofer a very specific location. That alone can save labor time and get you to a fix faster.
About Marcus Vance
Content Creator @ Grit & Home
Marcus Vance is a lifelong DIY enthusiast and self-taught home renovator who has spent the last decade transforming a dilapidated 1970s ranch into his family's dream home. He specializes in budget-friendly carpentry, room-by-room renovations, and demystifying power tools for beginners. Through his writing, Marcus shares practical tutorials and hard-learned lessons to help homeowners tackle their own projects with confidence.