A leaky shower valve is one of those problems that feels small until it is not. A drip turns into a stained ceiling below. A slow leak behind the wall turns into mushy drywall and a musty smell you cannot un-smell.
The good news: most shower valve leaks are fixable with a couple of hand tools and the right replacement parts. The trick is identifying what you have, taking it apart without damaging the finish, and putting it back together in the right order.
Small caveat: some modern pressure-balance and thermostatic valves, or valves that are severely corroded, can turn into a specialty-tool job or even a full valve replacement. You can still start with the basics below, just know when to stop before you snap something expensive.

Before you start: what kind of leak is it?
Different leaks point to different fixes. Take 60 seconds to observe what is happening.
- Drips from the showerhead when the handle is OFF: Usually a worn cartridge (single-handle) or worn seats and washers or valve stems (many dual-handle setups).
- Drips from the tub spout when the handle is OFF (tub/shower combo): Could be the valve, but also check the tub spout diverter. A tub spout diverter is more likely to cause water to sneak up to the showerhead while filling the tub. A true “off” drip is still commonly the valve.
- Water behind the trim plate or running down the wall while the shower is ON: Often a failed seal behind the handle, a loose bonnet nut, or a worn cartridge O-ring.
- Water appears even when nobody is using the shower: Treat this as urgent. Shut water off and open the wall below if needed to confirm the source.
If you see active water inside the wall cavity or any moldy insulation, stop and consider calling a plumber. Not because the valve is mysterious, but because water damage escalates fast.
Identify your valve: single-handle vs. dual-handle
Single-handle valve
One handle controls hot and cold and turns the shower on and off. Inside is usually a cartridge (a replaceable plastic and metal unit with seals). Many newer single-handle valves are pressure-balance types with an anti-scald feature.
Dual-handle valve
Two handles, one hot and one cold. Inside you may have:
- Compression stems that seal against replaceable seats with a rubber washer (common in older setups)
- Cartridges or ceramic discs (varies by brand)
Quick tip from my own mistakes: do not guess your replacement parts from a blurry online photo. Pull the cartridge or stem first, then match it. You will save yourself a second teardown.
Tools and supplies
You do not need a whole plumbing shop. You do need the right basics.
Tools
- Phillips and flathead screwdrivers
- Allen key set (many handles use a small set screw)
- Adjustable wrench or channel-lock pliers
- Needle-nose pliers
- Utility knife (for cutting caulk)
- Cartridge puller (optional but very helpful if the cartridge is stuck)
- Flashlight or headlamp
Supplies
- Replacement cartridge or seats and washers (and springs if your design uses them), brand and model specific
- Plumber’s silicone grease (not petroleum jelly)
- Teflon tape (only if your valve design calls for it, not for cartridge seals)
- Rags and a small cup for screws
- Painter’s tape (protect tile and finishes)
- 100% silicone caulk (for re-sealing the trim plate, if manufacturer instructions allow)
Two-second save: plug the shower drain with a rag (or cover it with painter’s tape) before you touch any tiny set screws. The drain is hungry and it will win.
Safety note: retaining clips can spring free, and old metal edges can be sharp. Eye protection is a good idea, especially when you are pulling clips overhead.
Step 1: Shut off the water (and verify it is off)
You have three common options, depending on your plumbing:
- Shut off the whole house water at the main.
- Shut off a dedicated bathroom branch if you have one.
- Use integral stops if your valve has small flathead shutoffs behind the trim (not all do).
After shutting water off, open the shower valve to the ON position to relieve pressure, then open a nearby faucet to confirm water is really off. This is the step that prevents a surprise wall shower.
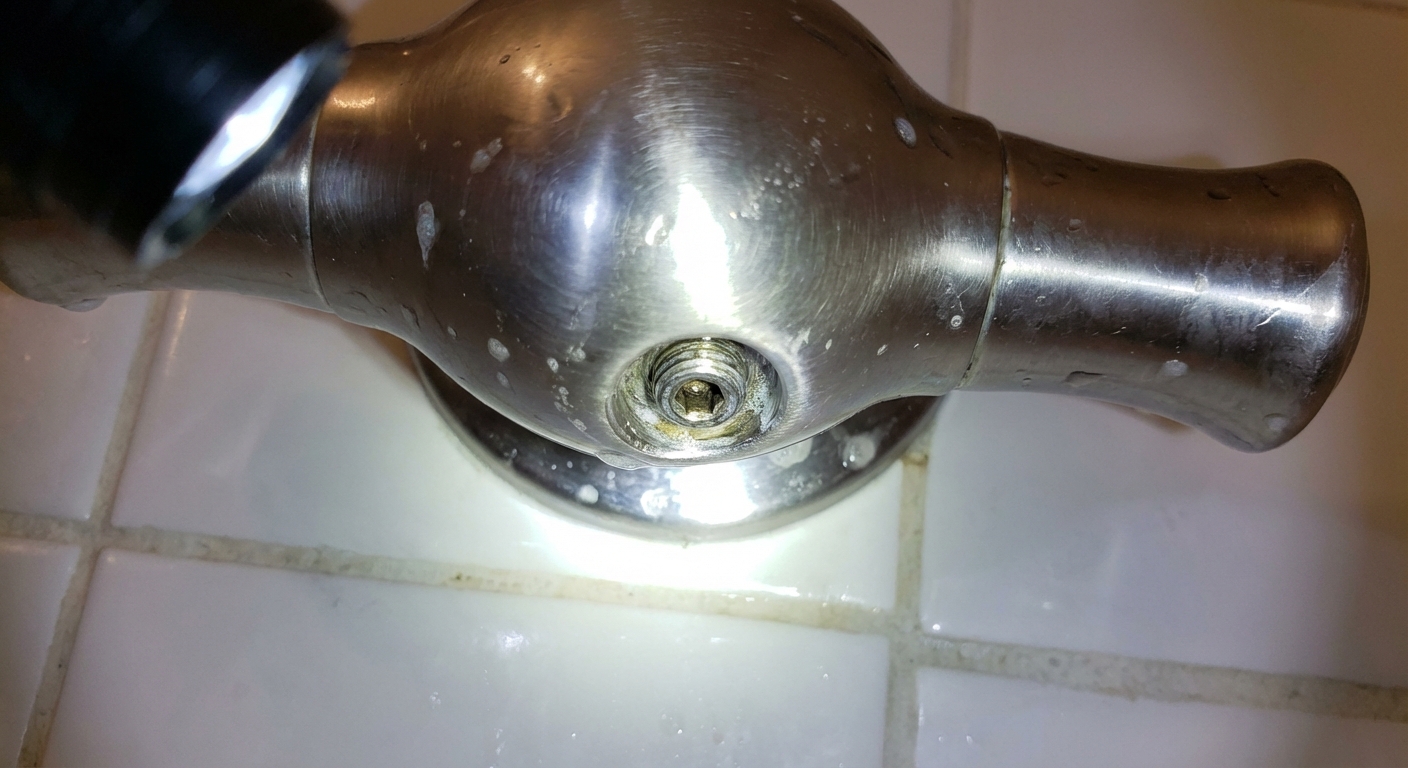
Step 2: Remove the handle
Most handles come off one of two ways:
- Set screw: Look underneath or behind the handle for a tiny Allen screw. Loosen it a few turns and pull the handle off.
- Cap and screw: Pry off a small decorative cap (carefully) to access a Phillips screw.
Put painter’s tape on the tile below your work area. It helps prevent chipped tile if a screwdriver slips.
Pro move: take a quick photo before you remove anything. It makes reassembly feel unfairly easy.

Step 3: Remove the trim plate
Trim plates are often sealed to the wall with a thin bead of silicone. If you just yank, you can crack grout or peel paint.
Cut the caulk: Run a sharp utility knife around the edge of the plate.
Remove screws: Usually two screws hold the plate to the valve body.
Gently wiggle off: Pull straight out. If it sticks, re-cut the caulk line.
Once the plate is off, look for obvious issues: water trails, mineral buildup, or a loose bonnet nut.

Step 4: Pick the right repair
At this point, you can usually tell which path you are on.
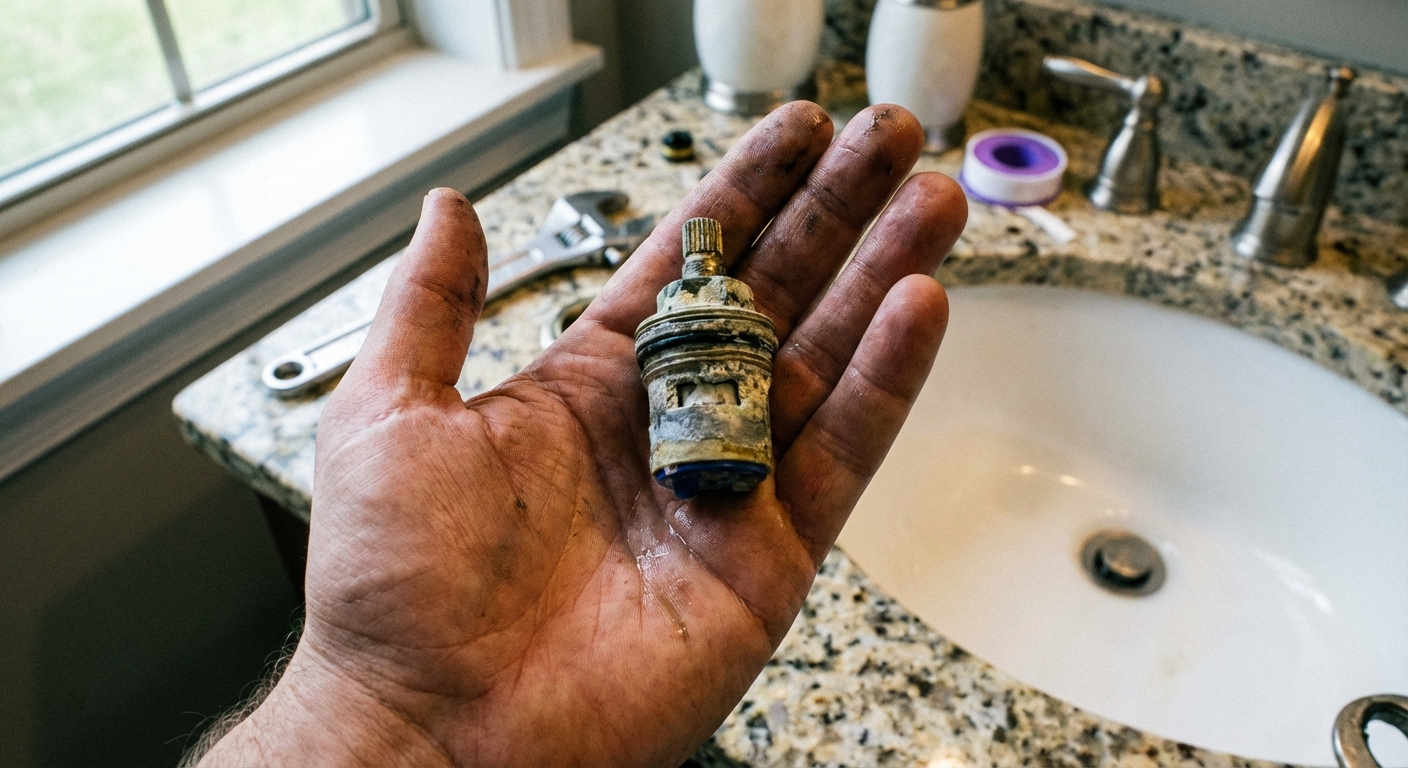
If you have a single-handle valve: replace the cartridge
Cartridges wear out. Seals harden. Mineral buildup makes them stick. Replacement is the standard fix for a drip from the showerhead when off.
If you have a dual-handle compression style: replace seats and washers
Older valves often seal via a rubber washer pressing against a brass seat. Worn washer or a pitted seat equals drip. Some designs also use springs behind seals, but not all do.
Important: Brands matter. Delta, Moen, Kohler, Pfister, Grohe, and others all use different parts. If you cannot find a logo on the trim, take a clear photo of the cartridge or stems once removed and bring it to the hardware store.
Single-handle valve: replace a cartridge
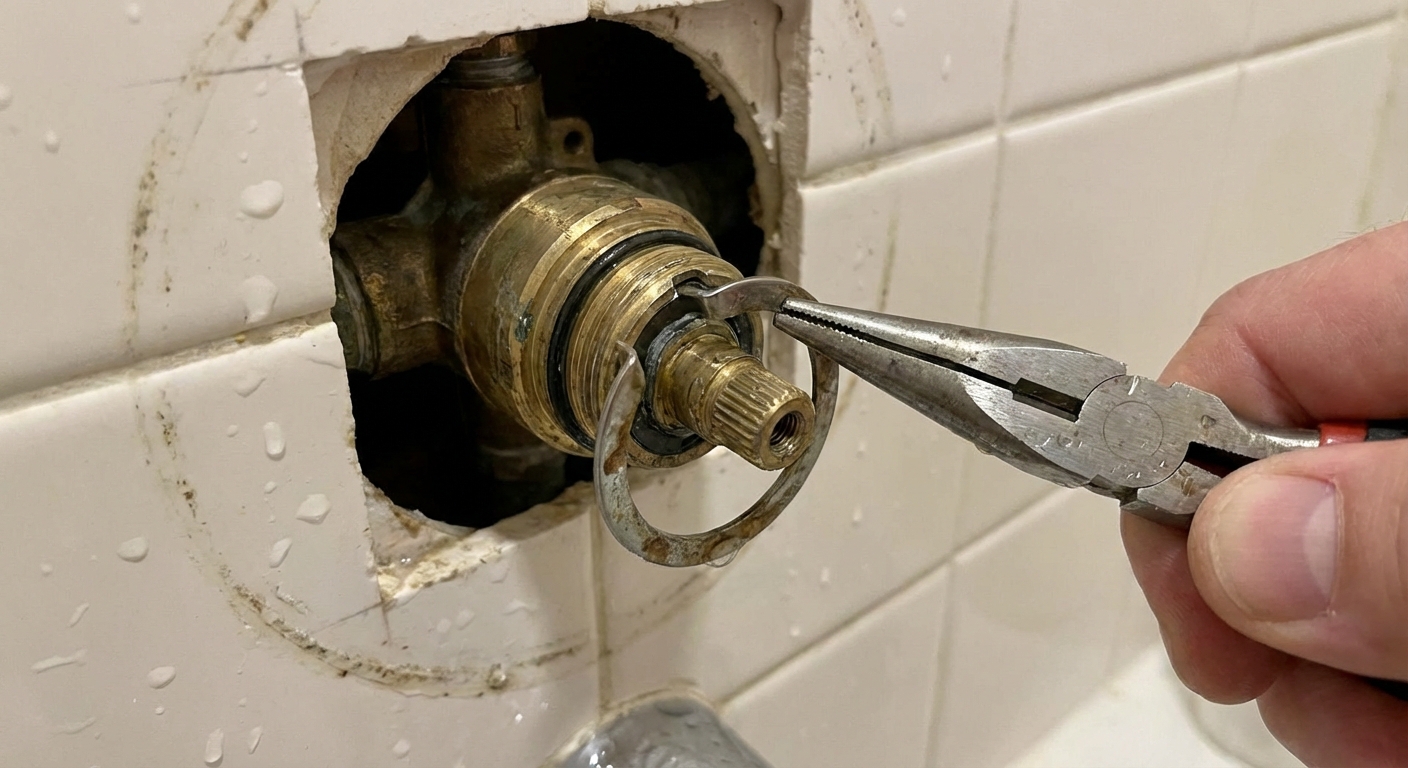
1) Remove the retaining clip or bonnet nut
Cartridges are held in place with either:
- A U-shaped retaining clip: Pull it straight up with needle-nose pliers.
- A threaded bonnet nut: Loosen carefully with an adjustable wrench.
Go slow. If you round a nut or break a clip, you are making a simple job harder.
2) Pull the cartridge
Try pulling straight out with your hand. If it is stuck:
- Wiggle gently, side to side.
- Use a cartridge puller made for your brand if needed.
Do not pry against tile. If you need leverage, brace against the valve body, not the wall surface.
3) Clean the valve body
Wipe out grit and mineral buildup. A little debris can keep new seals from seating and cause a leak behind the wall.
If you have hard water, expect crusty buildup. A nylon brush and a rag usually handle it. If you use vinegar to dissolve scale, use it sparingly and keep it off finished surfaces.
4) Install the new cartridge
- Lightly coat O-rings with silicone plumber’s grease.
- Align tabs and keyways exactly. If it does not seat easily, it is probably rotated wrong.
- Reinstall the clip or bonnet nut snugly. Do not over-tighten.
5) Check the temperature limit stop
Many pressure-balance valves have an anti-scald temperature limit stop. After a cartridge swap, the factory setting can leave you with a lukewarm shower. Before you put the trim back on, look for the limit stop piece on the cartridge or handle adapter and adjust it so you can get hot enough water without going full danger mode. Follow your valve brand’s instructions, since the adjustment style varies.
6) Turn water on and test with trim still off
This is my favorite habit: test while everything is exposed. Turn water back on slowly and watch for:
- Drips from the valve body
- Water weeping around the cartridge
- Leaks only when the valve is opened
If it stays dry, you are ready to reassemble.
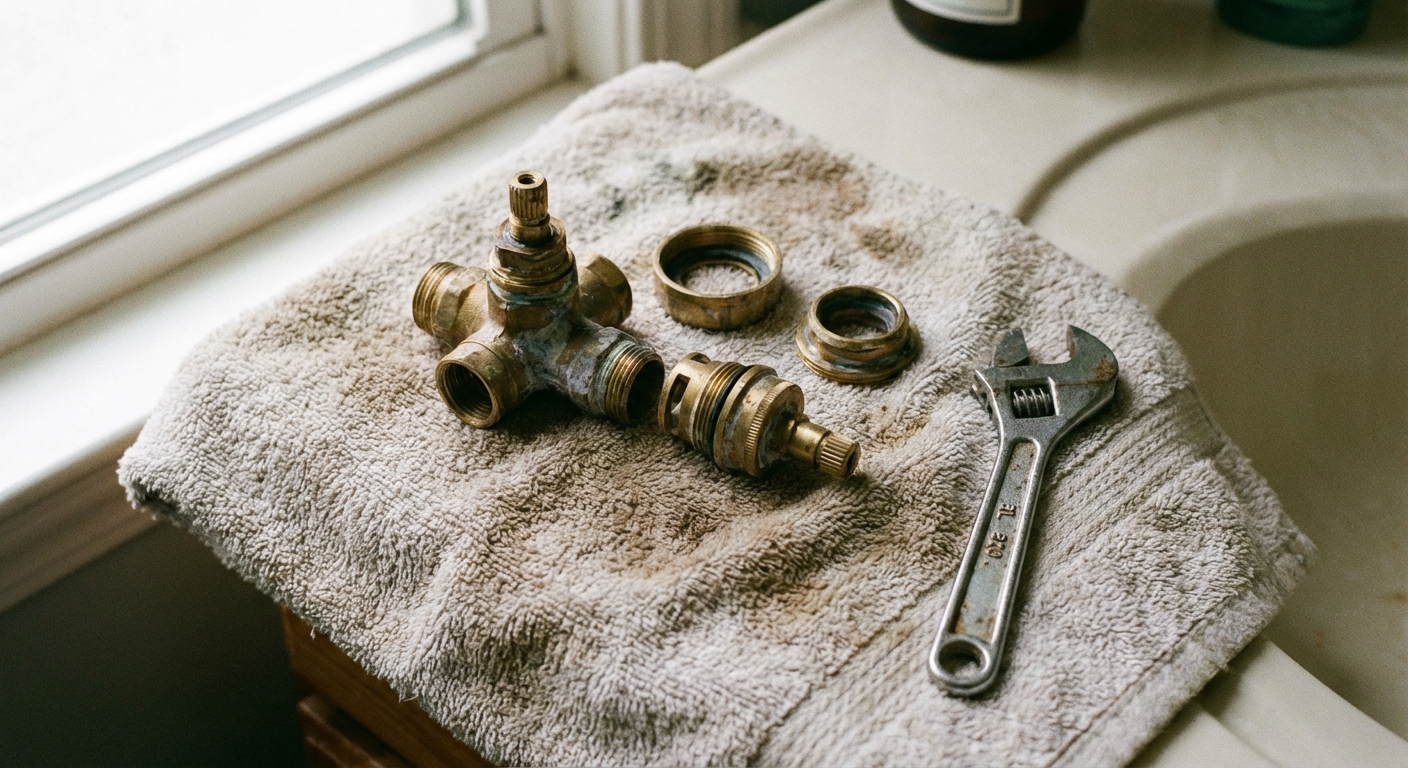
Dual-handle compression: seats and washers
Dual-handle valves vary a lot, but the basic idea is consistent: the stem closes against a seat to stop water. If the shower drips when off, the sealing surfaces are worn.
1) Remove each handle and trim
Take one side apart at a time so parts do not get mixed.
2) Remove the stem
Use an adjustable wrench to loosen the packing nut or bonnet nut, then unthread the stem assembly.
3) Replace the wear parts
- Rubber washer: If it is hard, cracked, or misshapen, replace it.
- Seat: If the brass seat is pitted or grooved, replace it using a seat wrench (if removable).
- Springs (if present): Replace if distorted or rusty.
If your seats are not removable (cast-in seats), you may need a reseating tool or a plumber. At that point the cost-benefit shifts fast.
4) Reassemble and test
Reinstall the stem, snug the nuts, then turn water on and test with the trim off like you would on a cartridge job.
Leak behind the wall: what to check
If you saw moisture behind the trim plate, do not just swap parts and hope. Check these common culprits:
- Loose bonnet nut: A slightly loose bonnet can seep only when water is running.
- Damaged cartridge O-rings: Replace cartridge or O-rings if your kit includes them.
- Pressure-balance spool: Some valves have a balancing spool that can stick from mineral buildup and cause weird temperature behavior or flow problems after a repair. If your brand uses one and symptoms persist, it may need cleaning or replacement.
- Cracked valve body: Rare, but it happens. If the brass body is cracked, the valve must be replaced.
- Old caulk line: Water can migrate behind trim and show up as a “leak.” You still want it sealed correctly after repair.
If you have access from the back side (closet drywall behind the shower), it can be worth opening a small inspection window to confirm the leak is truly fixed before you patch and paint.
Reassembly: trim, handle, caulk
1) Put the trim plate back on
Make sure the gasket is in place if your trim has one. Tighten screws evenly so the plate sits flat.
2) Caulk the plate
If your manufacturer instructions allow caulk, run a thin bead of 100% silicone around the top and sides of the plate, but leave the bottom uncaulked. That small gap gives any future leak a place to escape where you can see it, instead of trapping water in the wall. If your trim is designed to seal with a gasket only, skip the caulk and let the gasket do its job.
3) Reinstall the handle and set screw
Tighten snugly, then test operation and temperature range.
Testing checklist
- With valve OFF: no drip from showerhead or tub spout after 5 to 10 minutes
- With valve ON: no water behind trim plate
- Handle turns smoothly with no grinding
- Hot and cold behave normally (no sudden temperature flips)
If a drip remains after a cartridge replacement, double-check that the cartridge is seated fully and oriented correctly. On some valves, a cartridge installed 180 degrees off will behave strangely.
If it is still dripping after all that, the culprit is often debris caught in the valve body, a damaged sealing surface in the valve, or a second worn component (like a balancing spool or check valve) depending on your model.
Common mistakes (I have made most of these)
- Buying parts before pulling the old one: Brands have look-alikes that are not compatible.
- Forgetting the retaining clip: Without it, the cartridge can shift and leak.
- Over-tightening: More force is not better. It can crack plastic parts or distort seals.
- Skipping the “test with trim off” step: Reinstalling trim twice is a special kind of weekend fun.
- Using petroleum grease: It can swell rubber. Use silicone plumber’s grease.
- Letting tiny screws escape: If you did not plug the drain, this is where the drain gets fed.
When to call a plumber
I am all for DIY, but there are times it is smarter to tag in a pro:
- You cannot shut the water off fully
- The cartridge or stem is seized and you are close to breaking the valve body
- You find a cracked valve body, leaking solder joints, or heavy corrosion
- You have a thermostatic valve you cannot positively identify
- There is active water damage and you need a bigger repair plan
If you do call someone, you can still feel like you won: you narrowed the problem down, you exposed the valve, and you learned what you are dealing with for next time.
Quick parts-matching tips
- Look for a brand name on the trim, handle, or cartridge.
- Take photos of the cartridge from multiple angles next to a tape measure.
- Bring the old cartridge or stem to the store. It is the best “part number” you have.
- If your home is newer, check your closing paperwork or fixture manuals. Builders sometimes leave model info.
My thrifty closer
A leaky shower valve is one of the best DIY repairs for saving money because the parts are usually inexpensive, and the labor is what costs. Take your time, keep your screws in a cup, and test before you button it up. The first time you hear silence instead of drip, drip, drip, you will know it was worth the hour.
About Marcus Vance
Content Creator @ Grit & Home
Marcus Vance is a lifelong DIY enthusiast and self-taught home renovator who has spent the last decade transforming a dilapidated 1970s ranch into his family's dream home. He specializes in budget-friendly carpentry, room-by-room renovations, and demystifying power tools for beginners. Through his writing, Marcus shares practical tutorials and hard-learned lessons to help homeowners tackle their own projects with confidence.