A leaking toilet tank looks like a small problem until it quietly soaks your floor, rusts hardware, and makes the toilet wobble. The good news is most tank leaks are very fixable with basic hand tools and a modest parts kit. Many fixes land in the $10 to $30+ range, depending on your toilet brand and what you replace.
In this guide, I will show you how to diagnose where the water is coming from, including the sneaky “false leak” (condensation), then walk you through the most common repair: replacing the tank-to-bowl bolts and the spud washer (the big gasket between the tank and bowl).
Before you start: quick safety and setup
- Shut off the water at the toilet stop valve (usually on the wall behind the toilet). Turn clockwise until it stops.
- If the valve will not fully stop the water, shut off water at the main before you continue (or call a plumber). Working on a “mostly off” valve is how surprise floods happen.
- Flush and hold the handle down to keep the flapper open and drain as much water as possible from the tank.
- Sponge or towel out the remaining water so you are not working in a sloshy tank.
- Put down an old towel behind the toilet. Tank leaks tend to show up back there first.
Marcus’s note: The first time I did this, I skipped the towel and spent the next 10 minutes chasing water under the vanity. Lay the towel. Future you will be proud.
Tools and parts you will likely need
Tools
- Adjustable wrench or 1/2 inch wrench
- Large flathead screwdriver (for some bolt styles)
- Slip-joint pliers (optional, helpful)
- Sponge, small bucket, towels
- Flashlight
Parts
- Tank-to-bowl repair kit (includes bolts, rubber washers, metal washers, nuts)
- Spud washer (tank-to-bowl gasket, doughnut gasket)
- Fill valve (only if you confirm the fill valve is leaking)
If you can, bring a photo of the inside of your tank to the hardware store. Toilet parts are not hard, but there are enough variations to make guessing annoying.
Diagnose the leak: 5-minute checklist
Two quick clarifiers before we chase the wrong problem:
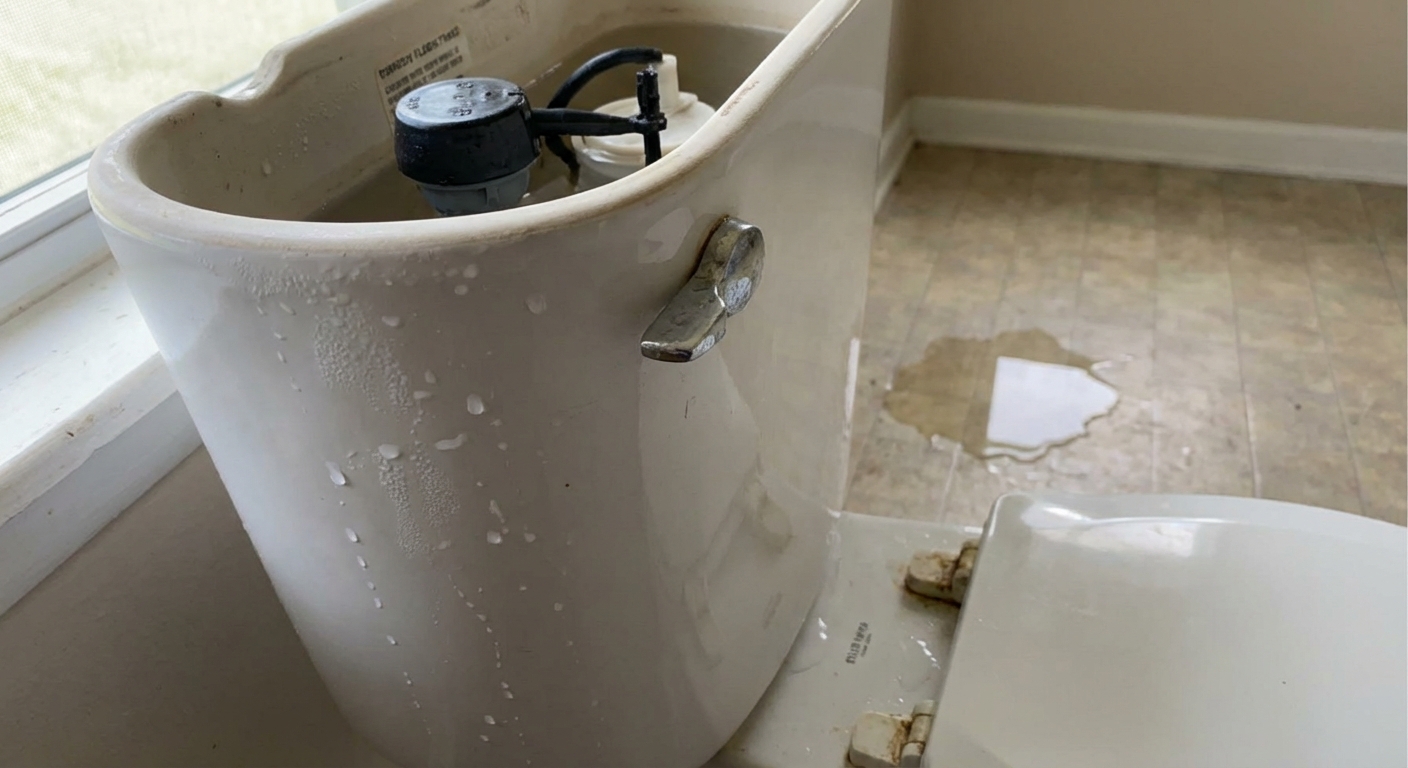
- Tank leak: water appears on the outside of the tank, runs down the back of the bowl, or puddles behind the toilet.
- Running toilet: water leaks inside the toilet into the bowl (often a flapper or overflow issue). That usually does not create a puddle behind the toilet, but it does waste water and can confuse the diagnosis.
The trick is to find the highest point that is wet. Water runs down and lies to you. Start at the top and work down.
1) Rule out condensation
If the outside of the tank feels uniformly damp and you see beads of water all over the porcelain, you might be dealing with sweating, not a plumbing leak. Sweating is driven by cold tank water and humid room air, so it often shows up during and after refills.
- Dry the tank completely with a towel.
- Do not use the toilet for 20 to 30 minutes.
- Then flush once and watch through the refill. If the tank “sweats” evenly across the porcelain (especially on humid days), it is likely condensation.
Fix: Reduce humidity (fan, dehumidifier), use an anti-sweat tank liner, or consider a tempering or mixing valve that slightly warms refill water. That last option is less common and can involve plumbing code and proper installation, so if you go that route, check local requirements or talk to a plumber. If you see water only at specific hardware points, keep diagnosing. That is a real leak.
2) Check the water supply connection
Look where the supply line connects under the tank at the fill valve shank.
- If it is wet right at the nut, try snugging the nut about 1/8 turn.
- Do not crank hard. Many fill valve shanks are plastic, and overtightening can crack the shank or deform the washer.
- If it still drips, the supply line washer may be worn or the line may need replacement.
3) Check tank bolts and the tank-to-bowl seam
If you see water on the bolts or dripping down the back of the bowl, the usual culprits are worn rubber washers, corroded bolts, or a flattened spud washer (tank-to-bowl gasket).
4) Check the fill valve for a slow seep
Some fill valves leak where they pass through the tank. Look for water tracking down from the fill valve locknut area.
5) Inspect for a cracked tank
Hairline cracks can leak only when the tank is full. Dry the tank, then run a dry finger along suspicious lines. If the crack weeps, do not mess around.
- Small crack with active leaking: Replace the tank or the whole toilet. Porcelain repair is not a reliable long-term fix for a tank that is constantly filled and under stress.
- Sudden worsening leak or spreading crack: Shut off water and stop using the toilet until replaced.
Most common fix: replace tank bolts and spud washer
If your leak is coming from the tank-to-bowl area, this is the repair that solves the majority of cases. Plan for about 45 to 90 minutes your first time.

Step 1: Shut off and disconnect the supply line
- Turn off the stop valve.
- Flush to empty the tank.
- Place a small bucket under the supply connection.
- Unscrew the supply line from the bottom of the tank.
Step 2: Remove the tank from the bowl
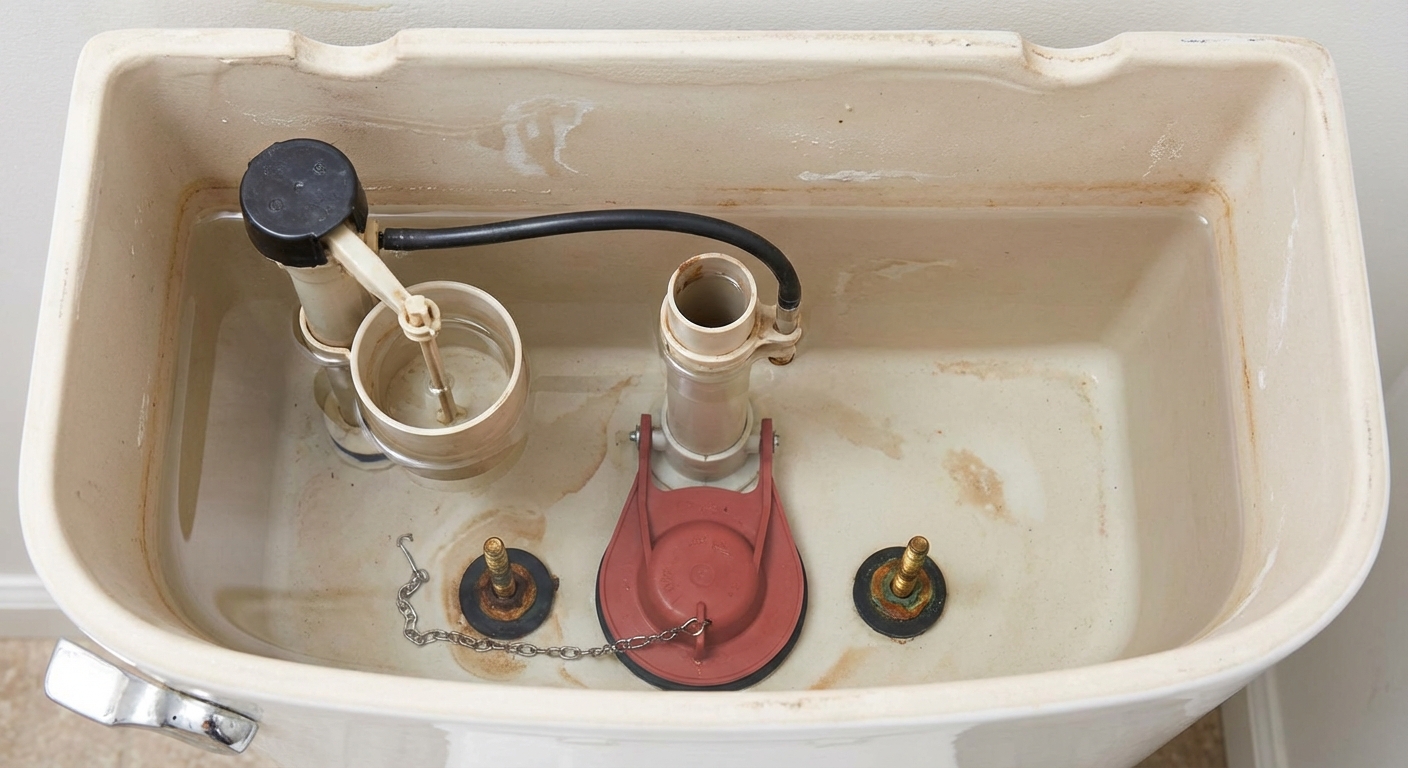
Inside the tank, you will see 2 or 3 bolts at the bottom. Under the bowl’s rear ledge, you will find the nuts. Some are under small caps, and some are a bit concealed, so you may need to feel for them.
- Hold the bolt head inside the tank with a screwdriver if needed.
- Loosen the nut underneath with a wrench.
- Repeat for each bolt, alternating between bolts so the tank comes off evenly.
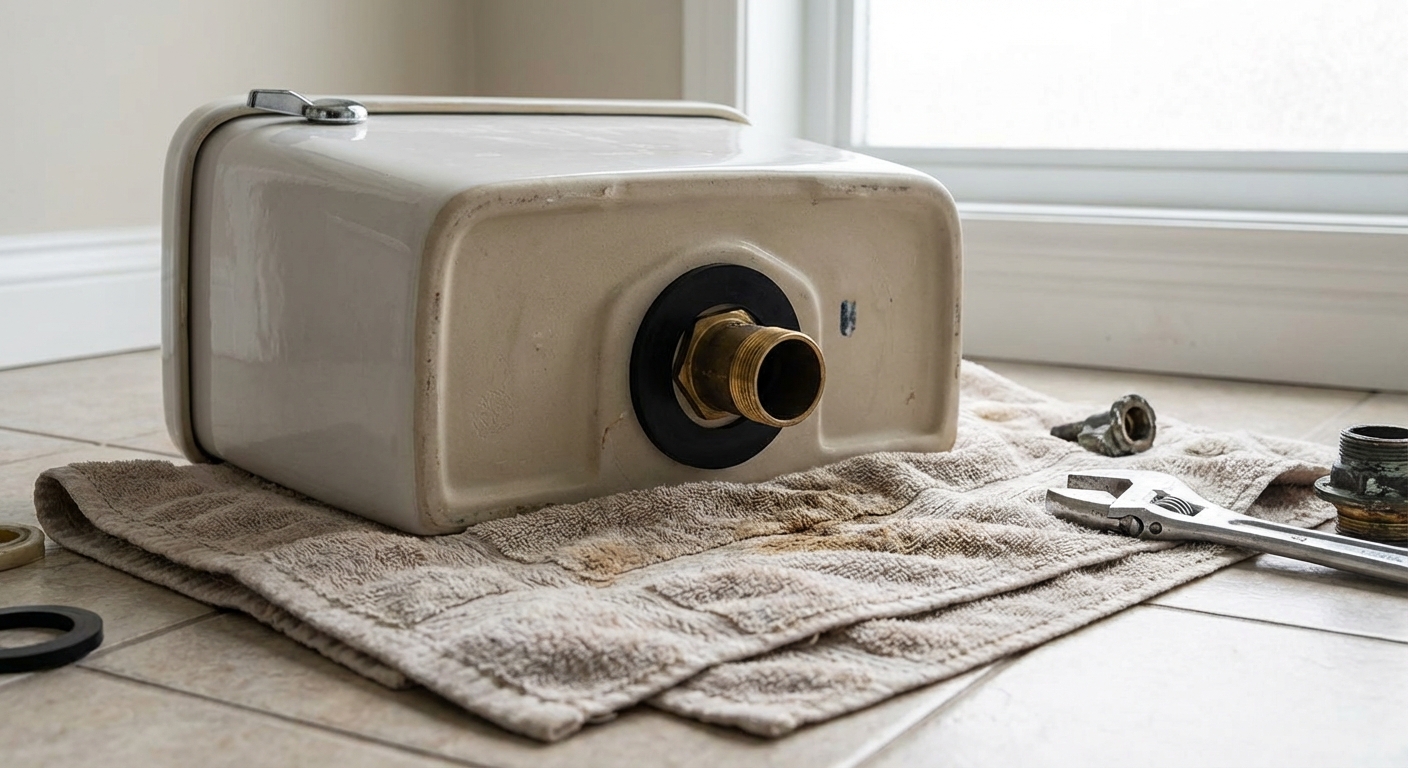
Lift the tank straight up and set it on a towel on the floor. Porcelain is tougher than it looks until it is not, so keep it low and controlled.
Step 3: Remove old bolts and washers
- Pull the old bolts out from inside the tank.
- Remove any rubber washers that are stuck to the porcelain.
- Clean the bolt holes gently. A rag is usually enough.
What you are looking for: rubber washers that are flattened, cracked, or hard as plastic, and bolts that are rusted or pitted.
Step 4: Replace the spud washer
The spud washer (tank-to-bowl gasket) is the big gasket that seals the tank’s flush outlet to the bowl inlet. When it deforms, water can escape at the seam between tank and bowl.
- On most models, you will remove the large locknut that holds the flush valve in place. This is usually a big plastic nut on the bottom of the tank.
- Slide off the old spud washer.
- Clean the porcelain seating area with a rag.
- Install the new spud washer, making sure it sits flat and centered.
- Reinstall and snug the flush valve locknut. Firm is good. Over-tight is how parts crack.
If your kit includes a spud washer, use it. If it does not, buy one that matches your toilet brand and style as closely as possible.
Step 5: Install new tank bolts the right way
This order matters. A common beginner mistake is putting rubber washers in the wrong place.
- From inside the tank: bolt head, then a rubber washer directly under the bolt head.
- Insert the bolt through the tank hole.
- Under the tank, add the metal washer and nut if your kit includes them in that position.
Some kits vary slightly, so follow the kit instructions, but the key principle is this: rubber seals against porcelain. Metal washers do not seal water on their own.
One more thing: you typically do not need plumber’s putty or silicone on tank bolts or the tank-to-bowl gasket. If anything, sealants can interfere with seating and make future repairs messier. If your toilet manufacturer calls for a sealant in a specific spot, follow their instructions.
Step 6: Set the tank back on the bowl
- Carefully lower the tank onto the bowl, aligning bolts with the holes.
- From underneath, install washers and nuts on each bolt.
- Tighten each nut a little at a time, switching back and forth so the tank lowers evenly.
How tight is tight enough? Tighten until the tank feels stable and level, and the rubber is compressed. Stop before you hear creaking or see the porcelain stress. If the tank rocks, keep tightening in small increments.
Step 7: Reconnect water and test
- Reconnect the supply line.
- Turn the stop valve on slowly.
- Let the tank fill while you watch every connection.
- Dry the area with a paper towel and check again after a few minutes.
- Flush 3 to 5 times and check the seam and bolt areas.
If you still see moisture, do not keep cranking on one bolt. Loosen slightly, re-center the tank, then tighten evenly again. Uneven tension can create a leak path.
If the fill valve seal is leaking
If water is coming from where the fill valve passes through the tank, you have two options: re-seat the seal or replace the valve. I usually replace the valve if it is older, because the parts are inexpensive and it removes guesswork.
Try this first: snug the locknut
- Inside the tank, hold the fill valve body to keep it from twisting.
- Under the tank, snug the large plastic locknut about 1/8 turn.
- Stop if it starts to feel like you are forcing it. Plastic threads can strip, and plastic shanks can crack.
If it stops, great. If it still seeps, replace the fill valve.
Replace the fill valve
- Shut off water, drain tank, disconnect supply line.
- Remove the locknut under the tank and lift the fill valve out.
- Install the new fill valve with the rubber seal inside the tank.
- Tighten locknut, reconnect supply, set water level per manufacturer marks.
After replacement, watch the connection under the tank for a full fill cycle.
When the tank is cracked
I wish I could tell you there is a reliable patch for a cracked porcelain tank. In real bathrooms, with real temperature changes and a tank that fills and empties for years, patches are a gamble.
- If the tank is cracked and leaking: replace the tank or the entire toilet.
- If you cannot find a matching tank: replacing the whole toilet is usually faster than hunting discontinued parts.
If you see a crack near a bolt hole, treat it seriously. That area is under constant stress from bolt tension.
Troubleshooting after the repair
Leak still at the bolts
- Make sure the rubber washer is under the bolt head inside the tank.
- Check for a chipped bolt hole or debris preventing the washer from seating.
- Replace badly corroded bolts. Reusing old bolts is a classic false economy.
Leak at the tank-to-bowl seam
- Spud washer may be the wrong size or not centered.
- Tank may be tightened unevenly, creating a gap.
- Bowl or tank mating surface may be dirty or damaged.
Tank rocks after tightening
- Tighten bolts evenly in small increments.
- Confirm the spud washer is seated correctly and not pinched.
How to prevent tank leaks
- Do not use in-tank drop-in cleaners. Many degrade rubber and can shorten gasket life.
- If you see rust on tank bolts, replace them before they fail.
- Once a year, take 30 seconds to peek behind the toilet for moisture.
When to call a pro
- You find a crack in the tank or bowl.
- Shutoff valve will not fully stop the water.
- Bolts are seized and you cannot remove them without risking breaking porcelain.
- Leak has damaged the subfloor and the toilet feels spongy or unstable.
A plumber can handle a straightforward tank rebuild quickly, but even if you end up calling one, doing the diagnosis yourself helps you explain the issue clearly and make informed decisions.
Quick recap
- Confirm it is not condensation by drying the tank and watching where water first returns, especially during and after refills.
- Most tank leaks come from tank bolts or the spud washer between tank and bowl.
- Replace bolts and gaskets as a set, tighten evenly, and test with several flushes.
- If the tank is cracked, replacement is the safe fix.
About Marcus Vance
Content Creator @ Grit & Home
Marcus Vance is a lifelong DIY enthusiast and self-taught home renovator who has spent the last decade transforming a dilapidated 1970s ranch into his family's dream home. He specializes in budget-friendly carpentry, room-by-room renovations, and demystifying power tools for beginners. Through his writing, Marcus shares practical tutorials and hard-learned lessons to help homeowners tackle their own projects with confidence.