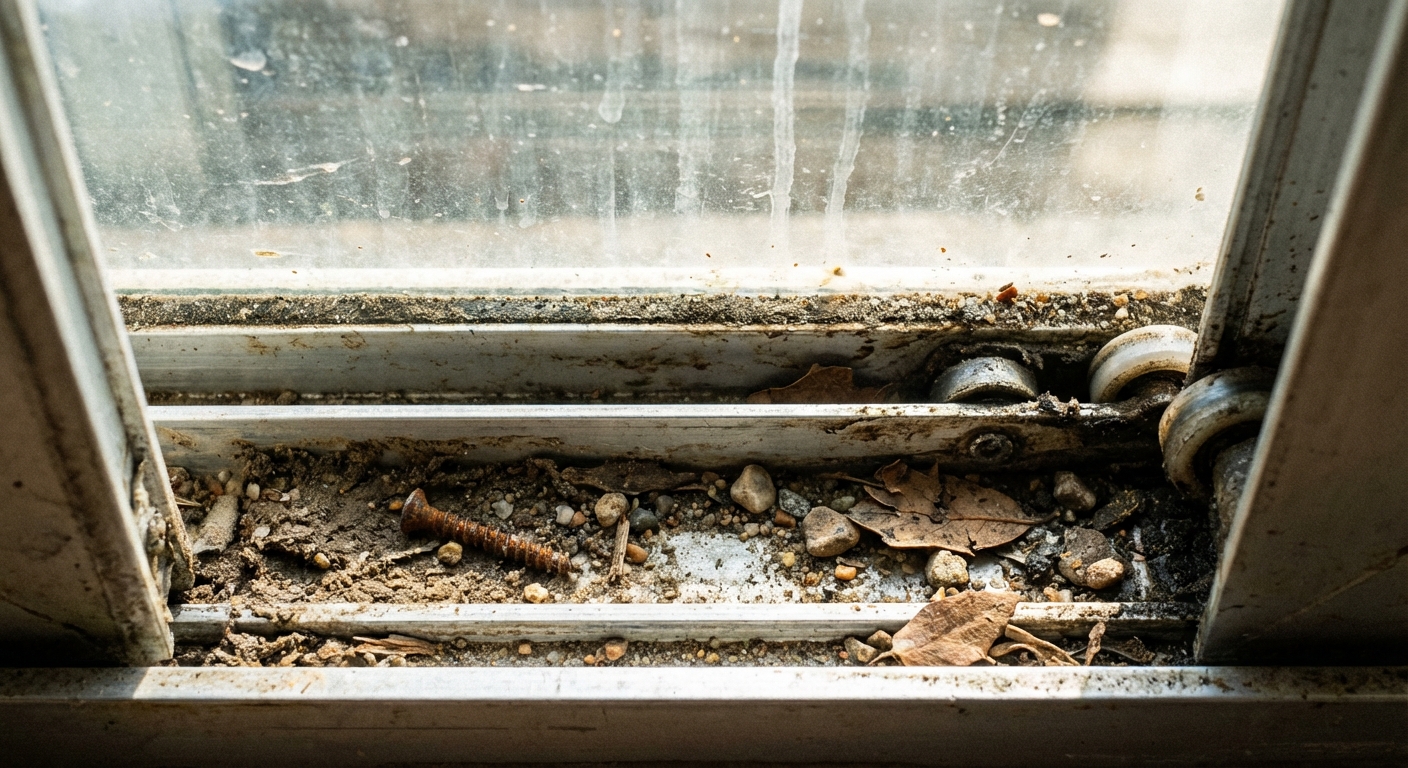
When a sliding patio door starts sticking, most people assume the rollers are shot. Sometimes they are. But in my experience, the usual culprit is simpler: a track packed with grit, pet hair, and the kind of mystery sand that shows up after winter. The good news is you can fix most sticky sliders in an afternoon with basic tools and a little patience.
This guide walks you through the common causes and fixes, from quick cleaning all the way to roller replacement and lock adjustments.
Time and difficulty: Cleaning and lubricating is usually 30 to 90 minutes and beginner-friendly. Roller adjustment is still easy. Roller replacement is more like 2 to 3 hours and works best with a helper.
Before you start: quick diagnosis
Take 30 seconds to notice what kind of “sticking” you have. It saves a lot of random fiddling.
- Door feels gritty or grinds: Track debris, damaged track, or worn rollers.
- Door is hard to start moving but glides once it’s going: Dry rollers or dirty track.
- Door rubs the frame or looks crooked: Rollers out of adjustment or door out of plumb.
- Door slides fine but won’t lock: Latch alignment, strike plate position, or door not fully seated on rollers.
- Air leaks, whistling, or water at the threshold: Worn weatherstripping or track drainage issues.
Safety note: Sliding door panels are heavy. If you remove the panel, have a helper if possible and wear gloves.
Tools and supplies
You do not need a specialty kit. Here’s what I actually use.
- Shop vacuum with a crevice tool (or a strong handheld vacuum)
- Stiff nylon brush or old toothbrush
- Microfiber rags or paper towels
- Warm water and mild dish soap
- Silicone spray lubricant labeled safe for vinyl and rubber or a dry PTFE spray
- Phillips screwdriver (and sometimes a flathead)
- Putty knife (helpful for packed-in gunk)
- Optional: mineral spirits for sticky residue (test first)
- Optional: replacement rollers and weatherstripping
- Optional: pipe cleaner or a zip tie (for weep holes)
Avoid: Grease and heavy oil on the track. They feel great for about a day, then turn your track into a dirt magnet. Also avoid using standard WD-40 as a long-term track lubricant. It can leave a residue that grabs dirt and gums things up over time.
Small exception: Some manufacturers call for a tiny drop of light oil on the roller bearings themselves (not the track surface). If you can find your door’s care instructions, follow those.
Step 1: Clean the track the right way
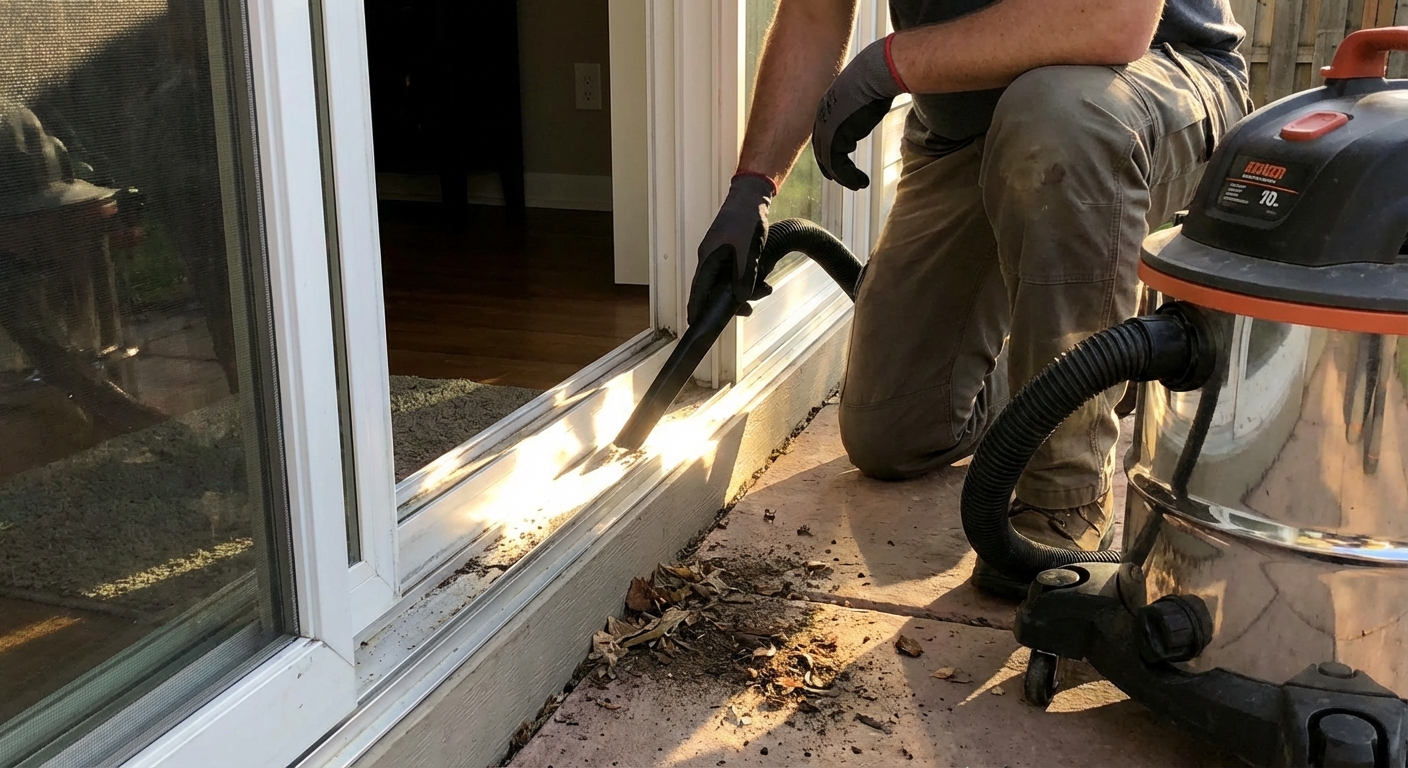
If I could only do one thing to fix a sticky slider, it would be this. Cleaning works shockingly often.
1) Vacuum first
- Open the door halfway.
- Vacuum the entire exposed bottom track length.
- Slide the door the other way and vacuum the newly exposed section.
2) Scrub the corners and channel
- Use a nylon brush and warm soapy water.
- Pay attention to the ends of the track where debris packs in.
- Use a putty knife carefully for hardened grime. Keep the blade flat so you do not gouge the track.
3) Do the top track too
The bottom track takes the beating, but the top channel collects spiderwebs, fluff, and grit that can add drag. A quick vacuum and wipe up there is worth the extra minute.
4) Wipe dry
Dry the track thoroughly. Lubricant works best on a clean, dry surface.
Pro tip from my own mistakes: If the track has old sticky lubricant, soapy water may not cut it. A small amount of mineral spirits on a rag can dissolve residue, but test in a hidden spot first. Keep it off painted surfaces and weatherstripping, and use good ventilation. It is also flammable, so keep it away from sparks and open flames.
Step 2: Lubricate without attracting more dirt
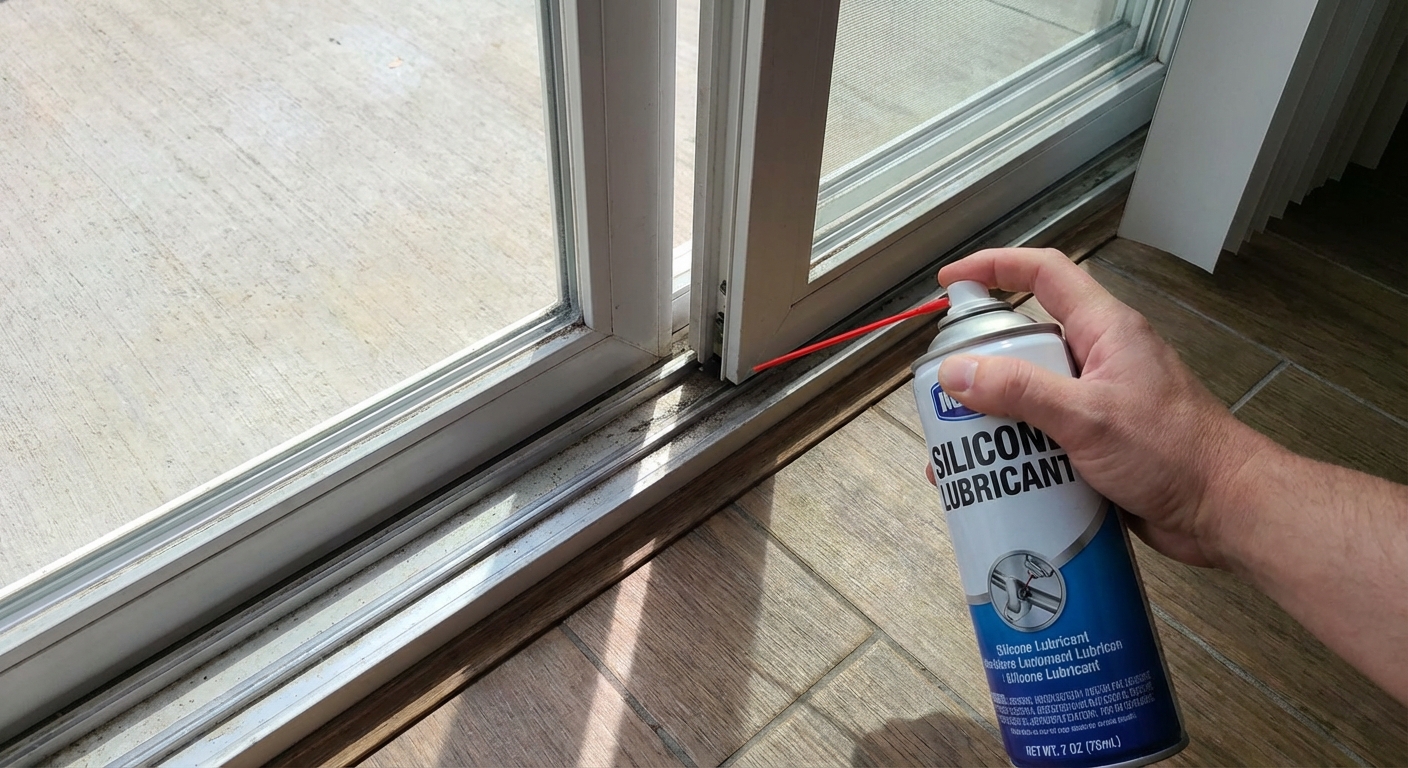
Once the track is clean, the goal is smoother rolling, not a greasy runway.
What to use
- Best all-around: Silicone spray that is labeled safe for vinyl and rubber. If you are not sure, do a quick spot test in a hidden area.
- Best for dusty areas: Dry PTFE spray (goes on wet, dries slick).
Where to apply
- Lightly coat the track where the rollers actually ride.
- Wipe off excess. More is not better here.
- If you can access the rollers from the edge of the door, a short shot directly at the roller helps too.
- To avoid overspray on flooring and finishes, you can spray onto a rag and wipe the roller path instead.
Slide the door back and forth 10 to 15 times to distribute the lubricant, then wipe the track again to remove overspray.
Step 3: Adjust the rollers
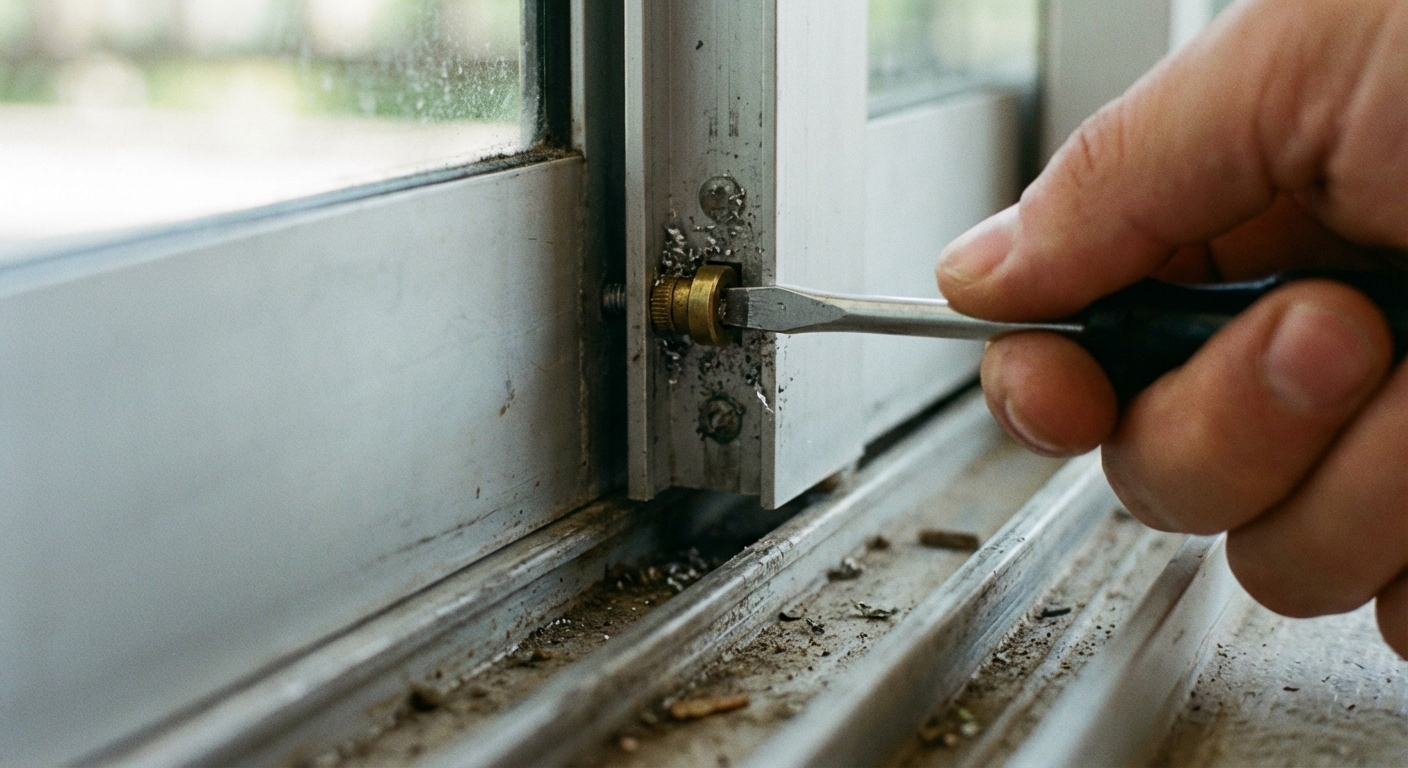
If the door still sticks after cleaning and lubricating, odds are the rollers are out of adjustment. When one side is lower than the other, the door drags on the track and can bind against the jamb.
Find the adjustment screws
Most sliding door panels have two roller adjustment screws, one near each bottom corner. They’re often:
- On the inside face near the bottom edge, or
- On the side edge of the door near the bottom, sometimes behind small caps.
Adjust in small increments
- Start with the door closed.
- Turn each screw 1/4 turn at a time.
- On many doors, turning clockwise raises the roller and the door, but it varies. Turn a little and watch the gap to confirm.
- Raise the side that drags. Try to keep the reveal (gap) even along the frame.
How you’ll know you hit it: The door should glide with one hand and not scrape. It should also line up better with the latch.
Step 4: Inspect the track and rollers
At this point you’ve handled the easy wins. Now we check for worn parts and damage.
Track damage check
- Run your finger along the roller path and feel for dents, sharp burrs, or a raised seam.
- Look for a flattened section where the roller has been grinding.
- Check the track walls too. Aluminum can get bent or pinched inward, which squeezes the roller path and causes binding.
Minor burrs can sometimes be smoothed carefully with fine sandpaper. Deep dents, pinched track walls, or a badly deformed threshold usually mean the track or threshold piece needs professional attention or replacement, especially on older doors.
Roller wear check
Worn rollers often cause:
- Thumping or bumping as you slide
- Metal-on-metal sound
- A door that won’t stay adjusted for long
Step 5: Replace the rollers
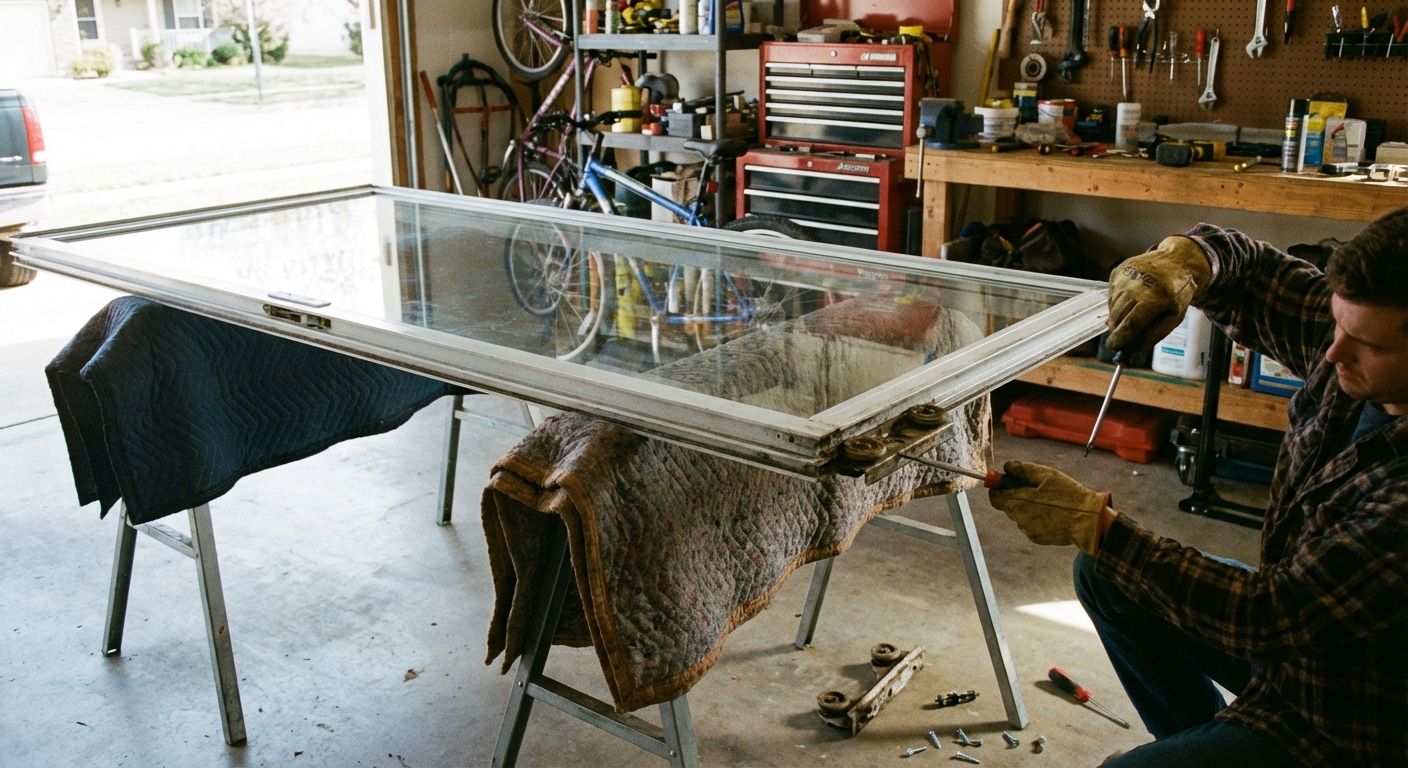
I used to avoid this job because I assumed it would turn into a full door replacement. It’s usually just a parts swap.
1) Remove the door panel
- If you have a screen door, remove it first. It gives you room to work and keeps it from getting bent.
- Look for an anti-lift block or head stop near the top of the sliding panel. Some doors will not lift out until you remove or loosen it.
- Lift and remove the interior stop or retainer (often held by screws along the jamb).
- With the door partially open, lift the panel up into the top track and swing the bottom out.
- Set the panel on padded sawhorses or a blanket. Protect the corners and glass.
If it won’t lift out: Back the roller adjustment screws out (counterclockwise) to lower the rollers fully. That gives you more clearance.
2) Identify the correct rollers
Rollers vary by door brand and era. The most reliable method is to remove one roller assembly and match it:
- Take the old roller to the hardware store, or
- Search by door manufacturer plus “roller assembly,” or
- Measure wheel diameter and housing dimensions.
3) Swap and reinstall
- Remove the screws holding the roller assembly.
- Install the new roller in the same orientation.
- Rehang the door, then adjust rollers until the door is level and glides smoothly.
Budget tip: Replace rollers as a pair. If one is worn, the other is not far behind, and mismatched rollers can make the door feel weird.
Step 6: Replace worn weatherstripping
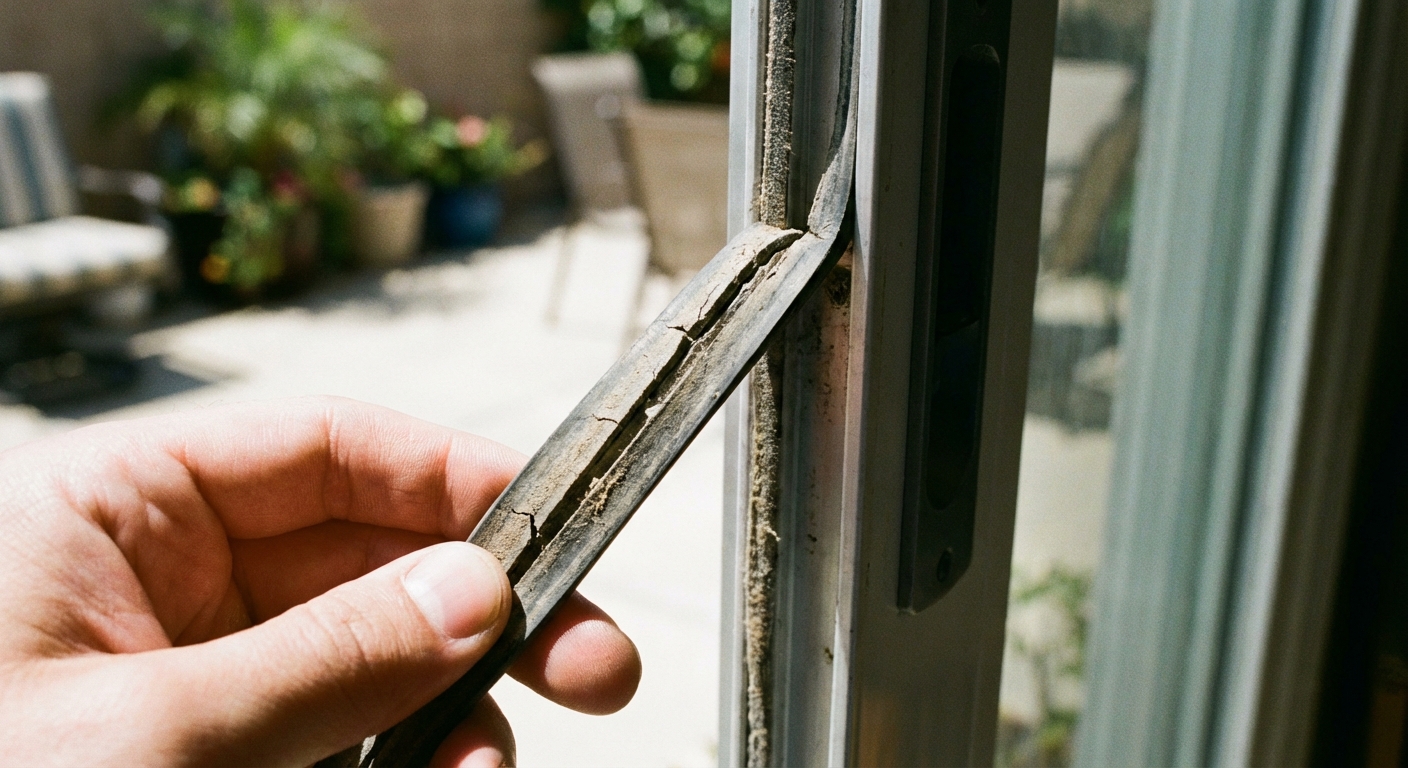
Weatherstripping won’t usually cause sticking, but it can create extra drag, and it’s a big reason doors feel worse after a cold season. Brittle or torn seals also lead to drafts and water intrusion.
What to look for
- Flattened “fuzzy” pile strips
- Cracked vinyl fin seals
- Loose sections that bunch up as the door slides
Replacement basics
- Pull the old strip out of its channel (or peel if adhesive-backed).
- Clean the channel with a vacuum and rag.
- Install the new strip the same way, keeping it straight and untwisted.
Take a small piece of the old weatherstripping with you when shopping so you match width and style. “Close enough” tends to turn into a door that’s hard to latch.
Step 7: Fix a door that won’t lock
If the door slides fine but the latch will not catch, the issue is almost always alignment.
1) Confirm the door is seated
- Try lifting the handle side of the door slightly. If it wobbles, adjust rollers to raise the panel until it feels solid.
- Close the door firmly and see if the latch now lines up.
2) Check the strike plate
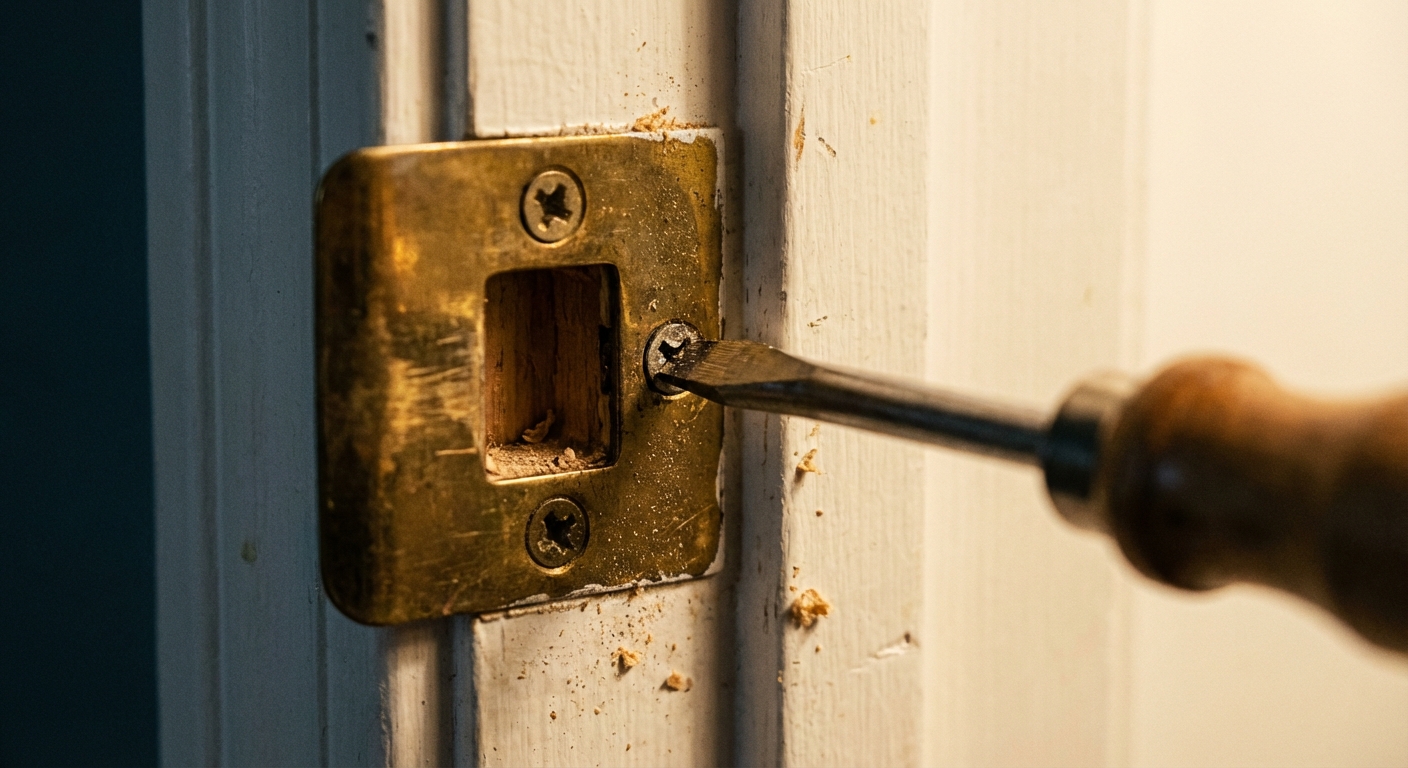
- On the frame, find the strike plate where the latch hooks.
- Loosen the screws slightly and nudge it up or down to match the latch.
- Retighten and test.
3) Clean and tune the latch
- Vacuum debris from the latch area.
- Add a small amount of silicone spray to the latch mechanism, then wipe off excess.
- If the latch is loose, tighten the handle screws.
Temporary security tip: If the lock is not catching reliably, use a secondary stop (a dowel or a “charley bar” in the track) until you get the latch alignment sorted out.
When to replace the latch: If the latch won’t extend smoothly, feels crunchy, or springs back weakly, replacement is usually cheaper than fighting it.
Step 8: Clear the weep holes
If you see water at the threshold or in the track after rain, the issue is often drainage, not the door. Many sliders have small weep holes (drain holes) in the bottom track that clog with dirt.
- Look along the bottom track for small slots or holes, usually toward the outside edge.
- Use a pipe cleaner, zip tie, or small brush to clear them. Do not enlarge the hole.
- Vacuum out loosened debris, then wipe clean.
- If you can, pour a small cup of water into the track and confirm it drains to the exterior.
If drainage still does not work, stop and investigate. Forcing water around a door can point to flashing or threshold issues that are bigger than a simple tune-up.
Seasonal issues
Sliding doors love to act up when seasons change.
- After winter: Salt, sand, and tiny stones migrate into the track. Clean and vacuum more than you think you need.
- During humid summers: Wood trim and frames can swell, and old weatherstripping can get grabby. Roller adjustment and fresh seals help.
If your door is in direct sun, heat can also make some vinyl tracks feel tacky. A dry PTFE lube is often the best choice in that case.
Fast troubleshooting checklist
- Sticks and grinds: Deep clean track (top and bottom), inspect for dents or pinched walls, check rollers for flat spots.
- Hard to slide, no grinding: Clean track, then silicone (labeled safe for vinyl and rubber) or dry PTFE lube.
- Door looks tilted: Adjust rollers evenly.
- Won’t lock: Adjust rollers, then align strike plate, then service or replace latch. Use a dowel or charley bar until it locks right.
- Drafts or water: Replace weatherstripping and clear track weep holes.
When to call a pro
I’m all for DIY, but a few situations are worth outside help:
- Cracked glass or a bent door frame
- Severely damaged track or threshold you cannot smooth
- Door feels like it could fall out of the opening
- Water intrusion you cannot solve with weatherstripping or weep hole cleaning (could be flashing or drainage)
If you do bring someone in, tell them what you already tried. “Track cleaned, lubricated, rollers adjusted” helps them skip the basic steps and get right to the real issue.
Simple maintenance routine
Here’s what I do at my own house so the door doesn’t start that familiar grind right when we want fresh air.
- Monthly in messy seasons: Quick vacuum of the track (top and bottom).
- Twice a year: Scrub the track and reapply a light silicone (labeled safe for vinyl and rubber) or dry PTFE lube.
- Once a year: Check roller adjustment and tighten handle screws.
A sliding door should feel boring to use. Smooth, quiet, and forgettable. If it’s making you wrestle it, something is off, and now you know exactly where to start.
About Marcus Vance
Content Creator @ Grit & Home
Marcus Vance is a lifelong DIY enthusiast and self-taught home renovator who has spent the last decade transforming a dilapidated 1970s ranch into his family's dream home. He specializes in budget-friendly carpentry, room-by-room renovations, and demystifying power tools for beginners. Through his writing, Marcus shares practical tutorials and hard-learned lessons to help homeowners tackle their own projects with confidence.