🚨 In a DIY emergency or rush?
Skip the details and jump straight to our 30-second cheat sheet for the most crucial info.
Carpet does a great job of hiding problems. Unfortunately, it also hides the fix. When a floor squeaks under carpet, it is most often the subfloor rubbing against a joist or a fastener that is moving with every step. The goal is simple: pull the subfloor tight to the joist and keep it there.
The good news is you usually do not need to pull up the carpet. With the right screws and a little patience, you can fix most squeaks from above and have the carpet look untouched when you are done.
Before you start: what is actually squeaking?
Squeaks generally come from movement and friction. Under carpet, the common offenders are:
- Subfloor to joist movement: the subfloor lifts slightly, then rubs back down as you step.
- Nail or fastener movement: an old nail is no longer tight and squeaks as it shifts in the joist.
- Subfloor panel seam movement: two sheets meet and flex because support is weak at the seam.
- Bridging or blocking that is loose: the joists themselves twist a bit and rub fasteners or adjacent wood.
- Perimeter and stair-edge squeaks: tack strip friction, edge blocking, or base plate contact near walls and stairs can squeak too.
- Something rubbing below: an HVAC duct, pipe, or wire can contact framing and chirp when the floor flexes.
If your floor is hardwood on top, the method changes because you are dealing with finish flooring and you need to protect the surface. We have a separate hardwood squeak guide on Grit & Home. This one is specifically for carpet over subfloor, where we can hide the repair in the pile.
Tools and materials (budget-friendly)
Typical time: 20 to 60 minutes for a single squeak. Typical cost: $15 to $30 for a kit, if you already have a drill.
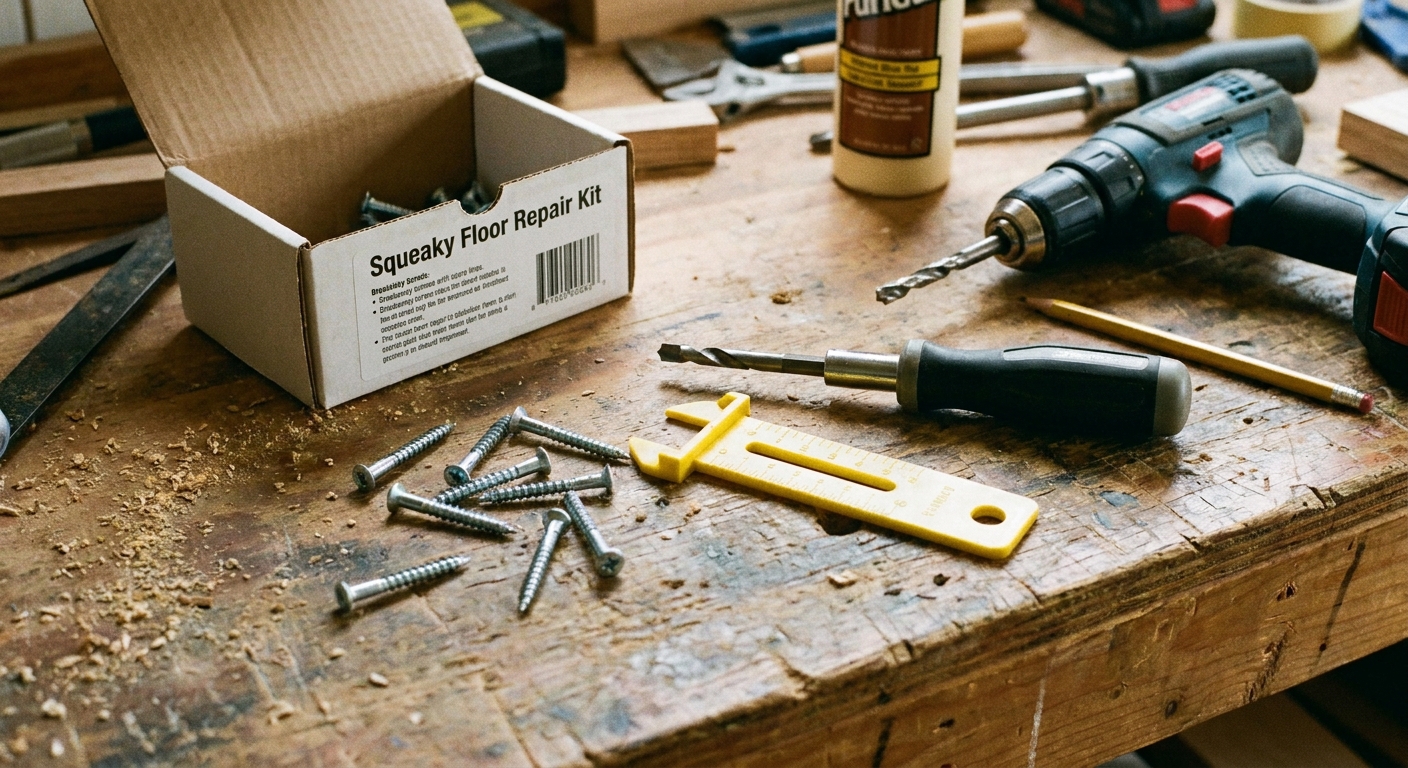
Best option (cleanest): squeak repair kit
- Squeak repair kit for carpet (usually includes breakaway screws and a depth-setting tripod tool)
- Drill or impact driver
- Stud finder with joist mode or deep-scan (helpful but not required)
Nice to have
- Painter’s tape (for marking squeak spots)
- Chalk (for joist lines on light carpet)
- Utility knife (only if you must do a tiny slit, which I try to avoid)
- Flashlight
Skip these (common mistakes)
- Regular drywall or deck screws through carpet: they can “mushroom” the carpet, grab fibers, and leave a permanent bump. Also, the heads do not break off cleanly.
- Powder or graphite: it can quiet rubbing temporarily, but it does not tighten anything. You want less movement, not better lubrication.
Step 1: Find the squeak and mark it
This part is low-tech, but it matters. Grab a helper if you can.
- Have one person walk slowly until the squeak happens.
- The other person listens closely and puts a small piece of painter’s tape right on the spot.
- Repeat from different directions. Squeaks can “broadcast” and fool you by a foot or two.
My rule: mark a small cluster, not a single dot. If the squeak is in one area, I’ll usually put 3 to 5 tape tabs in a tight circle so I remember the whole problem zone.
Step 2: Locate the joist from above (three ways)
You need to hit the joist. Screws into subfloor only will not fix the movement.
Option A: Use a stud finder
Some stud finders can pick up joists through carpet and subfloor, but results vary depending on padding, subfloor thickness, and the tool. If yours has deep scan or a joist mode, use it. Move slow, mark both edges, then mark the centerline. If you are not confident, confirm with measurement.
Option B: Find a clue line (vents, walls, stairs)
Floor joists are usually 16 inches on center (sometimes 24). If you can find one joist line near a wall, you can measure across and predict the next joists.
- At a heat register, sometimes you can see an edge of subfloor or feel stiffness changes.
- Along a wall that runs perpendicular to joists, the first joist is often close by.
Option C: Confirm with a tiny test hole (last resort)
If you are unsure, you can do a careful, very small probe right through the carpet in a less visible spot within the taped zone. In many carpets, the pile will close back up. Use a thin nail or an awl and feel for the solid joist. Keep it controlled. One or two probes is plenty.
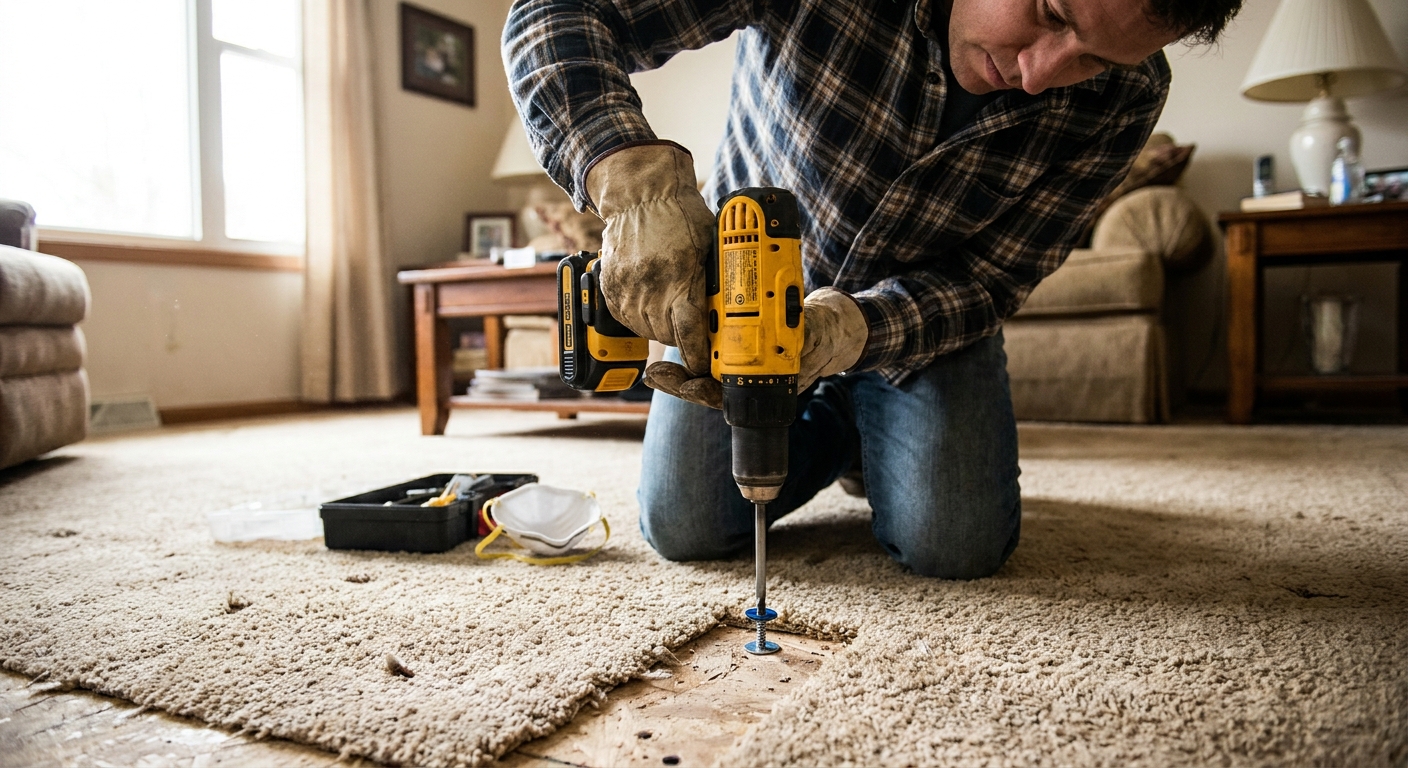
Step 3: Drive breakaway screws through carpet into the joist
This is the move that makes this fix “no carpet pull required.” Breakaway screws are designed so the head snaps off below the surface after the subfloor is pulled tight.
How to do it cleanly
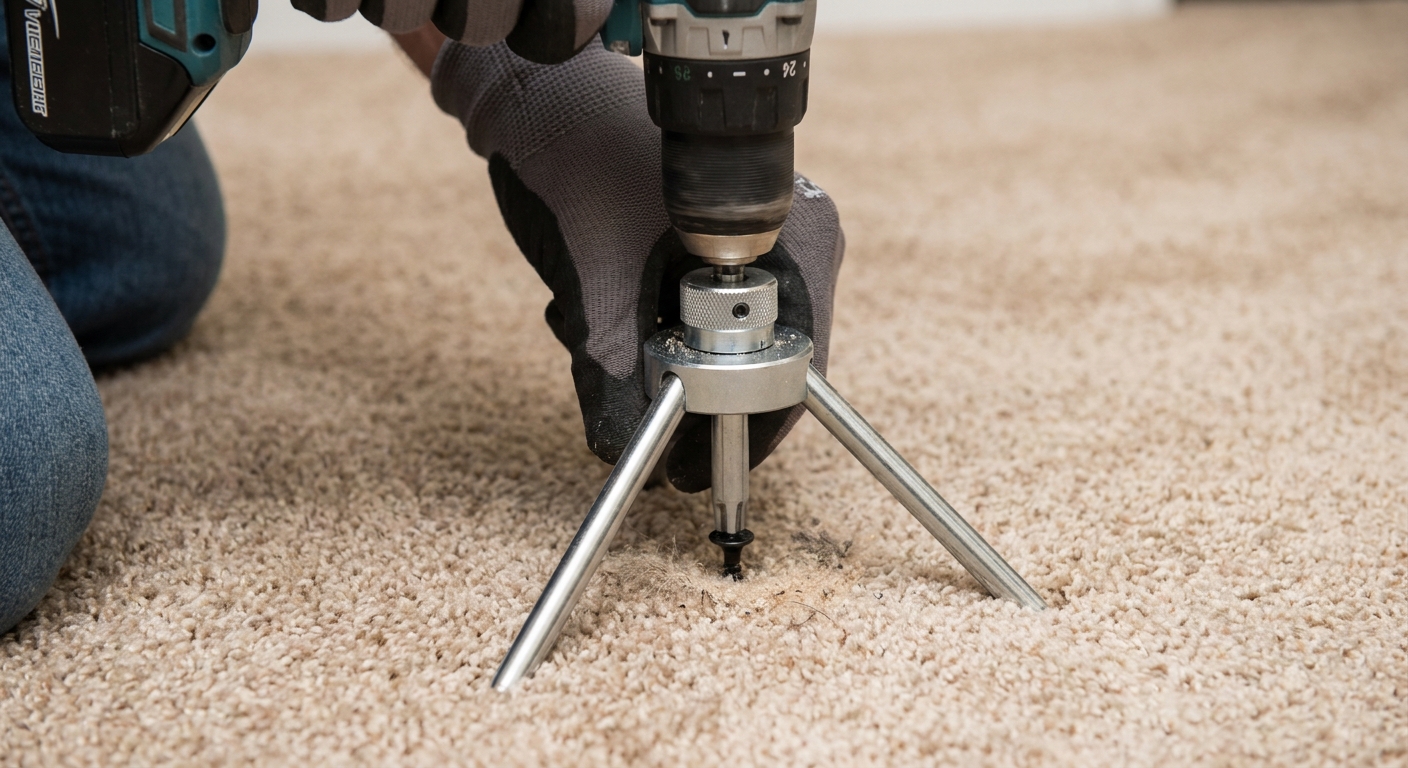
- Position the depth-setting tool (the little tripod) over your mark.
- Thick pad note: press the tripod legs down evenly so it sits flat, and keep the drill vertical. If the tool rocks on plush pad, it is easier to mis-seat the screw.
- Drive the screw straight down. Let the tool control depth.
- Keep driving until the head snaps off.
- Brush the carpet pile with your hand to fluff it back up.
Placement tip: Put screws in pairs, about 1 to 2 inches apart, centered over the joist in the squeak zone. If the squeak is stubborn, add another pair a few inches away along the same joist.
How many screws?
For a typical squeak, I start with 2 screws. If it improves but does not vanish, I go to 4 screws. If I hit 6 and it still squeaks, I stop and switch to diagnosis mode because something else is going on.
Step 4: Test, then expand the fix if needed
Have your helper walk the area again.
- If the squeak is gone: you are done. Vacuum the area and move on with your life.
- If the squeak moved: you likely tightened one spot and revealed the next loose spot along the joist. Keep going along that joist line.
- If nothing changed: odds are you missed the joist. Re-check your joist location and try again.
Quick reality check: Even pros miss joists occasionally through carpet. The fix is not brute force. It is re-locating and re-trying.
Troubleshooting stubborn squeaks (the stuff that actually happens)
You keep missing the joist
- Re-mark the joist centerline using two methods (stud finder plus measuring, for example).
- Work closer to a reference point like a wall or vent and measure out.
- If you have access from below (basement or crawlspace), jump to the “from below” section. It is often faster than guessing.
The carpet is berber or very low pile
Low-pile and loop carpets show disturbance more easily. Use the kit. Go slow. Brush the pile after each screw. In extreme cases, it may be better to fix from below to avoid visible changes on the surface.
The squeak is near a wall or stairs
If the squeak is within about 6 to 12 inches of a wall (or right at a stair edge), do not assume it is a joist issue. It could be tack strip friction, edge blocking, or a tight perimeter detail that rubs when the floor flexes.
- If you can access from below, that is usually the cleanest way to confirm what is moving.
- If you must work from above, take extra time locating joists. Perimeter framing can make “normal” spacing harder to predict.
The squeak is at a subfloor seam
If the squeak is right where two sheets meet, you may be dealing with a seam that is not properly supported.
- If the seam crosses a joist, screws usually solve it.
- If the seam is between joists, the real fix is adding blocking under the seam from below.
The framing is the problem (loose blocking or bridging)
Sometimes the squeak is not the subfloor. It is the joist assembly moving and rubbing.
Clues:
- You feel the floor “spring” more than expected.
- The squeak covers a wider area, not a single point.
- Screws into the joist do little or nothing.
Best fix: access from below, re-fastening loose blocking or installing solid blocking where it is missing.
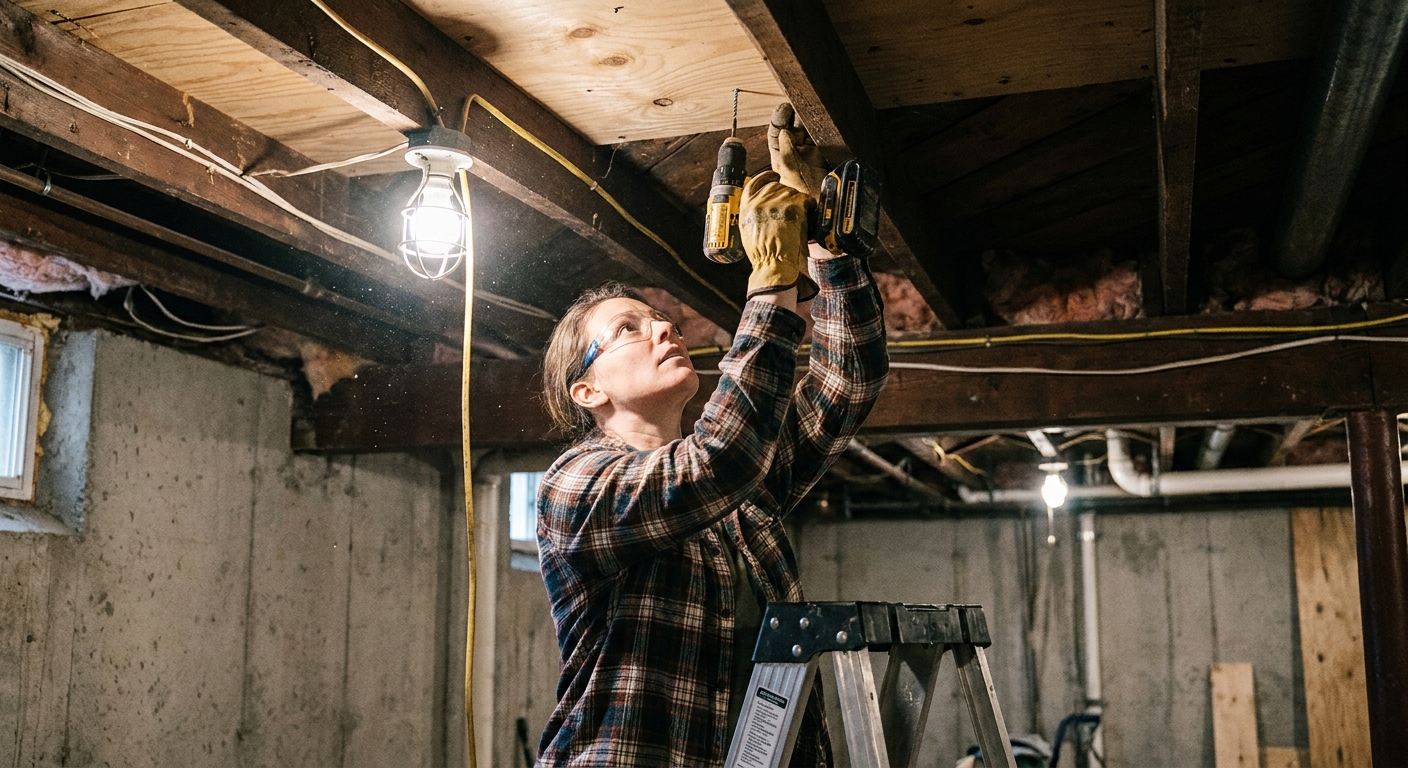
If you can access from below (basement or crawlspace): a stronger fix
When I have the option, I like from-below fixes because they do not disturb the carpet and they let you see what is actually moving.
What to look for
- Gaps between subfloor and joist
- Shiny nail shanks (a sign of movement)
- Cracked or loose blocking
- Ducts, pipes, or wires that are close enough to rub when the floor flexes
Fix options from below
- Add screws up into the subfloor through the joist (careful with length so you do not poke through).
- Subfloor adhesive plus screws: adhesive reduces friction, screws add clamping force. Adhesive alone will not help unless you can pull the joint tight while it cures.
- Squeak cleats or shims: good for small gaps, but do not force a huge shim in. Over-shimming can lift the floor and create a new problem.
- Add blocking at seams or between joists where the subfloor needs support.
Safety and “don’t regret it later” notes
- Watch for wiring and plumbing if you are probing or working from below. If you cannot see what is under the spot, do not drive long screws blindly.
- Use the right screw length. Most carpet squeak kits are designed to avoid poking through. If you improvise, choose a length that fully bites into the joist without coming close to the surface on the other side. A common setup is 5/8 to 3/4 inch subfloor over 2x framing, so you generally do not need an extra-long screw to get good bite.
- Do not over-tighten to the point you crush the subfloor. You want snug, not mangled.
- If the floor feels spongy or damaged , squeaks may be the least of your worries. Water damage or delamination can mean subfloor replacement.
When to call a pro
I am all for DIY, but I also believe in picking the right battles. Consider help if:
- The squeak is paired with noticeable sagging or bounce
- You suspect rot, termites, or water damage
- You have a post-tension slab or radiant floor heating (different risks and rules)
- You cannot access the area safely from below and the above-carpet method is not working
FAQ
Will screws through carpet ruin it?
If you use a carpet squeak repair kit with breakaway screws and place them correctly over a joist, the carpet usually hides the repair well. Plush carpet is the most forgiving. Very low pile and loop carpet can show it more.
Can I just sprinkle baby powder to stop the squeak?
Powder can reduce friction at a seam for a short time, but it does not stop the movement that causes most squeaks. Tightening the subfloor to the joist is the real fix.
Why did the squeak move after I fixed it?
You likely tightened one loose point and exposed the next weakest spot along the same joist or seam. That is normal. Keep working methodically along the joist line.
What if the squeak is near a wall?
Near walls, you can run into tack strip, base plates, blocking, or tighter framing. The same principle applies, but joist targeting can be harder there. If the above-carpet method is not working quickly, a from-below inspection is often faster and cleaner.
The 30-Second Cheat Sheet
Essential takeaways for: How to Fix Squeaky Floors Under Carpet
What causes carpeted floor squeaks?
Most often, the subfloor is rubbing on a joist or a loose nail is moving. The fix is to pull the subfloor tight to the joist and keep it there. In some cases, squeaks come from perimeter areas like tack strip friction near walls or stairs, or even something rubbing below (ducts, pipes, wiring).
Fastest fix (from above)
- Find and mark the squeak area with painter’s tape while a helper walks.
- Locate the joist (stud finder, measuring from a wall, or careful probing).
- Use a carpet squeak repair kit and drive breakaway screws straight down through carpet into the joist.
- Start with 2 screws, then test. Add more along the same joist line if needed.
Key tips
- Hit the joist. Screws into subfloor only will not stop the squeak.
- Thick pad tip: press the tripod legs down evenly and keep the drill vertical so the depth tool sits firmly.
- Use the kit’s depth-setting tool so the head snaps off below the carpet surface.
- If the squeak improves but does not vanish, add screws a few inches apart along the joist.
If the squeak will not quit
- You may be missing the joist. Re-locate and try again.
- If it is a subfloor seam between joists, you likely need blocking from below.
- If the framing is moving, tighten loose blocking or bridging from below.
- If it is near a wall or stair edge, it may be tack strip or perimeter framing. From-below access is often the cleaner fix.
When to stop DIY and reassess
If the floor feels spongy, saggy, or bouncy, or you suspect water damage, the real fix may be subfloor or framing repair.
💡 Tip: Scroll up to read the full article for detailed, step-by-step instructions.
⬆️ Back to topAbout Marcus Vance
Content Creator @ Grit & Home
Marcus Vance is a lifelong DIY enthusiast and self-taught home renovator who has spent the last decade transforming a dilapidated 1970s ranch into his family's dream home. He specializes in budget-friendly carpentry, room-by-room renovations, and demystifying power tools for beginners. Through his writing, Marcus shares practical tutorials and hard-learned lessons to help homeowners tackle their own projects with confidence.