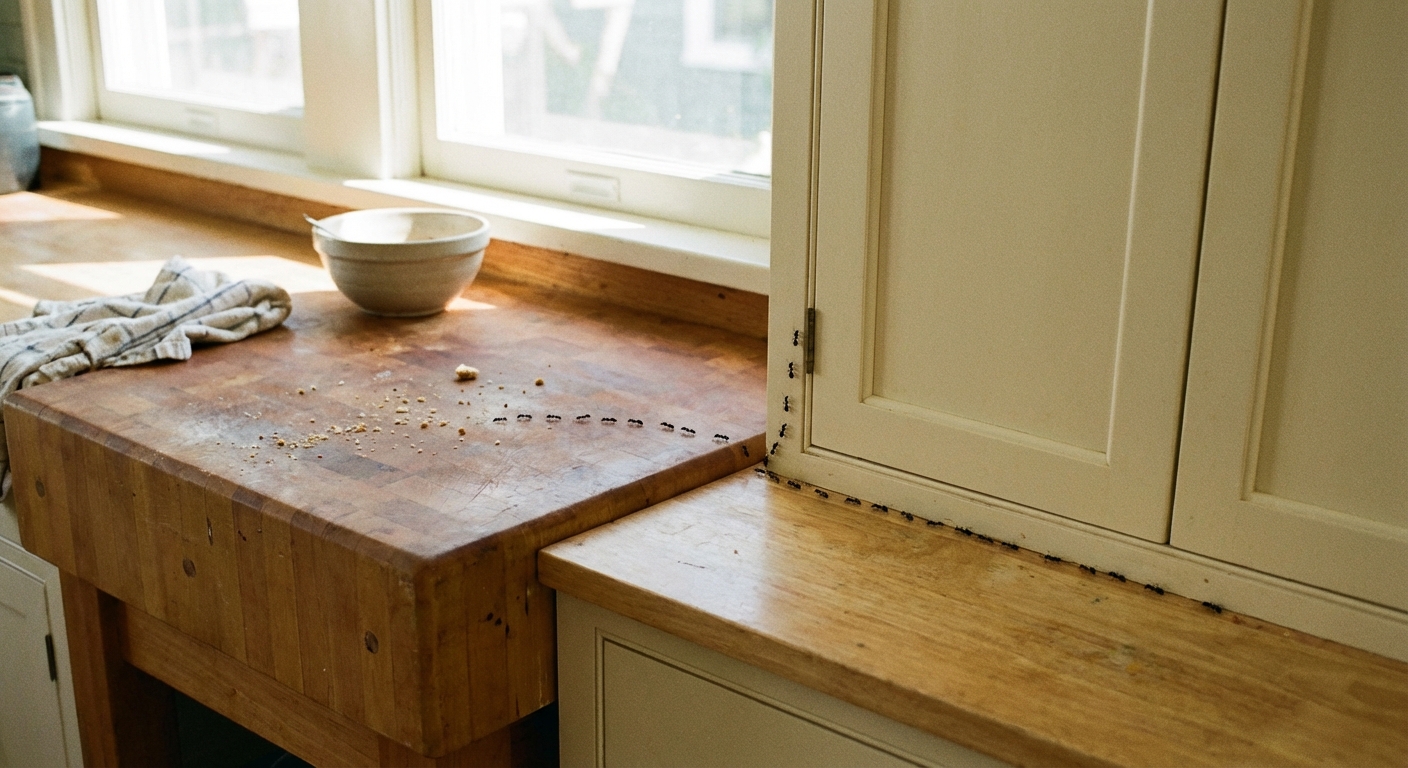
Ants in the kitchen feel personal. One day your counters are clean, the next you have a tiny marching parade headed straight for the fruit bowl. The good news is you can usually fix this without foggers, mystery sprays, or tearing your cabinets apart. The trick is to stop thinking like a homeowner and start thinking like an ant: find food, follow a trail, get back home.
This guide walks you through identification, the fastest way to knock down activity today, and the longer-term steps that keep them from coming back next week.
First, don’t spray the ants you see
I know that sounds backwards. I used to grab whatever cleaner was under the sink and go to war. Here’s the problem: most sprays kill the visible ants but don’t solve the colony. With some ants that nest in multiple spots, spraying can even make things worse by causing the colony to split and spread (this “budding” issue is notorious with Pharaoh ants and can happen with other species, like Argentine ants, depending on the situation and products used).
Instead, your goal is this:
- Get bait in front of the trail so ants carry it back to the colony.
- Clean up food and the mess so the kitchen stops paying them to come back.
- Seal entry points so the next wave can’t follow the same route.
Identify what you’re dealing with
You do not need to become an entomologist, but a quick ID helps you choose the right approach and spot situations that are not “just a few ants.” Here are the most common kitchen invaders.
Sugar ants (small kitchen ants)
“Sugar ant” is a catch-all term people use for small ants that love sweets. You’ll often see them in neat lines heading for:
- Fruit, honey, syrup, soda spills
- Pet food bowls
- Trash can drips and recycling residue
Typical look: very small, often light to dark brown. Typical clue: they show up fast after a spill and follow strong trails.
Pavement ants
Pavement ants commonly nest under slabs, along foundations, and under sidewalks. They wander indoors for food and water, especially when weather shifts.
Typical look: small, dark brown to black. Typical clue: you see them near exterior doors, along baseboards, or coming from cracks where the floor meets the wall.
Carpenter ants (pay attention here)
Carpenter ants do not eat wood like termites, but they do excavate it to build galleries, usually in damp or previously damaged wood. That can mean a moisture issue behind a sink, dishwasher, or window.
Typical look: larger ants (some quite big), often black, sometimes red and black. Typical clue: you find them near moisture, at night, or see small piles of wood-like debris.
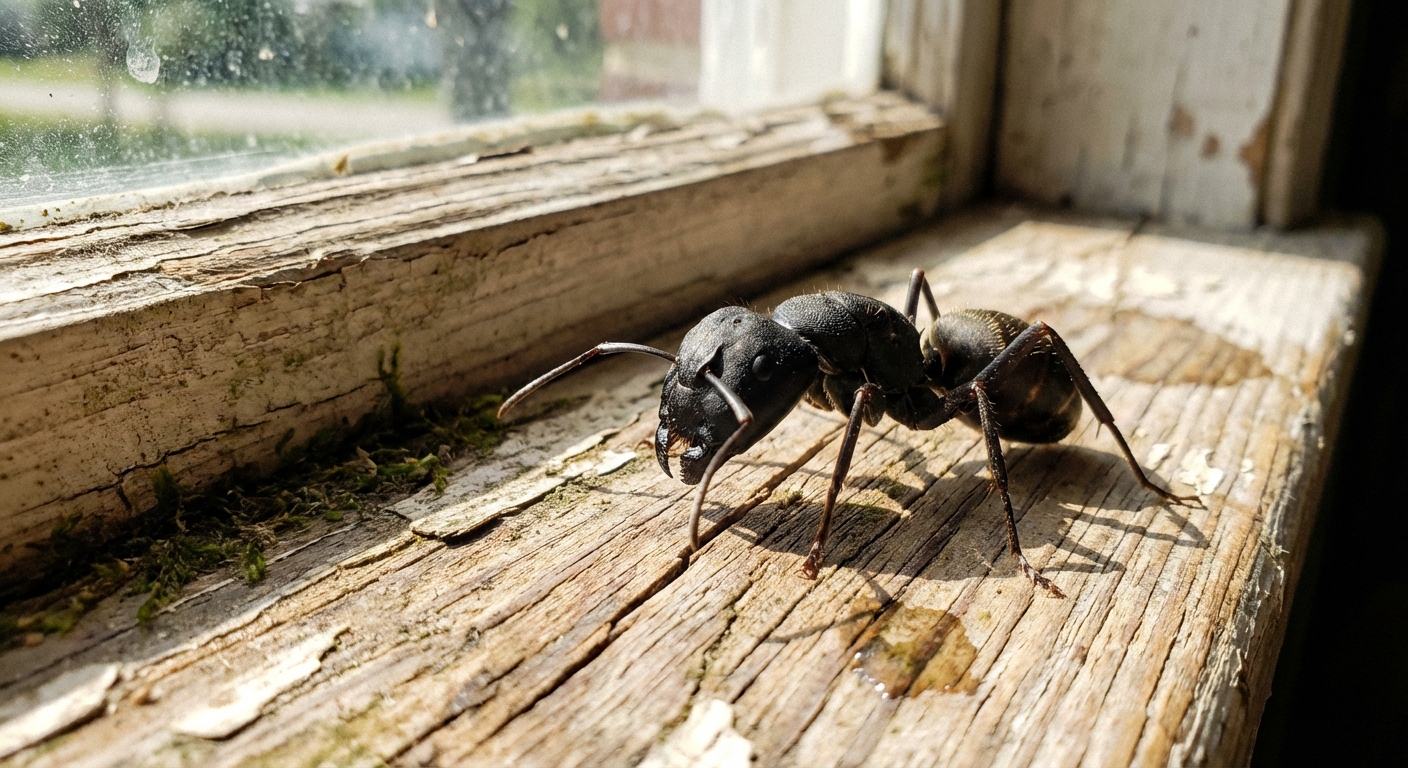
If you suspect carpenter ants, read the “When to call a pro” section below. DIY can still help, but you also need to think moisture and possible wood damage.
Pharaoh ants and other tiny indoor ants
If the ants are extremely small (think pinhead-sized), show up mostly indoors, and seem to pop up in new spots when you spray, treat that as a clue. Pharaoh ants are common in buildings and are especially likely to worsen with the wrong approach. This is one of those cases where slow-acting bait and patience matter, and a pro can save you a lot of time.
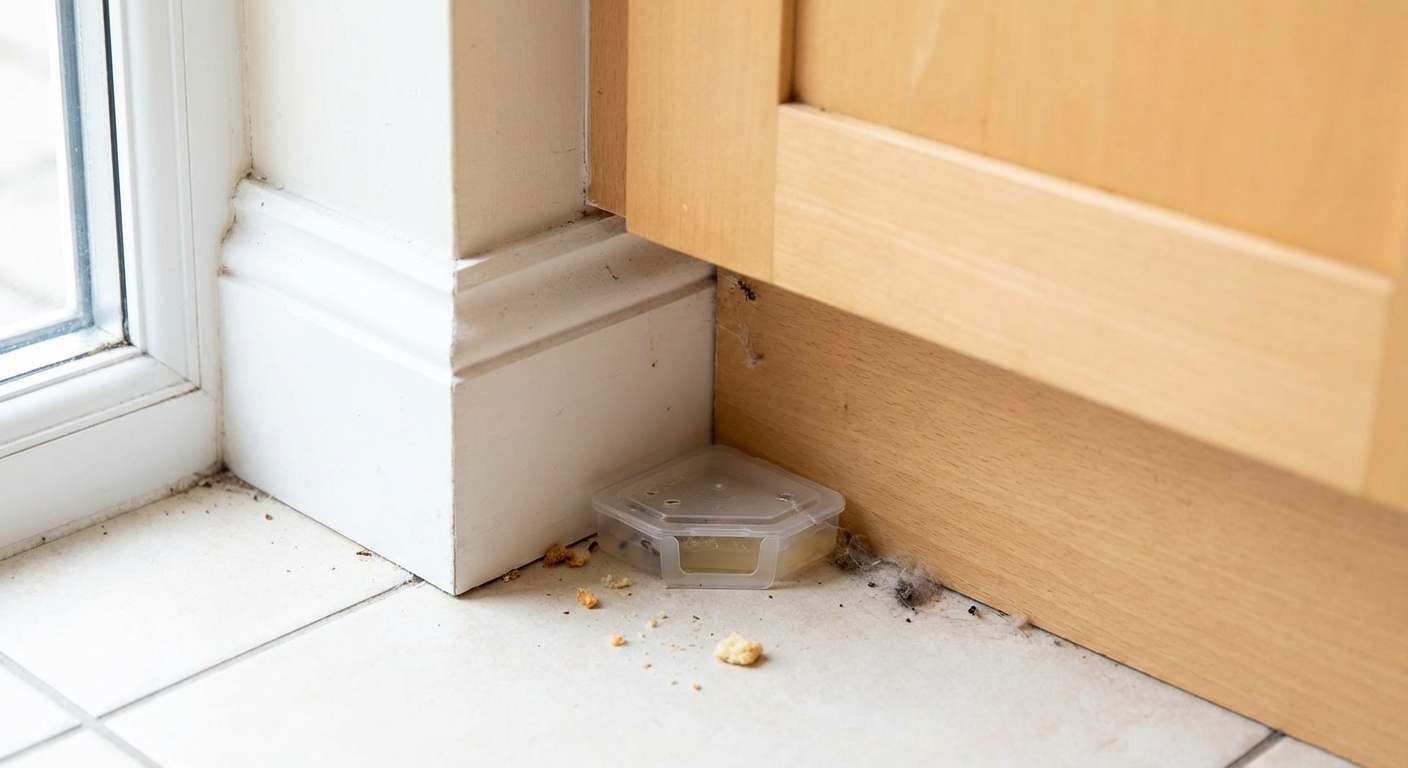
Step 1: Set bait first, then clean smart
Ants lay down scent trails. Cleaning helps, but there is a catch: if you erase the trail before you place bait, the ants can scatter and take longer to find it. So do this in the right order.
The right order (so bait works fast)
- Place bait directly on the active trail first, or right beside it along the baseboard where they are already traveling.
- Then clean the rest of the kitchen (crumbs, sticky spots, trash drips) so you are not feeding them better food than the bait.
- For 24 to 48 hours, avoid heavy wiping right over the bait placements and the exact “ant highway” leading to them. Let the ants keep finding the bait.
Quick cleanup that actually helps
- Wipe counters and baseboards with warm soapy water to remove food residue.
- Vacuum up ants (especially around baseboards and under toe-kicks), then empty the vacuum outside.
- Take out trash and rinse recycling, especially cans and bottles.
- Store food airtight: cereal, sugar, flour, snacks, and pet food.
- Check hidden crumbs: toaster tray, under microwave, under fridge edge, inside the utensil drawer.
If you want to wipe trails on hard surfaces, a vinegar and water wipe can help remove trail residues after you clean. Just do not scrub away the one path that leads to your bait until you have seen steady feeding for a day or two.
My most humbling lesson: the “mystery ant problem” in our kitchen was a single sticky spot under the rim of the compost bin. I cleaned the counter but not the bin. The ants did not care that the counter was spotless.
Step 2: Use bait, not brute force
Baits work because foraging ants carry the food back to the nest and share it. That is how you reach the colony, not just the scouts.
What bait to choose
- Sweet bait for sugar-loving ants (common in kitchens).
- Protein or grease bait when they ignore sweets and head for pet food, meat drippings, or greasy areas.
If you put out sweet bait and there is no interest after 24 to 48 hours, switch types. Ant preferences can change based on what the colony needs (carbs versus proteins and fats).
How to place bait so it works
- Place bait on the route they already use: along baseboards, under the sink, behind the trash can, near the dishwasher gap.
- Use several small placements instead of one big one. Ants do better when food is easy to find.
- Do not spray or use strong cleaners near bait. You want ants alive long enough to bring it home.
- Do not move bait daily. Let them build a routine.
- Give it time: you may see more ants at first. That often means it is working.
Safety note: Place bait where kids and pets cannot access it, and follow label directions.
DIY bait note
There are lots of homemade bait recipes online. Some can work, but the challenge is dosing: too strong and ants die before sharing, too weak and nothing happens. If you want the highest success rate with the least trial-and-error, use a commercially made ant bait and follow the label directions closely.
Step 3: Add barriers after bait is rolling
Barriers and repellents can reduce traffic, but they can also accidentally block ants from reaching bait. So the timing matters.
Rule of thumb: Put bait down first. Once you see ants feeding steadily for a day or two, then start adding barriers in cracks and hidden travel zones to reduce exploring and rerouting.
Diatomaceous earth (DE) for cracks and voids
Food-grade diatomaceous earth is a fine powder that can kill insects by damaging their protective outer layer, leading to dehydration. It works best when used dry in places people and pets do not disturb it.
- Where to use it: under the sink cabinet edges, behind appliances, along wall voids, in cracks near baseboards.
- How to apply: a light dusting. More is not better. Ants avoid big piles.
- Keep it dry: if it gets wet, it is much less effective.
Safety note: Use food-grade (not pool-grade), avoid breathing the dust (it is still an inhalation irritant), and keep it away from places kids and pets can access.
Trail wipe-downs (when to do them)
Vinegar and water can help remove trail residues on hard surfaces, especially after you clean. Use it away from your bait placements at first. Once the bait has had time to work, wiping the old trails can help stop reruns.
What I avoid in kitchens
- Broad indoor spraying along countertops or food areas. It is messy, and it often creates a short-term win with a long-term problem.
- Outdoor-only pesticides used indoors. If the label does not say it is for indoor use, do not bring it inside.
- Strong essential oil claims. Some scents can deter temporarily, but they rarely solve an established infestation by themselves.
Step 4: Seal entry points
If bait is the punch, sealing is the lock. Ants get in through ridiculously small gaps, especially where different materials meet.
Common kitchen entry points
- Where countertops meet the wall backsplash
- Gaps around sink plumbing under the cabinet
- Where the dishwasher or fridge water line enters the wall
- Cracks in baseboards and at the floor edge
- Gaps around window trim and door thresholds
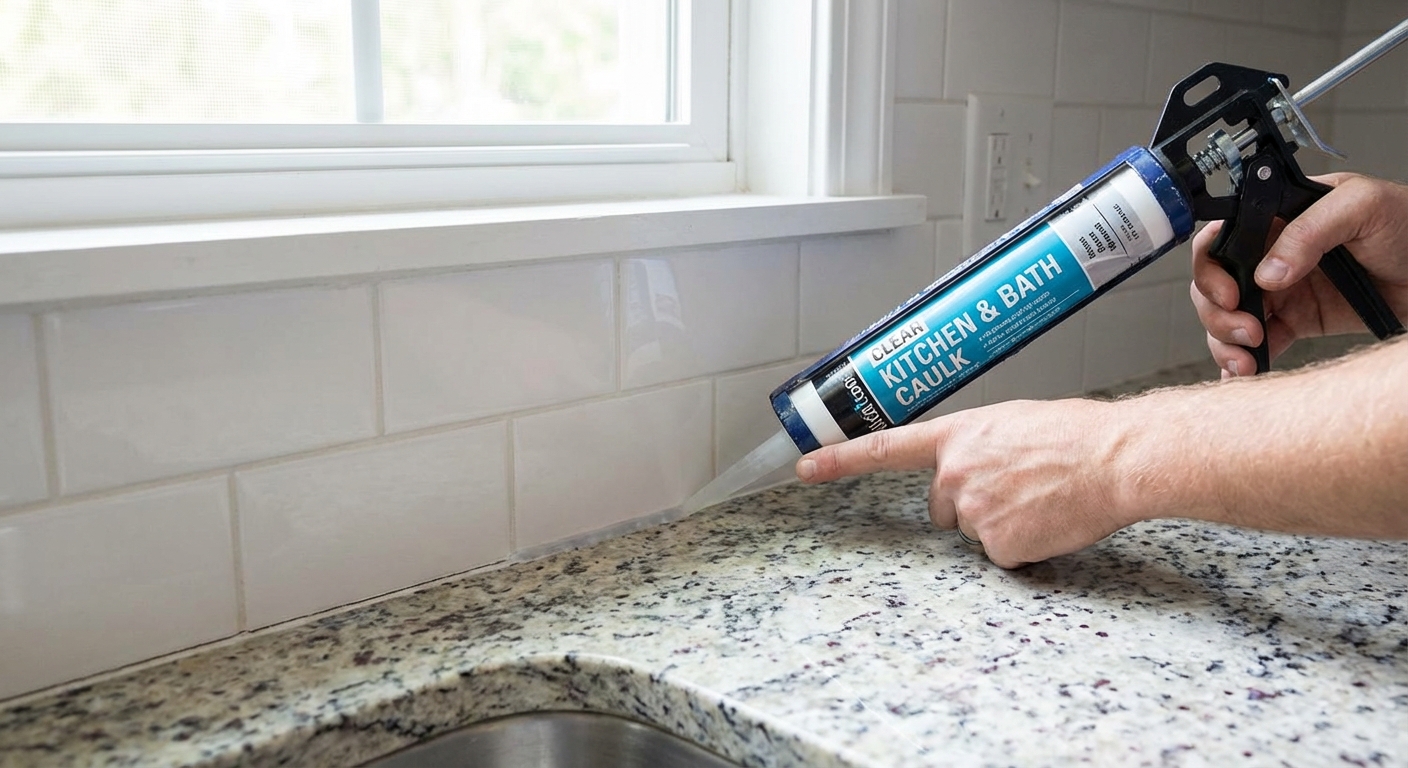
Simple materials that work
- Caulk (paintable for baseboards, clear for tile and backsplash areas)
- Expanding foam for larger utility penetrations (use sparingly and trim clean)
- Weatherstripping for doors that have daylight at the bottom or sides
My thrifty rule
Before you seal, watch the ants for 2 to 5 minutes. Find the main highway and the “on-ramp” into your kitchen. Seal after bait has had time to work (usually a few days), not immediately at the start, or you may push them to find a new route.
Step 5: Fix what attracts them
If ants keep returning, they are finding either food, water, or both. Kitchens provide both in sneaky ways.
Quick checks that pay off
- Moisture under the sink: even a slow drip can support ants and other pests.
- Dishwasher area: check for damp insulation, leaks, or crumbs in the kick space.
- Pet bowls: set bowls on a tray and wipe daily.
- Pantry spills: flour and sugar dust on shelves is basically a welcome mat.
When to call a pro
I’m all for DIY, but there are times when calling in a pro saves money and prevents damage.
Call for help if you notice any of these
- You suspect carpenter ants (large ants, activity near damp wood, or piles of sawdust-like debris).
- You suspect Pharaoh ants or ants seem to spread to new spots after spraying.
- Ants keep returning after 2 to 3 weeks of baiting and sealing efforts (some infestations take longer, but you should see clear progress).
- You see ants in multiple rooms or on upper floors, which can suggest a larger or satellite nest issue.
- You cannot locate entry points and trails seem to appear from walls, outlets, or ceiling areas.
- You have a recurring moisture problem you cannot resolve quickly (leaks, wet crawl space, rotting trim).
A good pest tech can identify the species quickly, find the nest zones you cannot see, and use targeted products safely. If carpenter ants are involved, they will also tell you what to fix so the ants do not come back.
Fast plan for today (15 minutes)
If you want a simple checklist you can do right now, here’s the no-nonsense version.
- Place bait first directly on the active trail (or right beside it along the baseboard).
- Vacuum up the ants you see, then empty the vacuum outside.
- Wipe up sticky food spots and put food away (trash area, compost bin, pet bowls). Keep the immediate bait path as undisturbed as you can for 24 to 48 hours.
- Do not spray near the bait. Let them take it.
- Over the next few days, add caulk where you see gaps and re-check for leaks under the sink.
FAQ
Why are there suddenly ants in my kitchen when it was clean?
Spring and summer heat, rain, and changing food availability outside push ants to forage indoors. Also, “clean” to us can still mean crumbs under a toaster, a drip under the trash bag, or a sticky spot on the outside of a syrup bottle.
How long does ant bait take to work?
Often you’ll see a reduction in a few days, with the best results in 1 to 2 weeks. Larger colonies or tricky species can take a few weeks. The key is steady feeding and leaving the bait alone long enough to circulate through the nest.
Is diatomaceous earth safe to use in kitchens?
Food-grade DE can be used carefully in cracks and hidden areas. Keep it away from food contact surfaces and avoid breathing the dust. If you have kids or pets that can access the area, choose enclosed baits and sealing over loose powders.
Should I follow the ants to find the nest?
Yes, within reason. Follow the trail to see where they are entering the room. The nest might be outside under a slab, in a wall void, or near a moisture source. Knowing the entry point helps you seal strategically.
About Marcus Vance
Content Creator @ Grit & Home
Marcus Vance is a lifelong DIY enthusiast and self-taught home renovator who has spent the last decade transforming a dilapidated 1970s ranch into his family's dream home. He specializes in budget-friendly carpentry, room-by-room renovations, and demystifying power tools for beginners. Through his writing, Marcus shares practical tutorials and hard-learned lessons to help homeowners tackle their own projects with confidence.