
First things first: do not trap or poison bats
If you hear fluttering, squeaking, or scratching up in the attic at dusk, your brain goes straight to “How do I get these things out today?” I get it. But with bats, the fast and messy “solutions” can be illegal, unsafe, and can actually make the problem worse.
- Poison is a no-go. It is inhumane, often illegal, and it can leave you with dead bats in walls and a whole new odor problem.
- Trapping is usually the wrong move. Many bat species are protected, and some trapping or handling methods may be illegal where you live. It can also separate mothers from pups.
- The right method is exclusion. You let bats leave on their own through a one-way exit, then you seal the home so they cannot return.
Everything below is built around that humane, legal approach.
How to tell if you really have bats
A lot of attic noises are squirrels, mice, or even loose ductwork tapping in the wind. Before you buy supplies, confirm what you are dealing with.
Common signs of bats in an attic
- Noises at dusk and dawn: light chirping, squeaking, and fluttering as they leave and return.
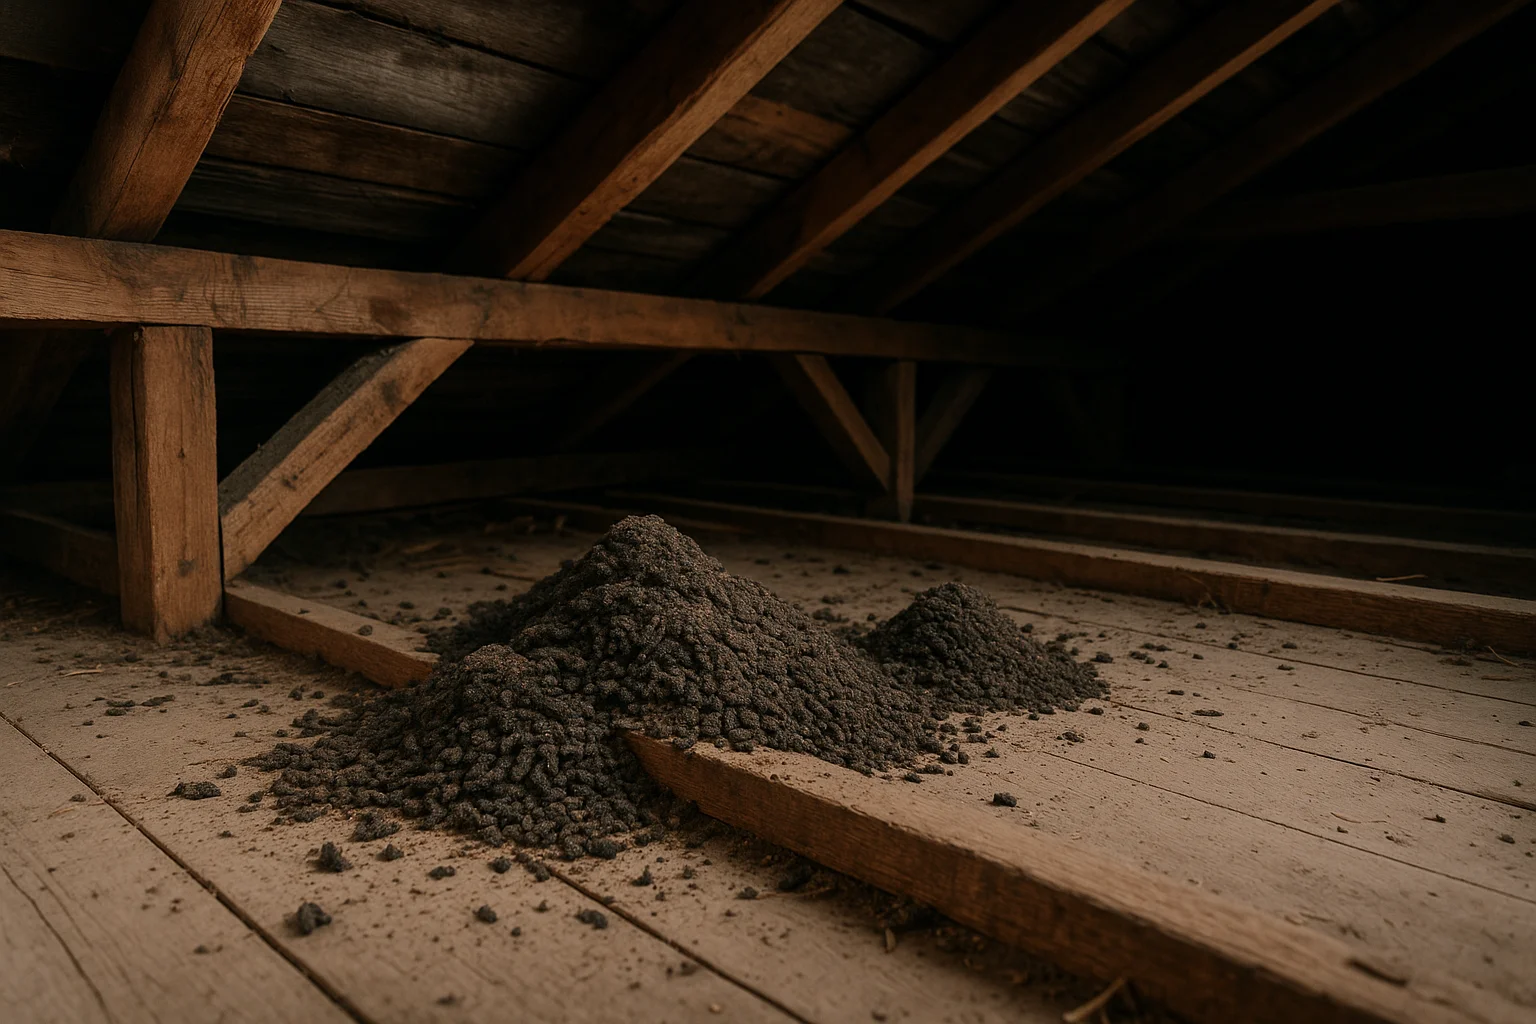
- Guano: small, dark droppings that often collect beneath entry points, on insulation, or on attic floor decking.
- Staining near openings: oily brown or black smudges around gaps where bats squeeze in and out.
- Ammonia smell: a sharp odor that gets stronger in warm weather.
- Evening fly-out: watching the roofline around sunset and seeing bats exit from one spot is one of the most reliable confirmations.
Guano vs mouse droppings (quick homeowner check)
Bat guano is usually crumbly and can sparkle a bit in bright light because it is full of insect parts. Mouse droppings are more smooth and uniform. Either way, avoid handling droppings with bare hands, and do not sweep them dry.
If you find a bat in your living space
Take it seriously. A bat in a bedroom where someone was sleeping, in a room with a child, or near a person who cannot reliably report contact should be treated as a potential rabies exposure. Close the door, keep people and pets away, and contact your local health department or animal control for guidance.
Key detail: Public health guidance often recommends capturing the bat for rabies testing if it can be done safely. Do not handle the bat with bare hands. If you are not trained or equipped, wait for animal control or a wildlife professional.
Legal and seasonal timing
Bats are beneficial insect-eaters, and many species are protected by state wildlife rules. There is also a practical issue. Exclusion at the wrong time can trap flightless pups inside, which is both inhumane and can create a terrible smell problem.
Know maternity season
In much of the US, bat pups are typically born in late spring to early summer and cannot fly for several weeks. Excluding during that window can leave pups trapped inside while adults exit through your one-way door.
- Before you exclude: check your state wildlife agency website for bat exclusion timing guidance.
- If you are unsure: call a licensed wildlife control operator and ask specifically about maternity season restrictions.
If it is winter
In colder regions, some bats may hibernate in attics or wall spaces, and they may not reliably exit at dusk. Exclusion can fail if bats are not actively flying out, and sealing at the wrong time can trap them inside. If temperatures are consistently cold or you are not seeing any evening fly-out, it is worth getting local guidance before you start sealing.
Protected species and permits
Some bat species have additional protections (and in certain regions, there may be rules tied to white-nose syndrome prevention). When in doubt, choose the conservative route: humane exclusion only, no killing, and follow timing recommendations.
Your plan: inspect, exclude, seal, then clean
The order is important. If you seal first, you can trap bats inside your attic and force them into walls or down into living spaces.
Step 1: Inspect safely and find entry points
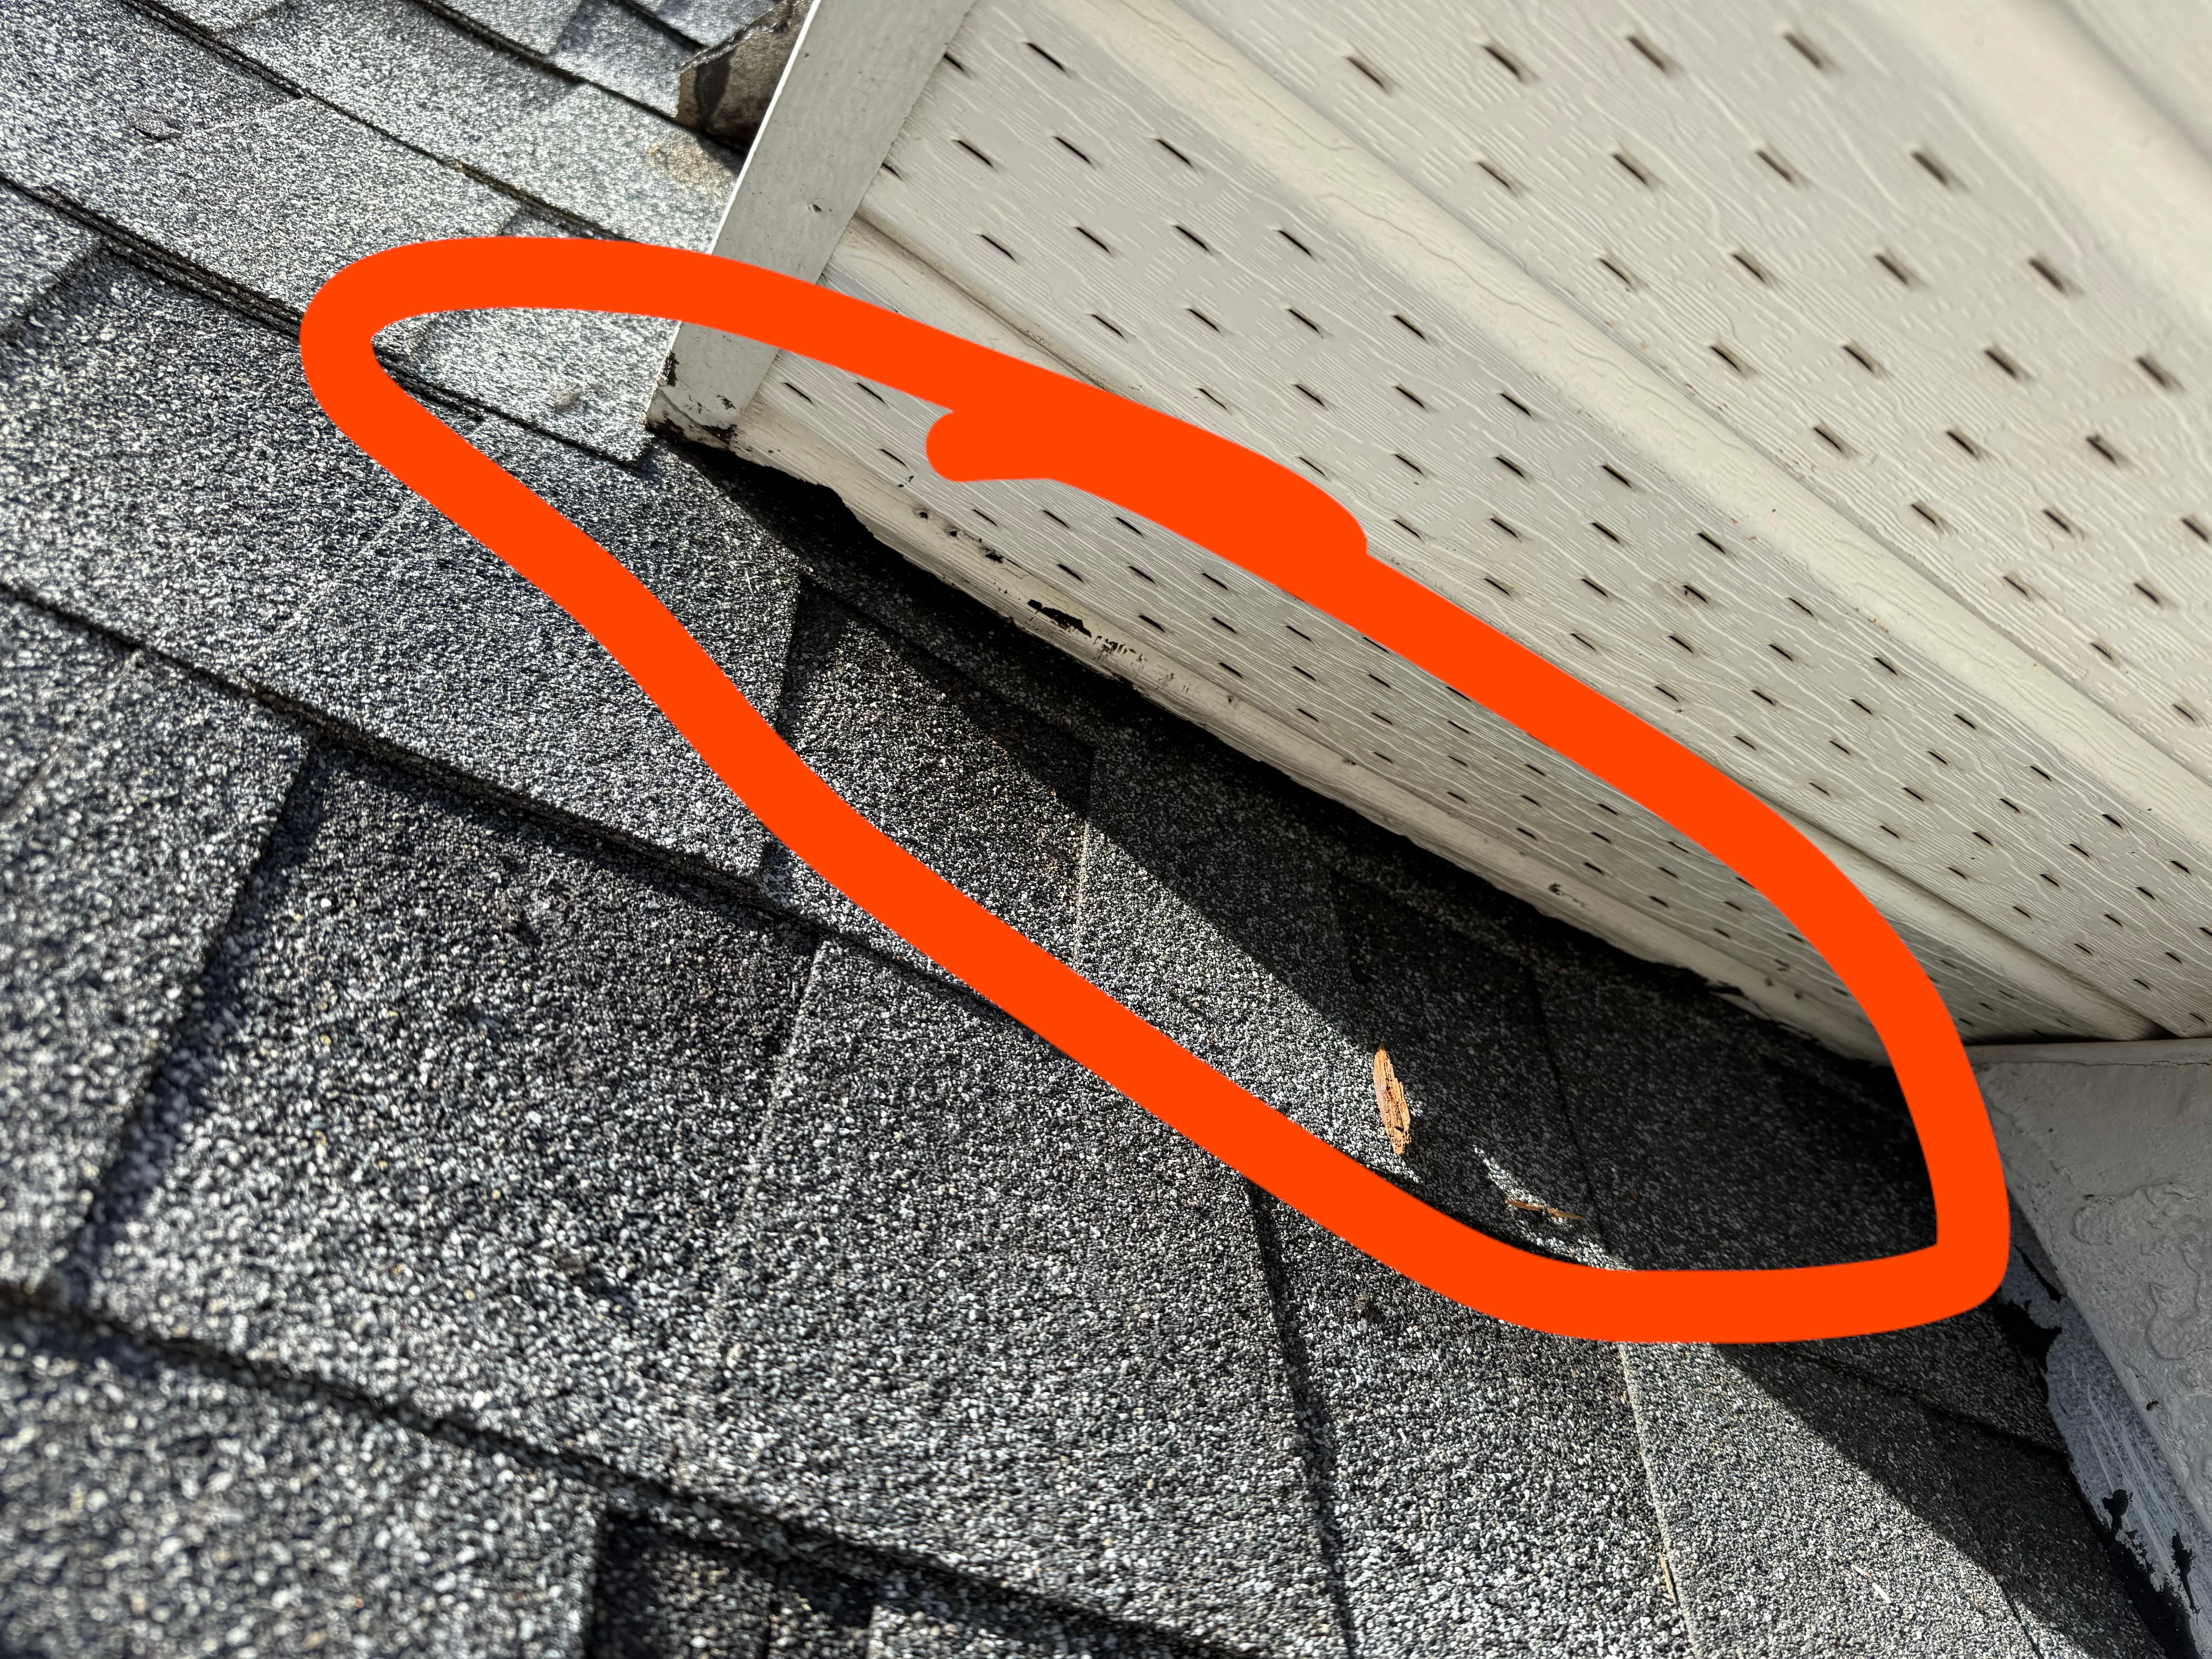
Bats can squeeze through very small gaps. Many homeowners use 3/8 to 1/2 inch as a practical rule of thumb, depending on species and the exact opening. On a typical house, that means you are hunting tiny construction gaps, not big holes.
- Gable vents and ridge vents
- Soffit and fascia gaps
- Roof-to-wall intersections
- Flashing edges around chimneys
- Loose or missing shingles
- Gaps around plumbing stacks
- Old attic fans or louvered vents
- Chimneys without proper caps
- Attic access points: hatches, pull-down stairs, and chaseways around ducts or pipes
Safety note: Be honest about heights. Ladder and roof work is where DIY projects go sideways fast. If the entry point is high, steep, or fragile, call a pro. Also, avoid doing roofline work at dusk when visibility drops.
DIY tip: At dusk, stand outside and watch the roofline for 30 to 45 minutes. If you see bats exiting, you just found your “primary” opening.
Step 2: Pre-seal secondary gaps
This is the step that makes exclusion actually work. You want bats to have exactly one way out.
- Seal smaller secondary gaps you find away from the main opening.
- Leave the primary entry point open so you can install a one-way device there.
- Use the right materials: exterior-grade sealant, metal flashing, hardware cloth (1/4-inch), and quality vent covers.
Step 3: Install a one-way exclusion device
Many homeowners have success with one-way tubes or netting when they are installed carefully.
Option A: One-way tube
- Fit the tube over the opening so bats can crawl out but cannot re-enter.
- Make sure the attachment is tight with no gaps around the sides.
- Keep the tube long enough that bats cannot grab the edge and climb back in.
- Do not rely on tape or a few staples alone. Use a secure, weather-resistant attachment and backing (like flashing or hardware cloth) so wind and rain do not peel it away overnight.
Option B: Exclusion netting (great for long cracks)
- Attach netting above the opening and on the sides.
- Leave the bottom loose so bats can drop out and fly away.
- Do not stretch the bottom tight. It needs to act like a flap.
- Secure it well enough that it does not billow open and create a side gap.
Timing tip: Install devices shortly before dusk, when bats are about to leave for feeding. Avoid working when bats are actively swarming at the opening.
Step 4: Confirm the bats are out
Leave the one-way device in place for several nights of good weather. You are looking for no more evening exit activity and no new guano beneath the entry.
If you still see activity, you likely missed a secondary gap or installed the device with a small bypass opening. Go back to inspection mode.
Step 5: Seal the primary opening
Once you are confident the attic is empty, remove the one-way device and seal the main entry point with durable materials.
- Repair wood rot and replace damaged soffit or fascia
- Add hardware cloth behind vents where needed
- Re-secure loose flashing and shingles
- Install or repair chimney caps as needed
- Use exterior sealant to close hairline cracks (after solid repairs)
Step 6: Clean up guano safely
Bat guano can carry fungal spores that may cause histoplasmosis, especially when droppings are disturbed and become airborne. This is not a “grab a broom and go to town” situation.
Protective gear
- N95 at minimum, ideally a P100 respirator
- Disposable gloves
- Eye protection
- Coveralls or old clothes you can wash hot immediately
Cleanup steps
- Ventilate the attic if possible (without blowing dust into the house).
- Mist droppings lightly with water to reduce airborne dust. Do not soak insulation or wood.
- Scoop and bag guano using a small shovel or dustpan into thick contractor bags. Double-bag if needed.
- HEPA vacuum remaining residue. Avoid standard shop vacs unless they are HEPA-rated.
- Remove contaminated insulation if droppings are widespread or soaked in urine.
- Disinfect hard surfaces according to product directions after bulk removal.
Quick caution: Strong disinfectants are not automatically better, and bleach is not always ideal on porous materials. Follow product labels, and when contamination is heavy, consider professional remediation methods like proper containment and negative air.
Thrifty but honest advice: If the guano pile is large, insulation is heavily contaminated, or the smell is strong, it is often worth hiring a pro for cleanup alone. The cost hurts less than the health risk.
What not to do
- Sealing everything in one afternoon. This can trap bats inside and drive them into walls or living spaces.
- Using expanding foam as the main fix. Foam can be chewed, weathered, and it is not great for larger gaps. Use solid repairs and flashing first, sealant second.
- Leaving guano cleanup to “later.” Odor, stains, and airborne dust get worse with time and heat.
- Trying repellents. Ultrasonic devices, mothballs, and strong scents are unreliable and can create their own hazards.
When to call a pro
I love a good DIY win, but bats are one of those projects where it is smart to draw a line and phone a specialist if any of the following are true:
- You cannot access the entry points safely (steep roof, high gables, fragile tiles)
- You suspect a large colony (lots of noise, lots of guano, multiple exit points)
- It is maternity season and you are unsure about timing
- It is winter and you are not seeing a consistent fly-out
- You found bats in living spaces more than once
- You have any possible human or pet exposure
Look for a wildlife control operator who specifically lists bat exclusion and humane removal, and ask what materials they use to seal openings (you want durable repairs, not just foam and hope).
How to keep bats from coming back
Once your attic is sealed and cleaned, prevention is mostly boring maintenance. Boring is good.
- Annual roofline walk-around: check soffits, fascia, vents, flashing, and chimney caps each spring and fall.
- Screen and cover vents correctly: use proper vent covers and hardware cloth where appropriate.
- Trim tree branches: reduce easy access to the roofline.
- Check attic access points: weatherstrip hatches and seal chaseways so your attic stays tight.
- Consider a bat house: if you want to keep bats around for mosquito control, a bat house placed away from the home can offer an alternative roost.
Quick checklist
- Confirm bats (dusk fly-out, guano, staining)
- Check local laws and maternity season timing
- Inspect safely and find all entry points
- Pre-seal secondary gaps
- Install a one-way exclusion device on the primary opening
- Monitor several nights
- Seal primary opening permanently
- Clean guano safely using proper PPE and HEPA methods
My bottom line
Getting rid of bats is less about fighting them and more about outsmarting your own house. Give them one clean way out, take away the way back in, and then handle the cleanup like the health job it is. Done right, you end up with a bat-free attic and a tighter home envelope. That is a win you will feel every time you climb the ladder and do not hear that flutter.
About Marcus Vance
Content Creator @ Grit & Home
Marcus Vance is a lifelong DIY enthusiast and self-taught home renovator who has spent the last decade transforming a dilapidated 1970s ranch into his family's dream home. He specializes in budget-friendly carpentry, room-by-room renovations, and demystifying power tools for beginners. Through his writing, Marcus shares practical tutorials and hard-learned lessons to help homeowners tackle their own projects with confidence.