First, confirm the pest
Carpenter ants can look scary, and they deserve respect, but the game plan is different than termites. Before you buy a bunch of products, take five minutes to confirm what you are seeing. That one step saves a lot of money and frustration.
Carpenter ants vs termites
- What they do to wood: Carpenter ants do not consume wood for nutrition. They excavate damp or softened wood to make galleries and carry wood fibers out. Termites eat wood and can often cause faster structural damage, although carpenter ants can still cause significant damage over time, especially with chronic moisture.
- Wings (swarmers): If you see winged insects indoors, check the wings. Termite swarmers have four wings about the same length that extend well past the body and may shed easily. Ant swarmers have front wings longer than the back wings, with more obvious venation.
- Body shape: Ants have a pinched waist. Termites have a more uniform, thick body.
- Antennae: Ant antennae are elbowed. Termite antennae are straight or gently curved.
Carpenter ants vs small kitchen ants
The tiny ants around a sugar bowl are often pavement ants or odorous house ants. Carpenter ants are usually larger (often black, sometimes red and black), but size alone is not a perfect test because carpenter ant workers can vary a lot within the same colony. What matters most is where you find them: carpenter ants are more likely to show up near moisture-damaged wood, windows, bathrooms, basements, or a damp sill plate.
Signs you may have carpenter ants
- Larger ants indoors, especially at night
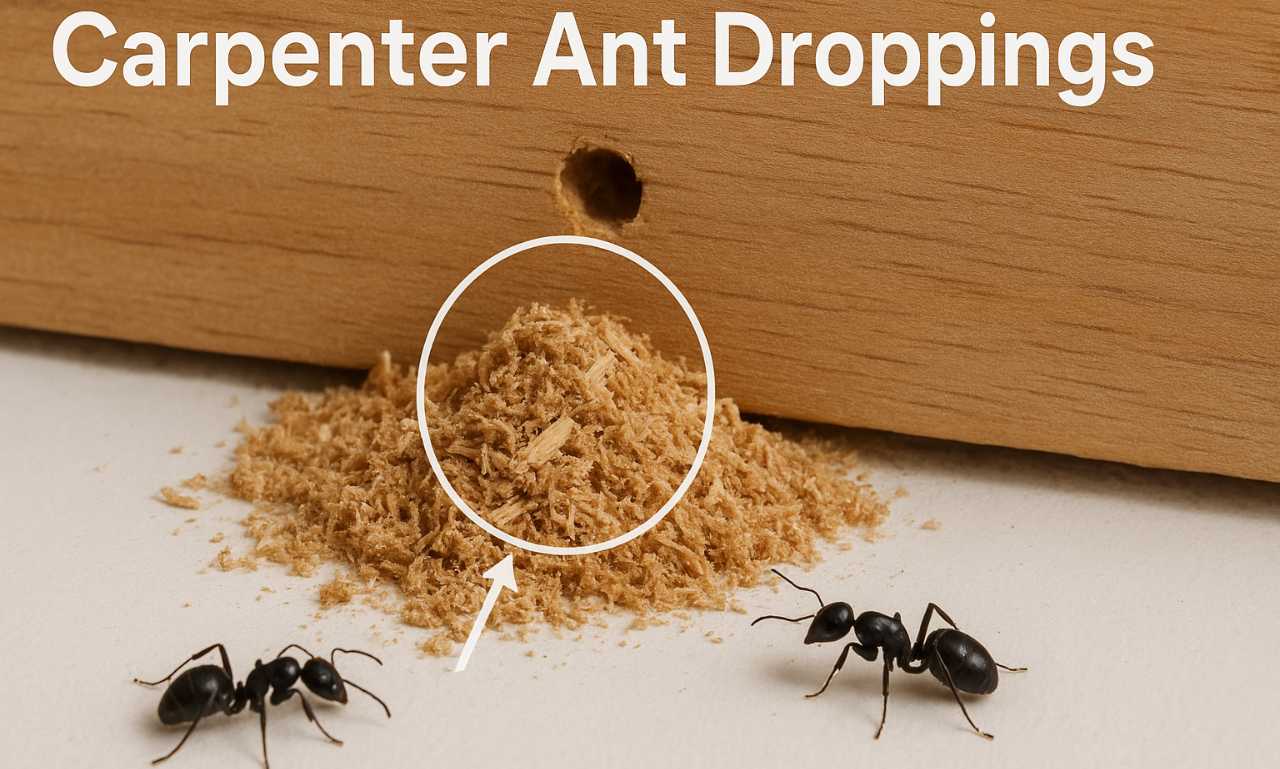
- Frass: small piles of sawdust-like material mixed with insect parts, often below a void (window trim, baseboard, a beam)
- Satellite activity: ants showing up in multiple rooms, often tied to moisture sources
- Possible: faint rustling in a wall or ceiling when the house is quiet (not a reliable sign by itself)
My rule: if you find frass indoors, treat it as a nest clue, not a housekeeping issue. Clean it up after you inspect, but do not ignore it.
Why they show up: moisture
Carpenter ants prefer soft, damp, easy-to-excavate wood. In other words, they love the same places your house is already trying to warn you about. When I was rehabbing our 1970s ranch, every “mystery” pest issue I found could be traced back to water getting where it did not belong.
Common nest spots indoors
- Behind tub and shower surrounds (especially with old caulk or a slow plumbing leak)
- Under or behind kitchen sinks and dishwashers
- Inside window and door frames with rot or chronic condensation
- In basement rim joists, sill plates, and band boards where humid air meets cool surfaces
- In attics near roof leaks or poorly vented bathroom fans
Common nest spots outdoors
- Rotting stumps, old logs, and wood piles
- Hollow trees or dead limbs touching the house
- Wet mulch piled high against siding
- Under loose steps, porches, or decks with poor drainage
A moisture checklist for today
- Fix drips under sinks, around toilets, and at shutoff valves.
- Re-caulk tubs and showers where gaps are visible.
- Confirm bathroom fans vent outside, not into an attic.
- Clean gutters and extend downspouts so water drains away from the foundation.
- Keep mulch and soil a few inches below siding and trim.
If you only do one thing, do this: stop the water. Without that, baits and sprays turn into an endless loop.
Find where they are coming from
Carpenter ant control works best when you treat the nest and the paths to it. You do not have to tear your house apart, but you do need a little detective work. One key note up front: do not rush to caulk or seal an active entry point. If you seal too early, you can force ants to reroute into a new void.
Follow the foragers
- Look for ants in the evening. Carpenter ants often forage at night.
- Use a flashlight and follow them along baseboards, plumbing penetrations, and window trim.
- Mark trail areas with painter’s tape so you can return later.
Check common entry routes
- Where utility lines enter: cable, AC line set, electrical conduit
- Gaps at hose bibs and exterior faucets
- Cracks at foundation and siding transitions
- Tree branches or vines touching rooflines and gutters
Use simple tools
- Moisture meter: great for confirming damp window sills, rim joists, or subfloor edges.
- Non-contact thermometer: can hint at damp areas that read cooler because evaporative cooling can lower surface temperature.
- Stethoscope or your ear: put your ear to a wall near activity and listen for faint rustling.
Safety note: if you suspect ants near a breaker panel, junction box, or inside a wall with unknown wiring, do not start poking with metal tools.
Baits vs sprays
Most homeowners reach for a spray because it feels immediate. The problem is that carpenter ants live in protected voids and may have multiple nests. Killing a few visible ants rarely solves the real problem.
Why baits usually win
- Baits spread: foragers bring food back to the colony and share it.
- Baits are targeted: you are not coating every surface with pesticide.
- Baits reach hidden nests: including satellite nests you cannot see.
When sprays help
- As a light exterior perimeter treatment to reduce incoming foragers
- For crack-and-crevice work in a specific void after you have clear nest evidence
- To knock down a small number of ants while you set baits (but not directly on the bait)
Common baiting mistakes (I have made these)
- Spraying the trail right before baiting. This can repel ants and stop them from taking bait.
- Using the wrong bait type. Carpenter ants can switch between sweets and proteins depending on the season and colony needs.
- Moving baits too soon. If ants are feeding, that is good. Let them work.
- Not addressing moisture. The colony keeps coming back to the same wet conditions.
Step-by-step plan
This is the approach I recommend for most households: confirm, bait, then seal and dry things out. You are aiming for a one-two punch: eliminate colonies and remove the conditions that support them.
Step 1: Reduce food and water
- Wipe counters and sweep crumbs at night for a week.
- Store pet food in sealed containers.
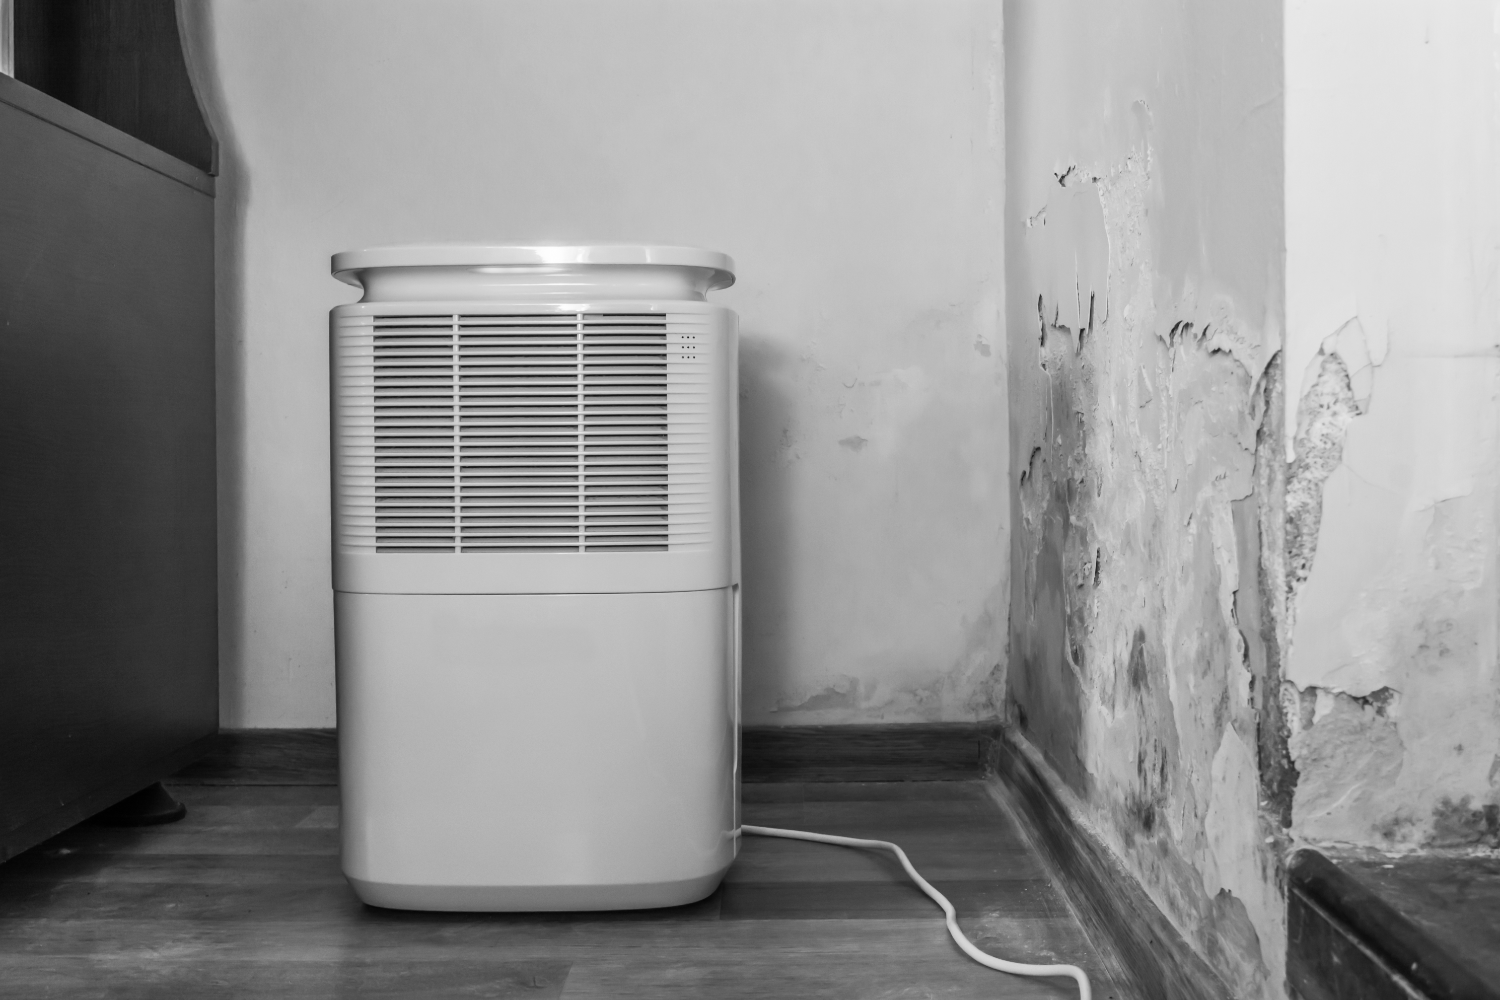
- Fix leaks and run a dehumidifier if your basement stays damp.
Step 2: Choose baits well
In many homes, carpenter ants respond well to both sugar-based and protein or fat-based options depending on the time of year. If you are not sure what they want, set out two bait types in separate locations and see which gets traffic.
- Place baits along trails, near entry points, and near suspected nest areas.
- Keep baits away from kids and pets. Follow label directions.
- Do not contaminate bait with cleaning sprays, air fresheners, or strong solvents.
If your editorial policy allows ingredient-level guidance, look for baits labeled for ants with active ingredients such as boric acid or borax, indoxacarb, or abamectin, and follow the label exactly.
Step 3: Be patient and watch
- Expect to see more ants at first. That often means the bait is working, especially if they are feeding on it steadily.
- Check bait stations daily and replace as directed.
- Track activity with notes: location, time, and how many.
Step 4: Treat exterior routes
Even if the main nest is outdoors, you can cut off the pipeline into the house.
- Trim branches so nothing touches siding or the roof.
- Move firewood away from the house and keep it off the ground.
- Rake mulch back from the foundation and improve drainage where water pools.
- Consider an exterior perimeter treatment labeled for ants, applied to the foundation and entry points per the product label.
Step 5: Seal gaps after the drop
Seal once you are not seeing active trails, or you can accidentally push ants into a new void.
- Caulk small exterior gaps around trim and penetrations.
- Use expanding foam where appropriate for larger voids, especially around utility penetrations. Trim and cover it if exposed to sunlight.
- Replace rotted trim or sill sections. Carpenter ants love punky wood.
- Repair or install door sweeps and weatherstripping.
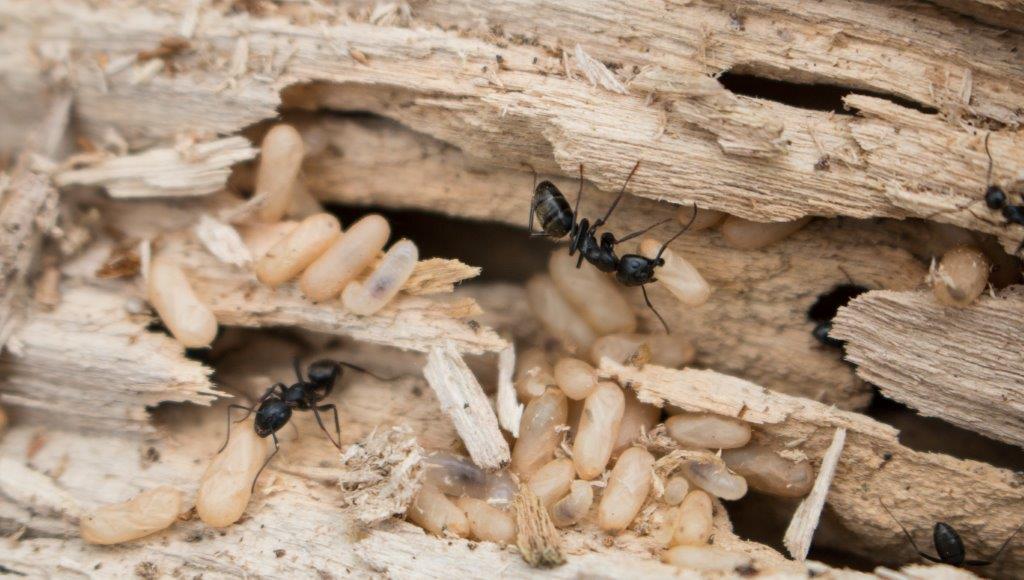
If you find a nest
Sometimes you get lucky and uncover obvious galleries while replacing trim or opening up a damp area. If you find hollowed wood with ants, eggs, or larvae, you likely found at least one nest.
What you can do
- Vacuum visible ants with a shop vac and discard the contents in a sealed bag outdoors.
- Remove and replace rotted wood when feasible. If the wood is structural, do not guess. Support and repair correctly.
- Dust or treat the void only with products labeled for carpenter ants, and only as directed. Avoid overapplying, especially in living spaces.
- Dry the area aggressively: fix the leak, run fans, and use a dehumidifier.
What not to do
- Do not soak wall cavities with random bug spray. It can stain, stink, and still miss the colony.
- Do not start tearing into walls near plumbing or wiring unless you can do it safely and you have a repair plan.
How long it takes
With effective baiting and moisture fixes, many homeowners see a big drop in activity in 1 to 2 weeks. Full control often takes several weeks, especially if there are satellite nests or an outdoor colony feeding into the home. Some situations take longer depending on species, colony size, bait type, and whether the main nest is located.
- If you still see heavy activity after 3 to 4 weeks of consistent baiting, you likely have a nest you have not addressed, or moisture conditions are still inviting them.
- If swarmers show up indoors, treat that as urgent. It can indicate a mature colony nearby.
When to call a pro
I love DIY, but I also love knowing when the cheapest option is to pay for expertise once, instead of experimenting for months while damage continues.
Call a pro if
- You see winged ants (swarmers) indoors more than once.
- You find extensive frass or multiple frass piles in different areas.
- Activity is coming from a high-risk area like a structural beam, load-bearing wall, or a roofline you cannot access safely.
- You have known water damage and cannot locate or fix the moisture source quickly.
- You have tried baiting correctly for a few weeks with no meaningful reduction.
What a good pro does
- Inspect for moisture and nest sites, not just spray baseboards.
- Use a combination of targeted treatments and recommendations for exclusion and repairs.
- Help you confirm whether you are dealing with carpenter ants, termites, or both.
Tip: If termite signs are possible, ask about a separate termite inspection. The control strategy and urgency are different.
Prevention
Once you knock carpenter ants down, prevention is mostly house maintenance. Not glamorous, but it works.
Outside
- Keep branches and shrubs trimmed away from siding and rooflines.
- Store firewood at least 20 feet away if possible, elevated off the ground.
- Fix grading so water runs away from the foundation.
- Repair damaged siding, fascia, and soffit where water gets behind.
Inside
- Run bath fans during showers and for 20 minutes after.
- Keep basement humidity in check with ventilation or a dehumidifier.
- Replace water-damaged trim and address the cause, not just the symptom.
Quick FAQ
Do carpenter ants mean my house is rotting?
Not always, but they do often point to moisture. Sometimes it is minor, like a window that sweats. Sometimes it is bigger, like a leaking shower valve. Treat the ants, then hunt the water.
Are carpenter ants dangerous?
They are not typically dangerous, but they can bite if handled. The bigger concern is the moisture-damaged wood they often move into and expand.
Should I spray ants I see?
If you are actively baiting, avoid spraying trails and areas near bait. You want the foragers to bring the bait back to the nest. If you need immediate relief, vacuum them and focus on bait placement.
The takeaway
Getting rid of carpenter ants is less about brute force and more about a clean, repeatable plan: identify correctly, bait strategically, remove moisture, and seal entry points. Do those in that order, and you usually win. Skip the moisture piece, and you are likely to be fighting the same battle next season.
About Marcus Vance
Content Creator @ Grit & Home
Marcus Vance is a lifelong DIY enthusiast and self-taught home renovator who has spent the last decade transforming a dilapidated 1970s ranch into his family's dream home. He specializes in budget-friendly carpentry, room-by-room renovations, and demystifying power tools for beginners. Through his writing, Marcus shares practical tutorials and hard-learned lessons to help homeowners tackle their own projects with confidence.