
Drain flies go by a few names: sewer gnats, moth flies, and that annoying little cloud that shows up near the sink when you are just trying to brush your teeth in peace. The good news is they are usually not a sign your house is filthy. The bad news is they do mean there is wet organic gunk somewhere that has turned into a nursery.
I learned this the hard way during our ranch-house remodel. I kept swatting flies in the half-bath and blaming the trash can. Turns out the flies were breeding in a slow bathroom sink drain I thought was “fine.” Once you remove the slimy biofilm inside the pipe, the population drops quickly.
What drain flies are
Drain flies are tiny (often about 1/16 to 1/8 inch, roughly 1.5 to 5 mm), gray to tan, and look a bit fuzzy or moth-like when they sit still. Adults do not live long, but they reproduce quickly. The larvae live in a gelatinous film inside plumbing where water and organic debris sit.
Common breeding spots
- Bathroom sink and tub drains with slow flow
- Kitchen sink drains, especially with a disposal
- Floor drains in basements, laundry rooms, and garages
- Shower drains with hair and soap scum buildup
- A rarely used guest bath where the trap dries out
- Leaky pipes, loose slip nuts, or a cracked trap keeping wood or drywall damp
Key idea: Spraying adults with insecticide does not solve the problem. You have to remove the breeding slime in the pipe or eliminate the moisture source.
Confirm drain flies
Drain flies get misidentified a lot. Fruit flies usually hover around produce, recycling, and fermenting stuff. Drain flies tend to hang out on walls and ceilings near drains and they fly in short, weak bursts.
Quick ID checklist
- Fuzzy wings: They look like tiny moths or little lint specks with wings.
- Location: Most sightings are in bathrooms, near tubs, or near floor drains.
- Flight: They hop-fly and land quickly, not strong, zippy flying.
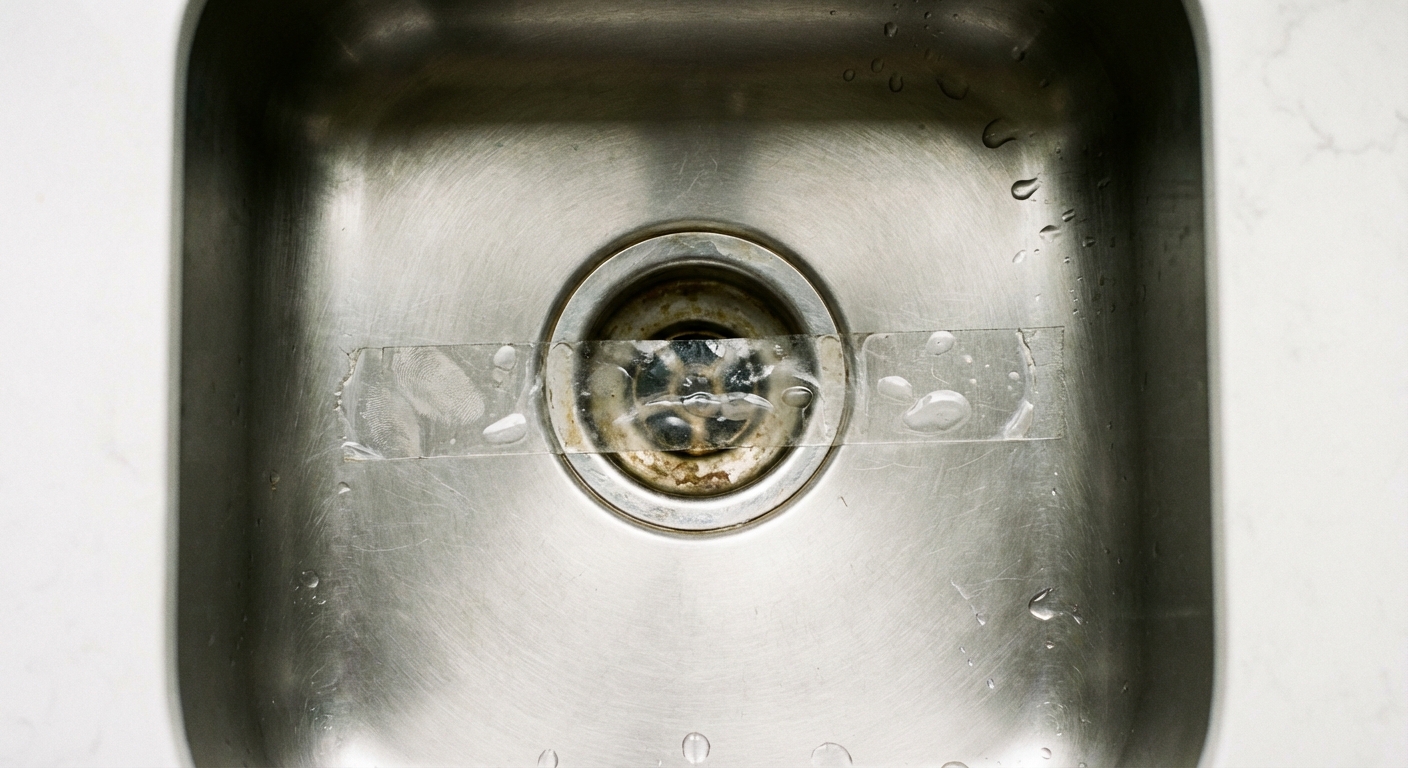
The tape test (my favorite 2-minute proof)
Dry the area around the suspected drain. Then place a strip of clear tape over the drain opening at night, sticky side down, leaving a small gap on one edge so the drain is not sealed airtight. In the morning, check the tape.
- If you catch several tiny fuzzy flies on the tape, that drain is a likely source.
- If the tape is clear, test the next closest drain.
Look-alikes to rule out
If your cleanup is not making a dent, it is worth making sure you are fighting the right bug.
- Fungus gnats: Often come from damp potting soil. You will see them around houseplants more than drains.
- Phorid flies: Small, fast runners that zip across counters. They can breed in drains too, but also in trash, leaks, or hidden organic messes inside walls.
Not sure? Do the tape test on the drain and also watch where the adults gather. Drain flies love to park near the plumbing.
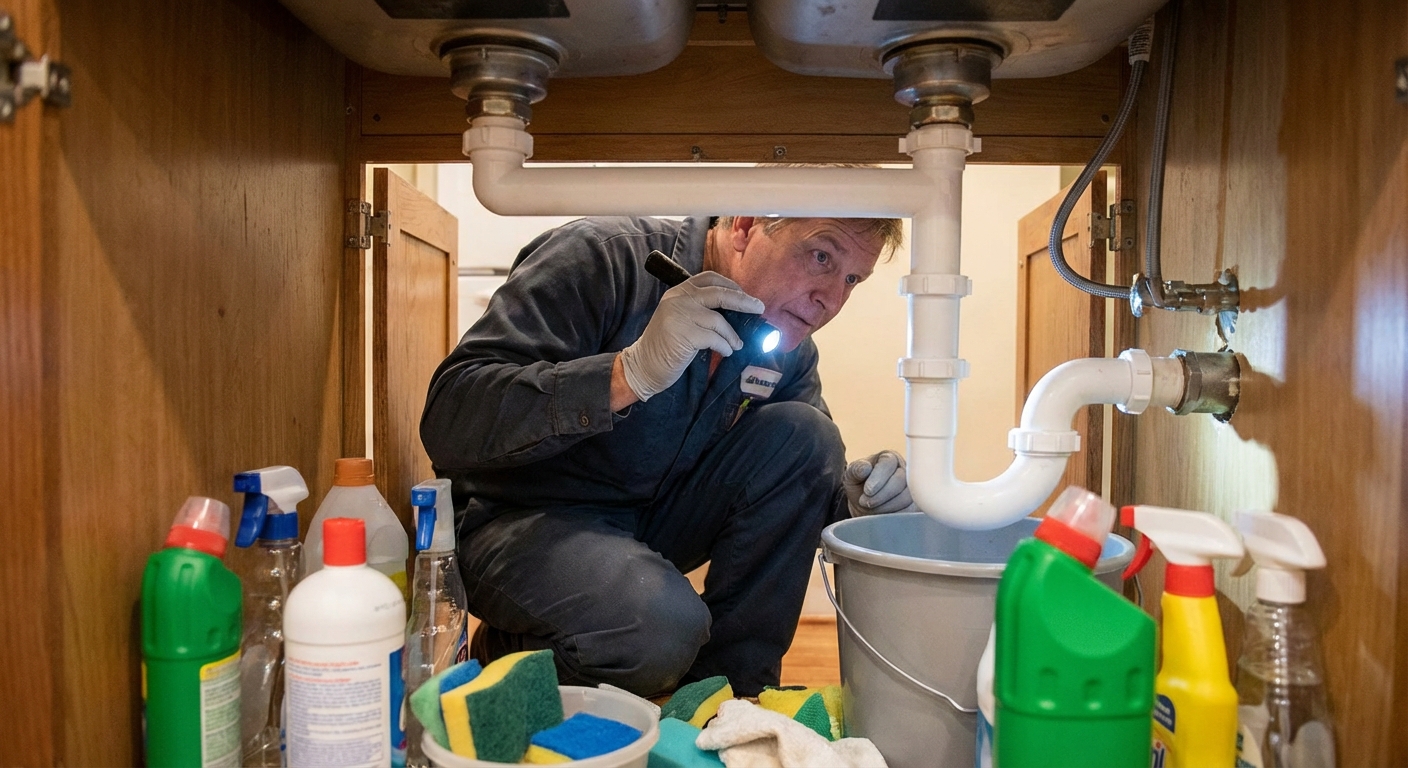
Step 1: Find the breeding spot
If you clean the wrong drain, you will waste a weekend and still have flies. Start by mapping where you see them most, then work outward.
My troubleshooting order
- Closest drain to sightings: sink, tub, shower, floor drain.
- Overflow openings: the little hole near the top of bathroom sinks can hide slime.
- Nearby seldom-used drains: guest bath, basement, utility sink.
- Plumbing leaks: look under sinks and around toilets for dampness.
Tip: If you see flies in the basement near a floor drain, that is often the main culprit. Those drains get forgotten, and they are basically a standing invitation for biofilm.
Step 2: Remove the biofilm
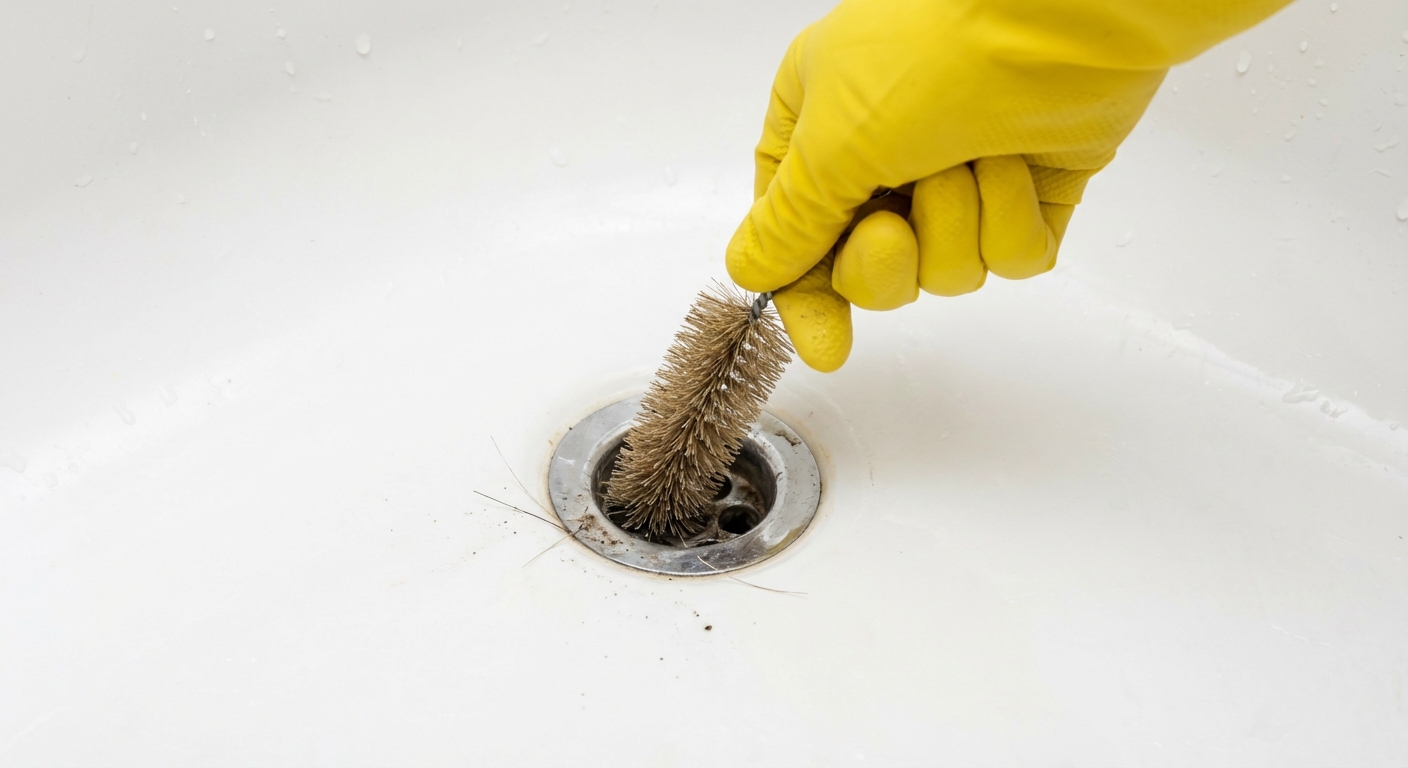
Drain flies lay eggs in the slime. To stop the cycle, you need to physically remove that film. Think of it like scraping a dirty grill. Cleaners help, but brushing is what makes it reliable.
What you need
- Drain brush (a flexible, narrow plumbing brush) or an old bottle brush
- Enzyme-based drain cleaner (labeled for organic buildup and drain flies)
- Hot tap water (unless your product label says otherwise)
- Rubber gloves and a flashlight
- Optional: screwdriver to remove a drain cover
How to brush and treat a sink or shower drain
- Remove the stopper or cover. Pull out hair and debris first.
- Brush the drain walls. Work the brush down into the pipe as far as it will go, twisting to scrub the sides.
- Do the overflow (if it has one). Use the brush carefully in the overflow opening and flush with hot tap water.
- Apply enzyme cleaner at night. Follow the label. Enzymes work slowly and need contact time.
- Repeat for 5 to 7 nights. This is where most people quit too early.
- Flush with hot tap water in the morning. Unless the product says to wait longer, a morning flush helps move loosened gunk along.
About boiling water and PVC: Your caution here is smart. Many household plastic drain systems are not meant for repeated or prolonged near-boiling temperatures. Avoid dumping a full kettle of rolling-boil water straight into a cold PVC drain. Use hot tap water instead, or let boiled water cool for a minute or two before flushing.
Step 3: Hit common hotspots
Kitchen sink and garbage disposal
Kitchen drains often have a greasy biofilm that enzymes love to eat through. Brush what you can reach.
- Scrub the rubber splash guard on the disposal. It can hold slime.
- After the enzyme cleaner has had the full dwell time listed on the label, run the disposal with cold water for a few seconds to help clear loosened gunk.
- Do not rely on citrus peels. They smell nice but do not remove biofilm.
Floor drains
Floor drains are prime real estate for drain flies because they stay damp and rarely get scrubbed.
- Remove the grate.
- Brush the walls of the drain and the trap area you can reach.
- Apply enzyme cleaner according to label directions.
- After the recommended dwell time, flush with hot tap water.
If the drain is rarely used, pour a couple cups of water into it weekly to keep the trap full. A dry trap can also let sewer gases in, which is a separate problem you do not want.
Toilet base and hidden leaks
If you have flies near a toilet but not near the sink, do a quick reality check: a rocking toilet, staining at the base, or a musty smell can signal a slow leak (including a failing wax ring). Drain flies usually come from drain biofilm, but any chronically damp, organic material can become a breeding site. Either way, this is a repair, not a “spray and hope” situation.
Step 4: Fix what caused it
Drain flies thrive where water sits and sludge builds up. After cleaning, make it harder for them to restart.
Common fixes
- Clear slow drains: If a drain is sluggish, address the clog. Standing water accelerates biofilm growth.
- Stop drips: Tighten slip nuts, replace worn washers, or swap a cracked trap.
- Check venting issues: Gurgling drains can indicate vent problems that affect flow and trap seals.
- Seal gaps: If you have an open pipe or missing cleanout cap, close it up.
If you find damp drywall or cabinet base material under a sink, do not just dry it and move on. Track down the leak first, then repair the damaged material so you are not leaving a long-term moisture problem behind the scenes.
Safety notes
- Wear gloves and consider eye protection when brushing gunk out of drains.
- Never mix cleaners. Especially do not combine bleach with vinegar or acids.
- Avoid using chemical drain openers right before or along with enzymes. Read labels and do not create a chemistry experiment in your pipes.
- If you are on a septic system, avoid harsh chemical routines and follow product guidance. Enzyme cleaners are often septic-friendly, but the label is the final word.
What not to do
- Do not only use bleach. A quick bleach splash might kill a few larvae on contact, but it often does not penetrate and remove the biofilm where eggs live. It can also be hard on some plumbing and septic systems.
- Do not mix chemicals. Never combine bleach with vinegar or other cleaners. Dangerous gases can form.
- Do not rely on bug bombs or sprays. Killing adults is temporary if the breeding site remains.
- Do not skip brushing. Enzymes are great, but scrubbing is what makes the treatment predictable.
How long it takes
In many homes, you will see a noticeable drop in 2 to 3 days once the right drain is treated and brushed. Full elimination often takes 7 to 14 days because any remaining eggs can hatch and restart the cycle if there is still biofilm. If multiple drains are involved, or there is a hidden leak, it can take longer.
A simple timeline
- Day 1: Tape test, brush, enzyme treatment at night.
- Days 2 to 7: Repeat enzyme nightly, flush with hot tap water each morning (or per label directions).
- Week 2: If you still see flies, re-test other drains and inspect for leaks or a dry floor drain trap.
Prevention checklist
- Flush seldom-used drains weekly with a few cups of water
- Brush and enzyme-treat problem drains monthly for maintenance if your home is prone to buildup
- Use sink strainers and pull hair from shower drains regularly
- Run water a few seconds after using the disposal and avoid dumping grease
- Fix slow drains early, before they turn into a slime factory
- Check under-sink plumbing for small drips every couple months
Call a pro
If you have done the brush-and-enzyme routine for about two weeks and the flies keep coming, it is time to widen the search. Call a plumber if you notice any of the following:
- Persistent sewer smell, especially with a dry floor drain or suspected venting issue
- Recurring clogs or gurgling that suggests a deeper blockage
- Water stains, soft flooring, or suspected leaks inside walls
- Flies coming from a drain you cannot access well, like a hidden cleanout or a damaged trap
A pest pro can help confirm the insect and rule out look-alikes, but in my experience, the plumbing and moisture diagnosis is what usually ends the problem for good.
If you rent
If the issue involves a leak, sewer smells, recurring backups, or a building floor drain you cannot access, loop in your landlord or property manager early. Drain fly fixes are straightforward, but moisture and plumbing repairs are usually not a DIY tenant job.
Quick-start plan
- Do the tape test tonight to identify the source drain.
- Tomorrow: remove the stopper, pull debris, and scrub the drain walls with a brush.
- Apply an enzyme drain cleaner every night for 5 to 7 nights (follow label dwell time).
- Flush with hot tap water each morning (or as directed).
- Fix any slow drain or leak you find along the way.
If you want that satisfying “I solved it” moment, this is one of those projects where a little persistence beats fancy products. Clean the slime, remove the moisture problem, and drain flies usually pack up and leave.
About Marcus Vance
Content Creator @ Grit & Home
Marcus Vance is a lifelong DIY enthusiast and self-taught home renovator who has spent the last decade transforming a dilapidated 1970s ranch into his family's dream home. He specializes in budget-friendly carpentry, room-by-room renovations, and demystifying power tools for beginners. Through his writing, Marcus shares practical tutorials and hard-learned lessons to help homeowners tackle their own projects with confidence.