Fleas are one of those “how is this possible?” problems. One day you notice a couple bites around your ankles. A few days later, the dog is scratching like crazy and you are seeing tiny jumpers on your socks or the carpet. The reason it escalates so fast is straightforward: fleas reproduce quickly, and most of the problem is not the fleas you see. It is the eggs, larvae, and pupae hiding in carpet, cracks, pet bedding, and upholstery.
One quick reality check that helps: fleas do not “live on people” the way they live on pets. If you are getting bitten, it usually means fleas are in the home environment, on a pet, or both. So the fix is not treating humans, it is breaking the cycle in your pet and your house.
The good news: you can beat fleas without burning your house down with chemicals or throwing away half your furniture. The key is a multi-step plan done in the right order, then repeated on a schedule long enough to catch the next hatch.
Know your enemy (quick flea life cycle)
You do not need to memorize entomology to win this fight, but you do need one concept: flea control is about breaking the cycle.
- Adult fleas live on pets and bite people.
- Eggs fall off the pet into carpet, bedding, and furniture.
- Larvae hide deep in fabric and floor edges, feeding on “flea dirt” (dried blood) and other debris.
- Pupae sit in a tough cocoon and can wait weeks (sometimes longer) to emerge, especially if the home is quiet.
That last stage is why you can spray once, think you are done, then see fleas again. Your plan has to cover pets + the house, and it has to include follow-up treatments.
Before you start: supplies that make this easier
You can do this with basic stuff, but a few tools make a huge difference.
Cleaning gear
- Vacuum with strong suction (bagged is great, but any is fine)
- Crevice tool and upholstery attachment
- Heavy-duty trash bags (for vacuum contents)
- Laundry detergent and access to hot water and high heat drying
Treatment gear
- Pet flea control from your vet or a reputable brand (topical, oral, or collar depending on your situation)
- House treatment: a flea spray labeled for indoor use (ideally with an IGR, “insect growth regulator”)
- Optional: fogger, only if the infestation is heavy and you can follow directions exactly
Nice-to-haves
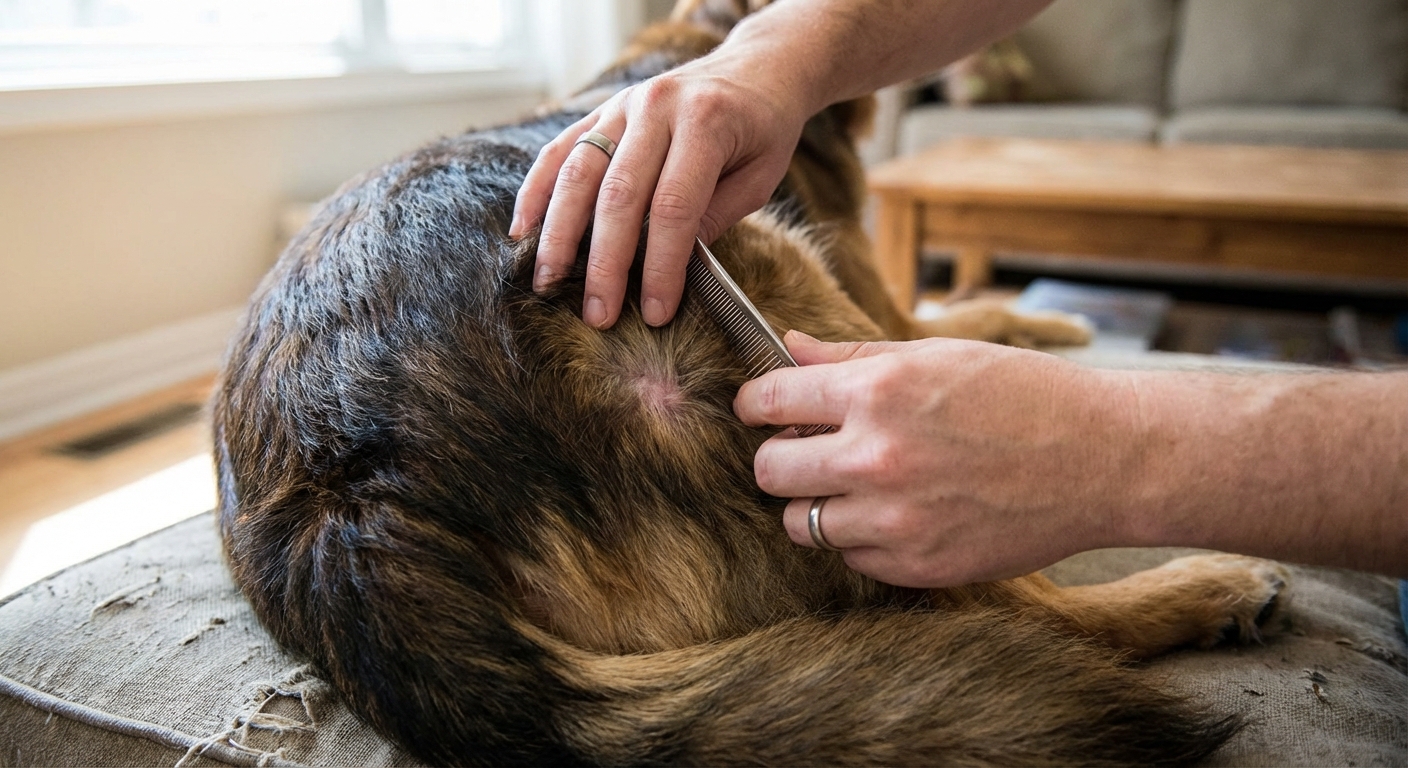
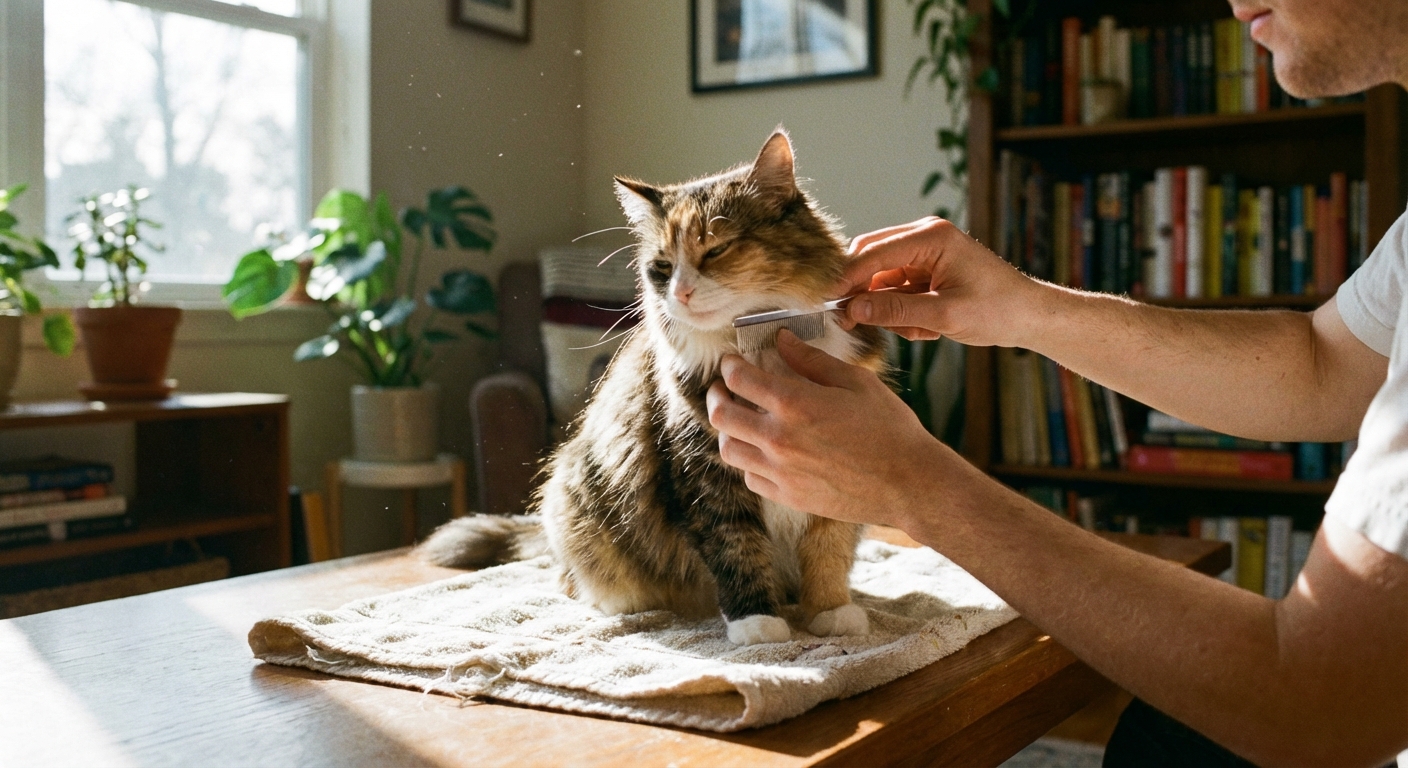
- Flea comb for cats or dogs
- Sticky flea traps (or a DIY white dish with soapy water under a night light)
Safety notes:
- If you have cats, be extra careful with any product containing permethrin. It is commonly used for dogs and can be dangerous for cats. Always read labels, and when in doubt, call your vet.
- Be cautious with essential oils. Many are toxic to pets, and they are not a reliable flea control plan.
Step 1: Treat the pets first (or you are bailing water with a hole in the boat)
If your pet is still carrying adult fleas, you can deep-clean all weekend and still lose the battle by Tuesday.
Pick a pet treatment that matches your home
- Oral meds (often prescription) work fast and avoid residue on fur.
- Topicals can work well but require proper application to skin, not fur.
- Collars can be effective for some pets and households, but you still have to treat the home.
Important: product choice depends on your pet’s species, age, weight, and health status. Some over-the-counter products are ineffective, and some can be unsafe. If you are unsure, your vet is the best shortcut here.
Do this the same day you start house cleaning
- Give the treatment exactly as directed.
- Comb your pet with a flea comb, especially around the neck and tail base.
- Wash pet bedding the same day (details below).
If you have multiple pets, treat all of them. Fleas are not polite enough to stay on one animal.
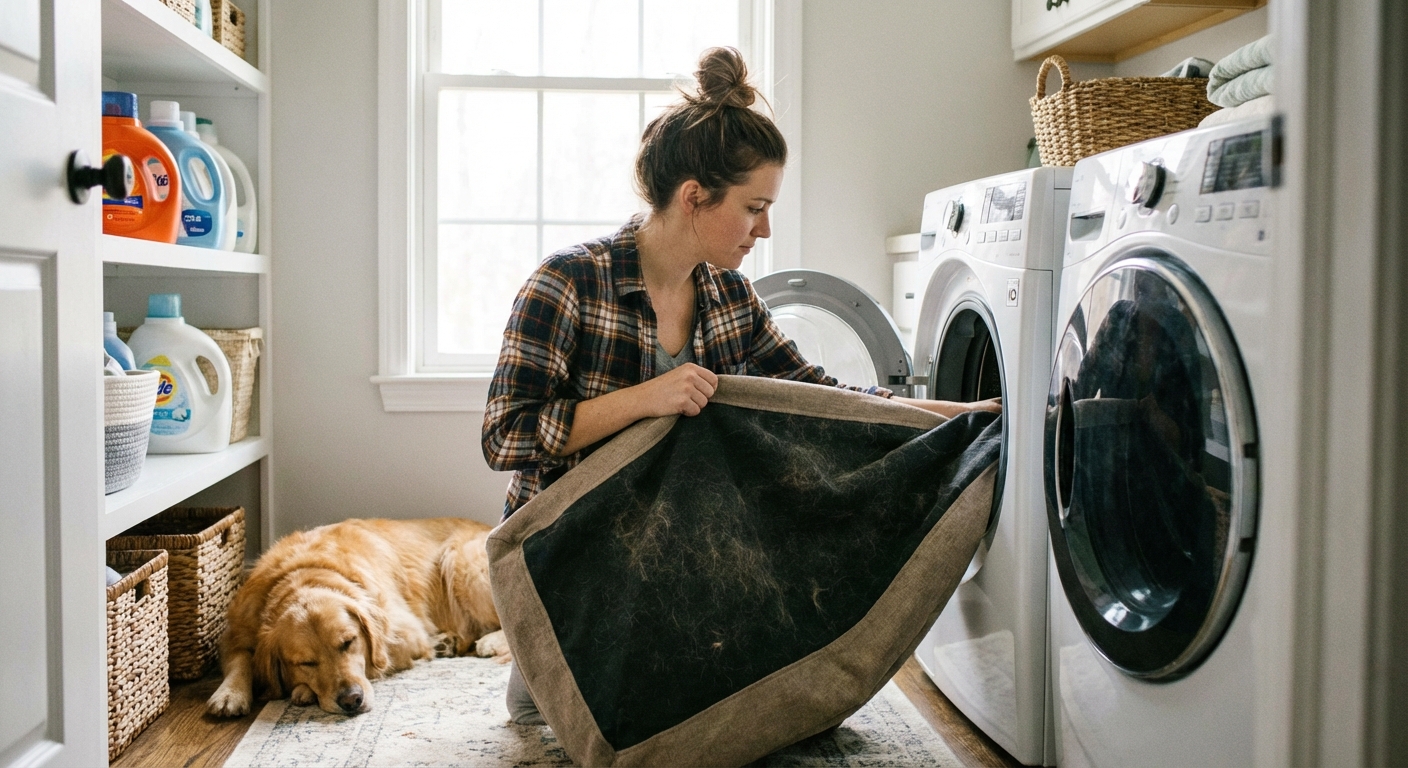
Step 2: Laundry attack (bedding, throws, pet zones)
This is one of the highest “return on effort” steps you can do after treating pets. Flea eggs and larvae love soft, protected places.
What to wash
- Pet beds, blankets, crate pads
- Your bedding if pets sleep in the room or on the bed
- Throw blankets and slipcovers
- Washable rugs and bath mats
How to wash it
- Hot water if the fabric allows
- High heat dry for at least 30 to 40 minutes if safe for the item
- If you cannot wash it, run it through the dryer on high heat (again, if safe)
Bag clean items as you go if you are dealing with a bad infestation, especially pet bedding. The goal is to keep clean textiles clean while you finish floors and furniture.
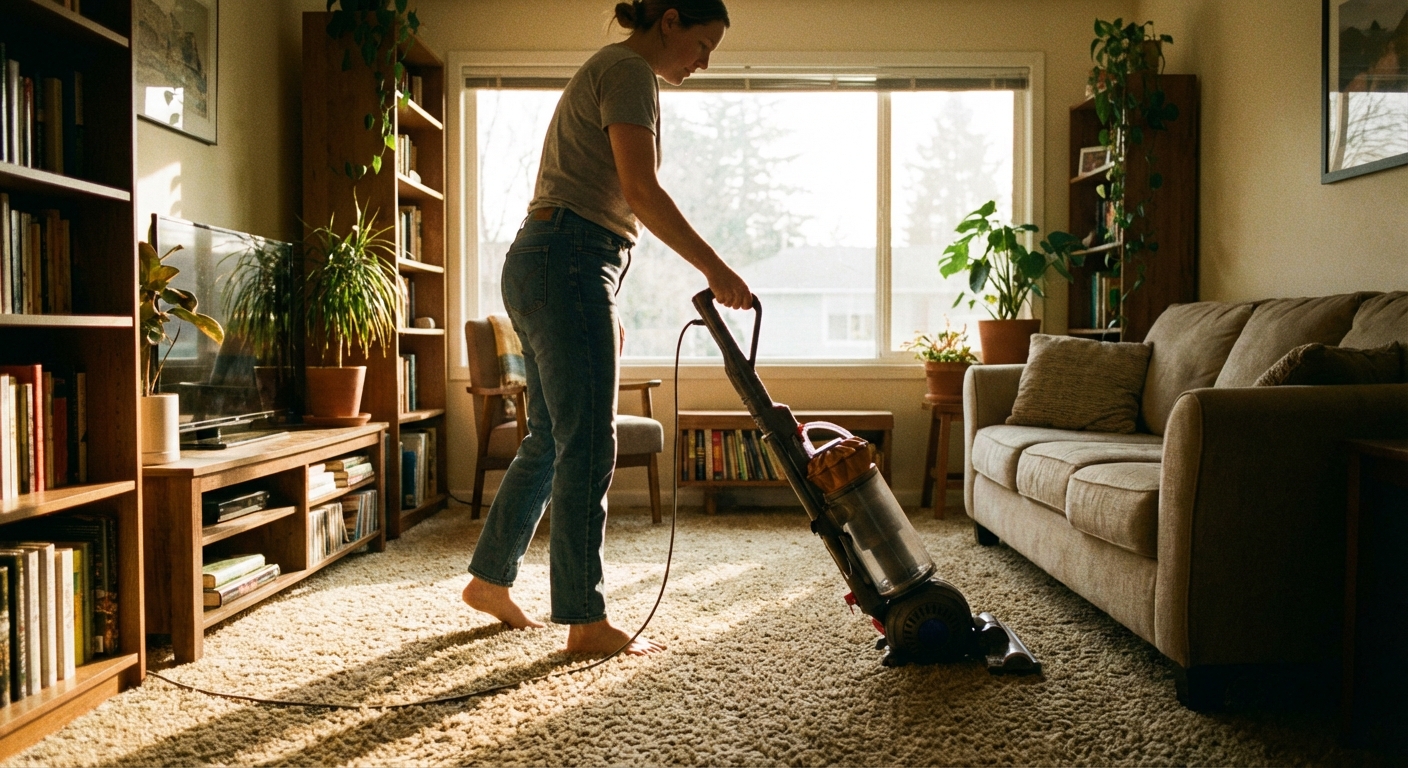
Step 3: Vacuum like a pro (this is the backbone of the plan)
If I had to pick one habit that separates “flea problem keeps coming back” from “we finally beat it,” it is vacuuming. Vacuuming can remove many eggs and larvae, and the vibration can even encourage pupae to emerge so they can be hit by your next treatment.
Where to vacuum (do not skip edges)
- All carpeted rooms, including closets
- Area rugs and rug pads
- Baseboards and floor edges with the crevice tool
- Under furniture, especially where pets nap
- Upholstered furniture, including cushions and seams
- Pet sleeping spots, window perches, and favorite corners
Hard floors still matter
If your home is mostly hard flooring, do not assume you are off the hook. Focus on cracks, baseboards, and the soft zones where larvae hide: rugs, couches, pet beds, and any cozy corners where dust and pet hair collect.
A simple vacuuming strategy that works
- Go slow: one pass up, one pass back.
- Do the perimeter of each room with the crevice tool.
- Finish with upholstery and cushions.
What to do with the vacuum contents
Right after vacuuming:
- If bagged: remove the bag, seal it in a trash bag, and take it outside.
- If bagless: empty into a trash bag, seal, and take it outside. Then wash the canister if possible.
This matters because fleas can survive inside a vacuum. Do not let the canister become a little flea hotel.
Step 4: Treat the home (sprays first, foggers only when necessary)
Once pets are treated and you have vacuumed and done laundry, it is time to apply an indoor flea product. The best results usually come from an indoor spray that includes an IGR. IGR stops eggs and larvae from developing, which is exactly what you want when the visible adults are only part of the problem.
Option A: Indoor flea spray (my go-to for most homes)
Choose a product labeled for:
- Carpet and rugs
- Upholstery (if needed)
- Indoor perimeter cracks and baseboards
- Includes an IGR (look for wording like “insect growth regulator”)
How to apply:
- Remove pets and people from the room as directed.
- Open windows if the label allows for ventilation during or after.
- Lightly treat carpets, rugs, and under furniture. Do not soak.
- Hit baseboards, floor edges, and cracks where larvae hide.
- Let it dry fully before re-entry.
Do not spray pet bedding as a substitute for washing it. Wash and dry it instead.
Cat household tip: keep cats away from treated areas and treated dog bedding until everything is fully dry and aired out, per label directions.
Option B: Fogger (only for heavy infestations and only if you can do it safely)
Foggers can help in some situations, but they are not magic. They also tend to miss the places fleas love most, like deep carpet and under baseboards. Many pest management and public health sources prefer targeted, label-directed applications over foggers because foggers can increase pesticide exposure in the home.
If you use a fogger:
- Read the label twice before you start.
- Turn off ignition sources as directed (gas appliances, pilot lights where applicable).
- Cover or remove food, dishes, and prep surfaces.
- Everyone leaves, including pets and fish tanks, for the full time on the label.
- Ventilate thoroughly afterward.
If you have asthma, small children, or multiple pets, a targeted spray plus aggressive vacuuming is often the safer, more controlled route.
Step 5: Repeat on a schedule (this is where most people quit too early)
Even a strong first round will not always get pupae that are protected in cocoons. Plan for follow-up.
A solid 14 to 21 day game plan
- Days 1 to 3: vacuum daily, especially pet zones and main traffic areas.
- Days 4 to 7: vacuum every other day. Wash pet bedding again near the end of the week.
- Week 2: keep vacuuming 2 to 3 times. Reapply indoor spray only if the product label recommends a second treatment interval.
- Week 3: evaluate with traps and “sock checks.” Continue vacuuming weekly.
Always follow the product label for reapplication timing. Some products are designed for a second treatment, others are not.
Don’t forget the yard and entry points
If your pet goes outside, the yard can be part of the flea story, especially in warm months or shaded, moist areas.
Simple outdoor steps
- Mow and trim to reduce shady, humid hiding spots.
- Rake up leaves and debris where fleas and wildlife hang out.
- Limit pet access to areas where neighborhood cats, raccoons, or possums visit.
Outdoor flea treatments can help, but I treat them as the final layer, not step one. Indoor and pet control usually deliver the biggest gains.
Common mistakes (avoid these)
- Treating the house but not treating every pet in the home.
- Stopping after a week because things look better. Pupae can be late to the party.
- Skipping under furniture, rug pads, and baseboards where larvae hide.
- Not following label directions for re-entry time, ventilation, or reapplication intervals.
- Using essential oils as the main plan, or mixing multiple pesticides “just to be safe.” More is not better.
How to tell if the fleas are gone
I like simple, measurable checks. Here are three that work:
- Sticky traps: place near pet sleeping areas and along baseboards. Check daily.
- White sock test: walk slowly on carpet in white socks. Fleas show up fast.
- Pet inspection: comb and look for live fleas or flea dirt.
Expect to see some activity for a bit even after a good first treatment. What you want is a clear downward trend over 1 to 2 weeks, not random spikes.
Prevent reinfestation (keep your win)
Once you have fought this battle, you do not want a rematch.
Monthly pet protection
- Keep pets on a consistent flea preventive schedule, especially in warm seasons.
- If you switch products, confirm the new one covers fleas effectively for your pet’s weight and age.
House habits that stop the comeback
- Vacuum weekly (twice weekly if you have lots of carpet and pets).
- Wash pet bedding regularly, ideally every 1 to 2 weeks.
- Reduce clutter in pet corners where debris feeds larvae.
- Address rodents or wildlife issues in crawlspaces, attics, and garages. Fleas hitchhike.
When to call a pro
If you have done two rounds of a solid plan, treated all pets, and you are still seeing significant fleas after 3 to 4 weeks, it is time to bring in a licensed pest control pro. Homes with lots of carpet and severe infestations can require a true integrated pest management approach. Also call sooner if anyone in the home is having severe reactions to bites.
My no-panic checklist
- Treat all pets today.
- Wash and high-heat dry pet bedding and throws.
- Vacuum carpets, edges, and upholstery. Empty the vacuum outside.
- Apply an indoor flea spray with an IGR, following the label.
- Vacuum daily for several days, then keep a schedule for 2 to 3 weeks.
- Repeat treatment only if the product label calls for it.
If you tackle fleas with this order and stick with it long enough to catch the next hatch, you can absolutely get your home back. And when you do, that relief feels just as good as finishing a renovation project. You did the work, you broke the cycle, and you built a more comfortable home.
About Marcus Vance
Content Creator @ Grit & Home
Marcus Vance is a lifelong DIY enthusiast and self-taught home renovator who has spent the last decade transforming a dilapidated 1970s ranch into his family's dream home. He specializes in budget-friendly carpentry, room-by-room renovations, and demystifying power tools for beginners. Through his writing, Marcus shares practical tutorials and hard-learned lessons to help homeowners tackle their own projects with confidence.