Powderpost beetles are one of those pests that feel personal, because they are not after your food or your trash. They are after your house. The good news is you can usually beat them with a calm, step-by-step approach: confirm what you are dealing with, figure out if the infestation is active, fix the conditions that keep wood vulnerable, and then choose the least invasive effective treatment that actually works.
Below is exactly how I would handle it in my own place, including when I would stop and call a pro.
First, make sure it is actually powderpost beetles
A lot of wood issues get mislabeled as “powderpost beetles.” Termites, carpenter ants, and old inactive beetle damage can all look similar at a glance. Identification matters because the best treatment depends on the pest, the beetle group, and whether the wood is still being attacked.
Powderpost beetles are not one beetle
Homeowners use “powderpost beetle” as a catch-all, but the common groups behave differently.
- Lyctid powderpost beetles: typically target hardwood sapwood (think flooring, trim, furniture, stored hardwood lumber). They are more tied to starch content and unfinished or newer wood than chronically damp conditions.
- Anobiid beetles: often show up in softwoods and can be a bigger issue in damp crawlspaces and basements (joists, framing, sill plates) because higher sustained moisture makes wood more livable for them.
You do not need to become an entomologist, but this one detail explains a lot, like why one home gets holes in oak flooring while another gets activity in basement framing.
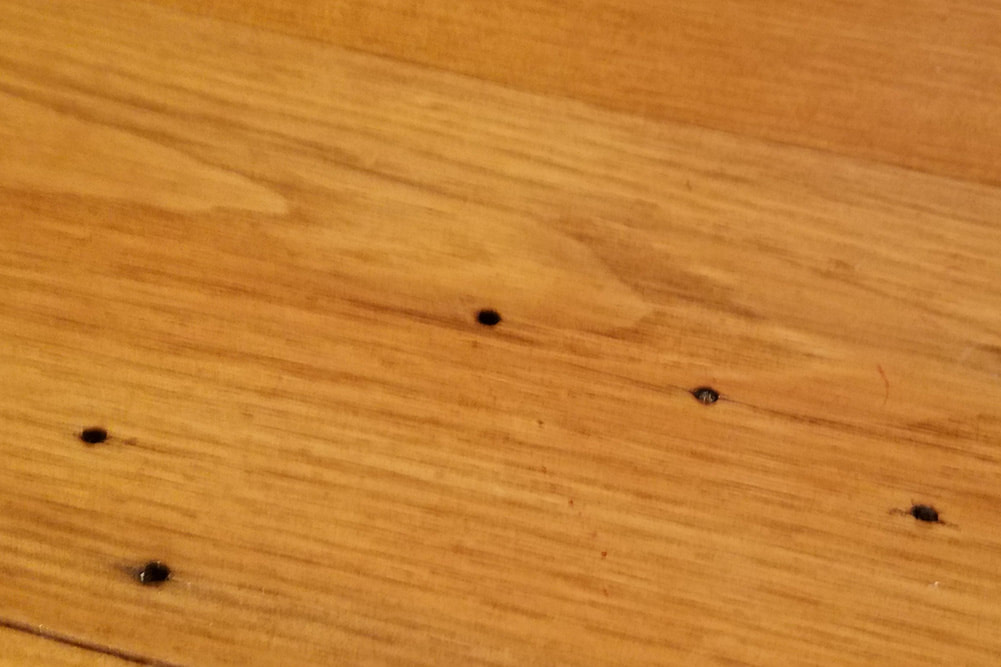
Common signs
- Tiny round exit holes, often roughly 1/32 to 1/8 inch depending on species. Think pinhead to small pencil lead size. Hole size alone is not definitive.
- Frass, a fine powder that looks like talc or flour. It may sift out of holes or collect in little piles below.
- New holes over time, especially during warmer months when adults emerge.
- Blistered or fragile wood surface in severe cases, where the inside has been chewed into a honeycomb.
What frass can tell you
Powderpost beetle frass is usually very fine and dry. Drywood termite frass tends to look like tiny pellets. Subterranean termites are more likely to show mud tubes and muddy or “carton” material than clean pellets. Carpenter ant debris looks more like coarse sawdust mixed with insect parts. If the powder is truly flour-like and sifts easily, powderpost beetles jump higher on the list.
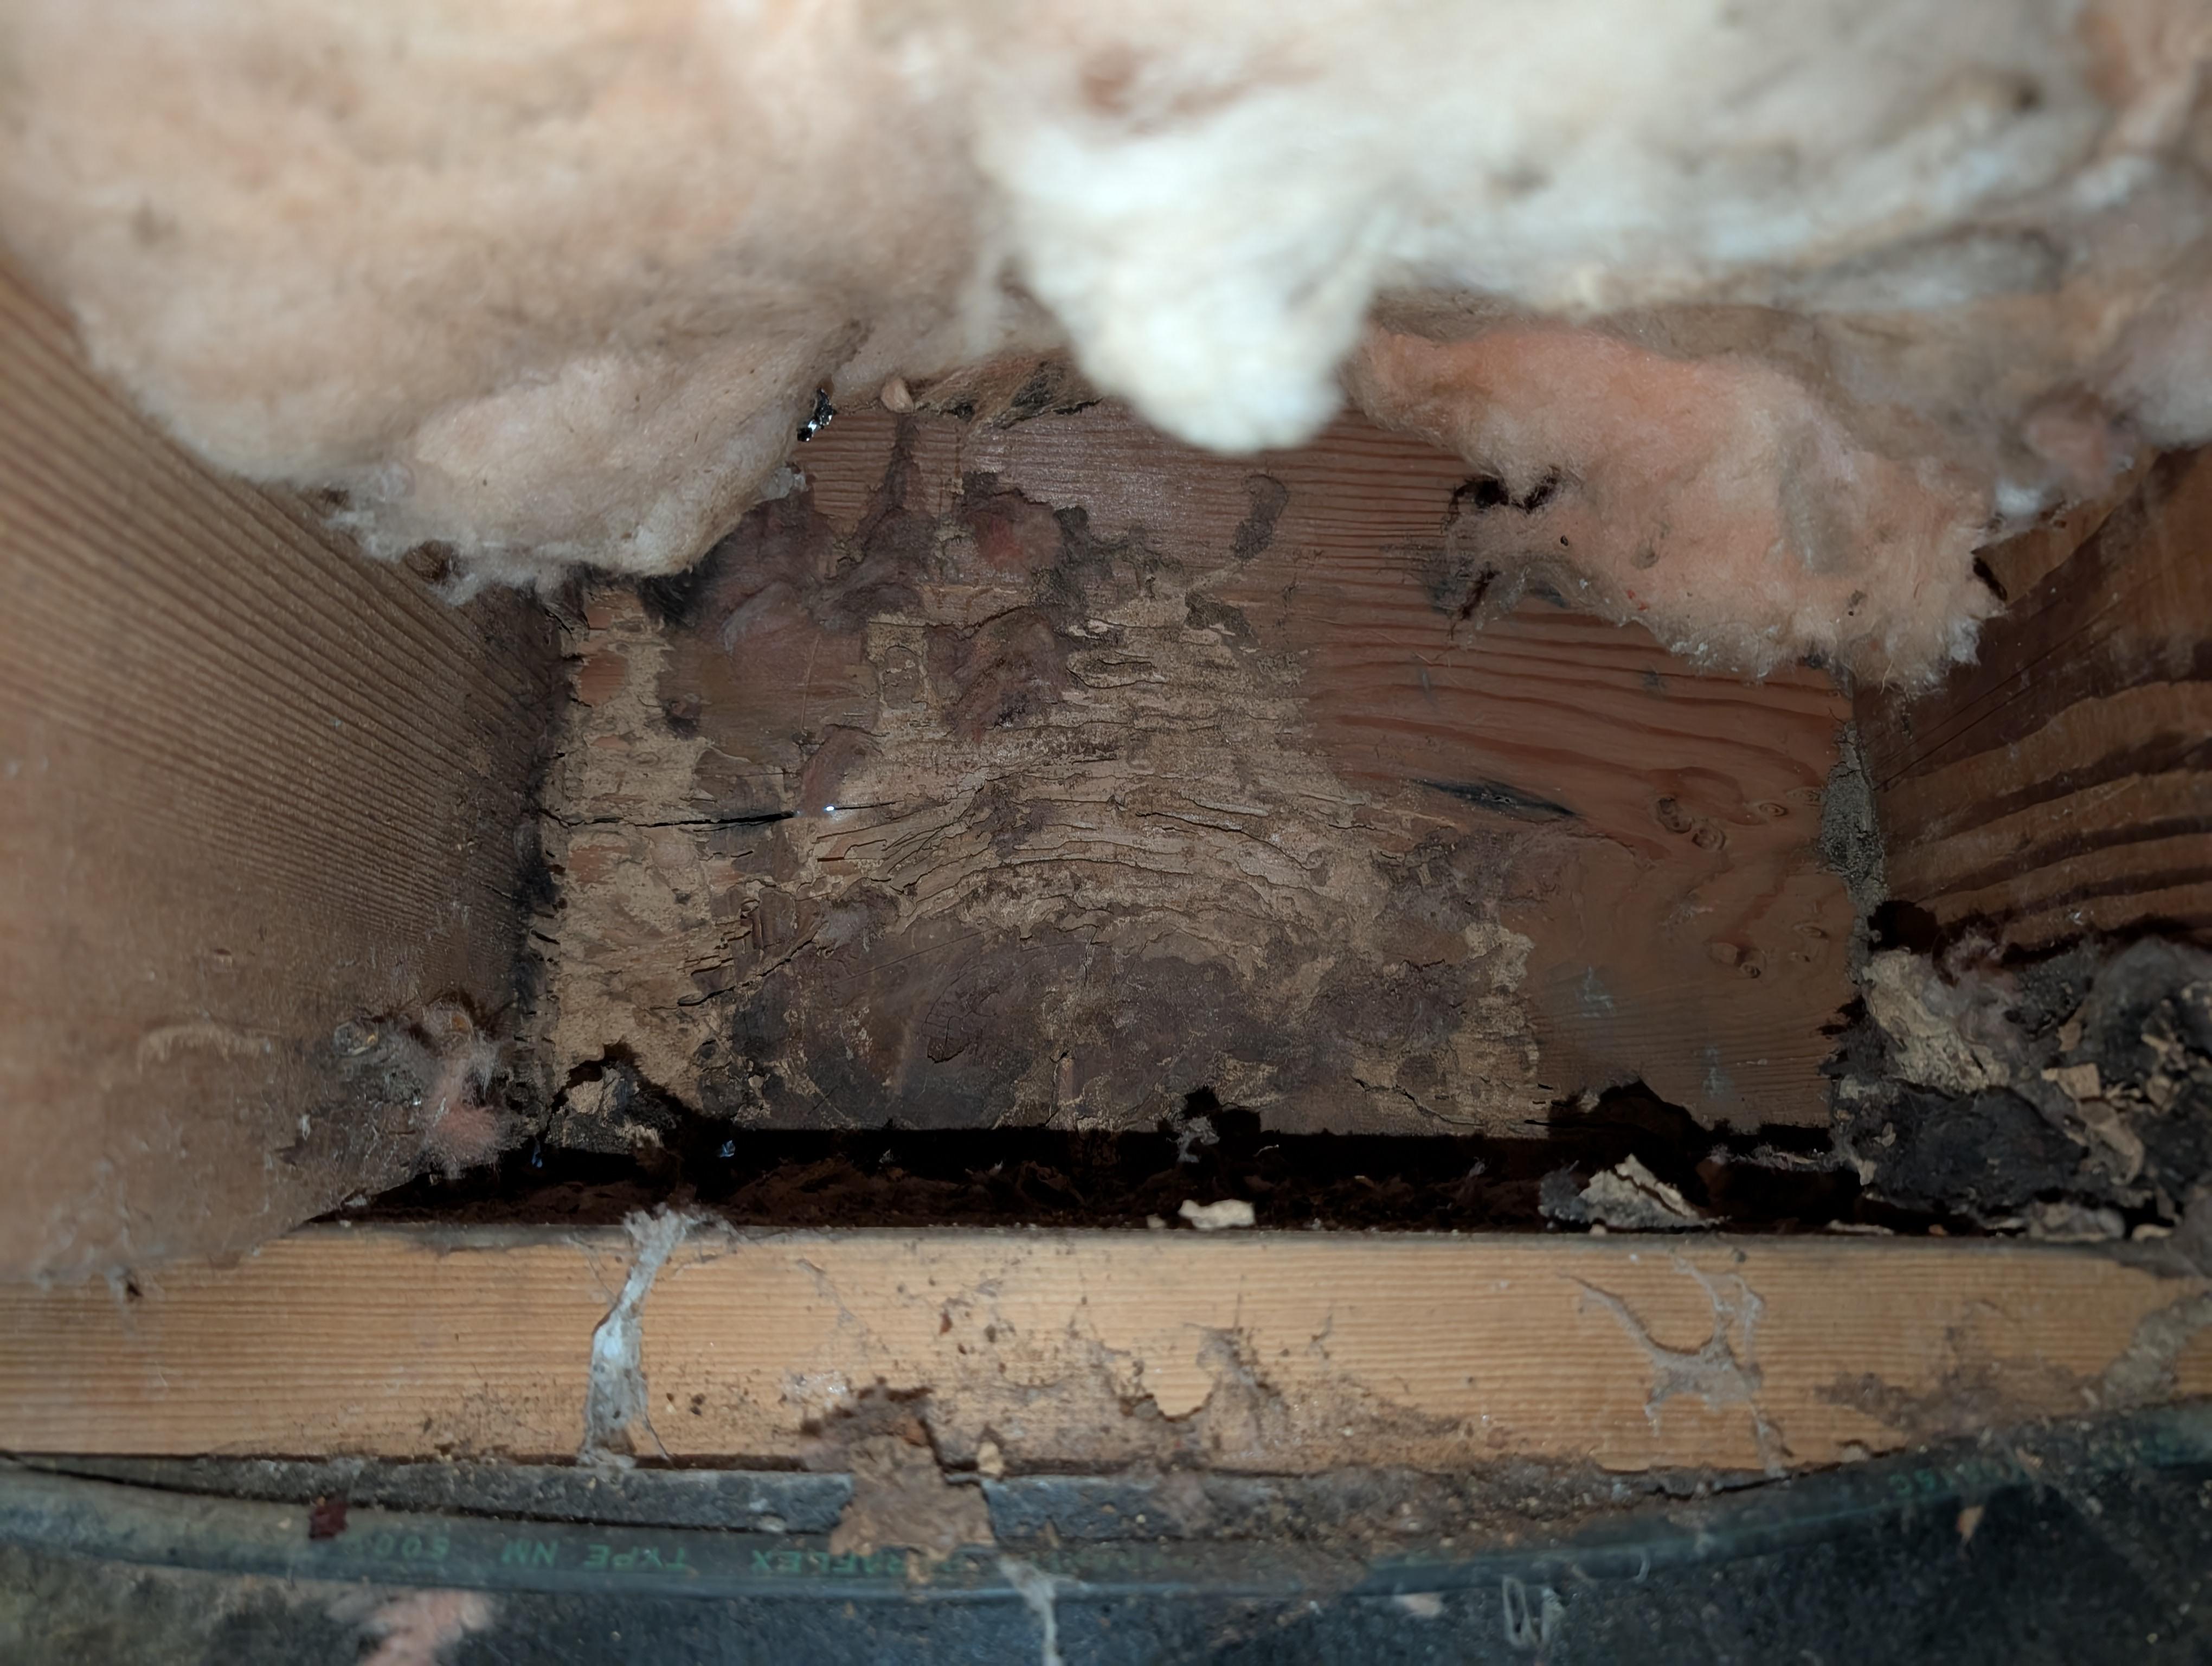
Is it active or old damage?
This is the most important question, because old beetle holes can stick around for decades. Treating inactive damage wastes time and money.
Quick ways to check for activity
- Clean and watch: Vacuum the frass, wipe the surface, and check again over 1 to 3 weeks. Fresh powder is a strong sign of activity.
- Tape test: Put a small piece of painter’s tape under a cluster of holes (or on a flat surface below). If new frass appears on the tape, something is still emerging.
- Look for seasonal patterns: New activity often shows up in spring through late summer.
- Probe the wood: If a screwdriver easily sinks in or the wood feels hollow, damage may be extensive even if activity is unclear.
My rule of thumb: If you are seeing new frass, treat it as active until proven otherwise.
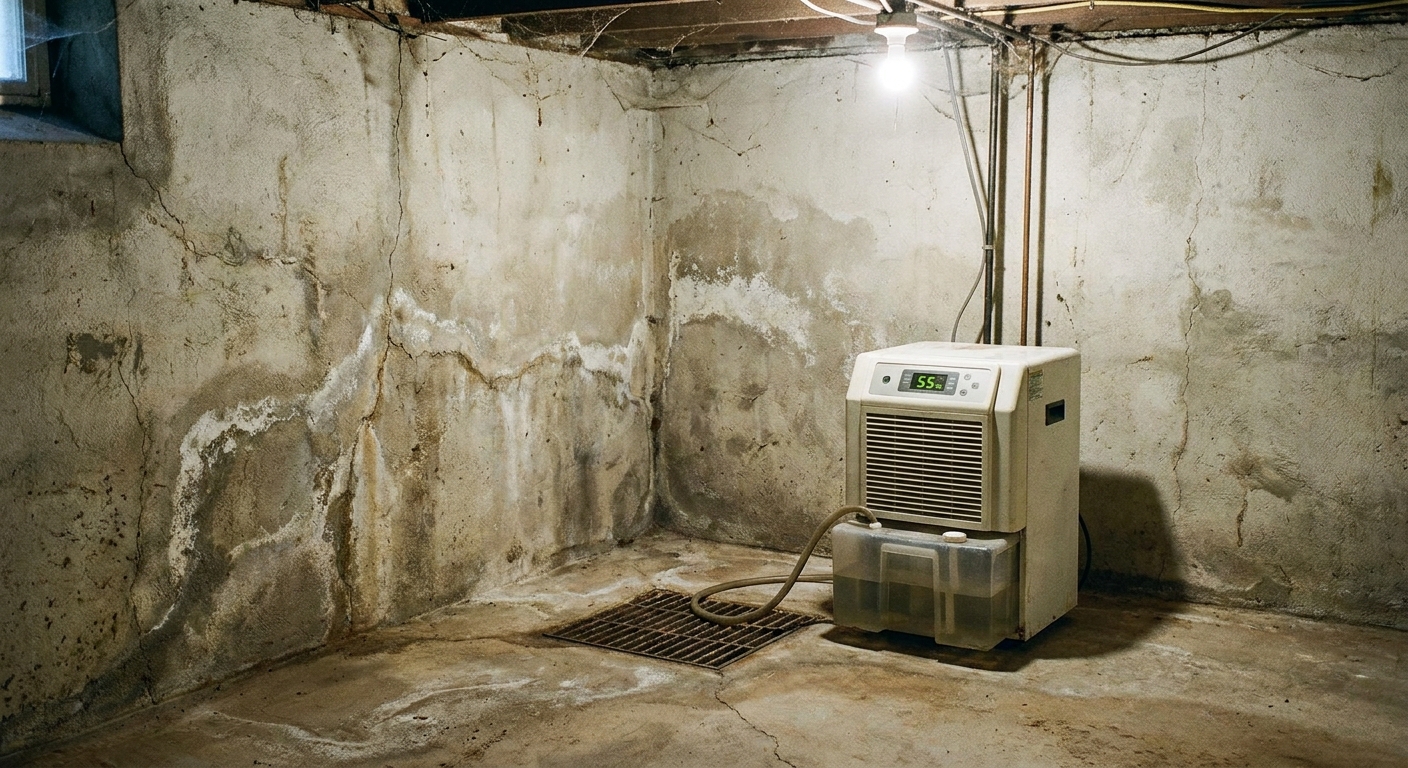
Why moisture still matters
Moisture is a big lever you can actually control, but it is not the whole story for every beetle group. Anobiids are especially tied to damp conditions, while lyctids can infest relatively dry hardwood sapwood. In real life, though, keeping your home dry reduces risk across the board and helps prevent reinfestation.
Typical moisture targets
- Indoor relative humidity: A common comfort and building-health target is about 35 to 55 percent.
- Wood moisture content: In conditioned spaces, framing lumber often sits roughly in the 8 to 12 percent range. When wood stays higher for long periods, risk tends to climb.
Fixes that actually move the needle
- Run a dehumidifier in basements and crawlspaces, and route the drain so it truly runs hands-off.
- Fix bulk water first: plumbing leaks, foundation seepage, wet crawlspace soil, clogged gutters dumping near the foundation.
- Improve airflow: do not pack storage tight against joists, and consider better ventilation where appropriate.
- Seal exposed soil in crawlspaces with a proper vapor barrier.
DIY vs pro: choosing the right treatment
There are three broad approaches: localized treatment (DIY-friendly in some cases), whole-structure fumigation (pro-only), and removal and replacement (DIY or pro depending on what the wood is doing structurally).
DIY is reasonable when
- Damage is limited to a small, accessible area (exposed joists, unfinished beams, accessible trim).
- You can confirm activity and track whether it stops.
- The wood is not structural-critical, or a pro has confirmed it is still sound.
- You can correct the moisture problem (if any) that allowed the infestation.
Call a pro quickly when
- Exit holes and frass show up in multiple rooms or across different levels of the home.
- The suspected source is inside finished walls or ceilings you cannot access.
- You have hardwood flooring involved and cannot easily replace sections.
- You see signs of structural weakening (sagging, cracks, punky joists, bouncy floors). If structural members are in question, consider a structural professional as well.
- You need certainty for a real estate sale or insurance situation.
DIY safety note: Always follow label directions and local regulations. Some products and methods are restricted or best left to licensed pros.
Localized treatment options
Borates for raw, unfinished wood
For accessible, unfinished wood, borate-based products are a common go-to because they penetrate and remain in the wood, helping kill larvae and deter reinfestation. They are not magic on sealed, painted, or varnished surfaces because they cannot soak in.
- Best for: exposed joists, subfloor from below, unfinished beams, crawlspace framing.
- Not great for: finished furniture, sealed floors, painted trim unless stripped.
- How it is applied: usually by brush, spray, or foam according to label directions.
Thrifty DIY tip: Prep matters more than people think. Vacuum dust, knock down cobwebs, and treat bare wood evenly. Spot-spraying one visible hole is rarely enough because the larvae are deeper than the surface.
Targeted injection
Some products are designed to be injected into holes. This can be useful for small, isolated areas, but it is easy to get a false sense of victory. You might kill an adult that was about to emerge, while larvae elsewhere keep feeding.
- Best for: small infestations where you can treat the surrounding wood, not just the holes.
- Limitations: you rarely know where all the galleries run.
Heat treatment
Powderpost beetles can be killed with sustained high temperatures, but the key word is sustained. The wood core needs to reach a lethal temperature long enough to kill larvae, not just warm up on the surface. Pros typically use monitored sensors to confirm core temperatures and hold times.
- Best for: localized situations a pro can control, or small items that can be heated safely.
- Risks: fire hazards and damage to finishes or adhesives when done improperly.
Freezing small items
For small, movable items (some furniture, decor, small lumber pieces), freezing can be a safe DIY option. The catch is you need cold temperatures long enough to reach the core, and you have to manage condensation when you bring the item back to room temperature.
- Best for: small, non-structural items you can bag and freeze.
- Tips: seal the item in a bag before freezing to limit moisture and mess, then let it warm up slowly while still sealed to reduce condensation on the wood.
What to skip
- Surface-only sprays on finished wood if they cannot penetrate. They may kill an occasional adult but will not reach larvae.
- “Seal it up” as the only plan. Paint and polyurethane can trap frass and hide the problem, not solve it.
When fumigation makes sense
Fumigation is typically considered when the infestation is widespread, hidden, or impossible to reach with localized treatments. It is also the most disruptive option, so it is usually not the first step unless the scope demands it. This is a licensed-professional job.
Signs you may need fumigation
- Multiple active areas across the home.
- Active infestation in finished, inaccessible cavities.
- Hardwood floors or other large finished surfaces where you cannot realistically strip or access the wood.
- A pest professional has identified a species or pattern that is unlikely to be solved with spot treatments.
What fumigation does well: it can reach places liquid treatments cannot and kills insects present at the time of treatment. What it does not do: it does not fix moisture problems and it generally does not leave residual protection in the wood. If conditions stay beetle-friendly or you bring in new infested wood, reinfestation is possible.
When replacing wood is smartest
Sometimes the best pest control is a pry bar and a plan. If wood is badly damaged, replacing it can be safer, faster, and more final than repeated treatments.
Replace wood when
- The piece is structural and has lost strength (joists, beams, load-bearing studs).
- The wood is crumbly, hollowed, or extensively tunneled.
- The infestation is in a small, discrete component like a few boards of trim, blocking, or shelving.
- You cannot treat effectively because the surface is sealed and inaccessible, but the component is practical to remove.
Important: Bag and dispose of removed wood responsibly. Do not stack it in the garage “for later,” because later tends to become next season’s reinfestation.
Prevention basics
Once you get control, prevention is mostly about not reintroducing the problem and not creating beetle-friendly conditions.
- Inspect and quarantine questionable furniture or lumber, especially if it comes from a barn, garage, or estate sale.
- Store lumber off concrete and out of damp basements and crawlspaces.
- Seal or finish wood after you are confident activity is gone. This is especially helpful with hardwoods that attract lyctids.
- Keep humidity boring and consistent, especially in basements and crawlspaces.
Step-by-step plan
If you just want a clear checklist, this is the order I recommend.
1) Confirm and document
- Take close-up photos of holes and frass.
- Mark the date and the exact location.
- Vacuum frass and set a reminder to recheck.
2) Fix conditions
- Stop leaks, run a dehumidifier, improve drainage and airflow.
- If you have a crawlspace, consider a vapor barrier and humidity control.
3) Choose a treatment path
- Small and accessible: consider localized borate treatment on unfinished wood, and monitor.
- Structural concern: get a professional evaluation and plan for reinforcement or replacement.
- Widespread or inaccessible: schedule a pest pro to discuss whole-house options, including fumigation if warranted.
4) Recheck for activity
- Look for new frass weekly for a month, then monthly through warm seasons.
- Keep humidity in check long-term.
If you have ever tried to “DIY your way out” of a moisture issue without actually measuring humidity, you are not alone. I did that early on in my 1970s ranch. The turning point for me was treating humidity like a number, not a vibe. Once the basement stayed dry, wood problems in general got much easier to control.
Frequently asked questions
Are powderpost beetles dangerous to people?
They are not typically harmful to people in the way stinging insects are. The risk is to wood materials and potentially to structural integrity if the infestation is severe and left untreated.
Can they spread from furniture to my house?
It can happen, especially if infested items contain live larvae and the conditions are right. Quarantine questionable pieces, watch for new frass, and avoid storing suspect furniture in damp basements or crawlspaces.
Will painting or sealing the wood stop them?
Sealing can make it harder for new beetles to lay eggs on bare wood, but it does not reliably kill existing larvae deep inside. Use sealing as a finishing step after you are confident the infestation is addressed and moisture is controlled.
How long does it take to know treatment worked?
You are watching for no new frass and no new holes over time. Because beetle life cycles can be long, monitoring through at least one warm season is a smart, cautious approach.
When in doubt, get an expert ID
If you are on the fence, hire a licensed pest professional to identify the insect and the scope. Proper identification can save you from over-treating, under-treating, or missing a moisture issue that will keep the problem alive.
And if you want to stay in DIY territory, ask the pro for two things: what group or species they suspect, and what condition (moisture, unfinished wood, access) is making the wood attractive in the first place. Those answers guide everything that comes next.
About Marcus Vance
Content Creator @ Grit & Home
Marcus Vance is a lifelong DIY enthusiast and self-taught home renovator who has spent the last decade transforming a dilapidated 1970s ranch into his family's dream home. He specializes in budget-friendly carpentry, room-by-room renovations, and demystifying power tools for beginners. Through his writing, Marcus shares practical tutorials and hard-learned lessons to help homeowners tackle their own projects with confidence.