
If you are hearing thumps at night, finding your trash scattered like a confetti cannon went off, or catching a masked face on your security cam, you are not alone. Raccoons are smart, stubborn, and shockingly strong. The good news is you can usually solve the problem without harming them, as long as you tackle it in the right order: confirm activity, remove attractants, use deterrents, then seal up the house so they cannot come back.
One quick safety note from a guy who has crawled through more attics than I care to admit: raccoons can carry diseases and parasites, and a cornered raccoon can bite. If you suspect babies in the attic or you see an animal acting oddly aggressive or disoriented, skip DIY attempts and call a pro.
Signs You Have Raccoons
Common signs in the yard
- Trash raids: tipped cans, torn bags, pulled-out scraps. Raccoons often return on the same nights once they learn your schedule.
- Digging in sod or mulch: shallow holes where they are hunting grubs and insects, especially after rain.
- Raided bird feeders: feeders pulled down or emptied overnight, pole baffles defeated.
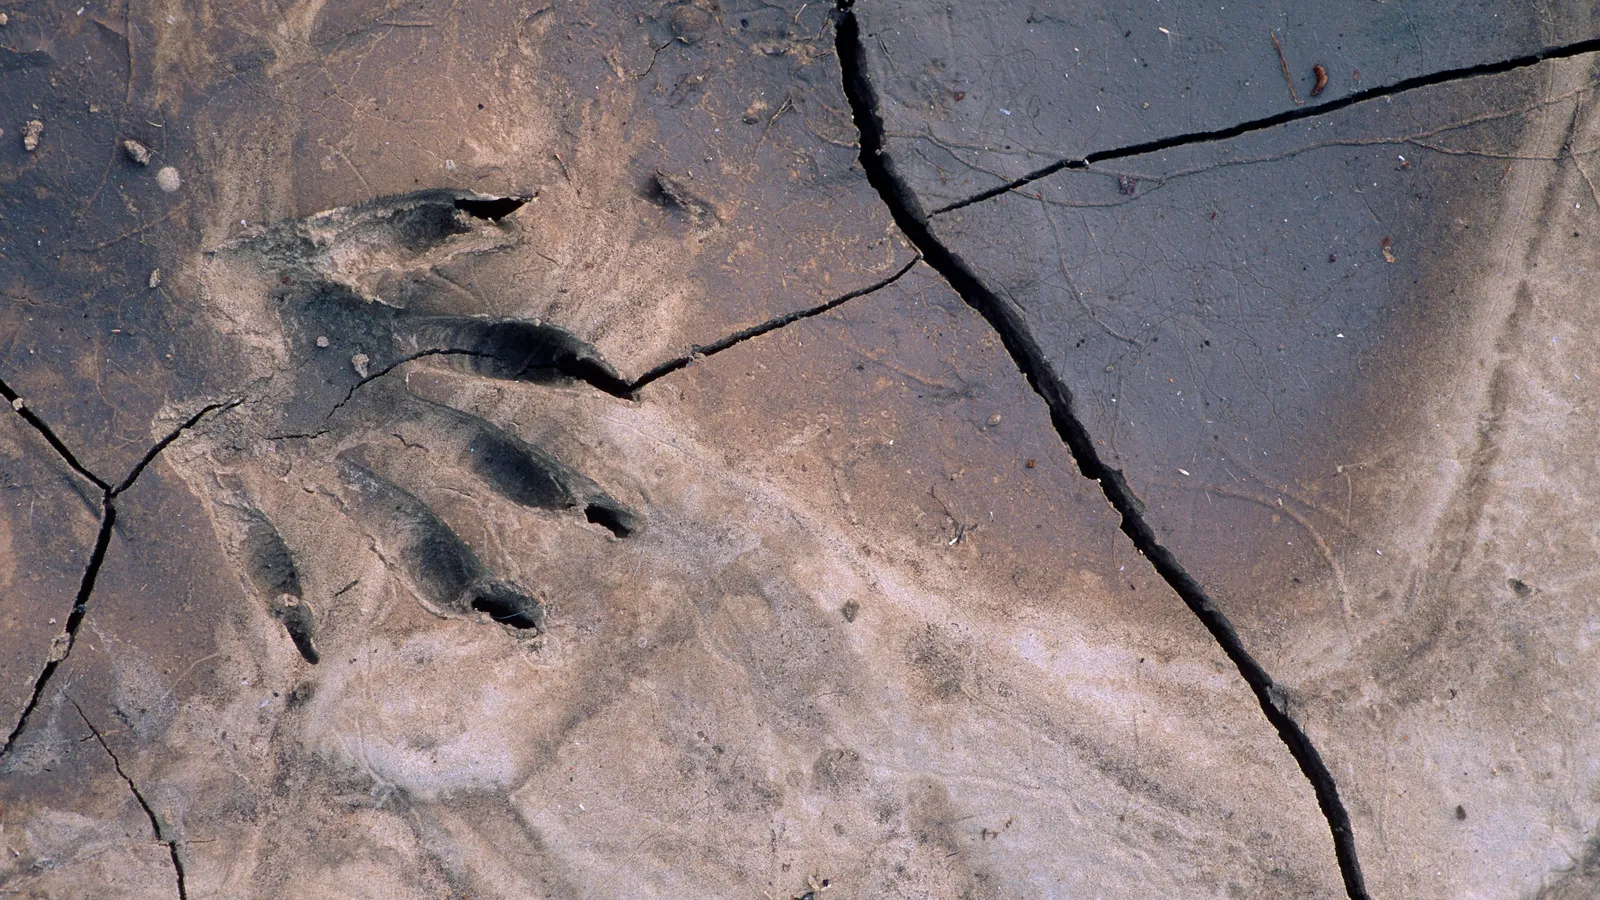
- Tracks: hand-like prints with five toes, often near muddy areas, around downspouts, and along fences.
- Droppings: raccoon poop is often dark and tubular. It may contain seeds or berry bits depending on diet.
Common signs in the attic or crawl space
- Heavy footsteps at night: louder and slower than squirrels, often a steady walk pattern instead of rapid scurrying.
- Scratching and chattering: especially around dusk and before dawn.
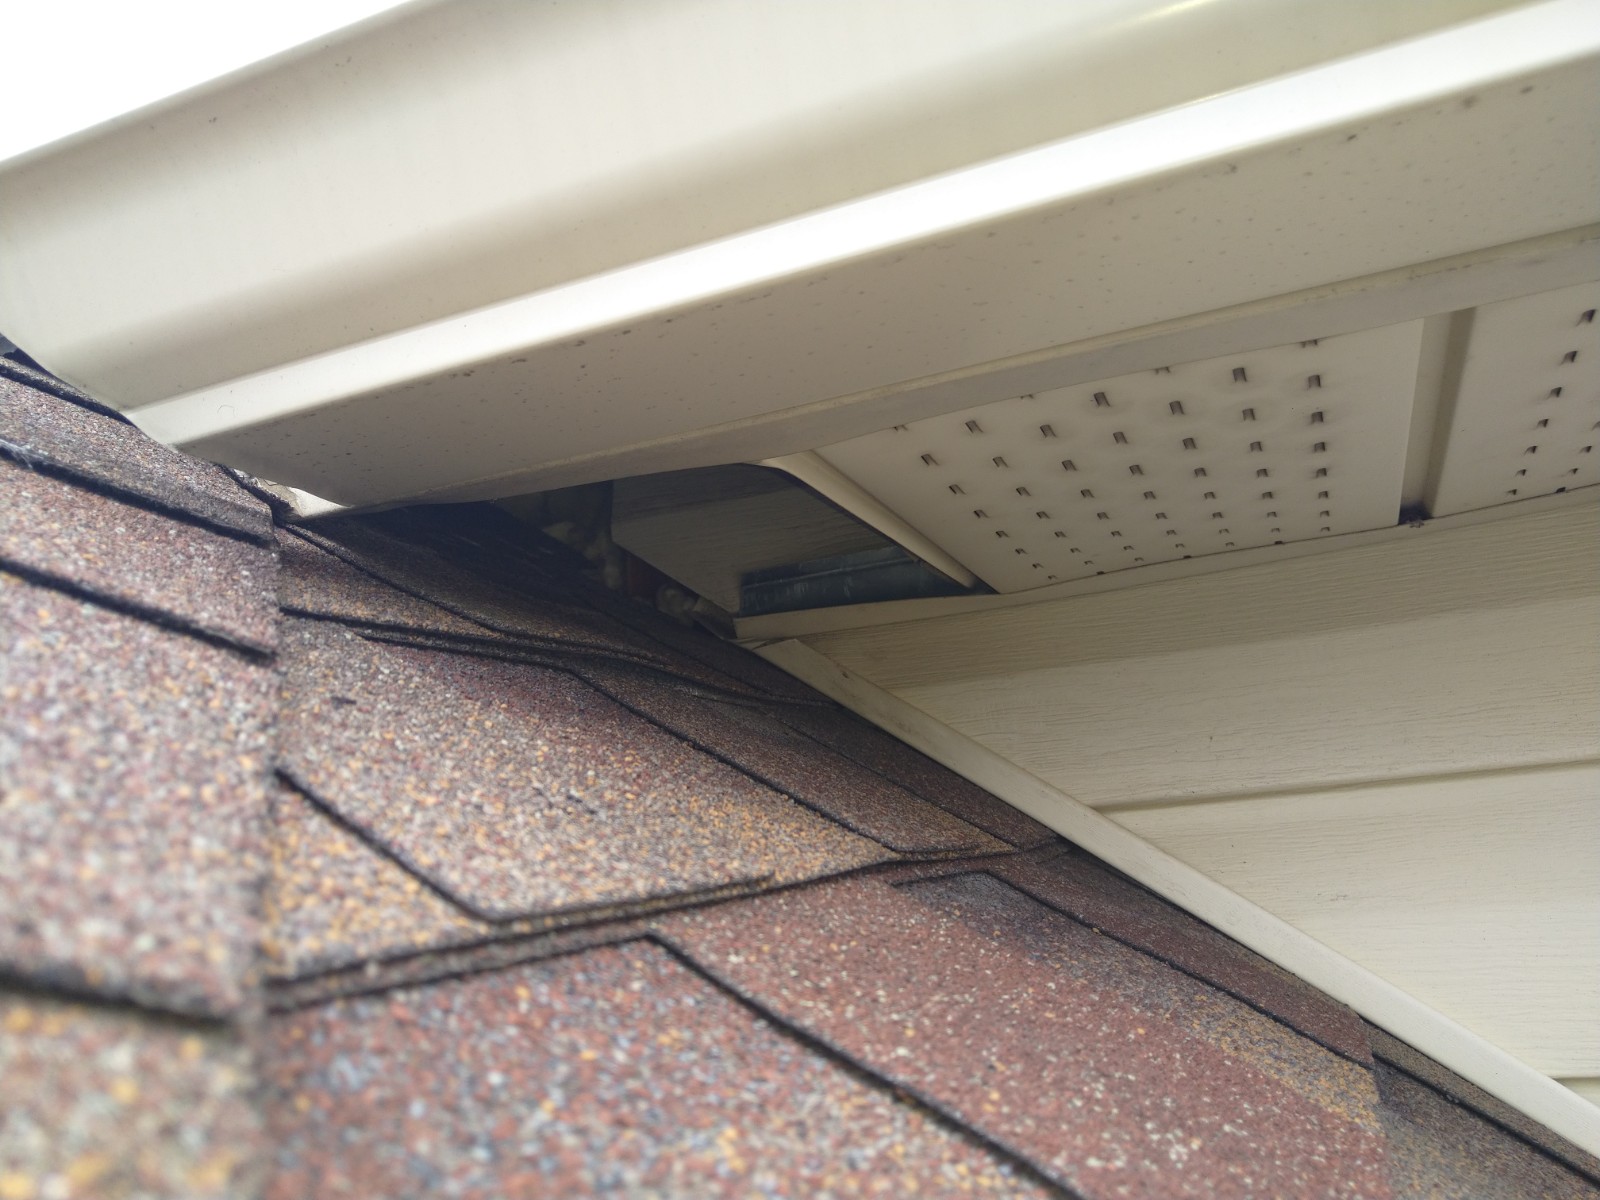
- Stained soffits or damaged vents: bent louvers, torn screening, separated soffit panels, roof edge damage.
- Strong odors: urine, musky smell, or the smell of trash inside the structure.
- Insulation damage: compressed insulation paths, torn vapor barrier, or nesting material.
Health and Safety
I know it is tempting to march into the attic with a flashlight and “handle it.” Please do not. Treat raccoon cleanup and exclusion like you would treat mold or sewage: use protection and keep your distance.
- Wear: thick gloves, long sleeves, eye protection, and a properly fitted respirator (N95 minimum, P100 is better for dusty insulation and droppings). This matters because raccoon droppings can carry raccoon roundworm (Baylisascaris procyonis).
- Keep pets inside: raccoon droppings can contain parasites and dogs love to investigate the worst things.
- Do not seal anything yet: if raccoons are still inside, sealing first can trap them, or worse, separate a mother from kits.
- Watch for “latrines”: raccoons sometimes use the same spot repeatedly. Avoid disturbing droppings until you are ready to clean safely.
Step 1: Remove Attractants
In my experience, deterrents often work much better once the buffet is closed. Raccoons are opportunists. If dinner is easy, they will tolerate a lot of inconvenience to keep getting it.
Lock down trash and recycling
- Use a locking lid or secure the lid with a bungee hooked to the handle. Raccoons have surprisingly good hands.
- Rinse cans and avoid putting meat scraps out overnight if possible.
- Store in a garage or shed the night before pickup if you can.
Remove easy food sources
- Bring pet food indoors, including outdoor cat food.
- Pause bird feeding for a couple weeks if the feeder is getting hit at night. Clean spilled seed underneath.
- Pick up fallen fruit from trees daily during the season.
- Secure compost with a tight lid and avoid meat, grease, and dairy.
Reduce water sources
- Fix dripping hose bibs, keep kiddie pools empty at night, and consider a motion-activated sprinkler near problem areas.
Step 2: Yard Deterrents
Deterrents work best as a layered setup. Think like a raccoon: if your yard feels bright, loud, unpredictable, and unrewarding, it is not worth the effort.
Motion lights and cameras
- Install a bright motion light near trash storage, along fence lines, and by deck stairs.
- A camera is not a deterrent by itself, but it helps you confirm time of activity and entry routes.
Motion-activated sprinklers
These are one of my favorite humane tools because they add surprise without causing harm. Place them to cover the approach route to trash cans, gardens, or pond edges.
Ammonia (results vary)
Homeowners often suggest ammonia because the smell can mimic predator urine. Sometimes it helps, sometimes raccoons ignore it. If you try it, do it safely and do not rely on it as your only move.
- Soak rags in ammonia and place them in a ventilated container with holes punched in the lid, then set near the problem area.
- Do not mix ammonia with bleach or other cleaners.
- Keep it away from kids and pets, and do not use it in occupied or poorly ventilated areas. Do not use it in a sealed attic space where fumes can build up.
Trim access points
- Trim branches back 6 to 10 feet from the roofline where possible.
- Move firewood piles away from the house and keep them neat so they are less inviting as shelter.

Step 3: Get Them Out
If raccoons are in the attic, your goal is simple: convince them to leave, confirm they are out, then close the door behind them.
Check for kits first
In many areas, raccoons have kits in spring and early summer, but timing varies. Signs include repeated chittering sounds, a mother coming and going at consistent times, and concentrated activity at one entry point.
If you suspect kits, I recommend calling a licensed wildlife control operator. Humane reunification and eviction is possible, but it is easy to get wrong. Also, avoid installing a one-way door if kits may be inside since it can lock the mother out.
Encourage an exit
- Light and noise: set a work light in the attic near the nest area and play a talk radio station at a moderate volume. Do not blast it. The goal is “uncomfortable,” not “panic.”
- One-way door: a pro-style one-way exclusion door over the entry hole lets animals leave but not re-enter. This is the cleanest method when installed correctly and when you are confident there are no kits inside.
- Timing: begin the eviction process in the evening when the animal is naturally active.
Confirm they are gone
- Use a camera aimed at the entry point, or lightly tape a piece of paper over the hole to see if it moves overnight.
- As a rule of thumb, wait at least 72 hours with no activity before you seal. Raccoons can hunker down during bad weather, so visual confirmation beats guesswork.
Step 4: Seal It Up
Exclusion is the long-term fix. Deterrents might convince a raccoon to move next door, but sealing prevents a repeat visit next season.
Find the entry points
Common raccoon entry spots:
- Loose or rotted soffit panels
- Gable vents with weak screening
- Roof returns and fascia corners
- Chimney tops without a proper cap
- Crawl space vents and damaged access doors
- Gaps at roof decking edges, especially after storm damage
Use tough materials
- Galvanized hardware cloth (at least 16 gauge; typically 1/2 inch openings, and 1/4 inch may be better for some vents and rodent-proofing)
- Metal flashing for chewed or pried edges
- Exterior-grade screws with washers to secure mesh
- Wood repair where rot is present, because raccoons will exploit soft spots
Avoid relying on foam alone for animal exclusion. Foam is great for air sealing, but animals can claw through it. If you use foam, back it with metal mesh.
Install a one-way door, then seal
- Cover the main opening with a one-way door or professional exclusion device (only when you are confident there are no kits inside).
- Seal secondary gaps first (vents, corners, nearby loose soffit sections).
- After at least 72 hours with no activity and you have visual confirmation they are out, remove the one-way door and seal the primary opening with hardware cloth and a durable exterior repair.
Final walk-around
I like to do one more loop around the house at dusk with a flashlight. Look for daylight gaps, bent vent screens, and fresh rub marks. Catching one missed corner now is way cheaper than another attic invasion later.
Cleanup Afterward
Even a short stay can leave behind urine, droppings, and ruined insulation. If the attic has heavy contamination, a remediation company is often worth it. For small, localized messes, careful DIY cleanup is possible.
DIY cleanup basics
- Wear gloves, eye protection, and a respirator (P100 is preferred). Raccoon droppings can contain Baylisascaris procyonis (raccoon roundworm).
- Lightly mist droppings with water to reduce dust before you handle them.
- Do not dry sweep or use a regular shop-vac on droppings. If vacuuming is necessary, use a HEPA-rated setup designed for hazardous dust.
- Bag waste in heavy-duty trash bags and seal tightly.
- Replace soaked or flattened insulation. Compressed insulation does not perform well.
- Disinfect hard surfaces using an appropriate disinfectant per label directions.
If you discover a large raccoon latrine, widespread insulation damage, or strong persistent odor, consider calling a professional. This is one of those times where “thrifty” can become “expensive” if you miss contamination. If you want official guidance for your area, your local health department can point you in the right direction.
When to Call a Pro
I love a good DIY fix, but here is my honest line in the sand. Call a licensed wildlife control operator if:
- You suspect kits in the attic or wall cavity.
- The raccoon is inside living space, trapped, or acting aggressive.
- You cannot safely access the roof or entry point.
- You see repeated re-entry after attempted sealing.
- You have significant contamination that needs specialized cleanup.
Also check your local rules. Many areas restrict trapping, relocation, or handling wildlife, and DIY trapping can be illegal. A reputable pro will know what is legal and humane where you live.
Prevention Tips
- Upgrade trash storage: locking cans, keep them clean, store in a secured area when possible.
- Cap the chimney: use a proper chimney cap installed to code. Before capping, confirm nothing is actively nesting inside.
- Reinforce vents: replace flimsy screening with hardware cloth secured with screws and washers.
- Repair wood rot: soft fascia and soffit boards are basically an invitation.
- Trim back access: keep branches and trellises away from the roofline.
- Seasonal checkups: walk the perimeter each spring and fall looking for new gaps after storms.
Common Mistakes
- Sealing too early: trap an animal inside and you are buying yourself a bigger problem.
- Using poison or mothballs: unsafe, often illegal, and can lead to dead animals in walls. Mothballs are a pesticide product and using them off-label is risky.
- Skipping the “why”: if trash, pet food, or bird seed is still easy to access, deterrents are an uphill battle.
- Using flimsy screen: if you can bend it with your fingers, a raccoon can bend it with enthusiasm.
Quick FAQ
Will mothballs or poison get rid of raccoons?
I do not recommend either. Poisons are dangerous, often illegal for wildlife, and can lead to a dead animal inside your walls. Mothballs are a pesticide product and using them in ways not on the label can be unsafe. Stick to humane deterrents and proper exclusion.
Do raccoons come back after you remove them?
Yes, if the entry point and attractants remain. That is why exclusion and trash control matter more than any single repellent.
What is the most effective long-term solution?
Exclusion: get them out, then seal all access points with durable materials. Pair that with secured trash and you will eliminate most repeat problems.
About Marcus Vance
Content Creator @ Grit & Home
Marcus Vance is a lifelong DIY enthusiast and self-taught home renovator who has spent the last decade transforming a dilapidated 1970s ranch into his family's dream home. He specializes in budget-friendly carpentry, room-by-room renovations, and demystifying power tools for beginners. Through his writing, Marcus shares practical tutorials and hard-learned lessons to help homeowners tackle their own projects with confidence.