Rats are not a “wait and see” problem. They reproduce quickly, contaminate food and surfaces, chew wiring and wood, and they are smart enough to avoid sloppy trap setups. The good news is you can beat them with a calm, methodical plan: confirm what you’re dealing with, shut the doors they’re using, then trap hard until activity stops.
This guide walks you through the same process I use at my own 1970s ranch when something starts scratching in the walls. We’ll cover how to tell Norway rats from roof rats, what traps actually work, what not to waste money on, and when it makes more sense to call in a pro.
First things first: make it safe
Before you start moving boxes or crawling around the crawlspace, do a quick safety setup. Rats can carry disease, and the dust from droppings can become airborne if you sweep or vacuum it dry.
- Wear protection: disposable gloves, an N95-style mask, and eye protection.
- Ventilate: open windows if you can.
- Do not dry-sweep or shop-vac droppings: spray first (see the cleanup section).
- Keep kids and pets away from traps, rodenticides, and contaminated areas.
How to tell if you have rats (not mice)
A lot of homeowners type “mice” when they really have rats. Your strategy changes with size, travel routes, and trap choice, so it’s worth confirming.
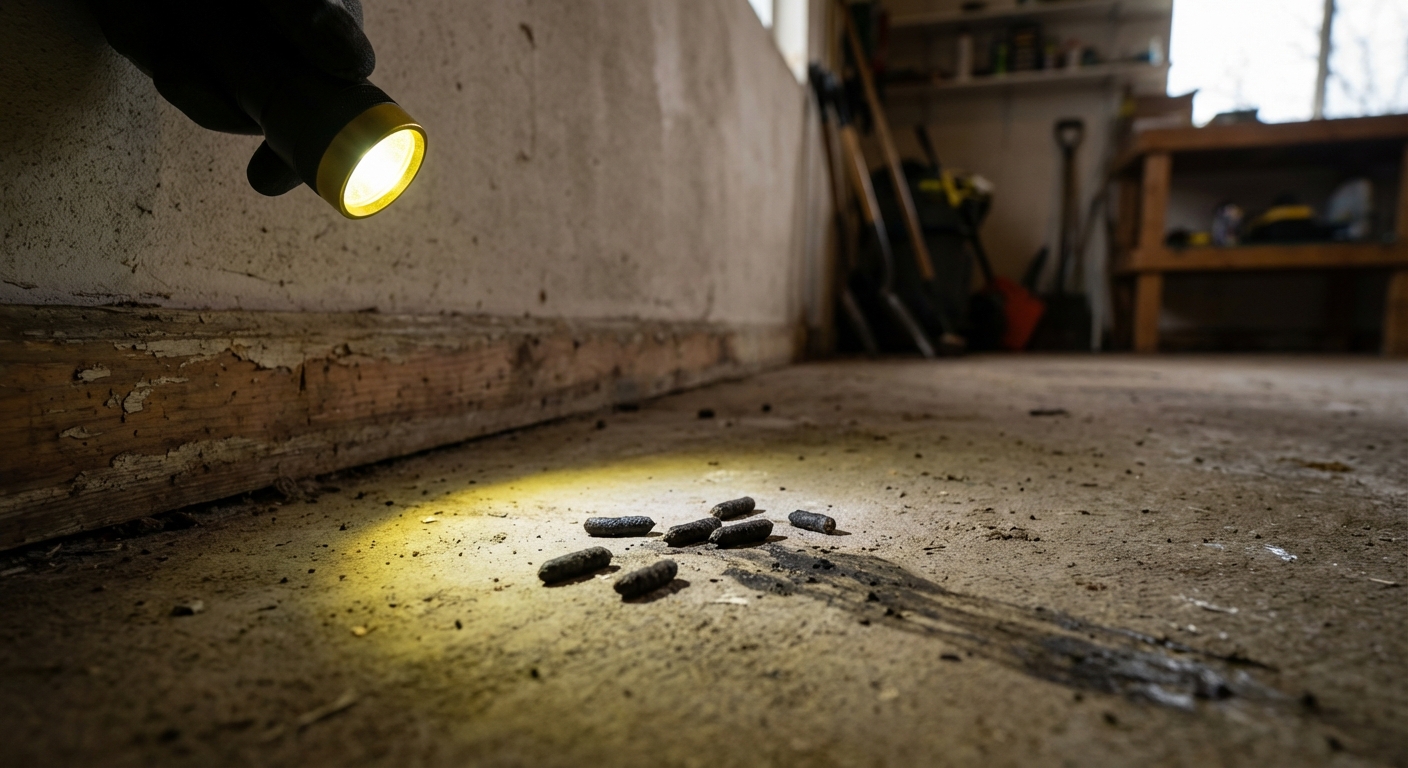
Common signs of rats indoors
- Droppings: rat droppings are usually about 1/2 to 3/4 inch. Mouse droppings are typically smaller, around 1/8 to 1/4 inch. There can be overlap, so don’t use size alone as the only clue.
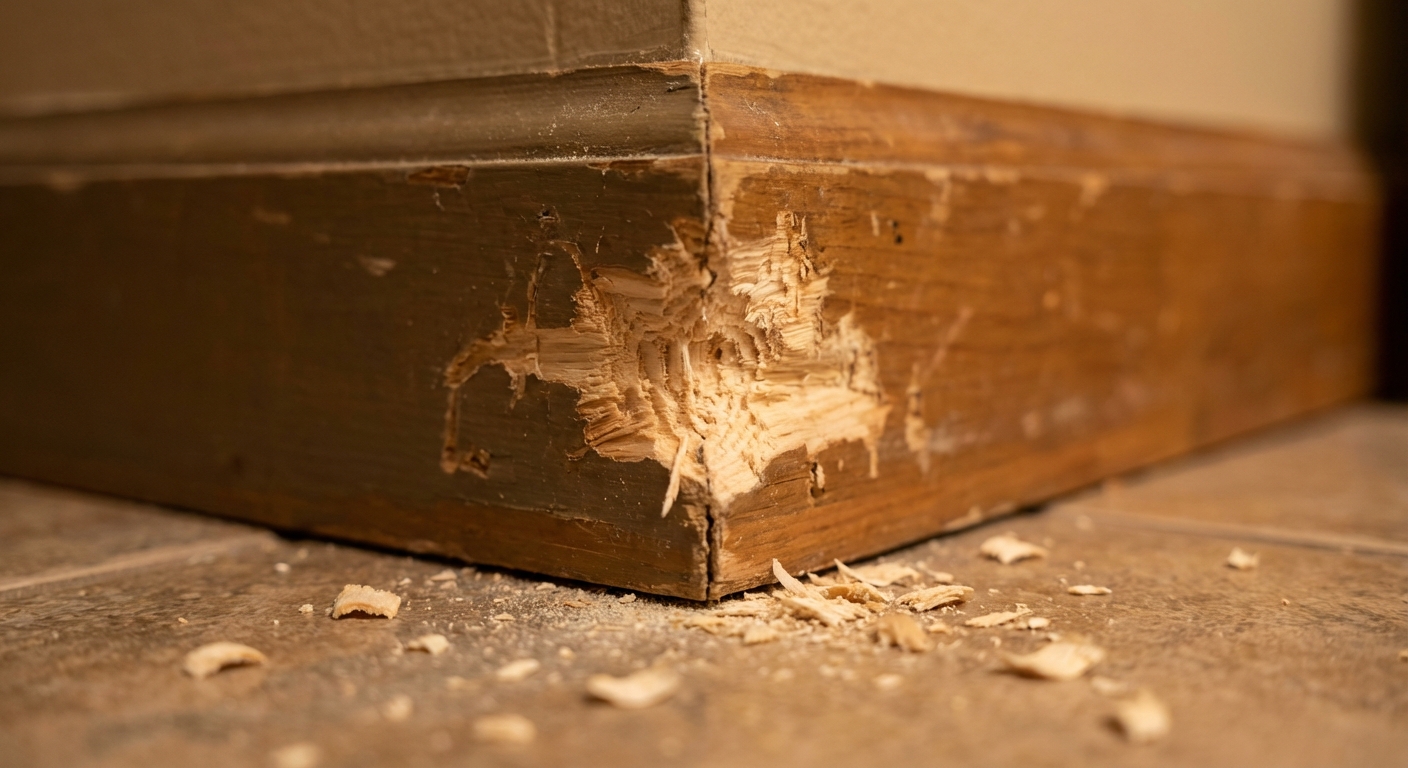
- Gnaw marks: rough, larger tooth marks on wood, plastic, or even soft metal edges.
- Grease rub marks: dark smudges along baseboards, pipes, or wall edges where they run repeatedly.
- Noises: heavier scratching, scurrying, and thumps at night, often in walls, ceilings, or under floors.
- Nests: shredded insulation, paper, fabric, or dried plant material tucked into quiet corners.
- Tracks: in dusty areas you might see footprints and a tail drag line.
Quick rat vs mouse reality check
- If droppings look like pepper grains: likely mice.
- If you hear loud movement overhead: often rats, especially roof rats in attics.
- If you see a hole the size of a quarter or larger: rats can use it. As a more specific rule of thumb, rats can squeeze through openings around 3/4 inch (and sometimes a bit smaller depending on the rat).
Norway rats vs roof rats (and why it matters)
These two behave differently, and that changes where you trap and where you focus sealing.
Norway rats (aka brown rats)
- Where they live: lower levels, basements, crawlspaces, garages, sewers, around foundations.
- How they travel: along walls and edges, usually on the ground.
- What to look for: burrows outside, activity near dumpsters, compost, pet food, or low entry points.
Roof rats (aka black rats)
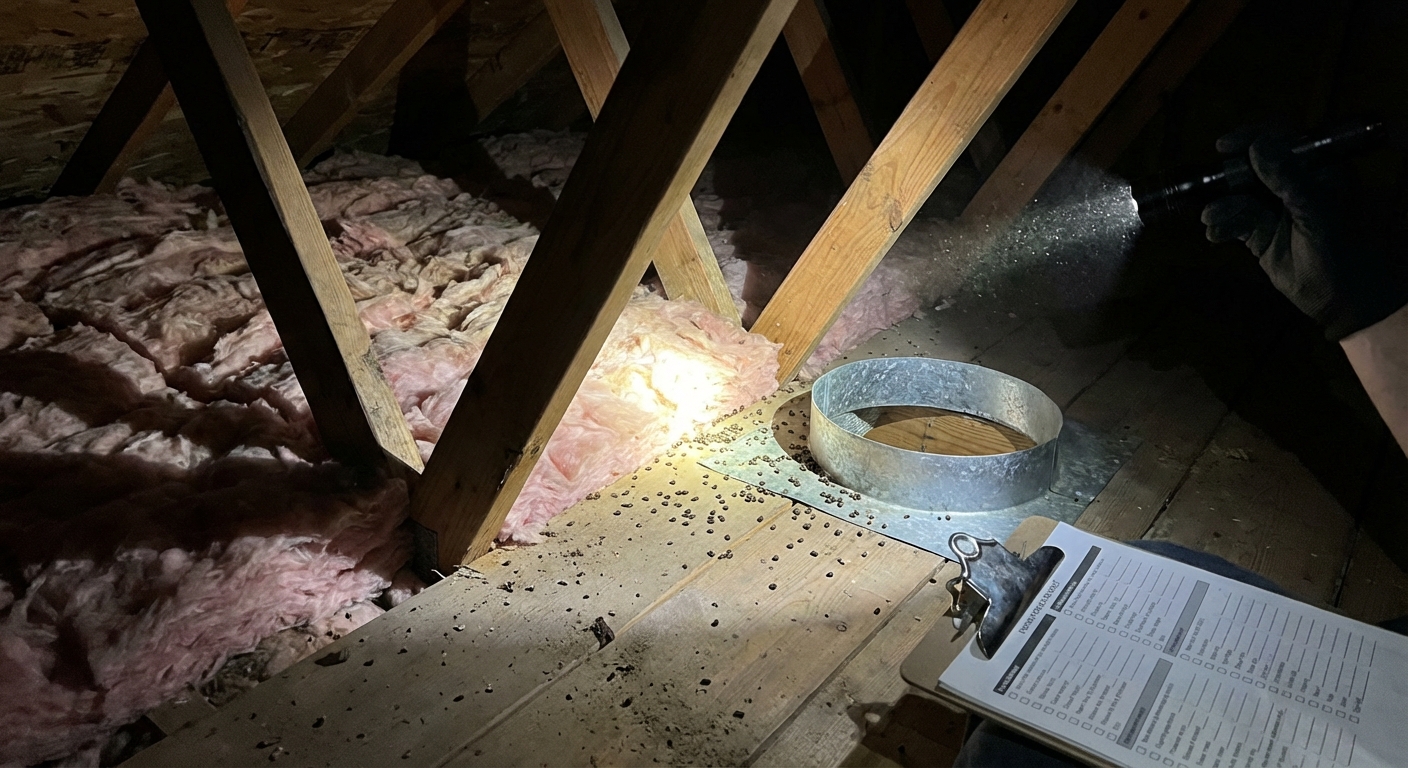
- Where they live: attics, rafters, upper cabinets, dense shrubs, trees touching the roofline.
- How they travel: climbing and running along pipes, beams, and overhead routes.
- What to look for: noises in ceiling or attic, droppings in attic insulation, rub marks along rafters, entry near roof vents and eaves.
The 4-step plan to get rid of rats
If you do these in order, you avoid the classic DIY mistake: setting traps forever while new rats keep walking in through a gap you never sealed.
- Confirm activity and map their paths
- Remove food, water, and shelter
- Seal entry points (exclusion)
- Trap aggressively until activity stops
Step 1: Map activity and find the hot spots
Rats are creatures of habit. They follow the same routes, usually tight to walls. Your job is to figure out where they are traveling and where they are getting in.
Where to inspect indoors
- Behind the fridge and stove
- Under the kitchen sink and around plumbing penetrations
- Pantry floors and lower cabinets
- Garage edges and corners, especially near stored seed, bird food, or pet food
- Basement rim joists, crawlspace access areas
- Attic (especially for roof rats)
Where to inspect outdoors
- Foundation line: cracks, gaps, missing mortar
- Door thresholds and garage door corners (including the top corners)
- Utility penetrations: AC line set, cable, gas line, hose bib
- Vents: dryer, bath fan, crawlspace vents
- Roofline: soffit gaps, roof vents, chimney flashing
- Gaps behind downspouts or where siding meets foundation
- Trees or shrubs touching the roof (roof rat highways)
Tip: Sprinkle a light dusting of flour or baby powder along suspected routes overnight. Tracks in the morning tell you exactly where to place traps. If you want a cleaner option, non-toxic tracking cards or tracking blocks can do the same job.
Step 2: Cut off food, water, and nesting material
Traps work better when the “free buffet” disappears. This is the unglamorous part, but it moves the needle.
- Store food correctly: move pantry goods to hard plastic or metal containers with tight lids. Cardboard boxes are basically an invitation.
- Pet food: feed on a schedule, then pick up bowls. Store kibble in a sealed bin.
- Water sources: rats need steady access to water. Fix leaky faucets, hose bibs, and spigots. Don’t leave pet water out overnight if you can avoid it. Dump standing water, and keep birdbaths drained or refreshed frequently.
- Trash: use lidded cans, clean residues, and keep outdoor bins closed.
- Clutter: reduce piles of paper, fabric, and boxes that can become nesting sites.
- Yard cleanup: remove fallen fruit, secure compost, and keep tall grass and dense ground cover trimmed back from the house.
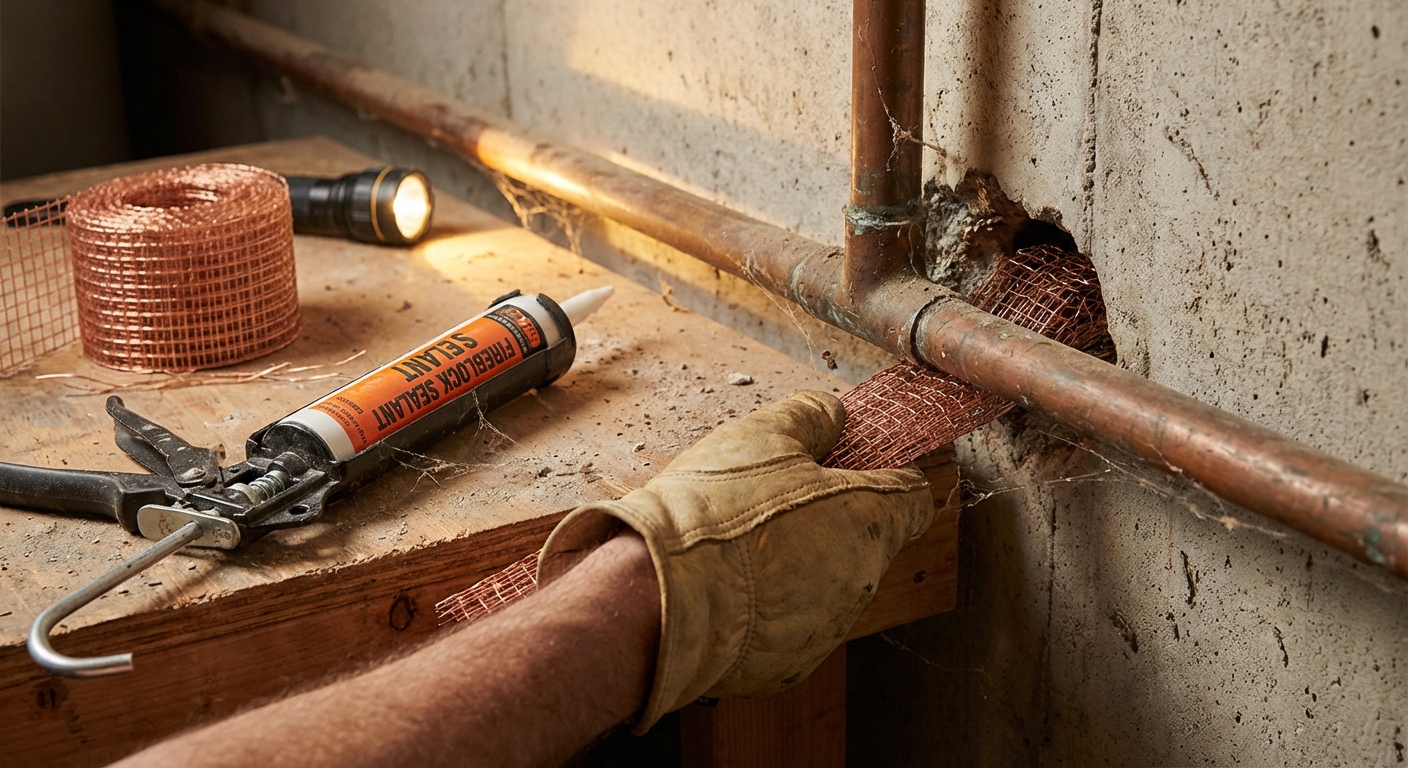
Step 3: Seal entry points (do this right)
Exclusion is what prevents the next wave. Rats can squeeze through surprisingly small gaps, roughly 3/4 inch in many cases. “Quarter-sized” is a quick mental shortcut, but the safest approach is to seal anything that looks even close.
Materials that actually work
- Steel wool or copper mesh for stuffing irregular gaps (then seal over it)
- Sheet metal for larger holes and chewed corners
- Hardware cloth (1/4 inch galvanized wire mesh) for vents and crawlspace openings
- Mortar or patching cement for foundation gaps
- Expanding foam: only as a secondary seal combined with mesh, since rats can chew foam alone
- Door sweeps and garage door threshold seals
High-payoff spots to seal
- Gaps around plumbing under sinks and behind appliances
- Openings at the rim joist in basements and crawlspaces
- Garage corners and the bottom seal of the garage door
- Dryer vent connections and damaged vent flaps
- Crawlspace vents without proper mesh
- Roof vents and soffit gaps (roof rats)
- Chimney gaps and damaged vent caps
Timing note (so you don’t trap them inside)
If you’re dealing with a heavy infestation, secure indoor food and water first, then set traps for several nights before you close up the main exterior entry holes. Otherwise you can create a messy situation where rats are stuck inside and get desperate.
Step 4: Trap effectively
I’ve made this mistake myself: one lonely trap, wrong bait, set in the middle of the floor, and then I wonder why the rat keeps winning. Rats hug edges. They investigate new objects. And big rats can steal bait without triggering a weak setup.
Best trap types for rats
- Snap traps (rat-sized): fast and effective when placed correctly. Choose traps specifically labeled for rats.
- Enclosed trap boxes or tunnels: helpful in homes with pets or kids, and they guide the rat’s approach. (These are different from rodenticide bait stations.)
- Electric traps: effective but cost more. Keep them dry and follow placement rules.
- Live traps: not my first pick indoors. Relocation may be illegal in many areas and can be ineffective, so check local rules before you go this route.
Skip glue boards for rats. They are inhumane, messy, and big rats can sometimes escape, leaving you with a worse problem.
Also skip ultrasonic repellents. In real houses, they tend to do a lot more annoying you than repelling rats.
Where to place traps
- Along walls, not out in open areas
- Perpendicular to the wall, with the trigger end closest to the wall
- In pairs in high-traffic spots (one may miss, the other gets the job done)
- Near evidence like droppings, rub marks, or gnawing
Best bait for rats
- Peanut butter (use a tiny amount and press it into the trigger)
- Chocolate or a small piece of candy
- Nuts or dried fruit
- Jerky or bacon in areas where they’re eating protein
Thrifty trick: tie a little floss or thread around the bait and the trigger. It forces a tug and improves trip rate, especially for bait thieves.
How many traps you need
More than you think. For a true rat issue, one trap is like one bucket in a flood. In a typical kitchen or garage problem, I start with 6 to 12 rat snap traps spread along the main travel edges, then adjust based on results.
Pre-baiting for trap-shy rats
If you suspect they’re avoiding traps, try this:
- Set traps unset with bait for 1 to 2 nights.
- Once bait disappears consistently, set the traps and keep everything else the same.
Strategies by rat type
Norway rat strategy (ground level)
- Trap low: basement, garage, behind appliances, along baseboards.
- Focus on foundation entry points: utility penetrations, garage door gaps, broken vents, crawlspace access doors.
- Outside pressure matters: secure trash, pick up fallen fruit, stop feeding wildlife, and keep birdseed locked up.
Roof rat strategy (high routes)
- Trap high: attic runs, on rafters or along beams where you see rub marks. Secure traps on a stable board so they do not tip, slide, or fall into insulation.
- Trim access: cut tree branches back several feet from the roof and thin dense shrubs near walls.
- Seal roofline openings: roof vents, gable vents, soffit gaps, and flashing problems.
Beginner warning: If you are not comfortable walking an attic or working near roof edges, focus on trimming vegetation and sealing accessible vents. Then consider a pro for the higher-risk work.
Cleanup and deodorizing
Even after the rats are gone, leftover droppings and urine can attract new pests and create odors. Clean safely.
How to clean droppings safely
- Ventilate the area.
- Do not dry-sweep or vacuum droppings.
- Spray droppings with disinfectant (follow the label) or a bleach solution (about 1 part bleach to 10 parts water) until damp. Let it sit for 5 minutes.
- Never mix bleach with ammonia or other cleaners.
- Wipe up with paper towels. Bag everything.
- Mop or wipe surrounding surfaces with disinfectant.
- Wash hands and launder clothing on hot.
If insulation is heavily contaminated in an attic, replacement is often the cleanest long-term fix.
Disposing of dead rats
Use gloves, double-bag the rat, and put it in a sealed outdoor bin. Wash up and disinfect any tools. Check local rules if your area has specific disposal requirements.
When bait stations or rodenticides make sense (and when they don’t)
Poison can be effective, but it comes with trade-offs that a lot of DIY articles gloss over.
- Risk of dead rats in walls: odor and flies can become your next problem.
- Secondary poisoning is possible: risk depends on the active ingredient, how it’s used, and what wildlife or pets have access to the area.
- Incorrect placement is common: and it can be dangerous around kids and pets.
If you use rodenticides, use tamper-resistant bait stations and follow the label exactly. In many homes, a serious trapping and sealing push is safer and just as effective.
When to call an exterminator
I’m all for sweat equity, but there are times when calling a pro is the smartest, cheapest move in the long run.
- You keep catching rats but signs never slow after 1 to 2 weeks
- You hear rats in multiple parts of the house (suggests multiple entry points)
- You cannot locate the entry point and droppings keep appearing
- You have rats in the attic and cannot safely access it
- You suspect a sewer-related issue or broken drain line
- Anyone in the home is immunocompromised, very young, or medically vulnerable
Ask what the company includes: inspection, exclusion work, trapping plan, follow-up visits, and warranty. “Spray and pray” services usually disappoint with rodents.
How long does it take to get rid of rats?
With solid exclusion and enough traps, you often see a noticeable drop in signs in 3 to 7 days. Full resolution can take 2 to 4 weeks, especially if there’s outdoor pressure or multiple access points.
Keep traps set for at least a week after the last sign, and keep monitoring with a quick weekly check in the usual spots (garage edges, under sink, attic access).
Quick checklist
- Confirm rats: droppings, gnawing, rub marks, sounds
- Identify type: Norway (low) vs roof rat (high)
- Remove food and water sources and reduce clutter
- Seal gaps with mesh plus a chew-proof barrier
- Set 6 to 12 rat snap traps along walls, in pairs
- Use sticky, high-value bait and consider pre-baiting
- Clean droppings safely and sanitize
- Skip ultrasonic repellents and glue boards
- Call a pro if the problem persists or access is unsafe
About Marcus Vance
Content Creator @ Grit & Home
Marcus Vance is a lifelong DIY enthusiast and self-taught home renovator who has spent the last decade transforming a dilapidated 1970s ranch into his family's dream home. He specializes in budget-friendly carpentry, room-by-room renovations, and demystifying power tools for beginners. Through his writing, Marcus shares practical tutorials and hard-learned lessons to help homeowners tackle their own projects with confidence.