
GFCI outlets are one of those upgrades that feel small until the day they matter. I still remember the first time I installed one in our 1970s ranch. I was proud of the clean finish, then immediately humbled when it would not reset because I had mixed up LINE and LOAD. If you take nothing else from this guide, take this: slow down, label your wires, and treat LINE vs LOAD like it is the whole game.
This walkthrough will help you replace a standard receptacle with a GFCI in a kitchen, bathroom, garage, basement, laundry room, or outdoor location. You will learn where GFCI is typically required, how to wire it correctly, and how to test it so you can sleep at night.
What a GFCI outlet does (in plain English)
A GFCI, or Ground Fault Circuit Interrupter, constantly checks that the electricity going out on the hot wire is coming back on the neutral wire. If it detects even a small difference (like current leaking through water, a damaged cord, or a person), it shuts off power fast.
- What it protects: People from shock in damp or wet areas.
- What it does not fix: Bad wiring, loose connections, overloaded circuits, or a missing ground in every situation.
- What the buttons do: TEST trips the outlet on purpose. RESET turns it back on after it trips.
Where GFCI is usually required
Electrical codes change over time and can vary by location. Always check your local requirements, but in most modern U.S. code cycles, GFCI protection is required in places where water, concrete, or the outdoors makes shock more likely.
Common places that need GFCI protection
- Bathrooms
- Kitchens (especially countertop receptacles)
- Laundry areas
- Garages and accessory buildings
- Unfinished basements and crawl spaces
- Outdoor receptacles
- Within about 6 feet of a sink in many jurisdictions (verify locally)
If you are remodeling, adding outlets, or replacing devices in these areas, it is a smart time to bring protection up to current standards. Even when not strictly required for a simple like-for-like swap, adding GFCI protection is a safety upgrade that buyers and inspectors like to see.
Before you start: when to stop and call a pro
I am all for DIY, but electricity is not the place to “figure it out live.” Consider hiring a licensed electrician if any of these are true:
- You open the box and see burned insulation, melted plastic, or scorched wires
- The breaker will not stay on, or the outlet sparks or crackles
- Aluminum wiring is present (common in some homes from the 60s and 70s)
- The box is overcrowded or the wires are too short to work safely
- You are unsure which cables are feed vs downstream and cannot confidently identify them
Also, if this is in a kitchen or bath and your home has older wiring, you may discover multi-wire branch circuits or other quirks. Those can be safe when done correctly, but they are not beginner territory.
Tools and materials
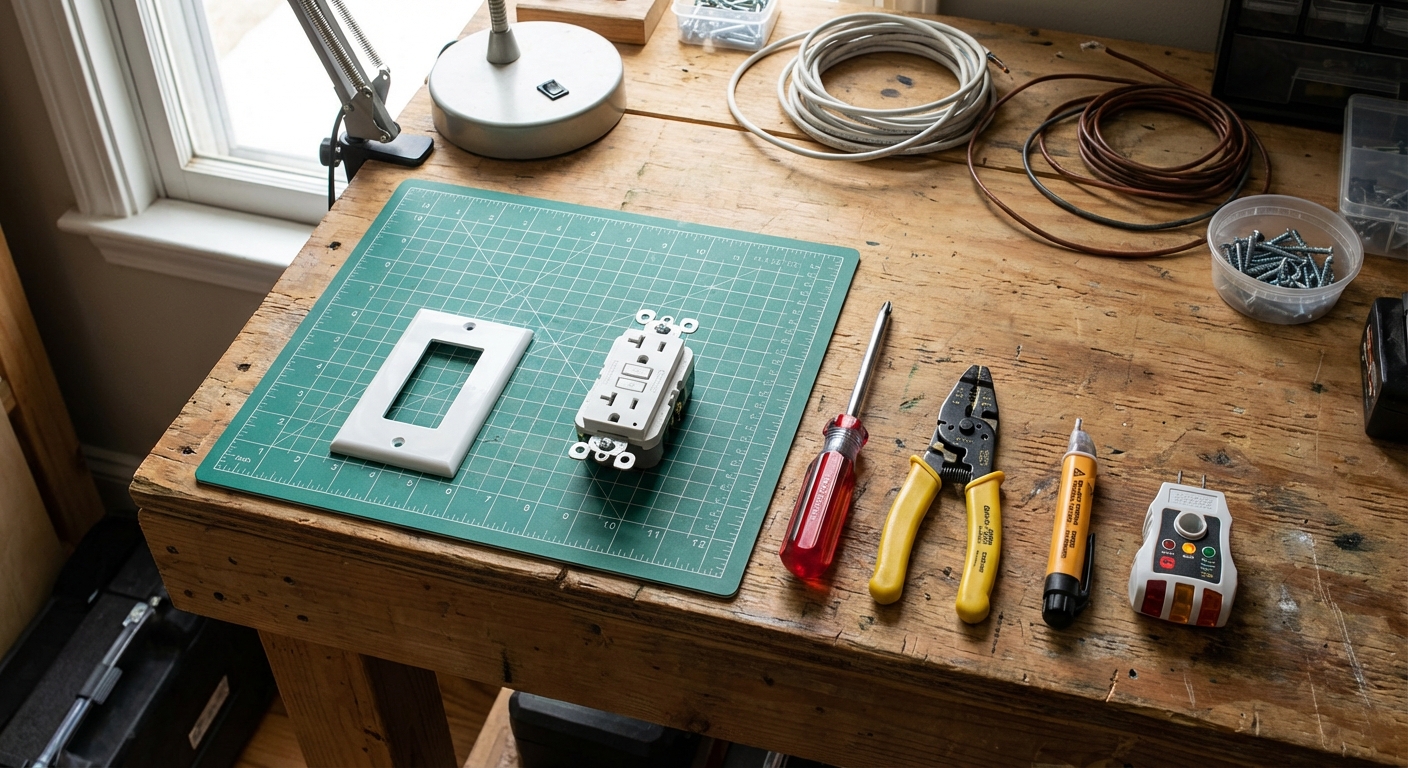
Tools
- Flathead and Phillips screwdriver
- Wire strippers (and cutters)
- Needle-nose pliers (helpful for shaping hooks)
- Non-contact voltage tester (for quick checks)
- Plug-in outlet tester (ideally one with a GFCI test button)
- Flashlight or headlamp
Materials
- GFCI receptacle (15A or 20A to match the circuit)
- Matching wall plate (standard, mid-size, or jumbo as needed)
- Electrical tape (optional, but I like wrapping the sides after wiring)
- Wire connectors (wire nuts) if you need to pigtail grounds or hots
Tip: If the circuit is 20A (common in kitchens and garages), you can install a 20A GFCI. A 15A GFCI is typically acceptable on many 20A circuits that serve multiple receptacles, but local rules and circuit use matter. When in doubt, match what the breaker and wiring support. A 20A breaker usually means 12 AWG wire.
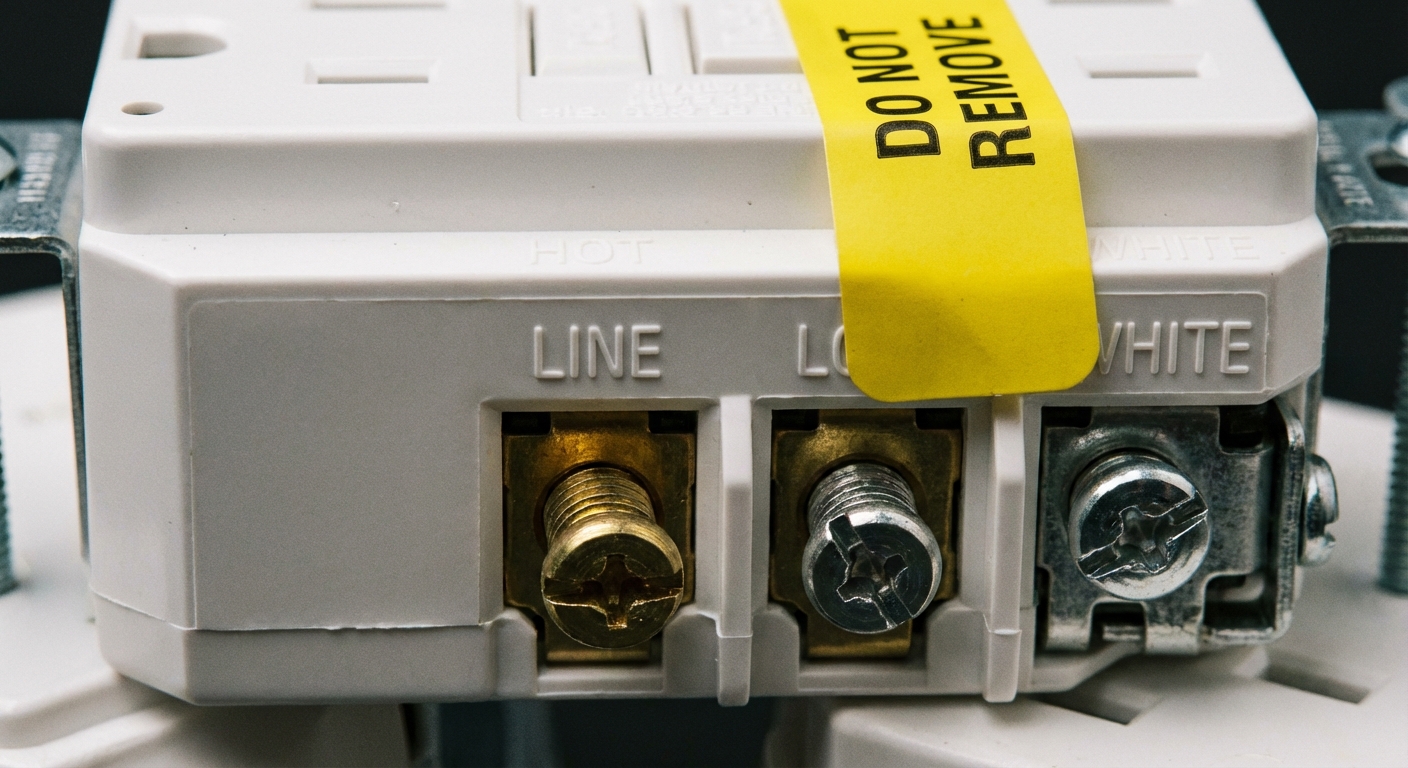
GFCI basics: LINE vs LOAD
This is the part that trips up most first-timers.
- LINE terminals are for the incoming power from the breaker. The GFCI must have power on LINE to work and to reset.
- LOAD terminals are optional. They send GFCI protection to other outlets “downstream” on the same circuit.
Most GFCI outlets come with the LOAD screws covered by a piece of tape. That is not decorative. It is the manufacturer begging you not to use LOAD unless you are sure.
Step-by-step: replace a standard outlet with a GFCI
1) Turn off the power and confirm it is off
Turn off the correct breaker. Then verify power is off at the outlet using a non-contact voltage tester and, if available, a plug-in lamp or outlet tester. Do not trust the label on the panel unless you confirmed it.
Safety note: If you are not comfortable working inside an electrical box, stop here and call a pro. There is no shame in that.
2) Pull the old outlet out and take a quick “before” photo
Remove the cover plate, then the two mounting screws holding the receptacle to the box. Gently pull the outlet out so you can see the wiring. Take a photo. Future-you will thank you.
3) Identify your wires
- Hot (usually black or red): connects to brass-colored screws.
- Neutral (usually white): connects to silver-colored screws.
- Ground (bare copper or green): connects to the green screw and metal box if present.
If you see two cables in the box (two blacks and two whites, plus grounds), one cable likely brings power in and the other feeds power out to the next outlet. That is where LINE/LOAD decisions come in.
4) Decide: protect just this outlet, or downstream too?
There are two common approaches:
- Option A: Protect only this outlet (simplest and least error-prone). Use LINE only. If there is a second cable feeding other outlets, keep that downstream circuit working by pigtailing hot to hot and neutral to neutral (never hot to neutral). In other words: join the incoming hot and outgoing hot together with a short pigtail that lands on the GFCI LINE hot terminal, and join the incoming neutral and outgoing neutral together with a short pigtail that lands on the GFCI LINE neutral terminal. The downstream outlets will stay on the regular circuit, but they will not be GFCI-protected by this device.
- Option B: Protect downstream outlets. Put the incoming feed on LINE and the outgoing cable on LOAD.
If you are not 100 percent sure which cable is the feed, use Option A or take time to identify the feed correctly (next step).
5) If there are two cables, identify the feed (LINE)
Here is the careful way:
- With the outlet pulled out and wires separated so nothing touches, turn the breaker on briefly.
- Use a voltage tester or multimeter to find which black (hot) is energized relative to ground or neutral. That cable is your LINE feed.
- Turn the breaker off again and confirm power is off before touching wires.
My rule: If I cannot confidently identify the feed, I do not use LOAD. A wrongly wired LOAD is the most common reason a new GFCI will not reset.
6) Remove the old outlet
Loosen the terminal screws and remove the wires. If your old outlet used push-in backstab connections, release the wires (there is usually a small slot to press with a flat screwdriver) and plan to use the screw terminals on the GFCI. Backstabs are notorious for loosening over time.
7) Wire the GFCI
Most GFCI devices are labeled clearly. Follow the instructions included with your outlet, but the usual layout is:
- LINE hot (black) to the brass LINE screw
- LINE neutral (white) to the silver LINE screw
- Ground to the green screw
If you are using LOAD to protect downstream outlets:
- LOAD hot (black) to the brass LOAD screw
- LOAD neutral (white) to the silver LOAD screw
Grounding tip: If there are multiple ground wires, connect them together with a wire connector and add a short bare copper pigtail to the GFCI ground screw. If the box is metal, it also needs to be bonded to ground using a ground screw or clip where required.
Connection tip: Form a clockwise hook on each wire so tightening the screw pulls the wire in tighter, not out.
8) Neatly fold the wires back into the box
GFCIs are chunkier than standard outlets. Fold wires in an accordion pattern, keeping bare ground away from hot terminals. If the box feels overstuffed, do not force it. Overcrowding can damage insulation and create a hazard. A deeper box may be needed.
9) Mount the GFCI and install the cover plate
Screw the GFCI to the box, square it up, and install the wall plate. Do not overtighten the plate, especially plastic, or it can crack.
How to test your new GFCI
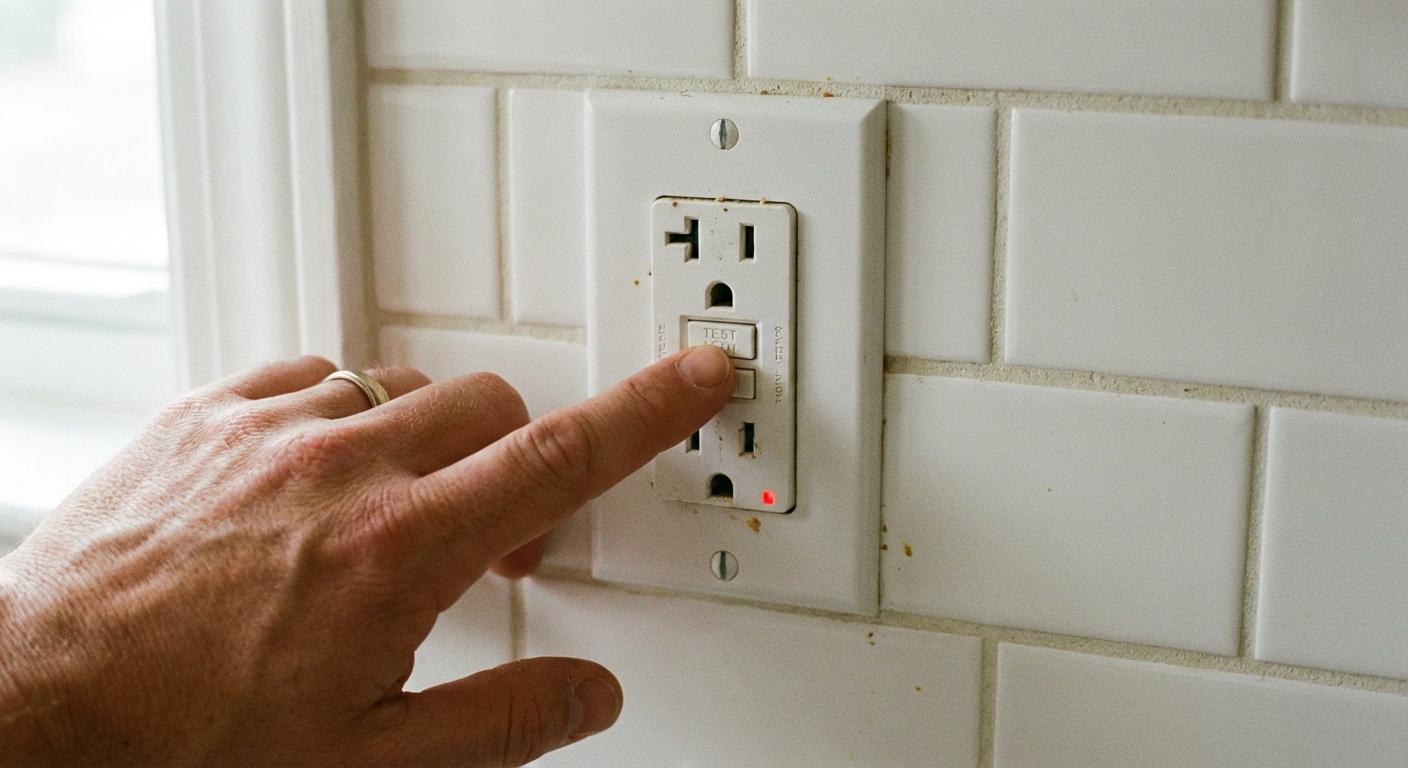
1) Power on and reset
Turn the breaker on. Press RESET on the GFCI. Many units click when they engage. If it will not reset, see the troubleshooting section below.
2) Use the built-in TEST button
Plug in a lamp or outlet tester, then press TEST. Power should shut off immediately. Press RESET to restore power.
3) Use a plug-in GFCI tester (recommended)
A plug-in tester with a GFCI button can trip the device to confirm it responds properly. Note that testers are helpful but not perfect for every wiring situation. The GFCI’s own test is still important.
4) If you used LOAD, test downstream outlets
With the GFCI reset, confirm downstream outlets have power. Then press TEST on the GFCI and confirm downstream outlets lose power too. Label those downstream outlets as “GFCI Protected” if your device includes stickers. That helps the next homeowner and can prevent confusion later.
Troubleshooting
The GFCI will not reset
- Most common: LINE and LOAD are reversed. Confirm the feed is on LINE.
- A neutral is loose or connected to the wrong terminal.
- There is an actual ground fault downstream (if using LOAD). Disconnect LOAD wires and see if it resets on LINE only.
- The breaker is off or tripped, or you are on the wrong circuit.
- The device is defective (rare, but it happens). Try another new unit.
Outlet tester shows “open ground”
That usually means your wiring does not have a proper equipment ground. A GFCI can still provide shock protection on an ungrounded circuit, but code rules often require labeling like “No Equipment Ground.” Do not fake a ground by tying neutral to ground at the receptacle. That is unsafe and not allowed.
The GFCI trips immediately when something is plugged in
- The appliance may have a fault. Try a different device.
- Moisture in an exterior box can cause trips. Check for a proper in-use cover outdoors.
- If using LOAD, a downstream outlet or connection may be miswired.
Common mistakes (I have made most of these)
- Mixing up LINE and LOAD. This is mistake number one.
- Using backstab connections on old outlets and assuming they are fine. Prefer screw terminals.
- Not tightening terminals firmly. Loose connections create heat.
- Overstuffing the box. A crowded box is not just annoying, it can damage insulation.
- Assuming wire colors are always correct. Verify, especially in older homes.
Quick FAQ
Do I need a GFCI breaker instead of a GFCI outlet?
You can use either. A GFCI breaker protects the entire circuit from the panel, while a GFCI outlet protects itself and optionally anything wired to its LOAD terminals. Breakers cost more but can be cleaner if you want whole-circuit protection without hunting for the first outlet.
Can I install a GFCI with no ground wire?
Often yes, if the box has only hot and neutral. It still provides shock protection. However, you may need proper labeling and you still will not have a true equipment ground for surge protectors or some electronics. If you are unsure, consult an electrician.
Which amperage GFCI should I buy, 15A or 20A?
Match the circuit and what is allowed in your area. Many countertop circuits are 20A, and a 20A GFCI is a safe choice when the wiring and breaker are 20A. If you are replacing like-for-like, match what is there and confirm at the panel.
My final safety checklist
- Breaker off, power verified off before touching wires
- Feed wires confirmed and landed on LINE
- Neutrals on silver screws, hots on brass screws, ground on green
- Wires tight and neatly folded, no exposed copper outside terminals
- GFCI TEST trips, RESET restores
- If using LOAD, downstream outlets lose power when GFCI trips
If you get stuck, take a photo of the box (with the breaker off) and compare it to your GFCI instructions. Most problems come down to one swapped pair or one loose neutral. Slow and steady wins this one.
About Marcus Vance
Content Creator @ Grit & Home
Marcus Vance is a lifelong DIY enthusiast and self-taught home renovator who has spent the last decade transforming a dilapidated 1970s ranch into his family's dream home. He specializes in budget-friendly carpentry, room-by-room renovations, and demystifying power tools for beginners. Through his writing, Marcus shares practical tutorials and hard-learned lessons to help homeowners tackle their own projects with confidence.