Swapping an old dial or basic digital thermostat for a smart one is one of those rare upgrades that feels modern and pays you back. Better scheduling, remote control, energy reports, and fewer "why is it blasting heat right now?" moments.
The good news: most installs are very DIY-friendly. The not-so-fun news: thermostat wiring is simple until it isn't. I'll walk you through the safe, careful way to do it, including how to label wires, what a C-wire actually does, and when it's time to bring in a pro.
Time: about 30 to 90 minutes. Difficulty: easy to moderate if your wiring matches and you don't need to add a C-wire.
Before you buy: check compatibility
Do this part first. It saves you the headache of getting halfway into the project and realizing your system needs an extra wire or a different model.
1) Identify what you have
- Heating only (furnace or boiler)
- Cooling only (rare, but possible)
- Heat pump (often uses an O/B wire and sometimes extra stages)
- Conventional heat + AC (common, usually fewer wires)
If you're not sure, pop the thermostat off the wall (no tools needed on many models) and look at the wire letters connected to the old thermostat. Those terminals are your best clues.
Quick note for boilers: many boiler thermostats are 24V, but some systems use millivolt controls or other setups. If your compatibility checker flags it, or your equipment label says something other than 24V control, pause and verify before you buy.
2) Use the manufacturer compatibility checker
Nest, Ecobee, and Honeywell Home all have online compatibility tools. You enter the terminal letters you see on your existing thermostat (like R, W, Y, G, C, O/B) and it tells you if you're good to go, plus any special notes.
3) Know what "C-wire" means
Most smart thermostats prefer, and many require, a C-wire (common wire) to provide continuous power. Some systems can run without it using a power-stealing setup, but that can cause weird issues like short cycling, Wi-Fi dropouts, or the furnace clicking on and off.
If you already have a wire connected to C at the old thermostat, you're in great shape. If you don't, don't panic. You've got options, and I cover them below.
4) If anything looks unfamiliar, stop
- Thick wires, wire nuts, or labels like 120V or 240V at the thermostat (line voltage).
- Multiple thermostat cables or a zoning panel controlling dampers.
- Separate Rc and Rh with no jumper, or a note on the old thermostat about two transformers.
Those are all solvable, but they're not "follow the picture and hope" situations.
Tools and supplies
- Small Phillips and flathead screwdriver
- Drill with small bits (if your new base needs different holes)
- Wall anchors (often included)
- Painter's tape and a pen (for labeling wires)
- Phone for photos and app setup
- Optional: small level (many thermostats have a built-in guide)
- Optional: wire stripper (helpful if your wire ends are short or mangled)
Safety first: shut off power
Thermostat wiring is usually low voltage (often 24V) on forced-air systems and many boilers, but you can still blow a fuse on the furnace control board if a live wire touches the wrong place. That's a common DIY mistake.
Turn off power at the HVAC equipment
- Flip the furnace/air handler switch if you have one (looks like a light switch near the unit), and
- Turn off the breaker for the furnace/air handler.
Then try turning your system on from the thermostat. If nothing happens, you're ready to work.
Remove the old thermostat
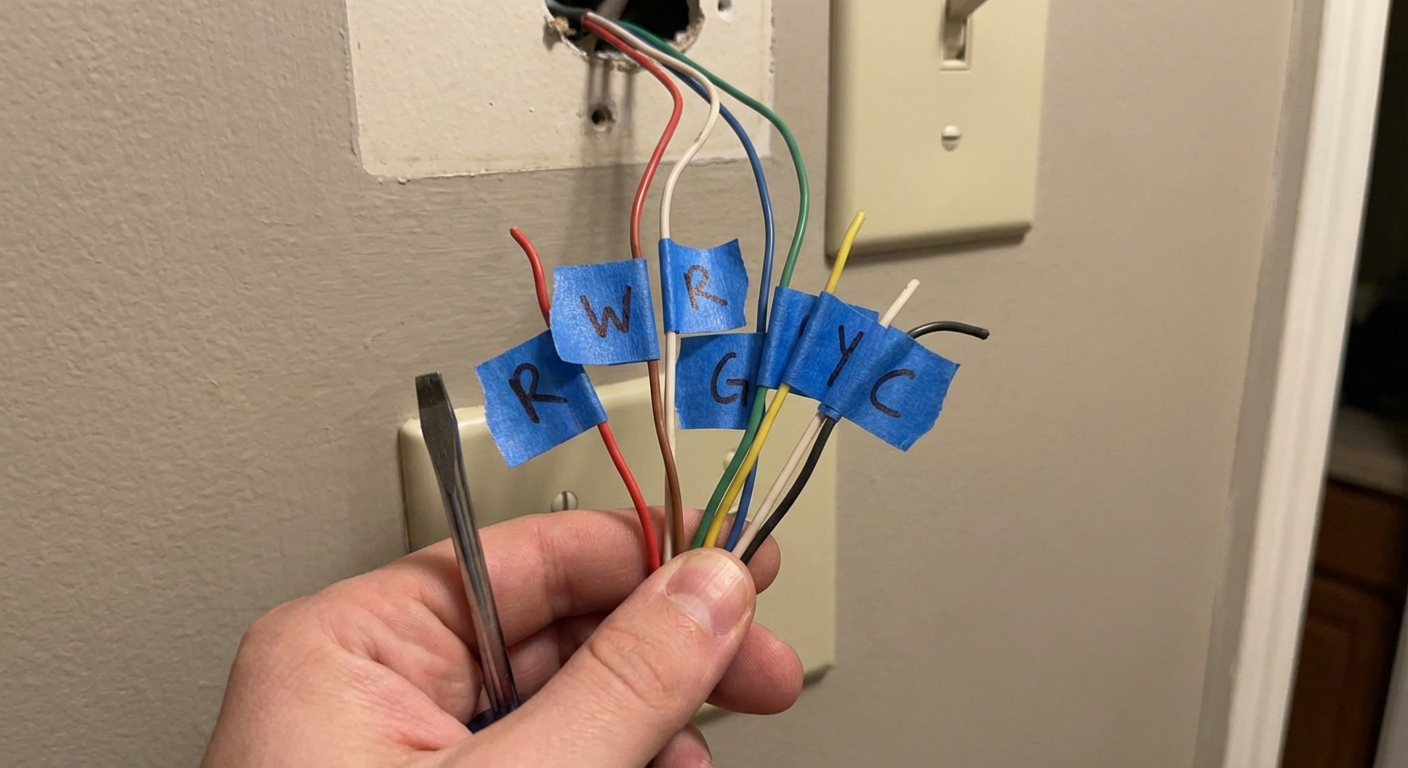
1) Take a clear photo of the wiring
Before you loosen a single screw, take a close-up photo of the old thermostat terminals and wire colors. This is your "undo" button if anything gets confusing.
2) Remove the thermostat face
Most faces pull straight off. Some have a small release tab. Set it aside.
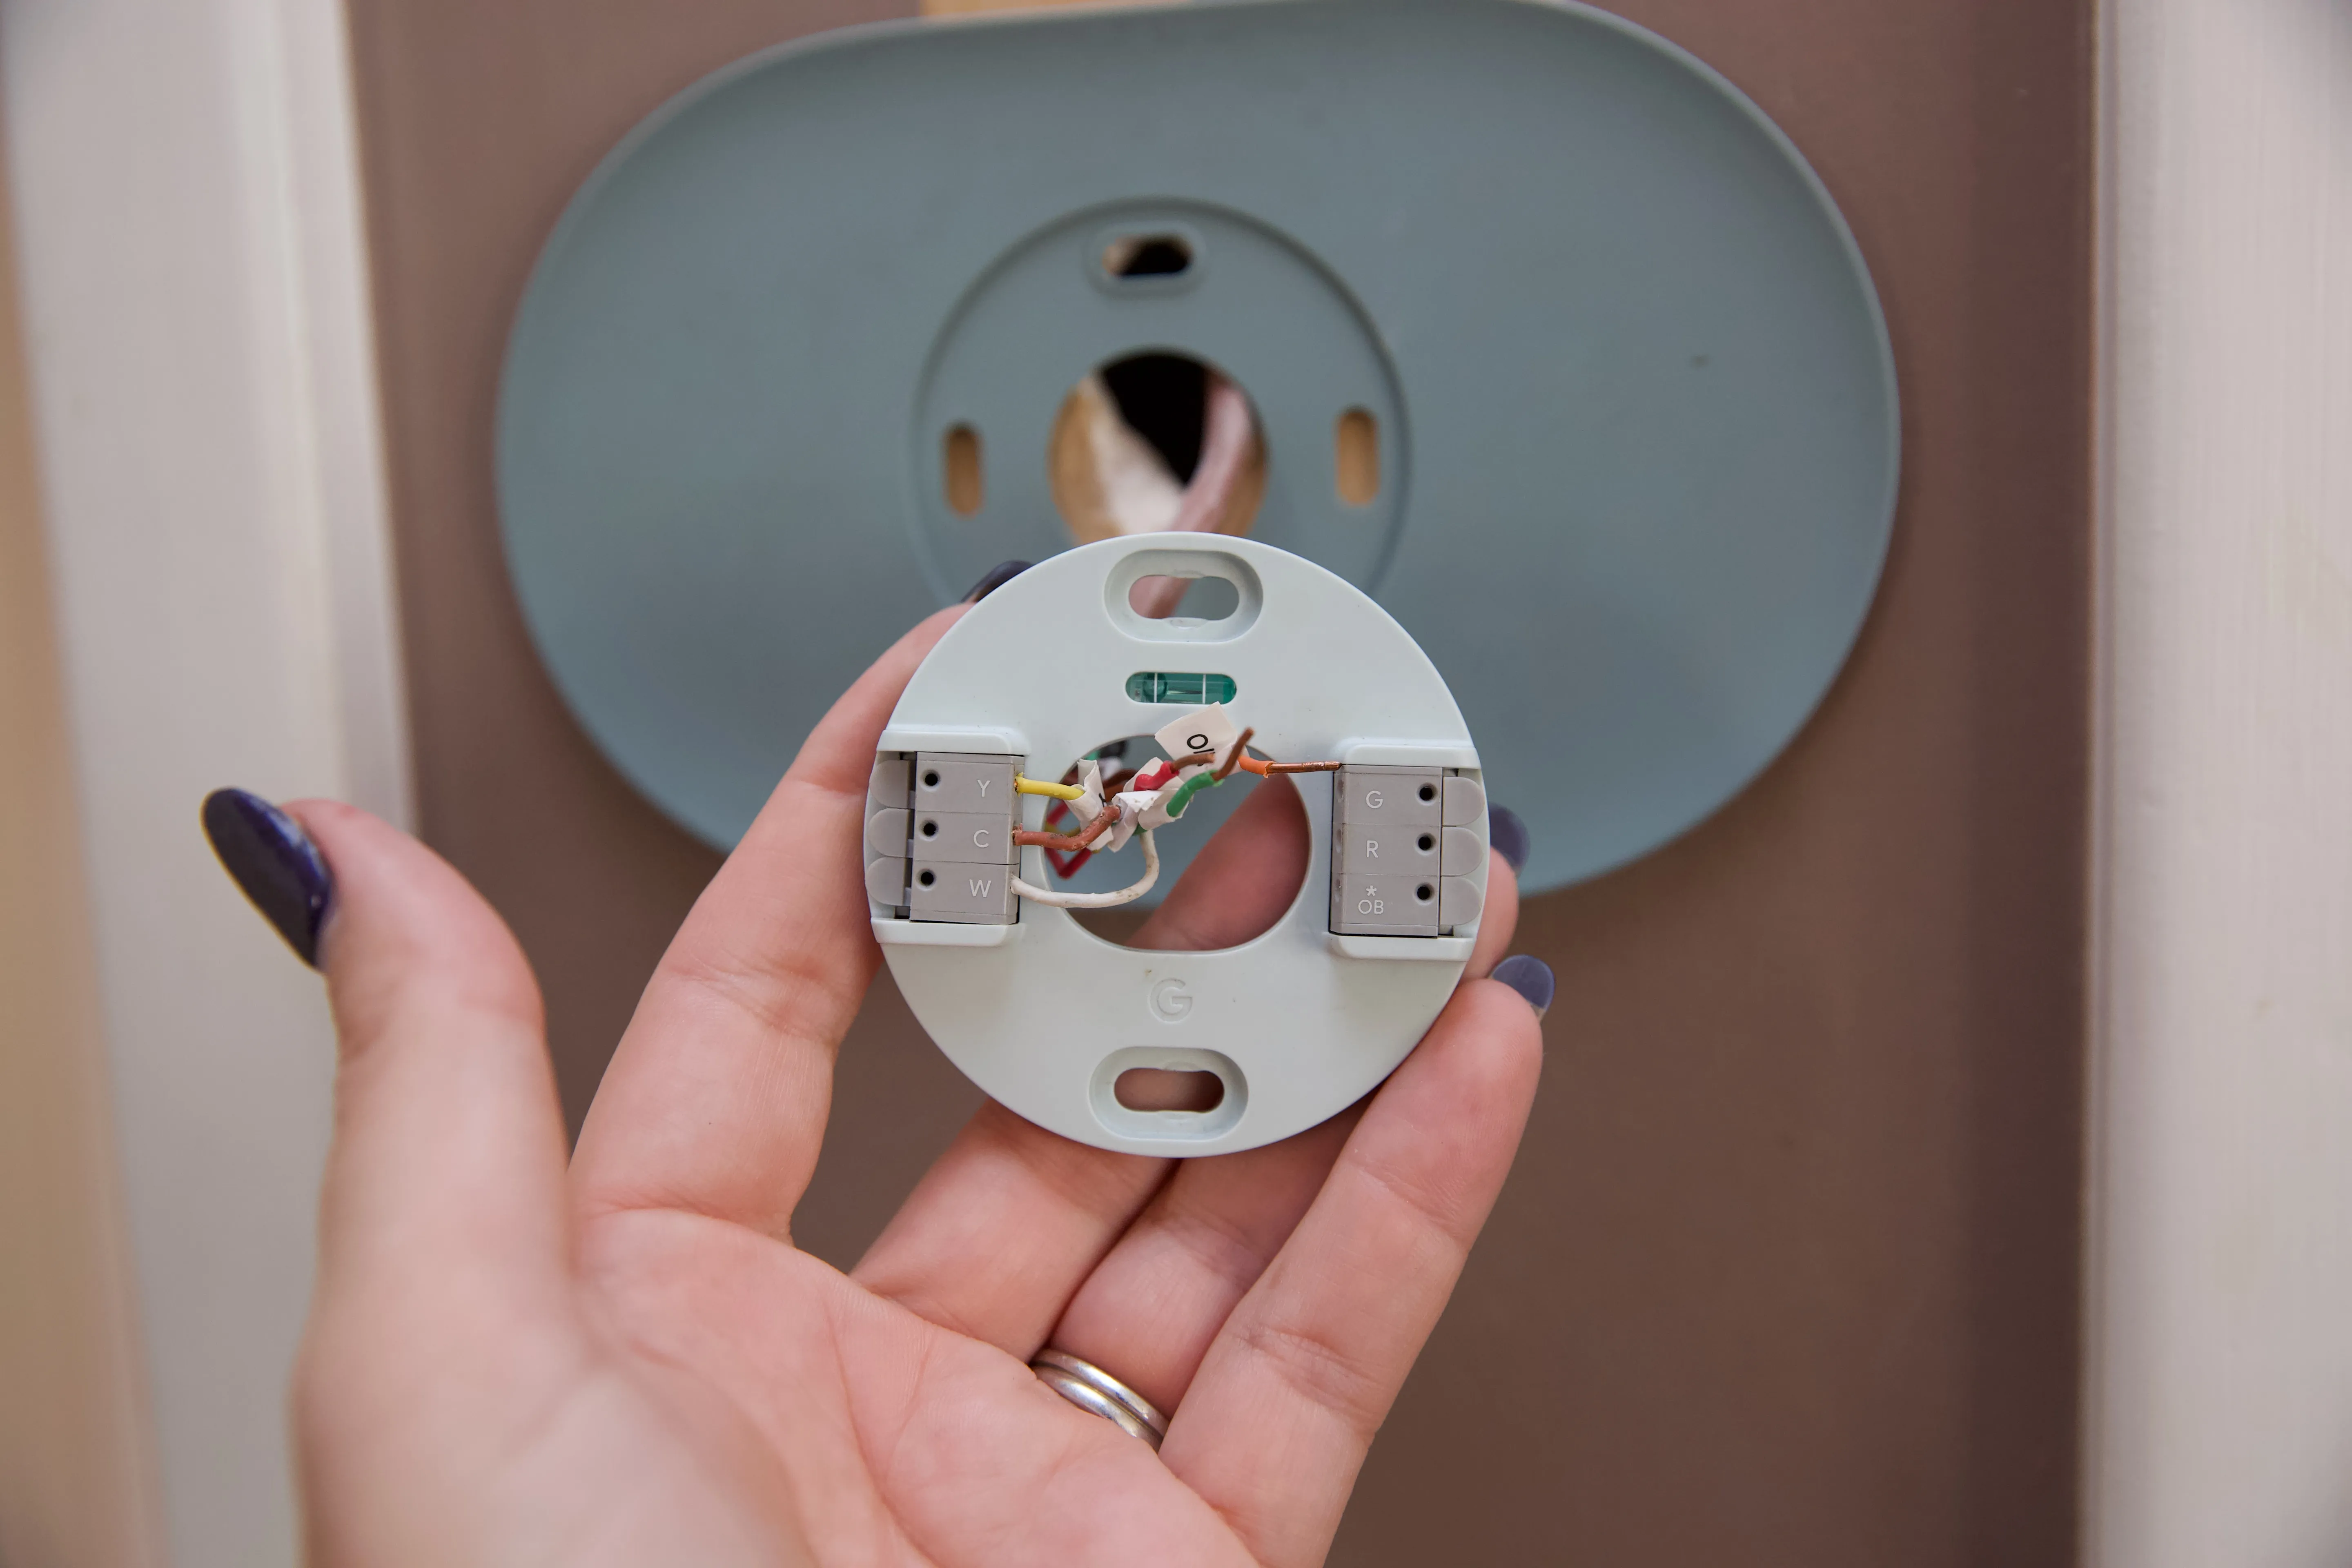
3) Label each wire by terminal letter
Wire colors are helpful, but they're not guaranteed. Label based on the letter next to the screw or push terminal where the wire is connected.
- R / Rc / Rh: power (hot)
- C: common (power return)
- W / W1: heat
- W2: second-stage heat (if present)
- Y / Y1: cooling
- Y2: second-stage cooling (if present)
- G: fan
- O/B: heat pump reversing valve
- AUX / E: heat pump auxiliary or emergency heat
Also look for jumpers. The common one is R to Rc, but older thermostats sometimes have other jumpers or oddball terminals. Snap a photo of anything bridging terminals.
Dual transformer heads up: if your old thermostat uses separate Rc and Rh from two different transformers (and no jumper), don't combine them unless your new thermostat instructions explicitly tell you to. Miswiring here can damage equipment.
4) Disconnect wires and keep them from falling in
As you remove each wire, bend it gently outward or tape it to the wall. I learned this the hard way once. Fishing a wire back out of the wall cavity with needle-nose pliers isn't my favorite hobby.
5) Remove the old base plate
Unscrew it from the wall. If the old thermostat left a larger paint outline, plan on using the trim plate that came with your new thermostat, or touch up paint later.
Install the new base
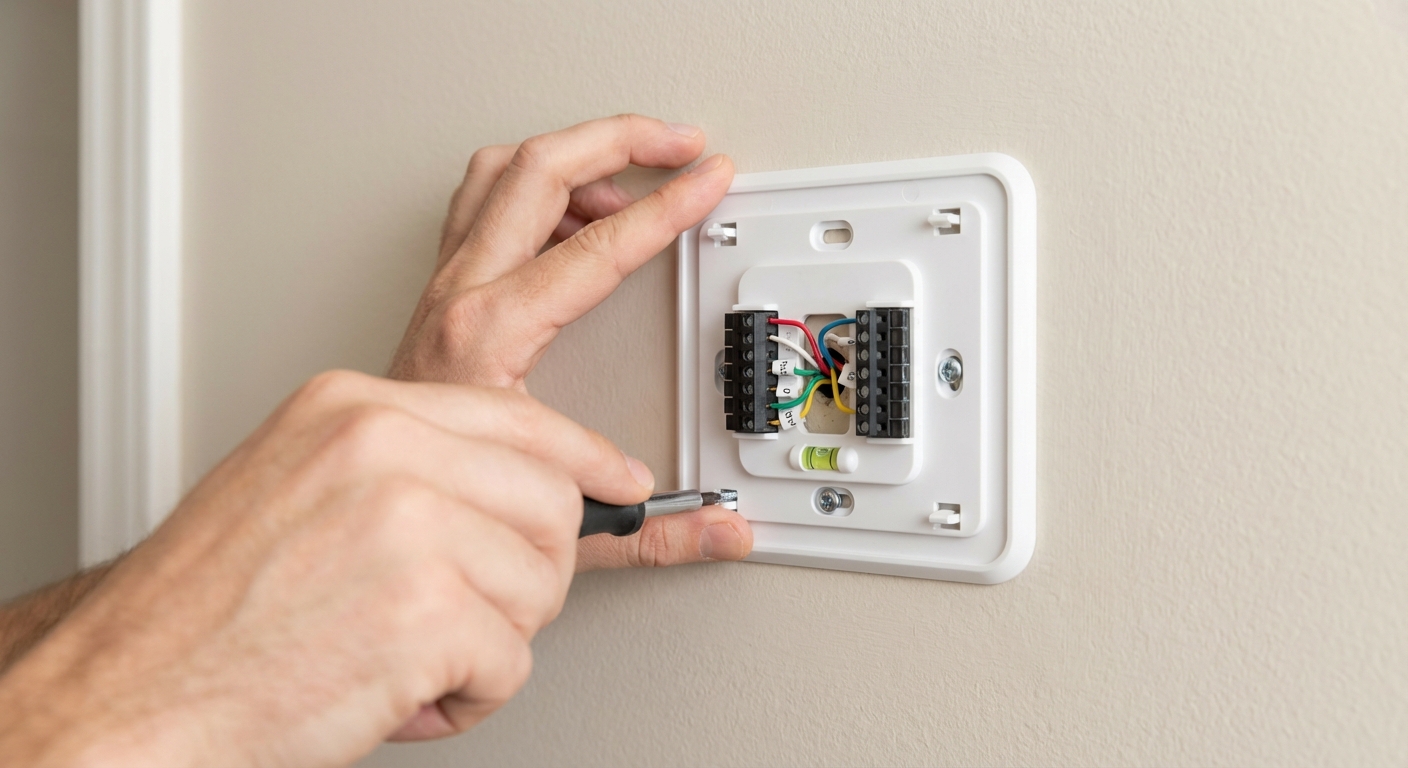
1) Thread wires through the base
Feed the wire bundle through the center opening of the new mounting plate.
2) Level and mount
Hold the base in place, level it, and mark holes. Drill if needed and use anchors if you're not hitting a stud. Snug the screws, but don't crush the plastic.
3) Prep wire ends if needed
If the wire ends are short, frayed, or bent, trim and re-strip them. Follow your thermostat manual for strip length and aim for this rule: fully seated wire, no bare copper showing outside the terminal.
4) Connect wires to the correct terminals
Match your labels to the new thermostat terminals. Most smart thermostats use spring terminals or small clamps. Insert the wire fully so no bare copper is exposed outside the terminal.
Important: if your old thermostat had a jumper wire between R and Rc, your smart thermostat usually doesn't need it. Many modern units handle that internally. Follow your thermostat's instructions if it asks about Rc and Rh.
5) Don't force wire assignments
If the app asks you to confirm a wire you don't have, stop and re-check your labels and photo. Smart thermostat setup is only as good as the wiring behind it.
C-wire options
This is the part that trips people up. Here are your common paths, from simplest to most involved.
Option A: Use an unused wire in the wall
Sometimes the cable has extra conductors tucked behind the thermostat. If you find an unused wire (often blue or brown), you may be able to connect it as C.
- At the thermostat: connect the unused wire to C.
- At the furnace/air handler control board: connect the matching unused wire to the C terminal.
Tip: take a photo at the control board before moving anything, and label wires there too. The board is the final authority on what goes where.
If you're comfortable removing the furnace access panel and identifying the low-voltage terminal strip, this is very doable. If that makes your palms sweat, this is a great point to call an HVAC tech.
Option B: Use a power extender kit (PEK)
Ecobee and some other brands include a power extender kit (often called a PEK). This can simulate a C-wire by reconfiguring wiring at the furnace control board. It works well for many conventional 1 heat, 1 cool style systems.
Heads up: PEKs aren't universal. Heat pump setups, multi-stage systems, and systems with accessories (humidifier, dehumidifier, ventilation) often need a true C-wire or a different approach. Always follow the brand instructions exactly and run your wiring through the compatibility checker.
Option C: Run a new thermostat cable
This is the most robust fix. It's also the most labor, because you're fishing wire through walls. If your thermostat is near the basement or a utility chase, it can be straightforward. If it's on an interior wall in a finished two-story home, it can be a project.
Option D: Use a plug-in transformer (only if supported)
Some homeowners use a plug-in 24V transformer to power the thermostat. This can work in certain situations, but it adds a visible wire path unless you can hide it cleanly.
Only use this method if your thermostat manufacturer explicitly supports it. It must be wired exactly as directed (typically to R (or Rc) and C), and you should not tie it into the existing HVAC transformer circuit unless the manufacturer tells you to. When in doubt, skip this and use a proper C-wire solution.
Attach the thermostat and restore power
1) Snap on the thermostat display
Once the base is wired, attach the display. You should feel it seat firmly.
2) Turn power back on
Flip the breaker and furnace switch back on. The thermostat should boot up within a minute or two. If it stays dark, re-check that the wires are fully seated, especially R and C.
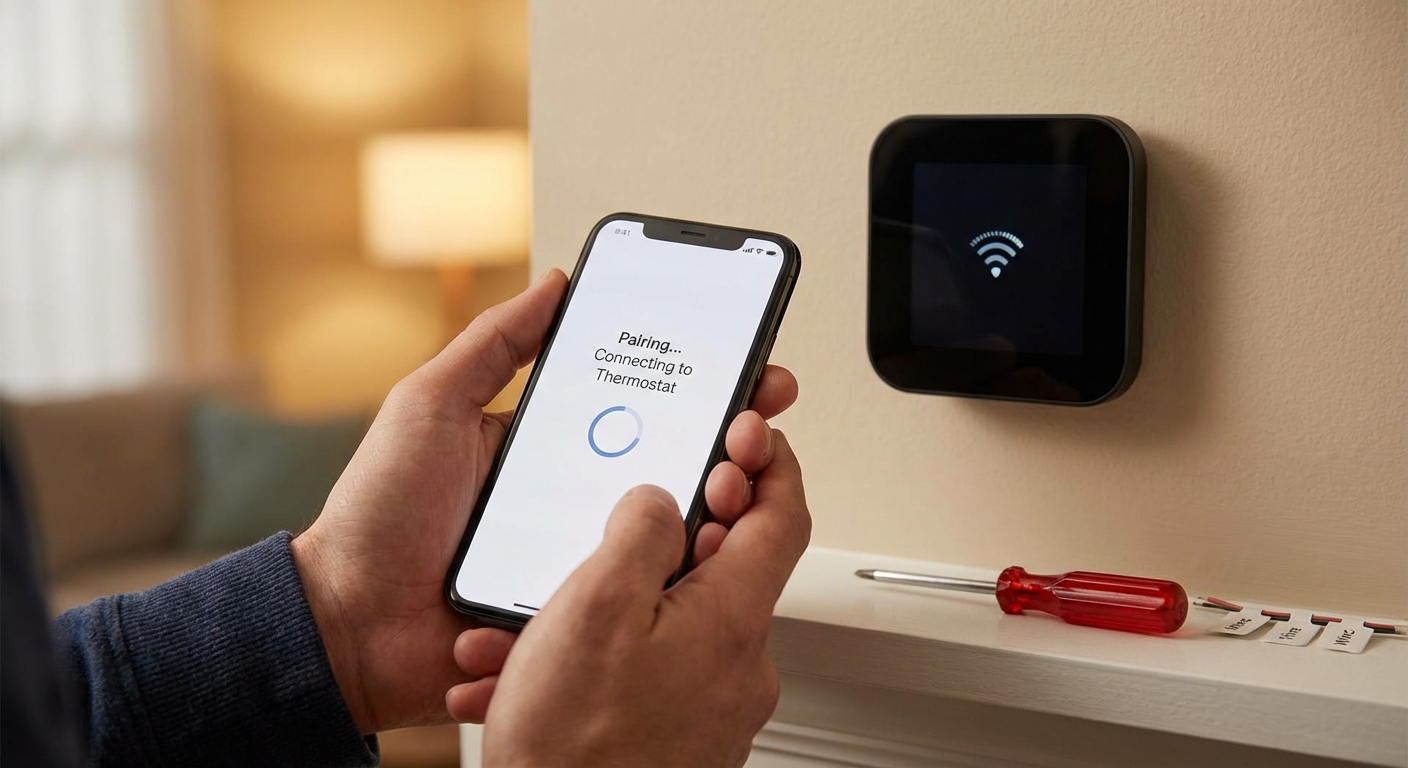
Wi-Fi and app setup
Each brand has its own app flow, but the basics are the same.
What you'll do in the app
- Connect the thermostat to your Wi-Fi (2.4 GHz is still the most compatible)
- Create or sign into your account
- Confirm your equipment type (furnace, boiler, heat pump, AC)
- Run a short equipment test (fan, heat, cool)
- Set your schedule or enable learning features
My setup tip
When it asks about your system, answer carefully. A heat pump accidentally configured as conventional heat can lead to expensive-to-run auxiliary heat kicking on too often.
Test your system
Right after install, run a basic test while you've still got tools out.
Quick checklist
- Fan: turns on and blows from vents when set to ON
- Heat: call for heat, confirm warm air or radiator heat after a short delay
- Cool: call for cooling, confirm outdoor unit runs and air cools after a few minutes
Remember: many systems have built-in delays to protect equipment. It's normal for the AC to wait a few minutes, sometimes up to 5, before starting.
Troubleshooting common problems
Thermostat won't turn on
- Check the furnace switch and breaker.
- Make sure the R wire is fully seated.
- If you shorted wires during install, you may have blown a small 3A or 5A fuse on the furnace control board. Power off and check the board fuse.
Heat works, AC doesn't (or vice versa)
- Re-check Y and W connections (and O/B on heat pumps).
- Confirm correct system type in the thermostat settings.
- Check that your outdoor disconnect and AC breaker are on.
Heat pump blows the wrong temperature
- The O/B setting may be wrong (energize on cool vs energize on heat). This is a configuration setting, not a wiring change, on most thermostats.
Wi-Fi won't connect
- Try 2.4 GHz Wi-Fi.
- Move your router closer temporarily for setup.
- Double-check your network password and security settings.
When to call a pro
I'm all for DIY, but there are a few situations where calling in help is the smart and safe move.
- You have no power at the thermostat and you're unsure how to check the furnace control board safely.
- Your system is line voltage at the thermostat (rare, but some older electric baseboard systems use it). If you see thick wires, wire nuts, or 120V or 240V markings, stop.
- You have a complex setup: multi-stage heat, dual-fuel, zoned systems, humidifier/dehumidifier, ventilation, or multiple thermostats controlling dampers.
- You suspect a dual transformer setup and your new thermostat instructions aren't crystal clear about Rc and Rh.
- You need to run new wire through finished walls and can't access the route cleanly.
- You smell burning, hear buzzing, or repeatedly blow a fuse after wiring.
If you're on the fence, a quick service call is often cheaper than chasing an intermittent issue for two weeks, or worse, damaging the furnace control board.
My thrifty final tip
Put the old thermostat, screws, and a photo of the original wiring in a zip-top bag and label it. If it had batteries, pull them out first so they don't leak and make a mess later. If you ever sell your home or troubleshoot down the road, you'll be glad you did.
If you want to keep building comfort upgrades, the next best bang-for-your-buck project is air sealing and insulation. A smart thermostat can only work with the house it's given.
About Marcus Vance
Content Creator @ Grit & Home
Marcus Vance is a lifelong DIY enthusiast and self-taught home renovator who has spent the last decade transforming a dilapidated 1970s ranch into his family's dream home. He specializes in budget-friendly carpentry, room-by-room renovations, and demystifying power tools for beginners. Through his writing, Marcus shares practical tutorials and hard-learned lessons to help homeowners tackle their own projects with confidence.