
Crown molding is one of those upgrades that makes a room look finished, even if the furniture is still a mix of hand-me-downs and Facebook Marketplace specials. It is also one of the first trim projects that makes beginners sweat, because corners are never truly square and ceilings are rarely flat.
The good news: you do not need a master carpenter vibe to pull this off. You need a plan, a couple of repeatable cuts, and a few tricks for the real-world messiness of walls and ceilings.
Before you start: pick the right molding
Not all crown is equally beginner-friendly. If this is your first install, choose a profile that forgives small gaps.
- MDF: budget-friendly, stable, great for painted trim. It chips easier, so handle corners gently.
- Finger-jointed pine or poplar: stronger edges, easier to cope cleanly, also paint-grade.
- Solid wood hardwoods: beautiful, but less forgiving and more expensive. Save it for later projects.
Size tip: In standard 8-foot rooms, 3 1/4 inch to 4 1/4 inch crown looks right in most homes. Bigger can be great, but it is heavier and highlights uneven ceilings more.
Tools and materials (what you actually need)
Tools
- Miter saw (10 inch is fine)
- Stud finder
- Tape measure and pencil
- Caulk gun
- Safety glasses
- Hammer and nail set (optional but handy)
- Jigsaw or coping saw (for coping inside corners)
- Small file or sandpaper (80 to 150 grit)
- Level or straightedge (for checking ceiling waves)
Fasteners and consumables
- 2 inch 18-gauge brad nails (or 15/16-gauge finish nails if crown is thick and heavy)
- Construction adhesive (optional but helpful on wavy walls)
- Wood glue (for scarf joints and outside corners)
- Paintable caulk
- Wood filler (or spackle for MDF)
My thrifty note: If you do not own a nailer, you can still install crown with a hammer and finish nails. It is slower and you have to pre-drill to avoid splitting near ends, but it works.
Know your two angles: spring angle and corner angle
Crown sits between the wall and ceiling at a “spring angle.” Common spring angles are 38 degrees and 45 degrees. This matters because it determines how you cut corners.
- Corner angle: the room corner itself (often not 90 degrees).
- Spring angle: how crown leans from wall to ceiling.
If your crown packaging lists the spring angle, keep it. If it does not, you can usually find it by searching the product name or by holding two scraps together to see how it nests.
Measuring and planning: the part that saves you money
1) Map the room
Walk the room and note every inside corner, outside corner, and any obstacles like cabinets or beams. Crown is easiest when you install in long, continuous runs, but real houses have interruptions.
2) Decide your joint strategy
- Inside corners: cope them (recommended for beginners who want tight joints).
- Outside corners: miter them and glue the joint.
- Long walls: use a scarf joint (two angled cuts overlapping) instead of a straight butt joint.
3) Measure wall lengths correctly
Measure each wall at the ceiling line, not halfway down the wall. Record each length and add at least 10 percent waste for first-timers, 15 percent if the room has lots of corners.
Marcus mistake I made once: I measured a wall at eye level, cut the crown, and then realized the wall bowed. At the ceiling it was almost 3/8 inch shorter. Measure where the molding actually goes.
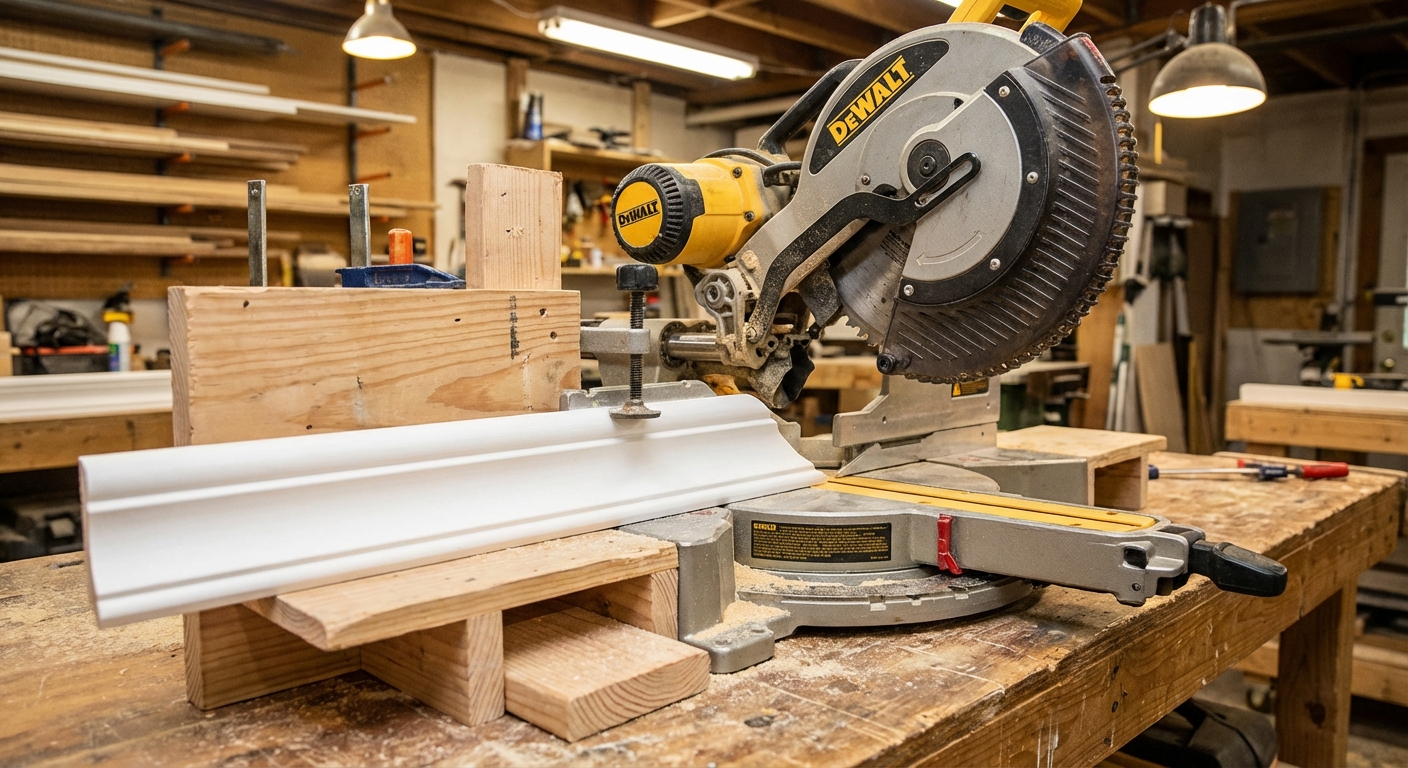
Set up your miter saw (two beginner-safe methods)
Method A: Cut crown nested
This is the classic approach: you “nest” the crown against the fence and table at the spring angle, then make simple miter cuts.
The rule you must remember: when crown is nested on a miter saw, it is upside down and backwards compared to how it sits on the wall.
- The edge that will touch the ceiling in the room sits flat on the saw table.
- The edge that will touch the wall in the room sits against the vertical fence.
- Because it is upside down, the piece can feel wrong until you see it click into the “V” it naturally wants to sit in.
- Make a simple support jig from scrap wood to hold the crown at the right spring angle.
- Mark the crown: write CEILING and WALL on the back, plus an arrow for UP (toward the ceiling when installed). This prevents the famous beginner move: a perfect cut on the wrong end.
- Keep a correctly oriented scrap next to your saw as a visual cheat sheet. When you are tired, this saves you.
Method B: Cut crown flat (compound cuts)
This lays the crown flat on the saw table and uses compound miter and bevel settings. It is accurate, but easier to mess up if your saw or crown angle is different than the chart.
If you are new: go nested unless you already feel comfortable with compound angles.
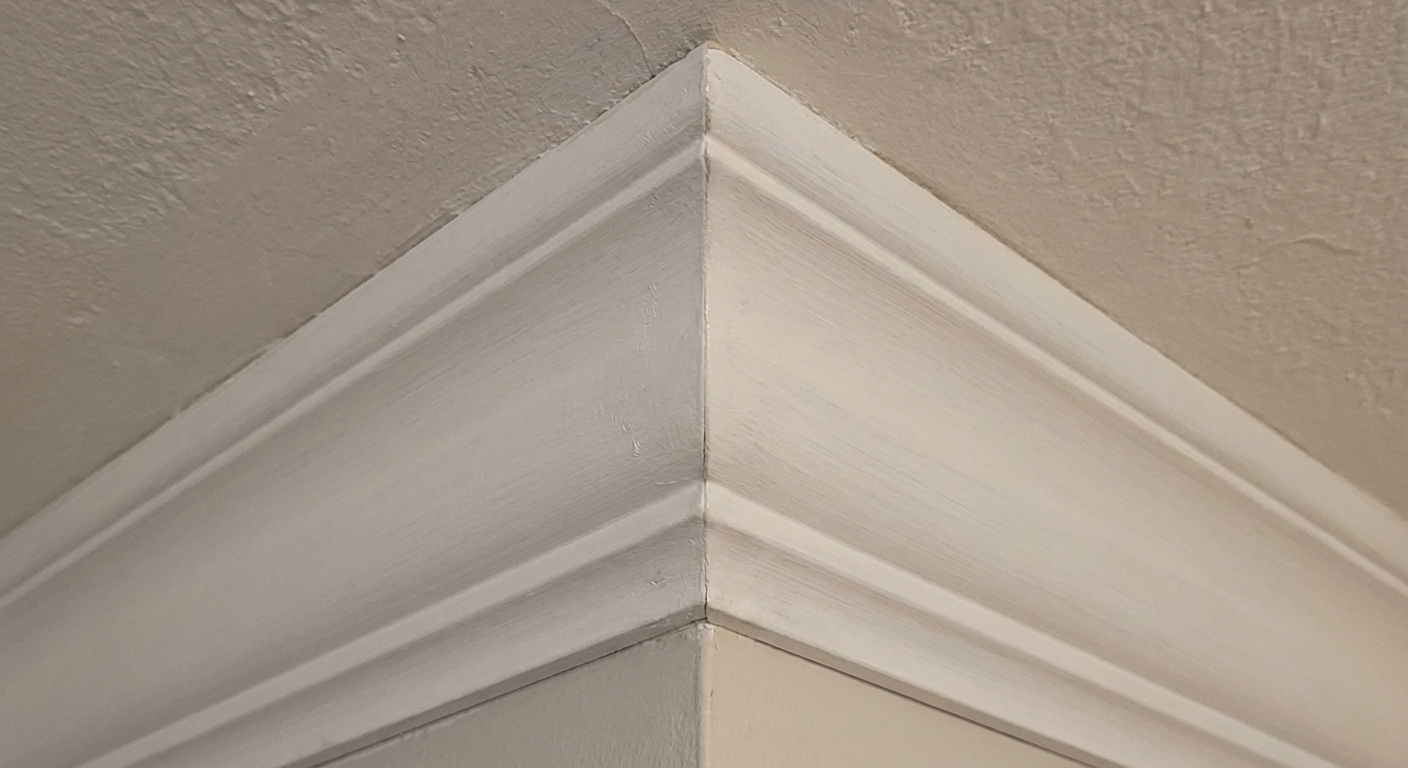
Inside corners: miter vs cope (and why coping wins)
Inside corners are where beginners lose confidence. Here is the secret: most inside corners are not perfect 90-degree angles, so two perfect 45-degree miters still leave a gap.
Option 1: Miter both sides (fast, but less forgiving)
- Cut each piece at 45 degrees (for a true 90-degree corner).
- Test fit and adjust if the corner is not square.
Option 2: Cope one piece (recommended)
With coping, one piece goes in square (butt cut), and the second piece is cut to match the profile of the first. A coped joint stays tight even if the corner angle is a little off.
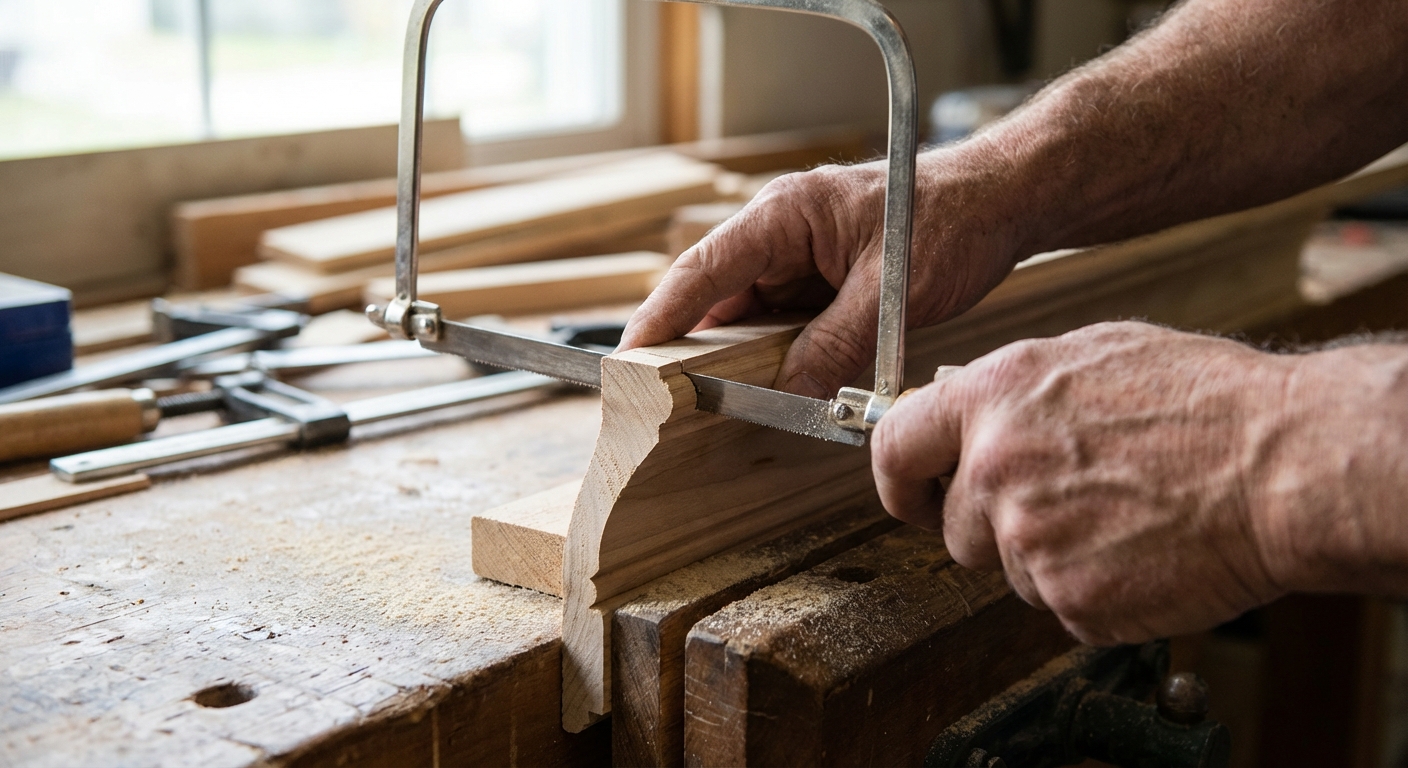
How to cope an inside corner (step-by-step)
- Step 1: Install the first piece with a square cut into the corner.
- Step 2: On the second piece, cut a 45-degree inside miter on the end. This exposes the profile line.
- Step 3: Use a coping saw to cut along the profile line. Angle the saw slightly back (back-cut) so the front edge stays crisp.
- Step 4: Test fit, then refine with a file or sandpaper.
- Step 5: When it fits tight, install it. A tiny bead of caulk later will disappear.
Beginner tip: If coping feels intimidating, practice on 1-foot offcuts first. Your hands learn the curve faster than your brain does.
Outside corners: strong miters that do not open up
Outside corners get bumped by ladders, moving furniture, and life. Treat them like a joint you want to last, not just look good for a week.
Cutting outside corners
- Start with 45-degree miters for a 90-degree corner.
- Dry fit both pieces together before you even think about nails.
- If the corner is not square, adjust the miter slightly (often 44 degrees and 46 degrees will close a gap).
Make the corner tougher
- Add wood glue to the miter faces.
- If you have a brad nailer, “pin” the joint by shooting a couple brads through one piece into the other before attaching to the wall. Keep fingers clear and go slow.
- Consider a small backer block behind the corner if there is no framing to nail into. A scrap of 1x behind the corner gives you something solid.
Scarf joints: when one wall is longer than your boards
If you need to join two lengths on a long wall, do not butt them together. A scarf joint is stronger and hides better.
- Cut opposing 30 to 45-degree angles so the pieces overlap.
- Place the joint over a stud if possible.
- Use wood glue on the joint and nail both sides into the stud.
Uneven walls and ceilings (because they all are)
This is the part nobody tells you when they post “weekend crown molding install” photos. Your ceiling line will likely wave a little, and your wall might bow in or out.
Find the best line
- Hold a scrap of crown in place and slide it along the wall.
- Look for the spot where the crown fits the ceiling most consistently. That is your reference height.
- Snap a light pencil line or use painter’s tape as a guide so the run stays visually straight.
Use adhesive strategically
If you have sections where the molding wants to pull away from the wall or ceiling, a thin bead of construction adhesive can help. Do not use adhesive as a substitute for nails, use it as insurance.
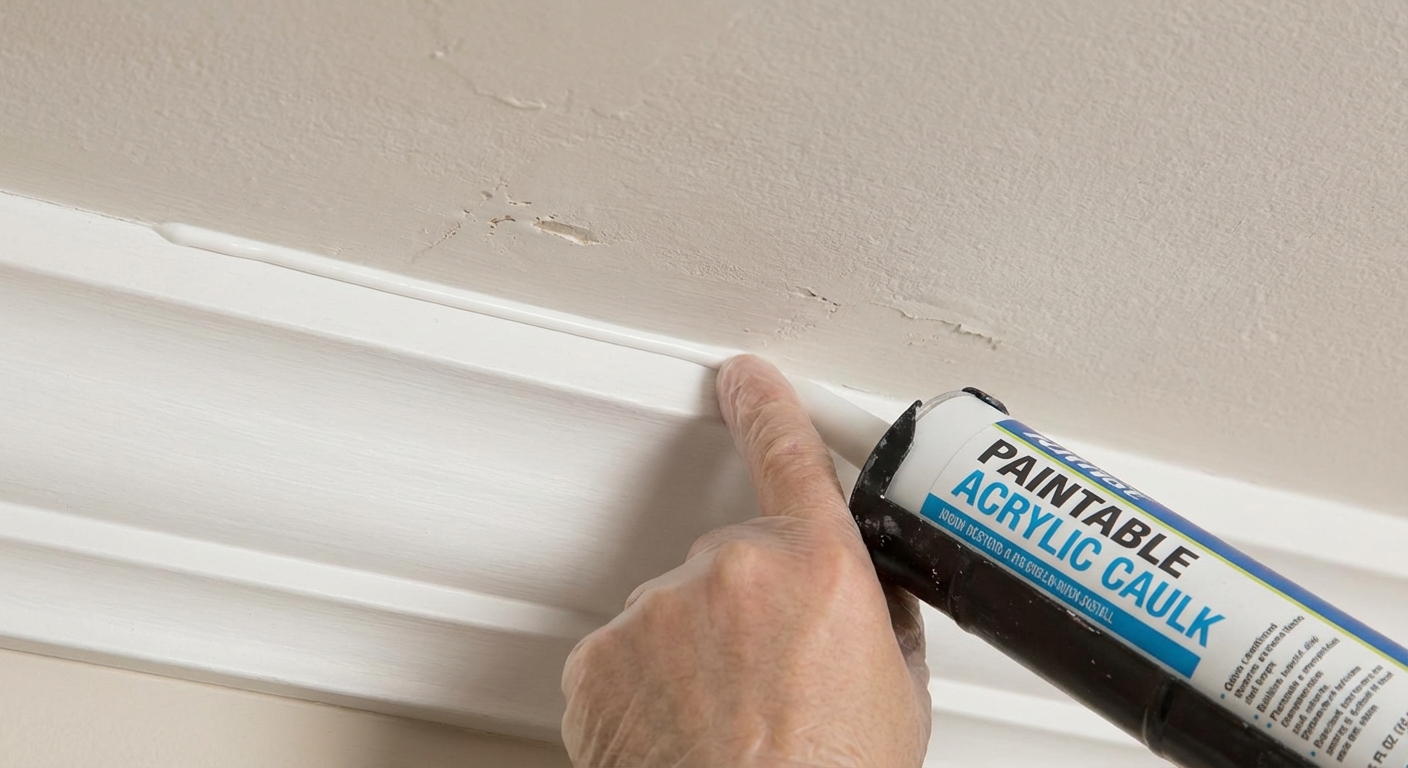
Caulk is not cheating
Small gaps along the top or bottom edge are normal. Paintable caulk makes trim look like it grew out of the house. Keep it minimal and tool it smoothly with a damp finger or caulk tool.
Installation order that keeps you out of trouble
There are a dozen ways to sequence crown installation. This one keeps measurements simple and reduces compound mistakes.
- Start with the most visible wall (usually the wall you see first when you enter).
- Install square-cut base pieces into inside corners where possible.
- Cope into those pieces for the inside corners.
- Save outside corners for when you are warmed up.
- Do scarf joints last, once you know your fit and reveal are consistent.
Nailing and fastening: where to shoot (and what to do when you cannot)
Crown needs to be fastened to framing, not just drywall. Ideally you are nailing into the wall top plate and ceiling joists, but in many rooms you will not hit both consistently.
Find your nail targets
- Use a stud finder to mark studs near the top of the wall.
- If you can, find ceiling joist direction. If you cannot, do not panic. Wall studs alone often hold crown fine if nailed properly.
Nail pattern
- Place nails about every 16 inches when you are hitting studs.
- Add nails within 2 to 3 inches of each corner and joint.
- Angle nails slightly to increase holding power.
When there is nothing to nail into
- Use a small bead of construction adhesive.
- Use temporary support: painter’s tape, a couple of 23-gauge pins, or a few carefully placed brads that you fill later.
- For stubborn spots, install a backer strip (a thin 1x2 or ripped plywood) along the wall line, then nail crown into that.
Cut lists and labels that prevent flip-flops
The fastest way to waste crown is to cut a perfect angle on the wrong end, or flip the board and mirror your cut. Labeling fixes this.
- On every piece, mark an arrow pointing UP toward the ceiling.
- Write the wall name and orientation: “North wall, left end inside corner.”
- Dry fit every piece before you nail it. Every single one.
My rule: If I am not 100 percent sure, I cut it long and sneak up on the fit. You can always remove material. You cannot put it back.
Finishing: fill, sand, caulk, paint
Crown looks like “pro work” mostly because the finish work is patient.
- Fill nail holes with wood filler (or spackle for MDF) and let it dry.
- Sand lightly to flush the filler. Do not burn through MDF faces.
- Caulk edges and seams with paintable caulk. Keep the bead small.
- Prime if needed, especially on raw MDF or bare wood.
- Paint with a quality trim paint. A small foam roller plus a brush works great.
Troubleshooting common beginner problems
My inside corner has a gap at the top or bottom
- If you coped: refine the cope with a file, then caulk the remaining hairline gap.
- If you mitered: the corner is likely not 90 degrees. Recut with a slightly different angle, or convert to a cope.
My outside corner looks perfect, then opens later
- Use wood glue on the miter, and pin the joint if possible.
- Make sure both pieces are nailed close to the corner into solid framing or a backer block.
My molding will not sit tight to the ceiling
- Ceiling is wavy. Use a consistent visual line, then caulk the gap.
- Add a small bead of construction adhesive in problem areas.
I keep getting upside down cuts
- Mark CEILING and WALL on every piece.
- Keep a correctly oriented scrap next to your saw as a reference.
- Remember: nested crown on the saw is upside down and backwards.
A simple weekend plan
- Friday night: measure, buy material, set up saw station, cut a few practice corners on scrap.
- Saturday: install the main runs, cope inside corners, handle outside corners, add scarf joints.
- Sunday: fill, sand, caulk, prime, and paint first coat (second coat after cure if needed).
If you take it slow and focus on tight joints instead of speed, crown molding is absolutely a beginner project. The first corner might feel clunky. By the fourth, you will wonder why you waited.
About Marcus Vance
Content Creator @ Grit & Home
Marcus Vance is a lifelong DIY enthusiast and self-taught home renovator who has spent the last decade transforming a dilapidated 1970s ranch into his family's dream home. He specializes in budget-friendly carpentry, room-by-room renovations, and demystifying power tools for beginners. Through his writing, Marcus shares practical tutorials and hard-learned lessons to help homeowners tackle their own projects with confidence.