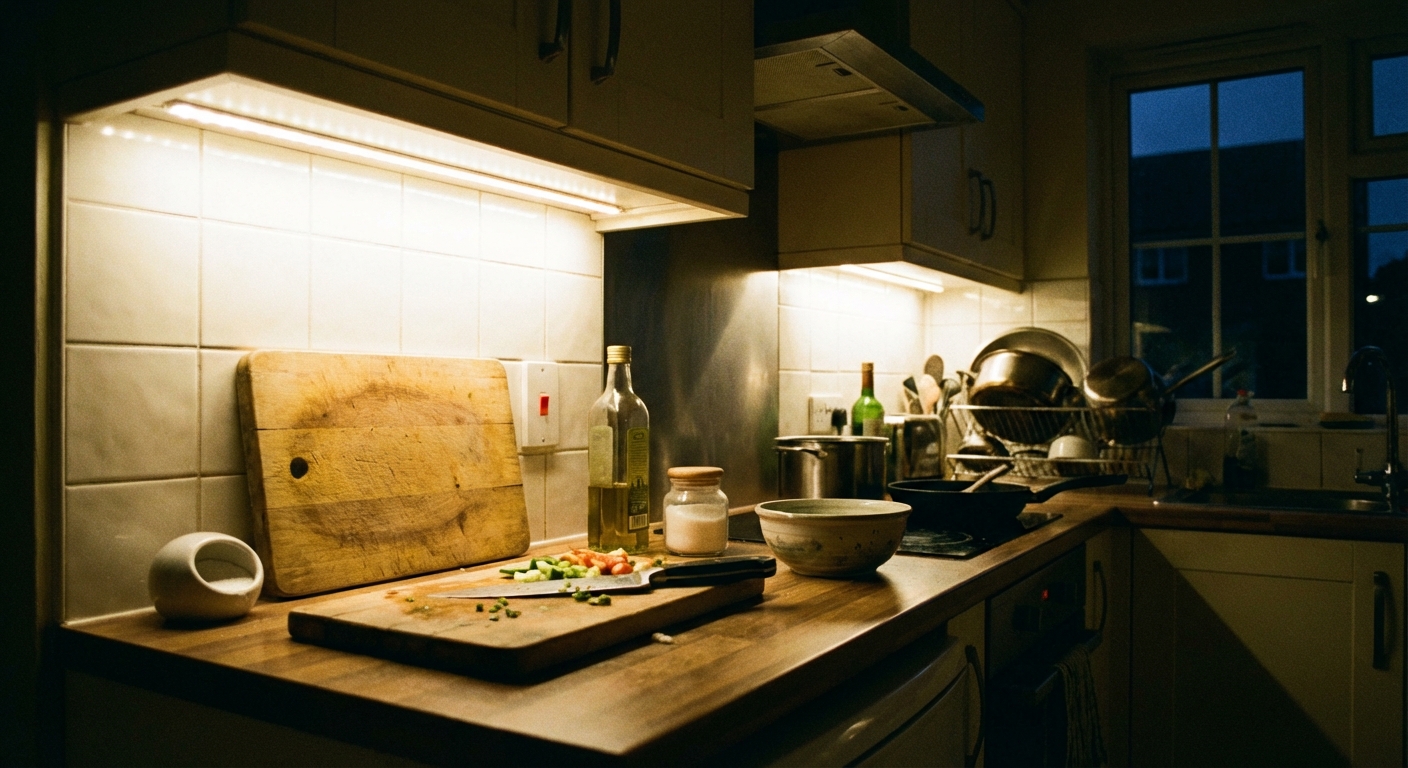
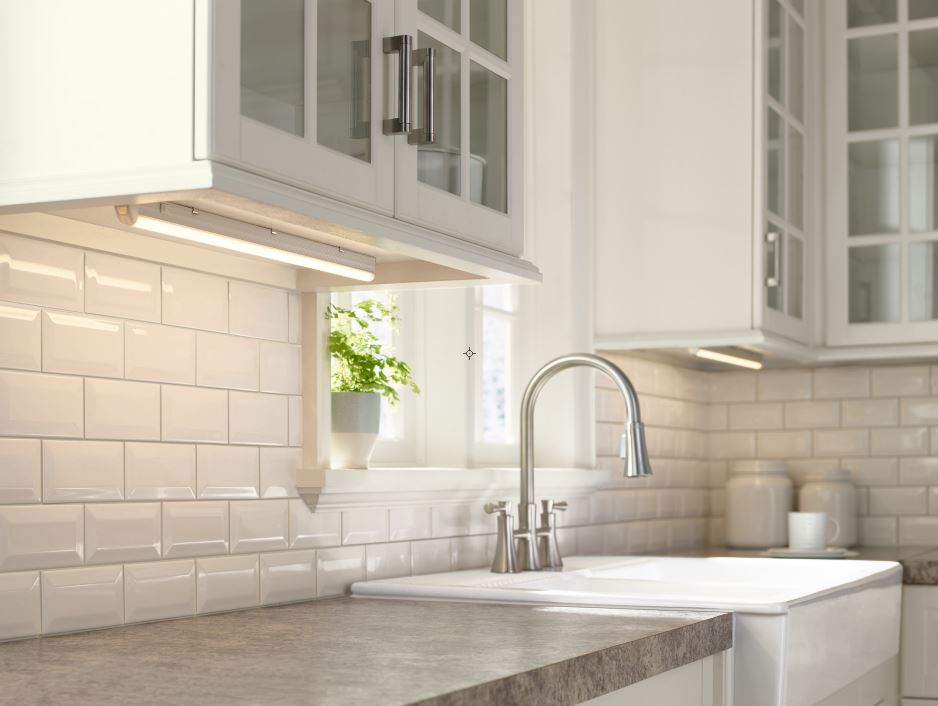
Under-cabinet lighting is one of those upgrades that feels fancy, but you can often install in a weekend. It makes chopping safer, reduces shadows from overhead cans, and gives your kitchen that clean, finished look.
I have installed all three common DIY types in my own 1970s ranch remodel at different times, sometimes because I wanted a specific look, and sometimes because I was trying to keep the budget from exploding. Below, I will walk you through what to buy, how to choose plug-in vs hardwired, and how to install each style.
Pick your lighting type
There are three common under-cabinet options you will see in most DIY retail aisles. They cover the majority of modern installs, even though there are other options out there (older xenon or halogen puck systems, and fully integrated fixtures that blur the line between “bar” and “strip”).
LED strip lights
Best for: even, continuous light across the whole counter, modern look, lots of flexibility around corners.
- Pros: Smooth light with fewer dark spots, easy to customize length, usually the lowest power draw.
- Cons: Cheaper kits can show individual dots, adhesives can fail near a hot stove, and drivers need a hiding spot.
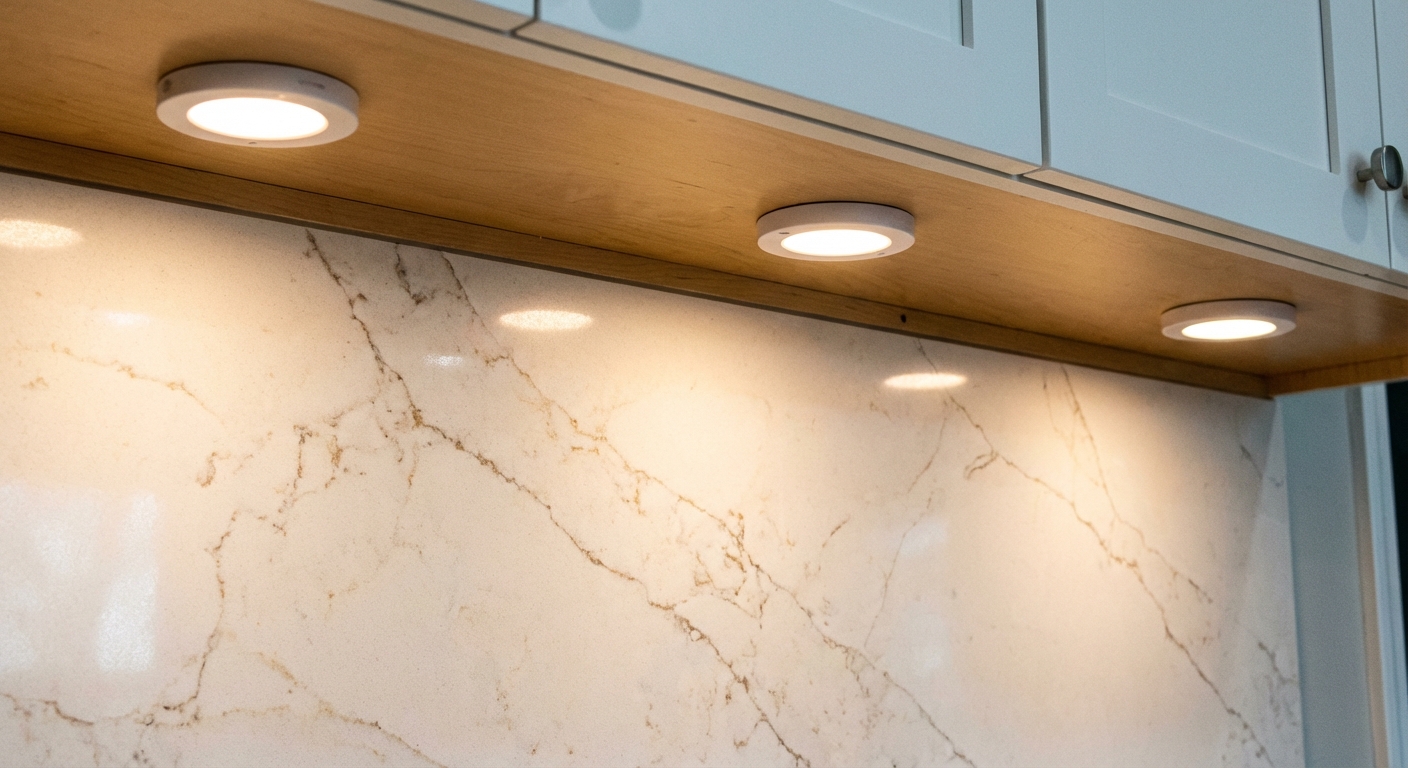
Puck lights
Best for: highlighting specific zones like a coffee station, sink, or a decorative backsplash.
- Pros: Simple concept, great “pools” of light, can look high-end with the right spacing.
- Cons: More shadowing between pucks, more holes and more wiring runs under cabinets.
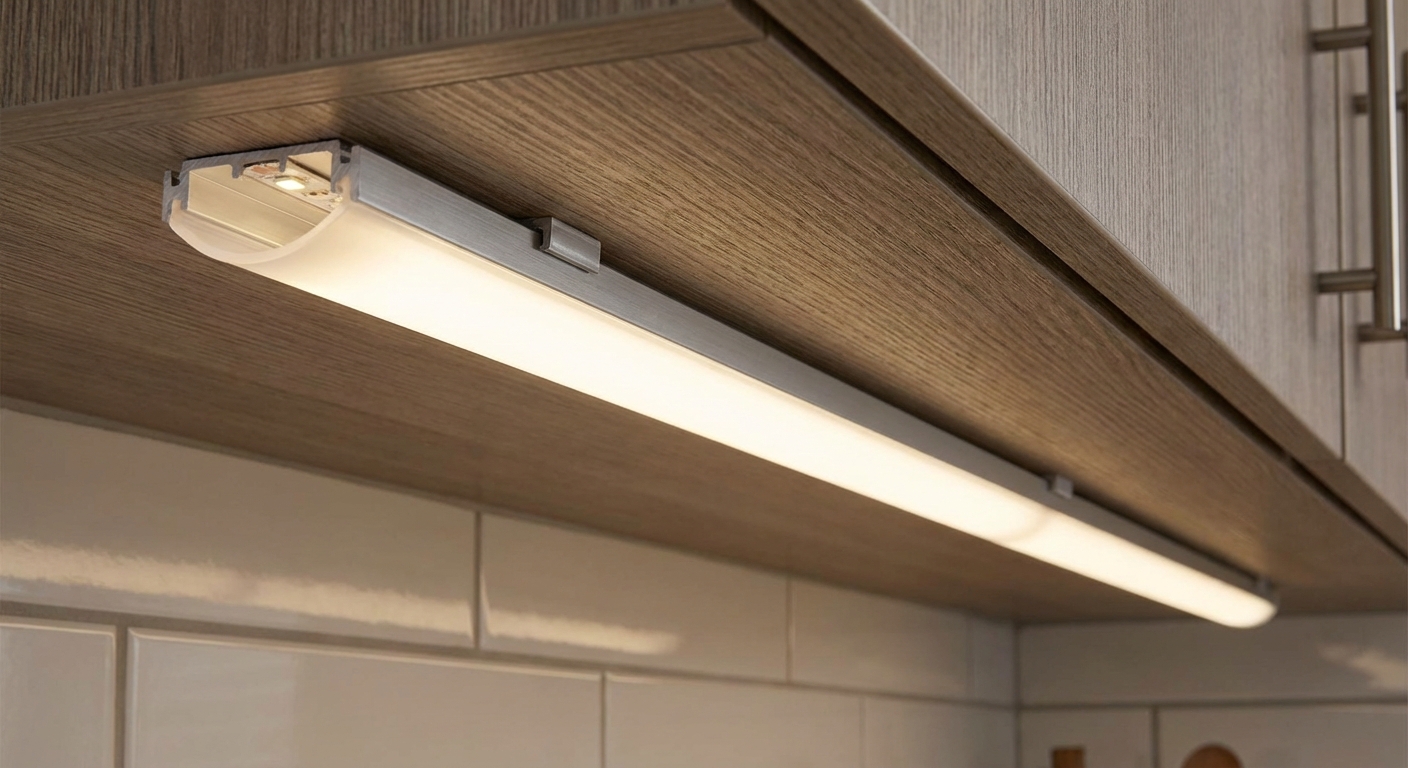
Light bars (rigid LED fixtures)
Best for: a clean install with fewer parts than strip lights, especially for straight cabinet runs.
- Pros: Very consistent output, sturdy housings, often linkable end-to-end.
- Cons: Less flexible around odd cabinet shapes and corners, you are locked into bar lengths.
Plug-in vs hardwired
This decision is usually more about your comfort level and your kitchen’s existing outlets than the lights themselves.
Plug-in (easiest DIY)
- Choose plug-in if you have an outlet in a nearby cabinet (common under sinks) or inside an upper cabinet, or you are fine adding one.
- Pros: No working inside an electrical box, easiest to troubleshoot, easy to swap later.
- Cons: You need a plan to hide cords and the power brick or inline driver.
Hardwired (cleanest look)
- Choose hardwired if you want a true built-in look, want wall-switch control, or do not have a good outlet location.
- Pros: Clean install, no visible cords, integrates nicely with a wall switch or dimmer.
- Cons: Requires comfort with electrical work. In many areas, new wiring, new switches, or new circuits may require a permit and inspection.
Safety note: Hardwiring typically means working in a junction box or an approved wiring compartment, and connections usually must remain accessible (not buried behind cabinets). Requirements vary by location and by fixture, so follow the manufacturer instructions and your local code. If you are not 100 percent comfortable identifying the correct circuit, making secure connections, and fitting everything back in the box, hire a licensed electrician for the final hookup. You can still do the layout, mounting, and cable hiding yourself.
Plan placement first
Most under-cabinet lighting mistakes come from placement, not wiring. A few minutes of planning prevents a lot of annoyance later.
The golden rule
For real task lighting, mount lights closer to the front edge of the cabinet, not tight to the wall. When lights sit too far back, your body blocks the beam and you end up chopping in your own shadow.
Where to mount
- To avoid glare: keep the light tucked behind the cabinet’s bottom rail or lip when possible, so you cannot see the LEDs when standing.
- Over a sink: center the brightest section over the basin. That is where you do precision work.
- Over a stove: avoid placing adhesive-only strips too close to heat and steam. Use mounting clips or aluminum channel, and consider a higher heat and moisture rating.
Color, brightness, and CRI
- 2700K to 3000K: warm, cozy. Works well with wood cabinets and warm countertops.
- 3500K: neutral. Great “true color” middle ground for most kitchens.
- 4000K: bright, crisp. Nice for modern white kitchens, but can feel clinical if overdone.
- Brightness target: as a rule of thumb, many homeowners like roughly 200 to 500 lumens per linear foot for task lighting. Treat that as a starting range since ceiling height, wall color, countertop reflectivity, and your overhead lighting all change what “enough” feels like.
- CRI: if you care how food and finishes look, pick 90+ CRI when you can. It is one of those specs that makes a kitchen feel “right” even if you cannot explain why.
What to buy
If you want a quick buying checklist that avoids most regrets, this is what I look for.
- Color temperature (CCT): pick 2700K to 4000K and match your existing kitchen lighting if you want a consistent look.
- Brightness: check lumens per foot (or total lumens and length) and aim for your use case (task vs ambiance).
- High CRI: 90+ is worth it if you prep food a lot or care about accurate countertop color.
- Dimming: confirm the light and driver support dimming, and what kind (see the dimming section below).
- Length and cut points: for strips, confirm where you can cut and how you will handle corners and jumps.
- Linkability: for bars or pucks, confirm max link length per power supply.
- Environment: near sinks and stoves, look for better moisture protection and solid mounting methods (clips or channel instead of adhesive only).
- Warranty and replacement: under-cabinet lights get used daily. A decent warranty matters.
Dimming and flicker
Most flicker problems are not “bad lights.” They are usually a mismatch between the dimmer and the driver, or a driver that is being pushed outside its preferred load range.
- Match the dimmer type: many under-cabinet LEDs work with standard phase-cut dimmers (often labeled LED or TRIAC). Some low-voltage systems want an ELV dimmer. Always check what the driver specifies.
- Watch minimum load: some dimmers and drivers behave badly if the total wattage is too low or too high.
- Use the compatibility list when possible: better brands publish dimmer compatibility charts. It saves a lot of trial and error.
Tools and materials
Your exact list depends on the light type, but here is what I keep on the counter before I start.
Common tools
- Tape measure and pencil
- Rubbing alcohol and a clean rag (for adhesive strips)
- Drill and bits
- Screwdriver
- Stud finder (optional, mostly for mounting drivers or transformers in cabinets)
- Wire clips or cable staples (for low-voltage wiring)
- Grommets for pass-through holes (optional but clean)
- Paintable cord cover or raceway (optional, great for hiding cords in a pinch)
For electrical work (hardwired)
- Non-contact voltage tester
- Wire strippers
- Wire connectors rated for your wiring type
- Electrical tape (as needed)
- Proper junction box or an approved under-cabinet wiring compartment as required by the fixture
Install option 1: LED strips
Step-by-step: plug-in strips
-
Measure each cabinet run. Include gaps where you need to jump over a window, range hood, or cabinet break.
-
Plan connectors and corners. If your kit uses solderless connectors, look at their size and bend limits so a bulky connector does not land right at a corner, inside a tight notch, or where it will show from normal standing height.
-
Dry fit everything. Before you peel any adhesive backing, lay the strip, driver, dimmer, and cords in place to confirm the routing makes sense.
-
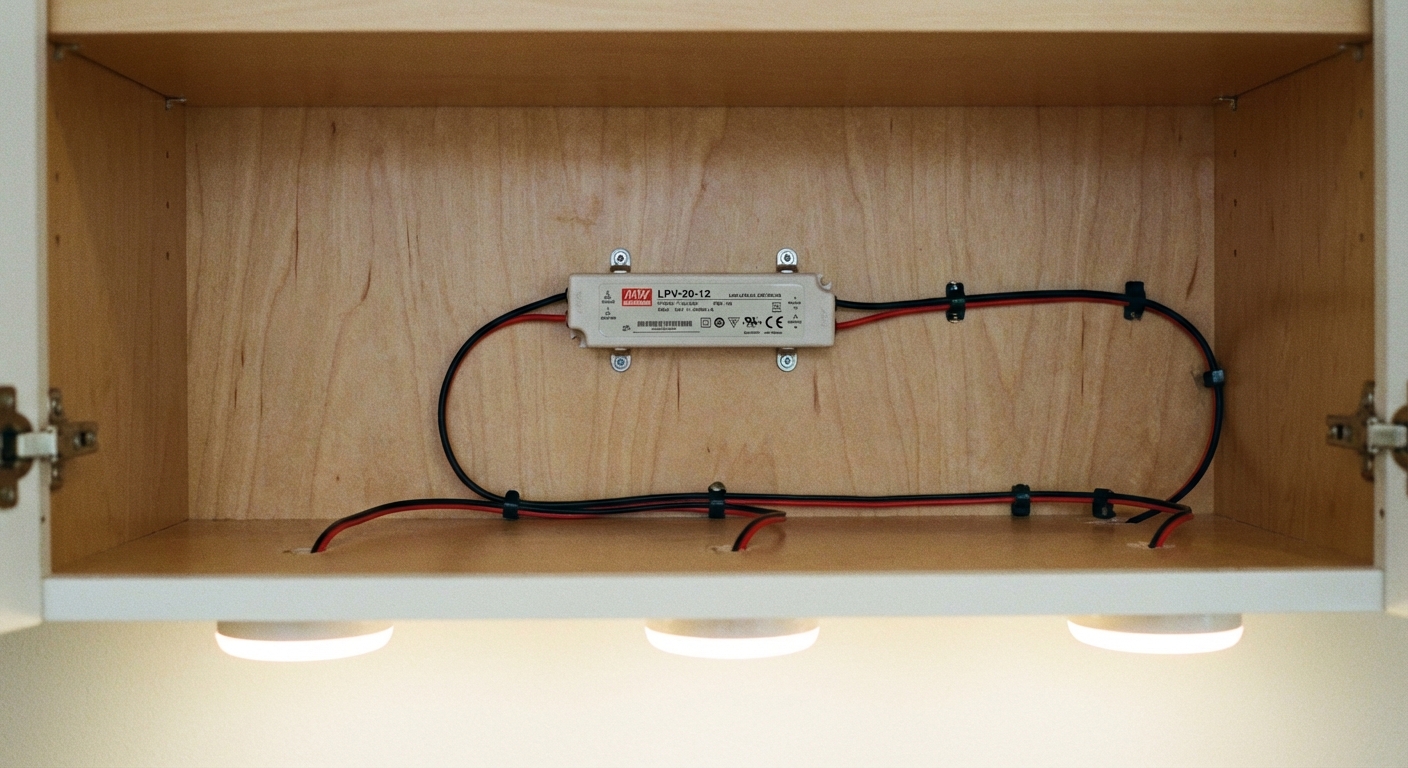
Pick a driver location. I like hiding it in an upper cabinet near an outlet, or in the sink base cabinet if the outlet is there. Leave slack for servicing.
-
Prep the surface. Wipe the cabinet underside with rubbing alcohol and let it fully dry. Adhesive fails most often because of grease film.
-
Mount the strip for task lighting. Place it closer to the cabinet front (usually behind the bottom lip) so the light lands on your work area instead of the backsplash.
-
Handle breaks. Use solderless connectors or pre-made jumpers where needed. Avoid sharp kinks that can damage traces.
-
Hide the wire. Run low-voltage wires along the cabinet back or inside the face frame using small clips. Keep it neat because you will see it every day.
-
Test, then tidy. Plug in, test dimming, then secure the power brick and excess cable with adhesive-backed clips or zip ties.
Step-by-step: hardwired strips (high-level)
-
Shut off power and verify. Turn off the breaker and confirm power is off with a tester before you touch any wiring.
-
Decide where switch control comes from. Many installs tap a nearby switch leg or add a new switch. This is the part that often triggers permit requirements.
-
Mount the LED driver in an accessible location. Cabinet interiors are common. Follow the driver’s mounting and clearance instructions so it stays cool and serviceable.
-
Run line-voltage to the driver and low-voltage to the strips. Follow local code for cable types, protection, and securing. Use an approved junction box or wiring compartment, and do not bury unapproved splices behind cabinets.
-
Install strips as above. Clean, stick, clip, and route low-voltage wiring cleanly.
-
Make final connections and test. If you are unsure here, this is a perfect handoff point for an electrician.
Pro tip: If you hate seeing “LED dots,” spend a few bucks on aluminum channel with a frosted diffuser. It also protects the strip from steam, bumps, and wipe-down cleaning.
Install option 2: puck lights
Spacing
- Most counters look good with pucks spaced about 12 to 18 inches apart.
- Start by placing one puck near each end of a run, then fill in evenly.
- For a sink run, place a puck centered over the sink and one on each side if needed.
Step-by-step: plug-in pucks
-
Lay out locations with painter’s tape. Stand back and check sight lines so you do not see the puck bodies while standing.
-
Decide on surface-mount vs recessed. Surface mount is simplest. Recessed pucks require a hole saw and enough cabinet bottom thickness.
-
Drill pass-through holes for wiring. Most puck kits daisy-chain with small low-voltage connectors. Drill small holes in cabinet dividers to route cables cleanly, and add grommets if the edges are rough.
-
Mount each puck. Use the provided screws. Adhesive-only pucks tend to sag over time, especially under older cabinets with a slightly dusty finish.
-
Connect to the driver and test. Hide the driver in a cabinet near the outlet, then secure extra wire with clips.
Step-by-step: hardwired pucks (high-level)
-
Shut off power and verify. Turn off the breaker and confirm power is off with a tester.
-
Install an accessible driver or transformer. Most puck systems are low-voltage and need a driver, even if the feed is hardwired. Follow the mounting and clearance instructions.
-
Bring power to the driver per code. Use an approved junction box or wiring compartment and proper strain relief.
-
Run low-voltage wiring to pucks. Drill neat pass-through holes and protect cables from sharp edges.
-
Mount pucks, connect, and test. Confirm your dimmer is compatible with the driver if you plan to dim.
Install option 3: light bars
Light bars are my go-to when someone wants a straightforward install without messing with cutting strips and connectors.
Step-by-step: plug-in bars
-
Choose bar lengths. Plan for full coverage across each cabinet section. If bars are linkable, confirm the max number you can connect on one power supply.
-
Mark mounting points. Most bars use keyholes or clips. Hold the bar in place and mark screw locations.
-
Pre-drill and mount. Use short screws that will not poke through the cabinet bottom. This is a real thing that happens. Ask me how I know.
-
Link bars and manage cords. Run linking cables tight to the cabinet back, then tuck the driver and plug where they will not interfere with stored items.
-
Test for flicker and dimming. If you get flicker, the dimmer type (standard LED or TRIAC vs ELV) or the driver load is often the mismatch, not the bar itself.
Step-by-step: hardwired bars (high-level)
-
Confirm the fixture is rated for hardwiring. Some plug-in-only bars are not designed to be modified.
-
Shut off power and verify. Turn off the breaker and confirm power is off with a tester.
-
Install a switched feed to an approved connection point. Many hardwired bars have a built-in wiring compartment. If not, you need a junction box in an accessible location. Follow the fixture instructions and local code.
-
Mount bars, connect, and test. Follow the manufacturer instructions for linking, grounding (if applicable), and dimmer compatibility.
Cord and wire hiding
Neat cable management is what separates “DIY install” from “why are there spaghetti wires under my cabinets.”
- In-cabinet routing: drill small pass-through holes between cabinets and use grommets for a clean finish.
- Clips and staples: use low-voltage clips under the cabinet to keep runs straight and tight to the back.
- Raceways and cord covers: paintable covers are great when you cannot drill or when an outlet is in an awkward spot.
- Hide the driver smartly: pick a spot you can actually reach later. Drivers and power supplies are the most likely part to need service.
Budget comparison
Prices vary by brand, brightness, and whether you add channels, diffusers, or smart controls. These ranges are a good planning baseline for an average kitchen with about 12 to 20 linear feet of upper cabinets.
Typical costs
- LED strips (plug-in): $30 to $120 for a decent kit. Add $20 to $80 for aluminum channel and diffusers.
- LED strips (hardwired): $60 to $200 in materials depending on driver and dimmer. Electrician help for hookup often adds $150 to $400+ depending on access and scope.
- Puck lights (plug-in): $40 to $150 for a set, depending on count and brightness.
- Puck lights (hardwired or transformer-based): $80 to $250 in materials, plus possible electrician cost if new wiring is needed.
- Light bars (plug-in, linkable): $50 to $200 depending on lengths and brand.
- Light bars (hardwired): $80 to $250+ in materials plus electrical labor if adding or extending a switched circuit.
Thrifty move: If your kitchen has an outlet inside a cabinet already, plug-in systems can look almost as clean as hardwired with smart cord routing, and they usually cost less end-to-end.
Common mistakes
- Sticking strips to a dirty surface: Clean with alcohol first, especially above the stove.
- Mounting too far back: Put the light closer to the cabinet front so it actually hits your work area.
- No service access: Do not bury a driver where you cannot reach it later.
- Buying the wrong dimmer: LEDs can be picky. Match the dimmer type to the driver and fixture specs.
- Overloading a power supply: Add up wattage, then keep a little headroom. Drivers run happier when not maxed out.
- Ignoring heat and moisture: Near sinks and stoves, use secure mounting and consider a fixture or strip with better protection for steam and splatter.
Quick FAQ
Do under-cabinet lights need their own circuit?
Usually not for low-watt LED systems, but it depends on how you are tapping power and what else is on that circuit. If you are adding new wiring, follow local code and consider consulting an electrician.
Should I choose warm or cool light?
If you want cozy, go 2700K to 3000K. If you want crisp task lighting, go 3500K to 4000K. If your overhead kitchen lights are already one color temperature, match it so the room feels consistent.
Can I install under-cabinet lighting without drilling holes?
Sometimes. Adhesive LED strips can be no-drill, but most clean installs still benefit from a few small holes to route wires through cabinet dividers and hide cords.
My simple recommendation
If you want the most “wow” per dollar, start with a plug-in LED strip kit plus diffuser channel, mounted for task lighting near the cabinet front. If you want a fast, sturdy install with minimal fiddling, go with linkable light bars. And if you want spot highlights, pucks are great, just plan your spacing carefully.
Whatever you choose, take an extra 20 minutes to plan placement and cord routing. That is the difference between “we added lights” and “this kitchen looks professionally upgraded.”
About Marcus Vance
Content Creator @ Grit & Home
Marcus Vance is a lifelong DIY enthusiast and self-taught home renovator who has spent the last decade transforming a dilapidated 1970s ranch into his family's dream home. He specializes in budget-friendly carpentry, room-by-room renovations, and demystifying power tools for beginners. Through his writing, Marcus shares practical tutorials and hard-learned lessons to help homeowners tackle their own projects with confidence.