If your house feels drafty in winter, stubbornly hot in summer, or your HVAC seems like it never gets a day off, there is a good chance your attic is the main culprit. I learned this the hard way in our 1970s ranch. I kept chasing comfort room by room, but the biggest improvement came when I stopped treating symptoms and fixed the lid of the house.
This page walks you through a DIY attic insulation job the way I would explain it to a neighbor: how to pick the right R-value for your climate, why air sealing comes first, which insulation material makes sense for your attic, and how to avoid moisture problems that can quietly wreck wood and drywall.
Why attic insulation matters
Heat moves from warm to cold through conduction, convection, and radiation. In real houses, warm air leaks often rise and escape through the attic in winter, especially through little gaps around light fixtures, plumbing vents, and the attic hatch. In summer, a hot roof bakes the attic and that heat radiates down into your living space. Insulation slows heat transfer, and air sealing stops the leaks that make insulation perform like a sweater full of holes.
- Comfort: fewer hot and cold rooms.
- Lower bills: your HVAC runs less often and for shorter cycles.
- Longer HVAC life: less runtime equals less wear.
- Moisture control: properly air sealed attics reduce condensation risk.
Safety checklist
Attics are awkward, dusty, and full of surprises. Before you start, plan for safety. It is not overkill.
- Watch your footing: only step on joists or a laid-down walkway. Drywall will not hold you.
- Power awareness: knob-and-tube wiring, open junction boxes, and DIY electrical splices are a no-go until corrected.
- Personal protection: respirator or at least an N95, gloves, eye protection, and long sleeves. Fiberglass itch is real.
- Lighting: clamp lights or a headlamp. Dark attics lead to mistakes.
- Temperature: work early. Summer attics can be dangerously hot.
When to call a pro: active roof leaks, mold that keeps coming back, vermiculite insulation (possible asbestos), damaged wiring, or if you are considering full spray foam and want a warranty-backed install.
Combustion safety note: if your attic contains an atmospheric-combustion furnace or water heater, do not tighten the attic up without confirming it is venting safely. Backdrafting and carbon monoxide are real risks. When in doubt, get a combustion safety check.
Step 0: Prep and inspect
This is the unglamorous part that keeps you from burying problems under fresh insulation.
- Roof leaks: look for stains, wet sheathing, or damp insulation. Fix leaks first.
- Pests: address rodents or birds before you insulate. Remove contaminated insulation if needed.
- Bath fans: confirm every bathroom fan exhausts outdoors through a roof cap or wall cap, not into the attic.
- Ducts: if you have HVAC ducts in the attic, check for disconnected runs and obvious leaks, then seal with mastic or UL-rated foil tape.
- Wiring: do a quick scan for unsafe splices, overheated fixtures, and old recessed lights.
When to remove existing insulation: if it is wet, moldy, or rodent-contaminated, removal is usually worth it. If it is dry and reasonably clean, you can often air seal and then add more on top.
Step 1: Climate zone and R-value
R-value is resistance to heat flow. Higher R-value means better insulating power. The right number depends on your climate and what you already have up there.
Below are typical U.S. attic floor targets aligned with commonly cited guidance from the U.S. Department of Energy and the IECC. Exact requirements vary by code edition, local amendments, and whether you are insulating an attic floor (vented attic) or a roofline (cathedral ceiling or conditioned attic). If you want to be bulletproof, check your local building department and utility rebate rules.
Recommended total attic R-values
- Zones 1 to 2: R-30 to R-49
- Zone 3: R-30 to R-60 (many homes target R-38 to R-49)
- Zones 4 to 5: R-38 to R-60 (R-49 is a common target)
- Zones 6 to 8: R-49 to R-60+
How to find your zone: search “IECC climate zone map” plus your ZIP code, or use your state energy office site.
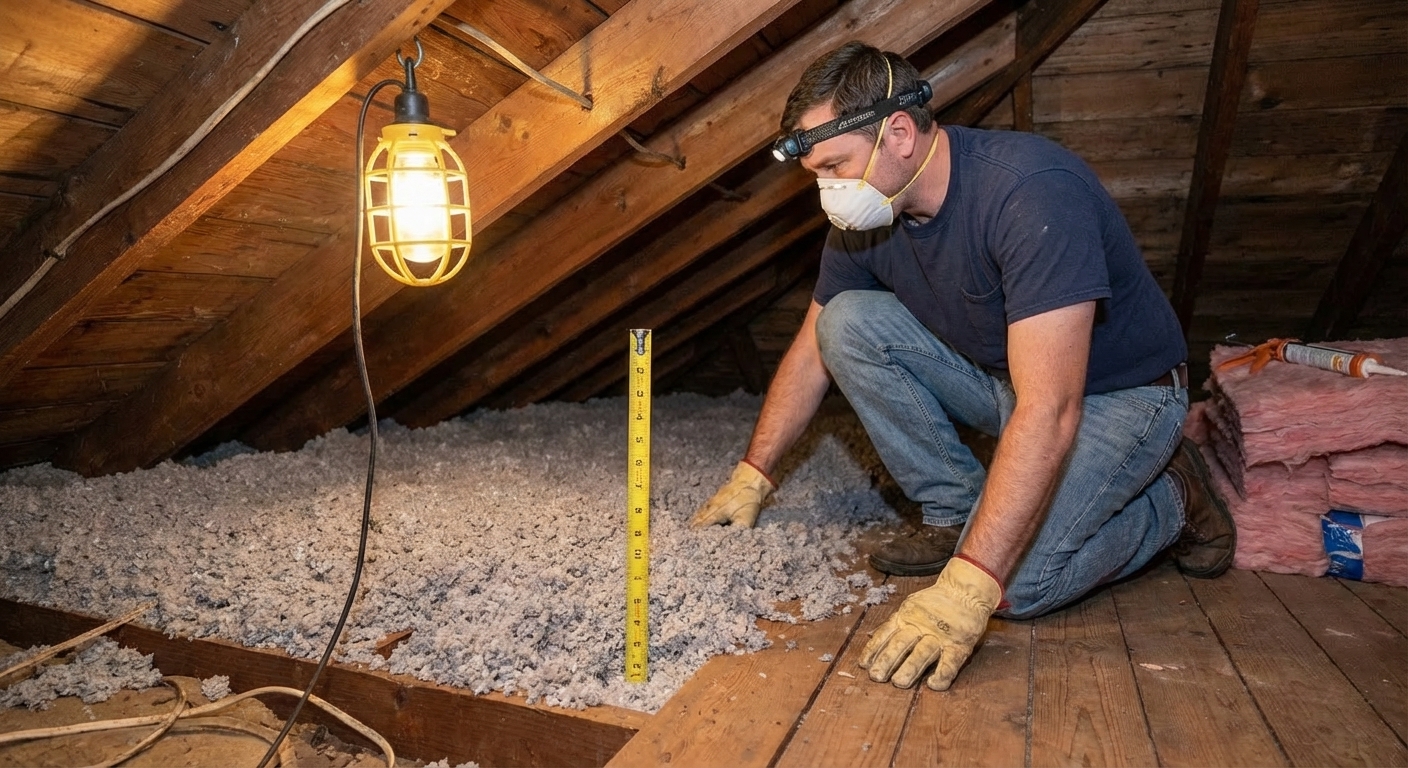
How much do you already have?
If you have existing insulation, measure its depth in a few spots. Depth alone is not perfect, but it gets you close enough to plan.
- Fiberglass loose fill: often around R-2.2 to R-2.7 per inch
- Cellulose loose fill: often around R-3.2 to R-3.8 per inch
- Fiberglass batts: varies a lot by product and install quality, commonly around R-3.0 to R-3.7 per inch
Rule of thumb: if you can easily see the tops of the ceiling joists across the attic, you probably need more.
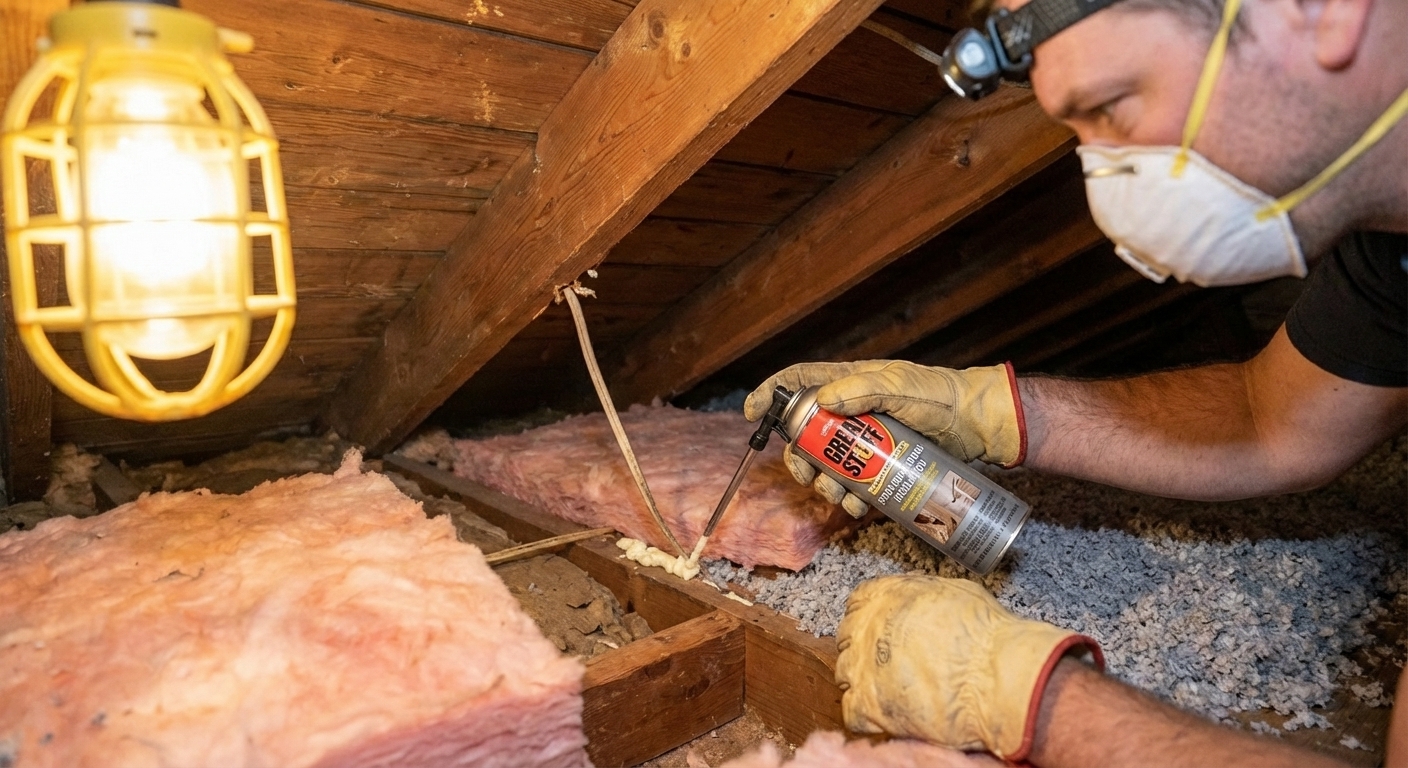
Step 2: Air seal first
If I could go back and redo my first attic upgrade, I would spend more time air sealing before adding a single bag of insulation. Air leaks can crush real world performance, and they also carry moisture into the attic where it can condense on cold surfaces.
Common air leaks
- Attic hatch or pull-down stairs
- Plumbing vent stacks and drain penetrations
- Bathroom fan housings and duct penetrations
- Recessed lights (especially older, non-IC rated cans)
- Top plates (where drywall meets the attic)
- Electrical wires through the drywall
- Chimney and flue chases (special rules apply)
Best sealing materials
- Acrylic latex caulk: small gaps and seams.
- Fire-blocking spray foam: medium gaps around penetrations (read the label).
- Rigid foam board plus spray foam: bigger holes like duct or chase openings.
- Foil tape or mastic: for duct sealing (avoid regular duct tape).
- Sheet metal plus high-temp sealant: around chimneys and metal flues. Maintain required clearances.
DIY reality check: the sealing work is fussy, but it is where the payoff is. Insulation is like a winter coat. Air sealing is zipping it up.
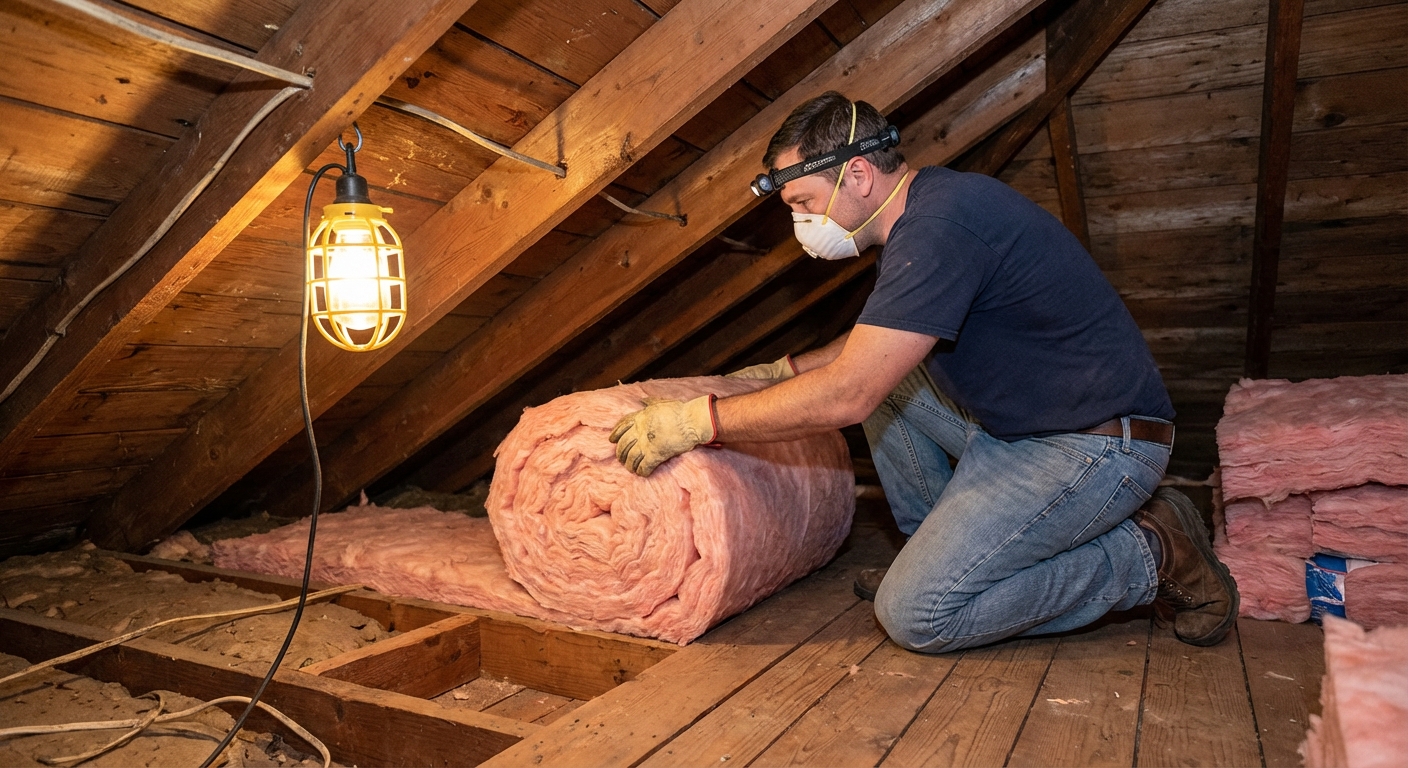
Step 3: Pick an insulation type
Most DIY attic jobs come down to three material choices. There is no perfect option for every house. The best choice depends on your attic access, existing insulation, budget, and whether you need to solve air leakage or mostly add R-value.
Fiberglass batts
Good for: open joist bays, small areas, and DIYers who want a clean, measured install.
- Pros: widely available, straightforward, no special machine.
- Cons: easy to install poorly. Gaps and compression reduce performance. Harder around wiring and odd shapes.
- Best use: in open bays, or as a top layer laid perpendicular over an existing layer to reduce thermal bridging.
Blown-in cellulose (loose fill)
Good for: topping off existing insulation, irregular spaces, and fast coverage.
- Pros: fills around obstacles well, often DIY-friendly with a free blower rental when you buy enough bags, good R per inch.
- Cons: dusty install, needs depth markers, can settle a bit over time (plan for it).
- Best use: adding a lot of R-value quickly across a large attic floor.
Spray foam (open-cell or closed-cell)
Good for: complex air sealing needs, insulating rooflines for conditioned attics, or where space is limited.
- Pros: air sealing and insulation in one, high performance per inch (especially closed-cell).
- Cons: expensive, DIY kits are costly for large areas, risk of poor installation.
- Repair and inspection note: spray foam applied to the roofline can make roof leak detection and future repairs harder in some cases. Local practices vary.
- Best use: targeted sealing (tricky penetrations) or professional roofline encapsulation when appropriate.

Step 4: Ventilation and baffles
Most vented attics need airflow from soffit vents (low) to ridge or roof vents (high). When you add insulation, you can accidentally block soffits, which can raise moisture risk and can also increase roof deck temperatures.
- Install rafter baffles: at the eaves to keep an air channel open from soffit to attic.
- Keep the channel clear: do not pack insulation into the roof deck at the eaves in a vented attic.
- Do not bury bath fan exhausts: ensure they vent outdoors, not into the attic.
Vent sizing rule of thumb: many codes use a net free vent area around 1:150 of attic floor area, or 1:300 if specific conditions are met (balanced intake and exhaust, vapor retarder details, and so on). Follow local code or manufacturer guidance if you are adjusting vents.
Note: an unvented “hot roof” is a different strategy that usually involves spray foam at the roofline and specific moisture rules. If you are not intentionally creating a conditioned attic, stick with a vented attic floor approach.
Step 5: Install insulation
Option A: Blow in over existing (most common)
- 1) Air seal first: do not skip it.
- 2) Install baffles: at all soffit bays.
- 3) Add depth markers: staple rulers or use cardboard depth gauges so you hit your target depth evenly.
- 4) Build a dam at the hatch: rigid foam or plywood keeps loose fill from spilling when you open the hatch.
- 5) Blow evenly: start at the far end and work back toward the access point.
- 6) Keep clearances: do not cover non-IC recessed lights, flues, or ventilation pathways. Use approved covers where needed.
Bag count tip: do not guess. Use the manufacturer coverage chart on the bag for your target R-value. It tells you how many bags per 1,000 square feet and the settled depth you should hit.
Option B: Fiberglass batts (new or second layer)
- 1) Fit, do not force: batts should fill the cavity without being compressed.
- 2) Cut around obstacles: split batts around wires and pipes instead of mashing them down.
- 3) Avoid gaps: small gaps add up to big performance losses.
- 4) For a second layer: lay batts perpendicular across joists to reduce thermal bridging.
My wish-I-knew tip: any time you are tempted to smash insulation into place, stop and cut it properly. Compressed insulation can lose a surprising chunk of its rated R-value.
Attic hatch upgrade
If you insulate everything except the attic hatch or pull-down stairs, you leave a big weak spot. This is one of the easiest upgrades to feel.
- Weatherstrip the opening: use adhesive foam gasket or high-quality weatherstripping so the lid closes tight.
- Add insulation to the lid: glue rigid foam to the back of the hatch, or build an insulated foam “cap” box over pull-down stairs.
- Latch it tight: a hatch that does not pull snug against weatherstripping still leaks air.
Vapor barrier basics
Vapor barriers and vapor retarders get confusing fast, so here is the homeowner version.
- Air sealing comes first: most moisture problems are air leakage problems, not vapor diffusion problems.
- Do not add polyethylene “just because”: in many climates and assemblies, adding a wrong-side vapor barrier can trap moisture.
- Kraft-faced batts: the facing is a vapor retarder. In a vented attic floor, it typically goes toward the conditioned space (down toward drywall).
- Mixed-humid and hot-humid climates: be cautious with interior vapor barriers. Many homes rely on solid air sealing and proper attic ventilation instead.
If your attic already has faced batts: you can usually blow loose fill over them. The key is sealing air leaks first and keeping ventilation paths open.
If you are unsure: check local code guidance or ask your building department. Moisture mistakes are expensive, and this is one area where a 10-minute phone call can save a lot of grief.
Costs
Prices vary by region and season. These are typical U.S. planning ranges for materials, not a quote.
DIY material ranges
- Blown-in cellulose: about $0.80 to $1.50 per square foot for a meaningful top-off, depending on depth and bag pricing.
- Blown-in fiberglass: about $0.70 to $1.40 per square foot.
- Fiberglass batts: about $0.90 to $2.00 per square foot depending on R-value and whether you do one or two layers.
- Air sealing supplies: typically $50 to $250 (caulk, foam, rigid board, tape), sometimes more if you build hatch insulation and dams.
Professional install
- Blown-in attic floor insulation: often $1.50 to $3.50 per square foot.
- Spray foam: commonly $3.00 to $8.00+ per square foot depending on type, thickness, and roofline complexity.
Budget tip: check utility rebates and state programs before you buy. Many areas offer rebates for attic air sealing and insulation, and some require pre-approval.
Savings and payback
Savings depend on your climate, fuel costs, and how under-insulated or leaky you started. Still, sealing and insulating an under-performing attic is often one of the best returns you can get.
- Typical range: many homeowners see roughly 10% to 20% reduction in heating and cooling costs after sealing and insulating an under-insulated attic.
- Payback: DIY attic insulation often pays back in 2 to 5 years in colder or very hot climates, sometimes faster with rebates. In mild climates or already decent attics, it can take longer.
A quick example: If you spend $1,200 on air sealing and cellulose for a mid-sized attic and your combined heating and cooling costs are $250 per month, a 10% savings averages $25 per month. That is about a 4-year payback, not counting comfort benefits.
To tighten your estimate:
- Annual HVAC spend: (average monthly bill for heating and cooling) × 12
- Estimated savings: annual spend × 0.10 to 0.20
- Simple payback: project cost ÷ estimated annual savings
Common mistakes
- Insulating before air sealing: you end up paying to bury leaks.
- Blocking soffit vents: can lead to moisture buildup and poor attic performance.
- Skipping the hatch: it becomes a big weak spot.
- Compressing batts: reduces R-value and creates cold stripes.
- Covering unsafe fixtures: non-IC recessed lights and hot flues need proper clearance and approved covers.
- Ignoring duct leaks: leaky ducts in the attic can erase a lot of your insulation gains.
A simple weekend plan
- Inspect: check for roof leaks, mold, pest activity, wiring issues, and bath fan venting.
- Air seal: hit penetrations, top plates, hatch framing, and duct connections.
- Ventilation prep: install baffles at eaves and clear existing vents.
- Hatch upgrade: weatherstrip and add rigid foam insulation or an insulated stair cover.
- Insulate: blow in cellulose or add batts to reach your target R-value.
- Final pass: confirm vents are open, clearances are maintained, and depth is even.
If you want extra certainty, confirm your climate zone and target R-value using the current DOE insulation recommendations and your local code or rebate program requirements. That little double-check keeps this whole project drama-free.
About Marcus Vance
Content Creator @ Grit & Home
Marcus Vance is a lifelong DIY enthusiast and self-taught home renovator who has spent the last decade transforming a dilapidated 1970s ranch into his family's dream home. He specializes in budget-friendly carpentry, room-by-room renovations, and demystifying power tools for beginners. Through his writing, Marcus shares practical tutorials and hard-learned lessons to help homeowners tackle their own projects with confidence.