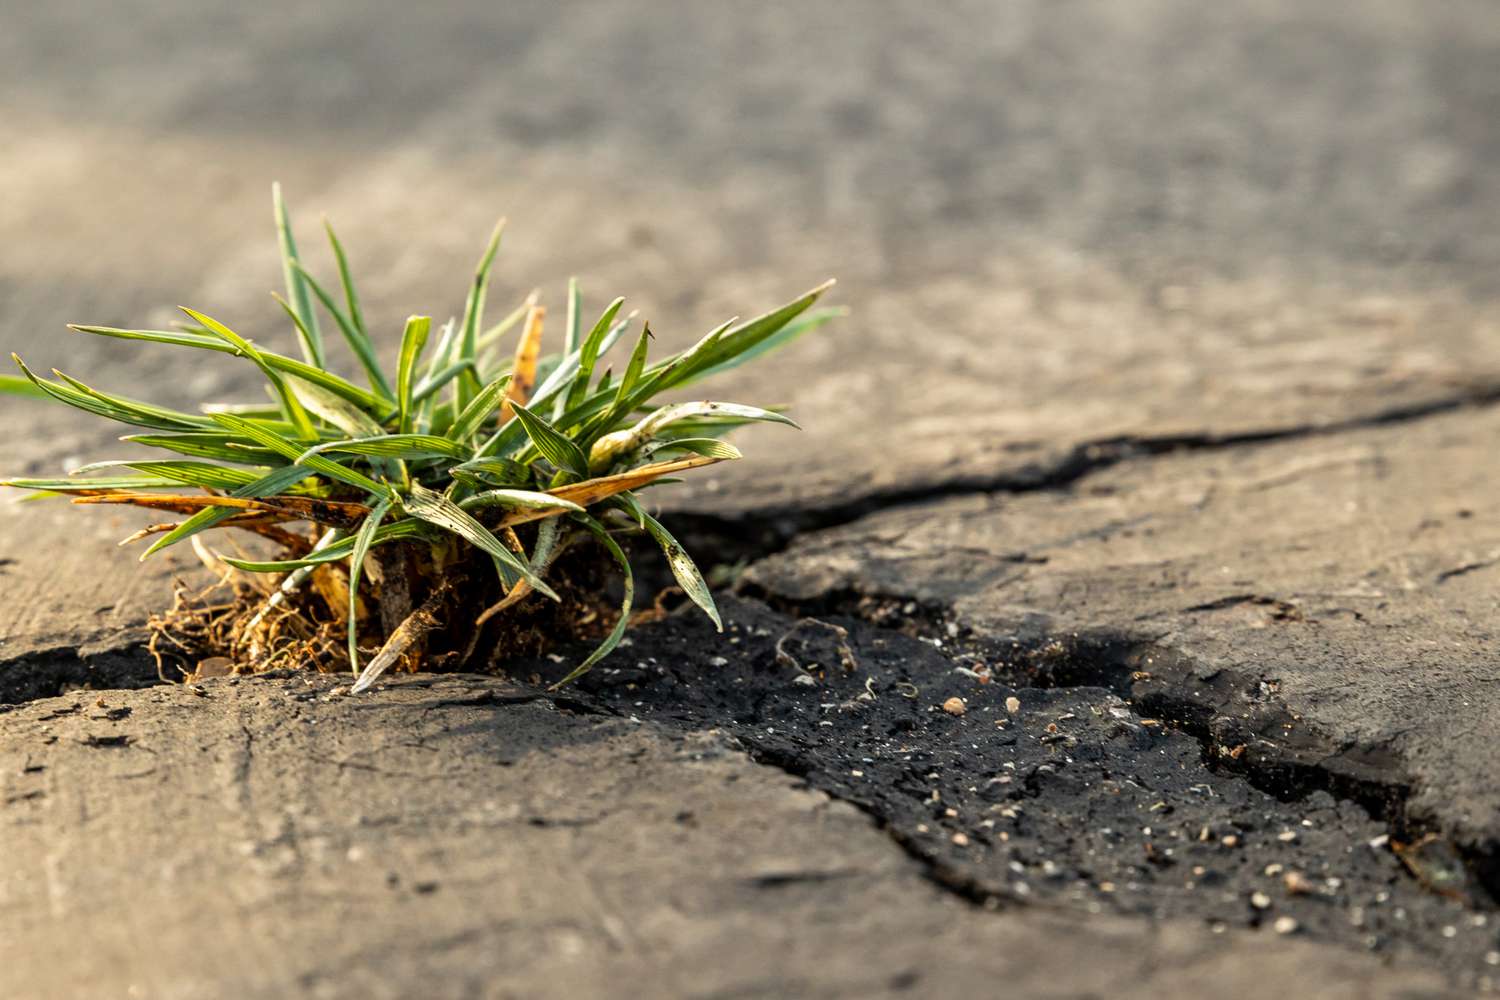
Why weeds love cracks
If you have weeds popping up between driveway slabs or along the sidewalk edge, you are not alone. Cracks and joints collect windblown dirt, decomposed leaves, and grit. Add a little moisture, and you have the perfect tiny flower pot that just happens to be made of concrete.
The good news is you can fix this in two phases: kill what is there, then block the crack so new seeds cannot move in. If you only do the first step, you will be right back here in a few weeks.
Quick safety and surface notes
- Concrete vs asphalt: Asphalt softens with heat and can be easier to mark or damage, especially in hot weather or on older surfaces. Avoid torching asphalt. With boiling water, be cautious in heat, and test a small spot if you are unsure.
- Pavers: Paver joints are meant to be filled. The best long-term solution is almost always polymeric sand after you kill and clean the joints.
- Runoff matters: Anything you pour or spray can wash toward lawns, gardens, drains, and ponds. Use the least aggressive method that works, and spot-treat.
- Local rules: Labels and local regulations matter. Some municipalities, HOAs, or fire restrictions limit herbicide use or torch weeding, especially near storm drains.
- Weed ID helps: If it is woody or viney, boiling water or vinegar may top-kill it but not finish the roots. That is where a systemic herbicide can help, as long as you choose an active ingredient labeled for the target weed.
Start with prep
Tools that help
- Stiff wire brush or crack brush
- Flat screwdriver or crack weeding tool
- Shop vac or leaf blower
- Garden sprayer (for vinegar or herbicide)
- Gloves and eye protection
5-minute prep steps
- Pull the big stuff: Grab tall weeds by the base and pull. This opens space for treatment to reach lower growth.
- Scrape and brush: Break up packed debris in the crack. You want treatment to contact plant tissue, not just dirt.
- Blow or vacuum: Get as much loose soil and seeds out as you can.
I used to skip this and wonder why my “miracle” weed killer was inconsistent. The truth is most failures come from trying to treat weeds that are basically protected by a little trench of soil.
Method 0: Just remove them
If you want a zero-treatment option, you can absolutely go old school. It is not always the fastest, but it is simple and effective when you pair it with prevention.
How to do it
- Use a crack weeding tool or a flat screwdriver to pry weeds out at the roots.
- Brush the joint clean and blow out debris.
- Move straight to prevention: refill paver joints with polymeric sand or seal true cracks in concrete and asphalt.
This works best after rain or a light watering, when the soil in the crack is slightly softened.
Method 1: Boiling water
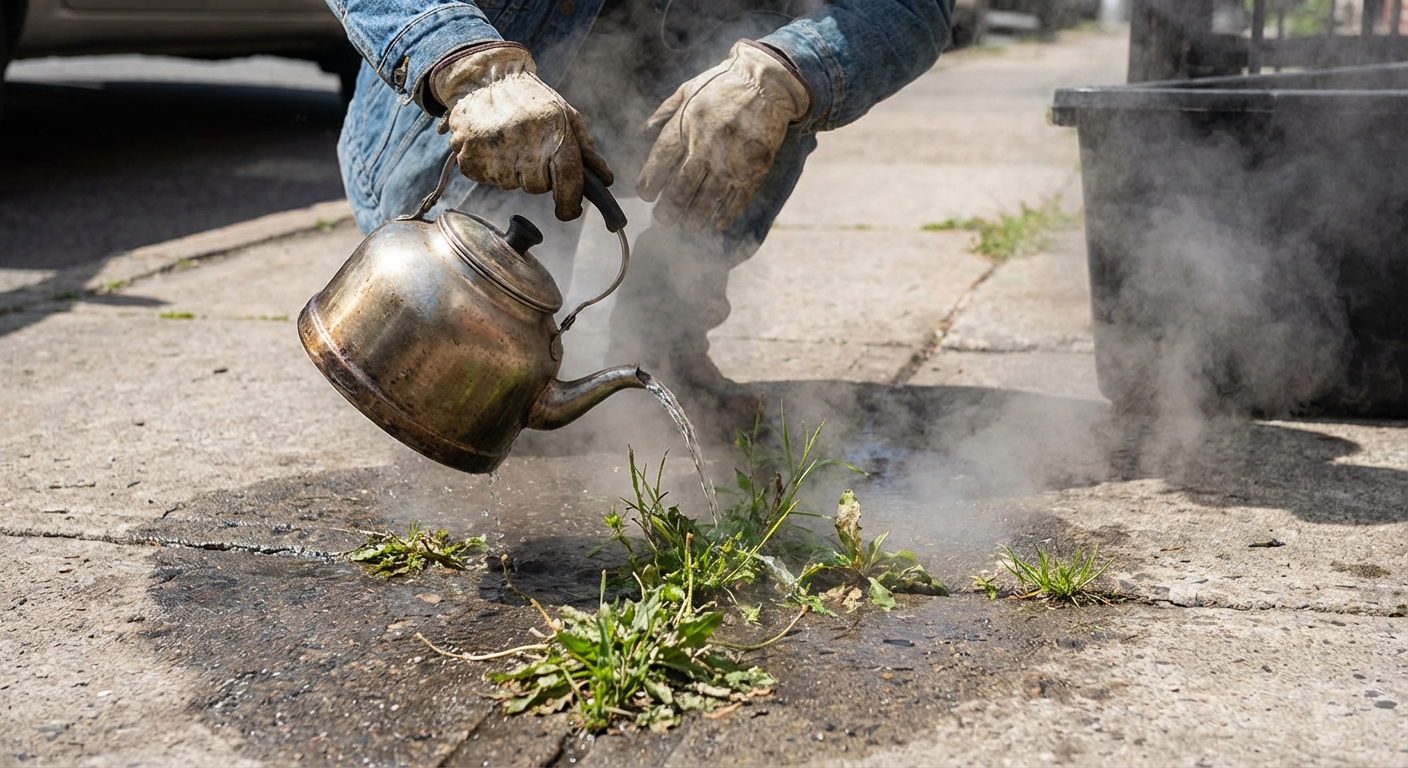
Boiling water works by rupturing plant cells on contact. It is one of my favorite first tries because it costs almost nothing and uses no herbicides.
Best for
- Small patches and fresh weeds
- Sidewalk joints and concrete cracks
- Homes with kids and pets where you want minimal residue
How to do it
- Boil a full kettle or pot.
- Slowly pour directly onto the weed crowns and along the length of the crack.
- Wait 24 hours. Most weeds wilt within hours and brown out by the next day.
- Repeat only if you see green returning, usually in 3 to 7 days.
Watch-outs
- Boiling water can burn you fast. Wear closed-toe shoes and pour slowly.
- It can also cook nearby grass. Keep the pour tight to the crack.
- On asphalt, use extra caution in hot weather and on older driveways. Avoid repeatedly flooding the same spot with very hot water, and test a small area if you are unsure.
Method 2: Vinegar solution
Vinegar is a contact killer. It burns the top growth, especially in hot, dry weather. Household vinegar is typically 5 percent acetic acid. Stronger horticultural vinegar exists, but it is much harsher and can cause serious burns, so read labels and wear proper protection.
A simple driveway-crack mix
- 1 gallon white vinegar (5 percent)
- 1 tablespoon dish soap (helps it stick to leaves)
Soap note: Use a small amount, and avoid products with added degreasers, bleach, or heavy-duty additives. You are looking for simple “stickiness,” not extra chemistry.
Skip the salt unless you truly do not care about anything growing nearby for a long time. Salt migrates and can damage soil along edges and landscaping beds.
How to use it
- Pick a dry day with sun if possible.
- Wear gloves and eye protection. For stronger vinegars, add long sleeves and closed-toe shoes.
- Spot-spray leaves and crowns until wet but not running. Avoid overspray onto lawns, ornamentals, and garden edges.
- Recheck after 24 to 48 hours and reapply if needed.
What to expect
- Great on young annual weeds.
- Often needs repeat applications on tough perennials.
- Does not prevent new seeds from sprouting later.
Method 3: Commercial herbicides
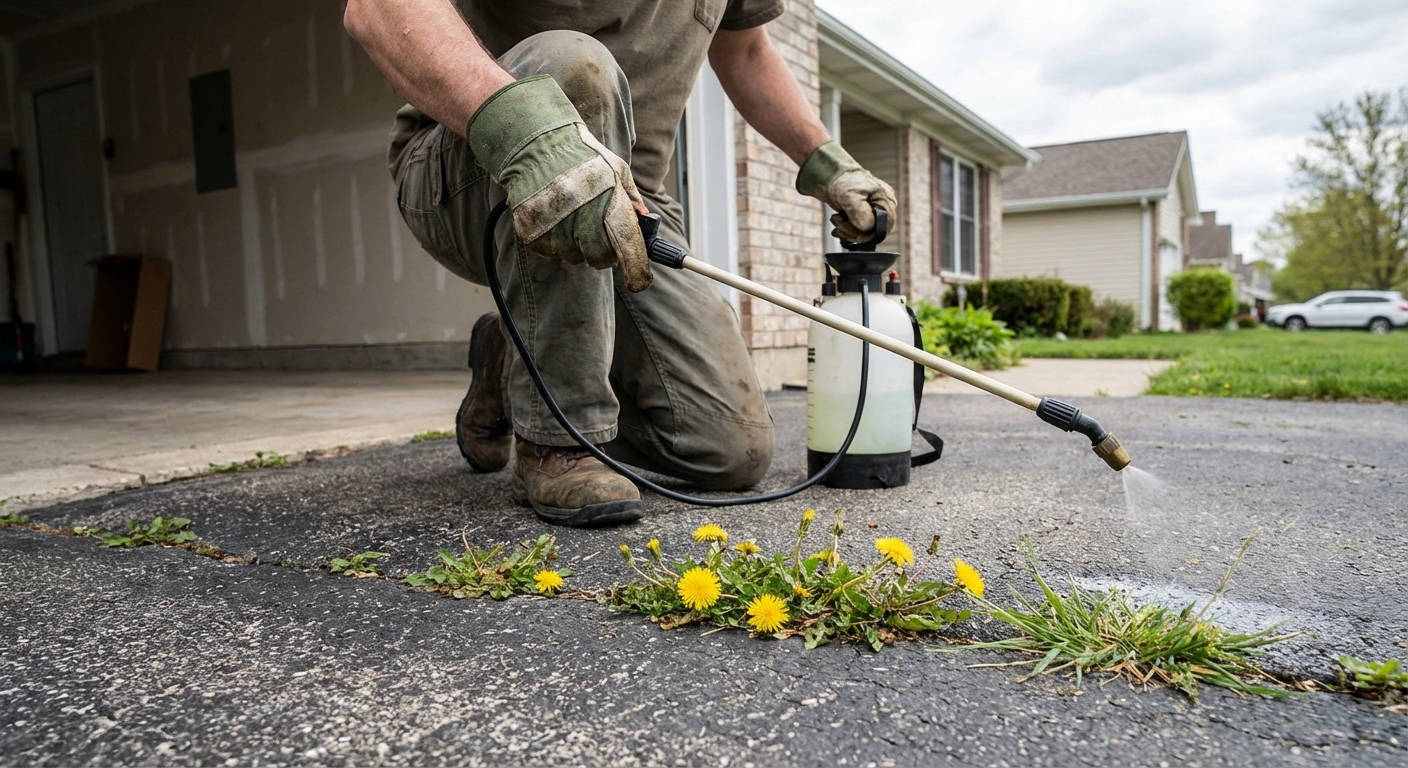
If weeds keep coming back from the same spot, you are usually dealing with a perennial with a deep or spreading root system. This is where a systemic herbicide can be worth it because it moves through the plant and helps kill the roots, not just the leaves.
Two common herbicide types for cracks
- Non-selective systemic killers: These kill most green plants they touch. Use for spot treatments in cracks where you are not trying to preserve nearby grass. For woody or viney weeds, choose a product labeled for that target, and expect that tough plants may take repeat applications or a cut-and-treat approach.
- Killers with pre-emergent: Some products include a pre-emergent to reduce new seedlings for weeks or months, depending on the label. Useful for wide joint networks, but not every pre-emergent is labeled for hardscapes, and some areas restrict use near driveways and drains. Check the label and local rules.
How to get good results
- Read the label: I know, boring. But it tells you the mixing rate, reentry time, rainfast window, and what surfaces are allowed.
- Spray at the right time: Aim for actively growing weeds. Avoid treating drought-stressed plants, and do not spray if rain is expected within the label window.
- Pick calm weather: Wind is how overspray happens.
- Spot treat: Aim low into the crack, not a wide fan over the driveway.
- Give it time: Many systemic herbicides take several days to fully show results.
My rule of thumb
If boiling water or vinegar takes care of it in two rounds, I stop there. If it comes right back from the same root, I step up to a systemic product and then focus hard on prevention so I do not have to spray again later.
Method 4: Torch weeding
A propane torch can quickly wilt weeds in cracks. You are not trying to incinerate them. You are trying to heat the plant tissue until it collapses.
Do not use a torch if
- You have dry leaves, mulch, or flammable debris nearby
- You are working next to vinyl siding, fencing, or landscape fabric
- You are on asphalt or a surface that could be damaged by heat
- Local rules or burn bans prohibit it
If you do torch, keep a hose or extinguisher nearby, work in short bursts, and never leave the area until you are sure nothing is smoldering.
Prevent regrowth
Killing weeds is the satisfying part. Prevention is the part that makes your Saturday effort last all season.
Option A: Polymeric sand
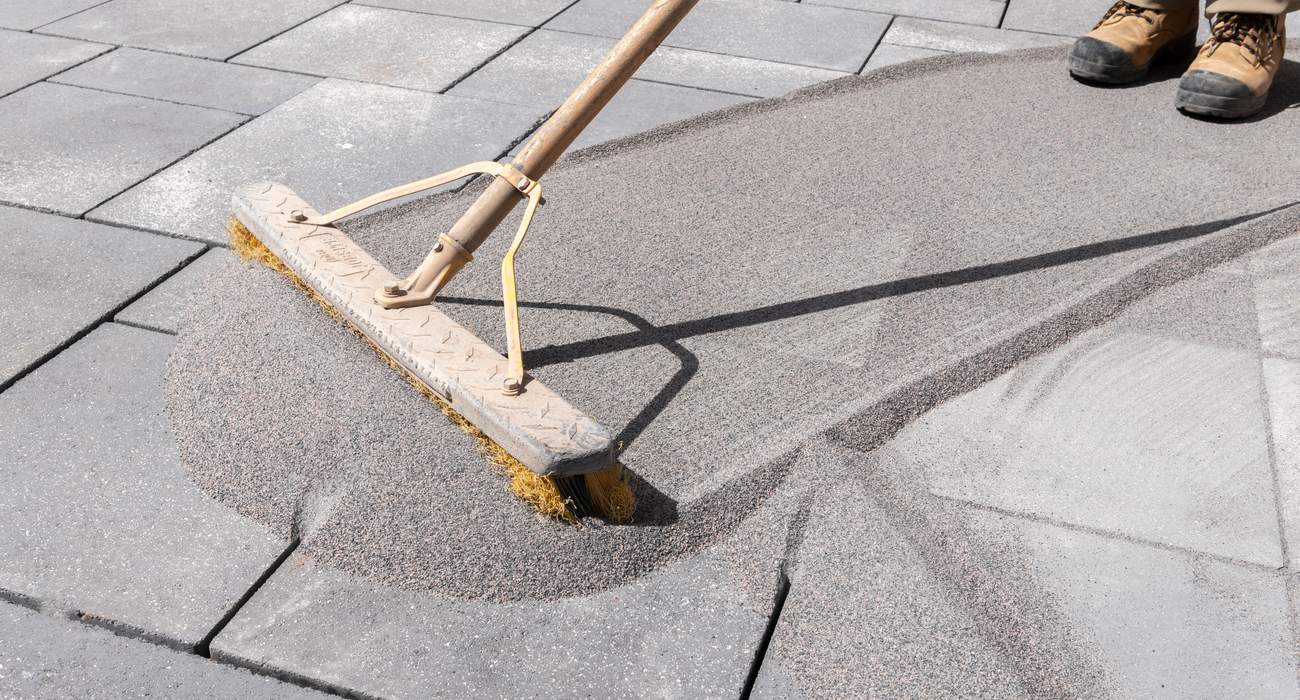
Polymeric sand is joint sand with binders. When activated with water, it firms up and helps block seeds from settling in. It still allows a bit of movement, which is exactly what pavers need.
- Use it on: Paver patios, paver walkways, and some paver driveways
- Do not use it on: Random cracks in poured concrete (crack sealant is usually better there)
Basic steps
- Kill and remove weeds, then clean joints thoroughly.
- Let the surface dry.
- Sweep polymeric sand into joints until full.
- Compact lightly if recommended by the manufacturer.
- Blow off haze carefully, then mist with water per the product directions.
Take your time on cleanup. If you leave polymeric sand dust on the pavers and wet it, you can end up with a stubborn haze. Ask me how I know.
Option B: Crack sealant
If you have a true crack in poured concrete or asphalt, sealant is the long-game move. It blocks water and dirt, and that removes what most weeds need to keep returning.
One caveat: some weeds can still sprout in a little layer of dust on top of a sealed crack or along edges. Keeping the surface clean still matters.
- Concrete: Use a concrete crack sealant appropriate for the crack width. Some are self-leveling for horizontal cracks.
- Asphalt: Use an asphalt crack filler or sealant made for driveways.
Basic steps
- Kill weeds first. Let them dry out, then pull them.
- Clean the crack: scrape, brush, then blow or vacuum.
- Make sure the crack is dry (sealants hate moisture).
- Apply backer rod in deep cracks if needed.
- Apply sealant and tool it smooth per instructions.
Option C: Simple maintenance schedule
- Monthly: Quick blow-out of joints and edges with a leaf blower.
- Every 6 to 8 weeks in growing season: Spot treat tiny sprouts with boiling water or vinegar.
- Once a year: Refill paver joints where sand has washed out, and inspect concrete and asphalt cracks for new gaps.
What works best?
- One-off weeds in a sidewalk joint: Boiling water, then brush out debris.
- Driveway cracks that keep reseeding: Kill the weeds, then seal the crack.
- Paver patio joints: Kill and clean, then polymeric sand.
- Thick, stubborn perennials: Systemic herbicide (spot treatment, labeled for the weed), then prevention with sealant or polymeric sand depending on the surface.
FAQ
Will vinegar kill weeds permanently?
Vinegar often kills the top growth, but many perennials can regrow from roots. It is best as a spot treatment and usually needs repeat applications.
Does salt kill weeds in cracks?
Salt can kill weeds, but it can also travel with water and harm nearby plants and soil. For most homes, it is not my first choice.
How do I keep weeds from coming back in concrete cracks?
After you kill and remove the weeds, clean out the crack and apply the correct crack sealant. That blocks dirt and moisture so seeds cannot establish. Then keep the surface swept so dust does not build up on top.
Should I pressure wash cracks?
Pressure washing can remove soil and seedlings, but it can also blast out joint sand between pavers and widen weak cracks. If you pressure wash, consider a surface-cleaner attachment, avoid forcing water under slabs, and plan to refill paver joints with polymeric sand afterward.
My no-regrets approach
If you want the simplest plan that works on most homes, do this: pull what you can, hit the cracks with boiling water, then once everything is dead and dry, seal concrete and asphalt cracks or refill paver joints with polymeric sand. That combo removes the plant and removes the “tiny pot of dirt” it was living in. Once you do that, weed control turns from a weekend battle into a quick maintenance habit.
About Marcus Vance
Content Creator @ Grit & Home
Marcus Vance is a lifelong DIY enthusiast and self-taught home renovator who has spent the last decade transforming a dilapidated 1970s ranch into his family's dream home. He specializes in budget-friendly carpentry, room-by-room renovations, and demystifying power tools for beginners. Through his writing, Marcus shares practical tutorials and hard-learned lessons to help homeowners tackle their own projects with confidence.