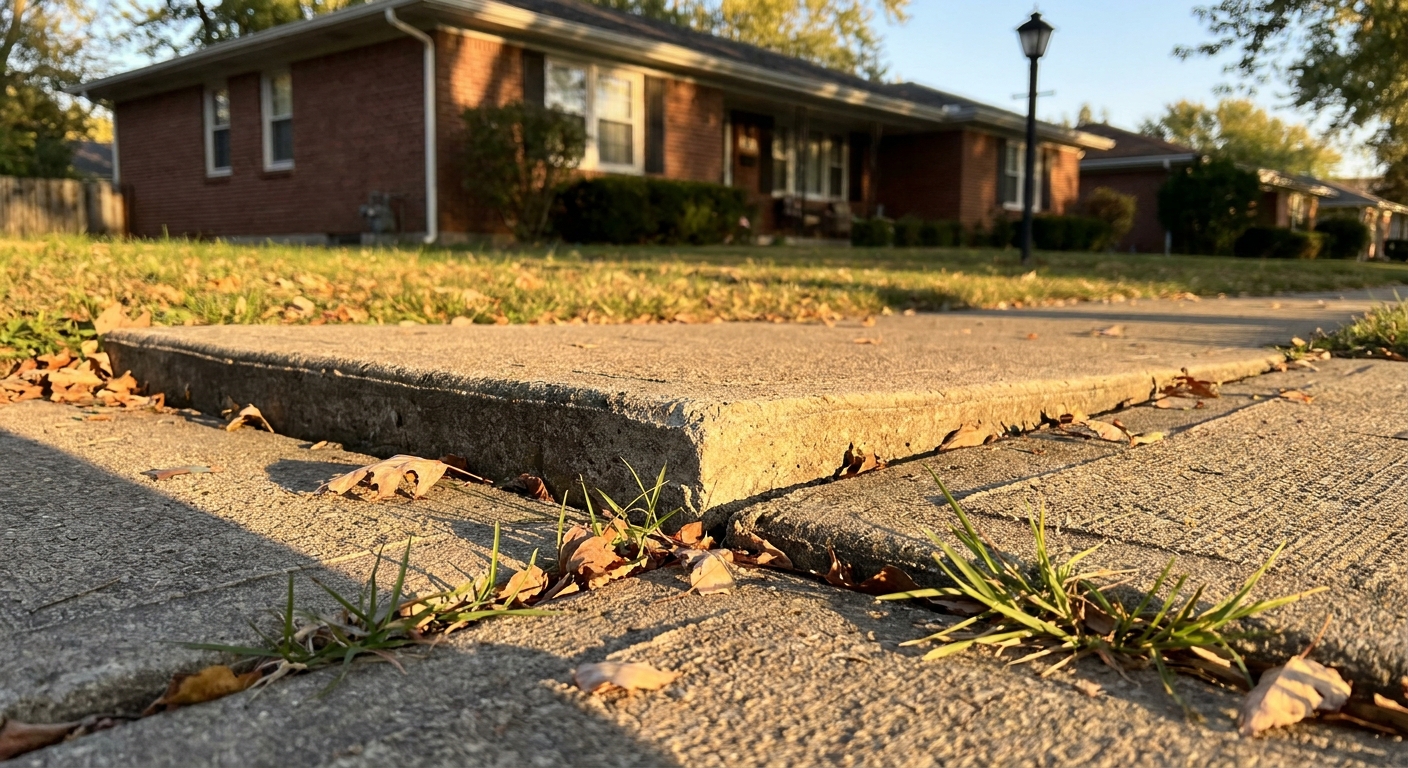
I still remember the first time I caught my boot on a lifted sidewalk joint at our place. I did not fall, but it was a loud reminder that concrete does not have to crack in half to be dangerous.
What counts as “uneven”? Usually it means a vertical change at a joint or crack where one side sits higher than the other. That little lip is a classic trip hazard, and in some places it can also become a liability issue if someone gets hurt.
Uneven slabs are one of the most common, most fixable hazards around a home, and there are three main ways to deal with them: grind the high edge, lift the low slab, or replace the section.
This page walks you through how to decide which route makes sense, what to prep before you touch a tool, and the real-world gotchas like city easements and that one neighbor who hates surprises.
Start here: Is it yours?
Before you rent a grinder or order foam, take five minutes to confirm who owns the problem. Sidewalks and shared hardscape get complicated fast.
Rules and easements
- Public sidewalk in the front yard: Many towns consider the sidewalk public infrastructure but make the homeowner responsible for maintenance. Some towns want a permit, approved contractors, or strict rules about how much height difference is allowed at joints.
- Right-of-way and utility easements: If the slab is near a street, water shutoff, storm drain, or utility box, you might be inside an easement. Digging, drilling, and even replacement can be restricted.
- Tree roots: If a street tree or neighbor’s tree is lifting slabs, there may be ordinances protecting it. Do not assume you can cut roots.
When neighbors matter
- Property lines: Sidewalk panels and shared patios sometimes straddle lines. If your fix changes drainage or creates a lip at the boundary, it can turn into a dispute.
- Shared driveways or alley approaches: Lifting one panel can change how water runs across the rest. Give the neighbor a heads-up, and agree on where water will go.
If you are not sure: call your city public works department and ask, “Is this sidewalk in the public right-of-way, and do I need a permit to grind or raise it?” That one call can save you a redo.
Quick diagnosis
Concrete is heavy. It only takes one weak spot underneath to make one corner sink.
- Soil washout: Downspouts dumping near the slab, poor grading, or sprinkler overspray can carry fine soil away.
- Compaction issues: Backfilled soil (common around new builds, trench repairs, or old landscaping) settles over time.
- Freeze-thaw: Frost can heave (lift) slabs, then leave them uneven as the ground thaws and resettles.
- Tree roots: Roots lift edges and corners, creating a sharp trip lip.
Your fix will last longer if you also address the cause, especially drainage.
Measure it first
Before you choose a method, measure the height difference so you are not guessing.
- Lay a straightedge across the joint (a 2x4 works in a pinch, but a straight level is better).
- Measure the gap from the low slab up to the bottom of the straightedge using a ruler or tape measure.
- Check more than one spot. Corners and edges often differ.
Code note: Trip-hazard definitions and allowable vertical discontinuities vary by jurisdiction and by standard (including ADA-related guidance and municipal sidewalk specs). Many jurisdictions start flagging vertical changes around 1/4 inch (6 mm) or more. Do not assume. Check your local sidewalk program or code.
Choose your fix
Here is the clean way to choose without overthinking it.
Option 1: Grind the high edge
Good fit when: the height difference is small and the slab is otherwise solid. Grinding removes the trip edge by tapering the higher slab down.
- Typical use: commonly used for small lips (often roughly 1/4 inch up to around 1 inch), but local rules and accessibility requirements vary.
- Pros: fastest, usually cheapest, no drilling, no lifting risk.
- Cons: you thin the concrete at the edge, and it does not fix the underlying movement. You also create concrete dust that needs serious control.
Option 2: Lift the slab
Good fit when: the slab is intact but has settled, creating a low spot or a lip where the neighboring panel is higher.
- Pros: restores a flatter surface without full replacement, keeps the original slab, usually quick.
- Cons: can crack slabs if lifted unevenly, requires holes, and can fail if the soil continues to wash out.
Option 3: Replace the slab
Good fit when: the slab is badly cracked, crumbling, or has major root heave that will return quickly.
- Pros: long-term reset if done with proper base prep.
- Cons: more labor, more cost, more disruption. Matching existing concrete color and finish is hard.
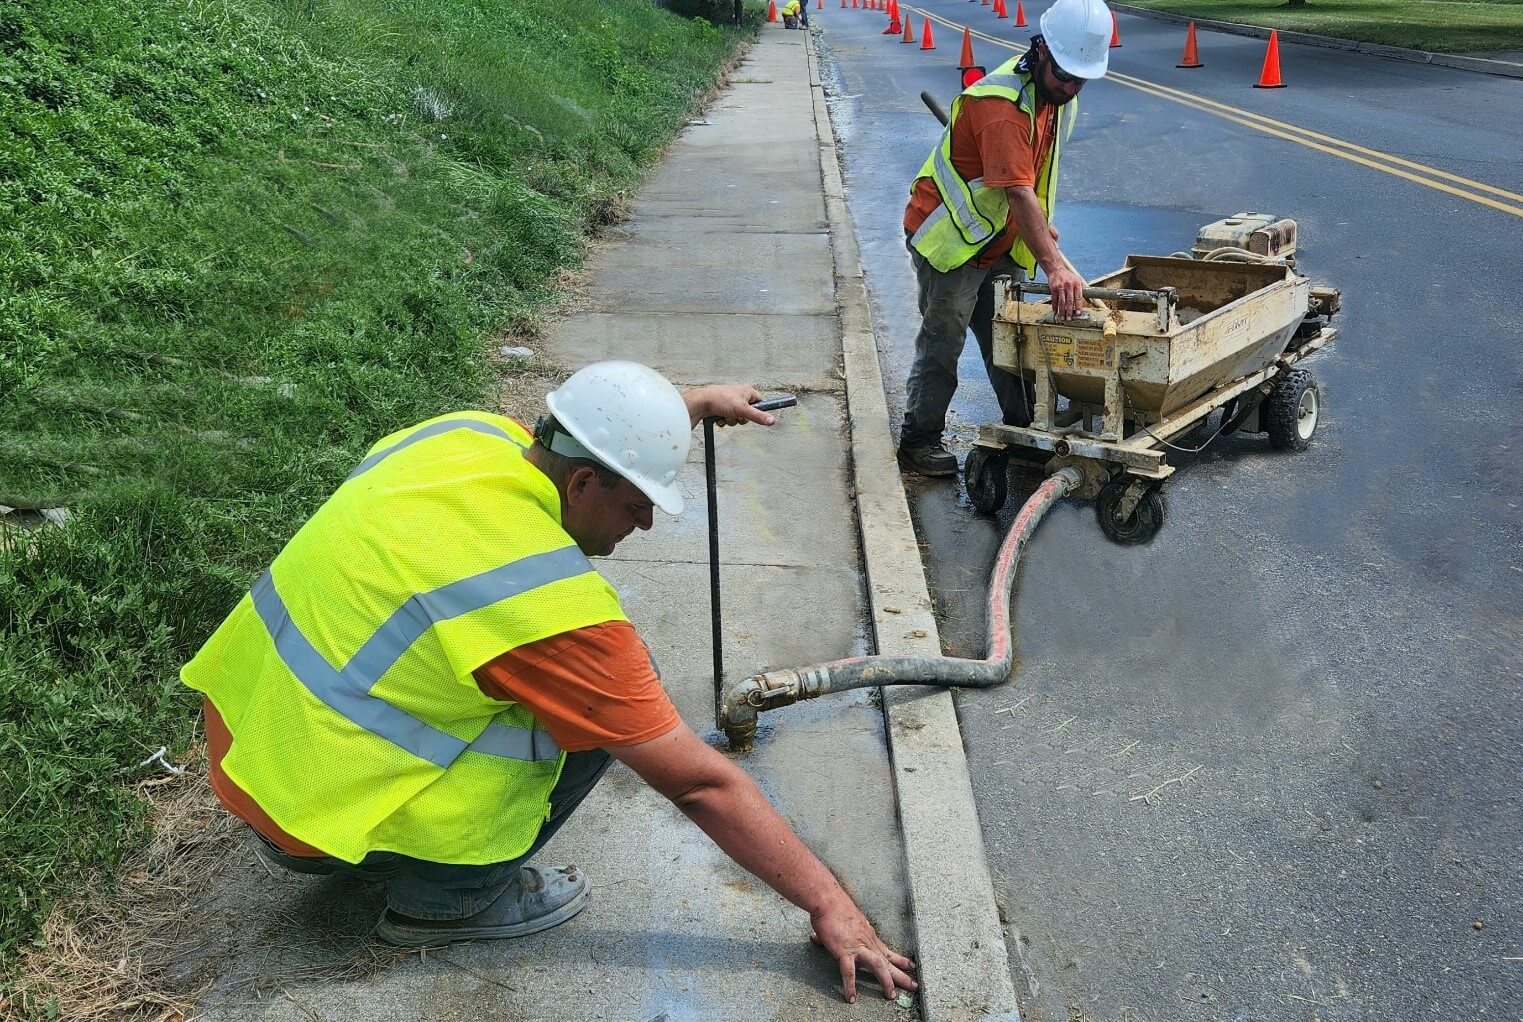
Mud jacking vs polyfoam
Both methods lift concrete by pumping material underneath, but they behave differently once they are in the ground.
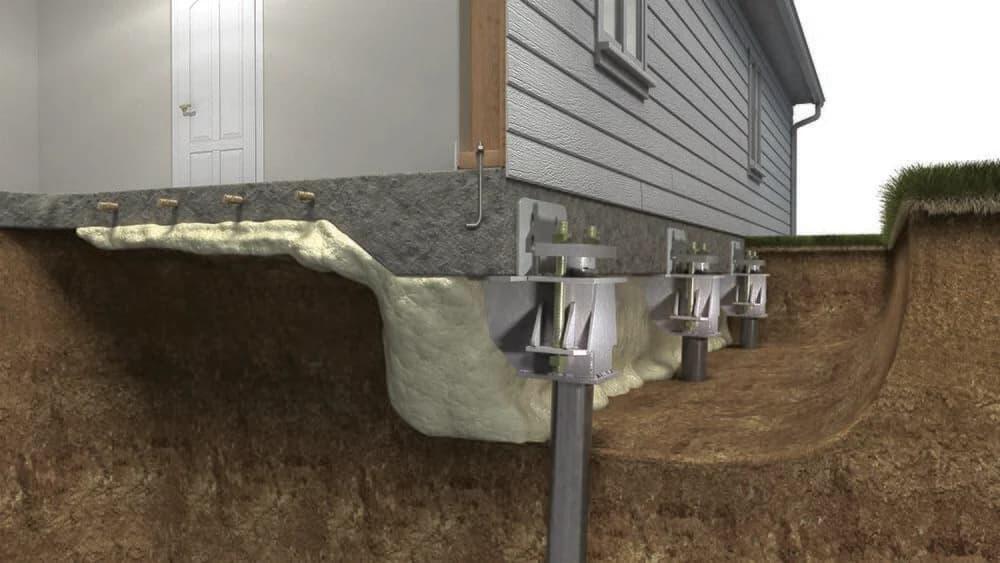
Mud jacking
Mud jacking (also called slab jacking) uses a cement-based slurry, often mixed with sand and fillers, pumped through drilled holes to fill voids and raise the slab.
- Hole size: commonly larger than foam, often around 1 to 2 inches, but it varies by contractor and equipment.
- Weight: slurry is heavier. The bigger issue is not “weight = bad” by itself, it is that weak, wet, or poorly compacted subgrade may keep settling if you do not fix the underlying conditions.
- Cure and use: typically needs more time than foam before it is ready for heavy loads. Light foot traffic may be fine sooner, but it is common to wait 24 to 48 hours before parking vehicles or putting heavy weight on it (follow your contractor’s guidance).
- Cost: often less than polyfoam per job, depending on region.
- Best for: larger, heavier slabs and situations where you want a traditional cementitious fill.
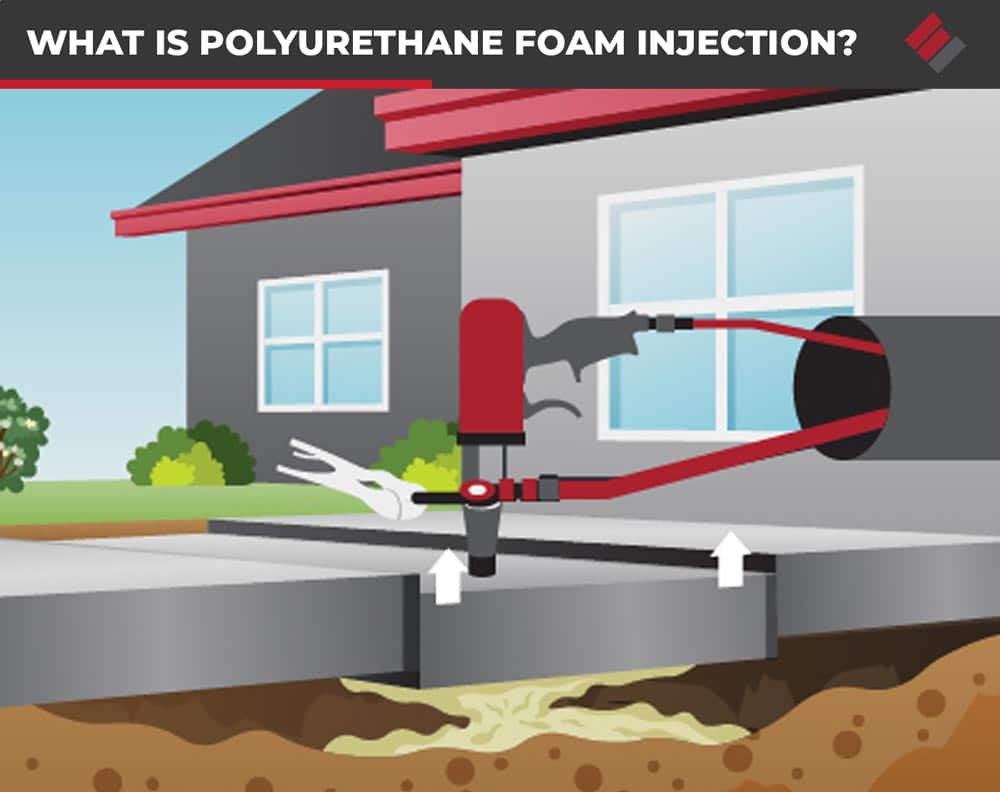
Polyfoam
Polyfoam uses expanding polyurethane injected under the slab. It expands to fill voids and can be dialed in to lift with precision.
- Hole size: commonly smaller, often about 3/8 to 5/8 inch, but it varies by system.
- Weight: very light compared to slurry.
- Speed: cures quickly and is often usable the same day (many crews treat it as “back in service” in hours, not days).
- Best for: precision lifting, minimizing added weight, and faster return to service.
My honest take: If this is a front walk or patio where appearance matters, polyfoam’s smaller holes and smoother control are nice. If the area is big and you are hiring it out anyway, mud jacking can be a solid value. Either way, the best lift is the one paired with drainage fixes so the void does not come back.
DIY polyfoam
DIY foam kits exist, and they can work on small slabs. The risk is not the foam itself. The risk is lifting too fast, lifting unevenly, or lifting a slab that is already cracked and ready to split.
Good DIY candidates
- Small sidewalk panels that have settled at one edge
- Patio corners that dipped from minor washout
- Garage apron corners that are intact but slightly low
Hire it out if
- The slab is large, thick, or tied into steps, footings, or a foundation
- You need more than about 1 to 2 inches of lift across a wide area
- There are multiple slabs involved and you need them to meet cleanly
- The area is in a city right-of-way with rules or inspection requirements
Tools and materials
- Rotary hammer drill and masonry bits sized to your kit
- Shop vacuum for drilling dust
- Foam injection kit and extra nozzles
- Marking paint or chalk
- 4-foot level or straightedge (a long one matters here)
- Pry bar or sturdy wood shims (for gentle persuasion, not brute force)
- Rapid-setting concrete patch or matching repair mortar for holes
- PPE: eye protection, hearing protection, gloves, and a NIOSH-approved respirator for fine dust when drilling (a simple paper dust mask is not enough). Many DIYers use an N95 at minimum; a half-face respirator with P100 filters offers better protection if exposure is higher.
DIY polyfoam steps
- Plan your lift and mark target height. Set a straightedge across the joint and mark where you want the slab to land. Also mark where you will drill. Most kits work best with multiple smaller injection points rather than one big “hail mary” hole.
- Drill and clean the holes. Drill straight down to the depth specified by your kit. Vacuum dust from the holes so the injection ports seat cleanly.
- Inject slowly in short bursts. Start with the lowest area. Inject a little, pause, and watch the slab. Foam expands and keeps pushing even after you stop.
- Lift evenly and keep checking the joint. Move between holes to avoid twisting the slab. Stop if the joint starts binding or pinching tight.
- Patch and test drainage. Patch the holes with a repair mortar that matches as closely as you can. After it is set, hose the area lightly and watch where water goes.
Safety note: Expanding foam can generate pressure. Keep your hands away from joints while lifting, and keep your face out of the line of fire. Also treat drilled holes like trip hazards until they are patched.
Prep that lasts
Leveling is only half the job. The other half is making sure water is not still undermining the slab next month.
1) Fix drainage first
- Extend downspouts so they discharge well away from the slab
- Regrade soil so water runs away from walks and patios
- Dial back sprinklers that hit concrete edges daily
2) Clean and inspect joints
- Remove packed soil, mulch, and weeds at the joint
- Look for voids under edges using a flashlight and a thin stick
- If ants are active, address them. Tunnels can contribute to voids.
3) Mark target height
Set a straightedge across the joint and mark where you want the slab to land. If you are lifting, aim for flush or slightly proud, then let it settle a hair over time. If you are grinding, mark a gentle taper so you do not leave a sharp ramp.
How to grind a lip
Grinding is the simplest fix for small lips. It is also the messiest if you do not control dust.
Tools
- Angle grinder with a diamond cup wheel, or a walk-behind concrete grinder for longer runs
- HEPA shop vac and a dust shroud if possible
- Chalk line or marker
- Stiff broom and leaf blower for cleanup
- PPE: safety glasses, hearing protection, gloves, and a NIOSH-approved respirator suitable for silica dust
Steps
Confirm local rules. Some cities allow grinding but not lifting, or vice versa. If this is public sidewalk, check first.
Set up dust control. Silica dust is not “just dust.” Use a grinder shroud and vacuum, and keep bystanders away.
Mark a taper. Do not grind a hard ledge. Aim for a smooth transition over several inches.
Grind in passes. Light passes give you control and reduce gouging.
Check with a straightedge often. It is easy to go too far when you are focused on one spot.
Leave traction. A very polished surface can be slick when wet. Stop before you make it glassy. If you accidentally polish it, consider a light pass with a more aggressive wheel pattern to leave it slightly rough (or talk to a pro about adding traction).
Mistake I have made: pushing too hard to “speed it up.” It just overheats the wheel, makes the grinder skate, and leaves a wavy dip that looks worse than the original lip.
How lifting works
Whether you hire mud jacking or do foam, the sequence is basically the same: drill, inject, lift slowly, and patch.
How to avoid cracks
- Lift slowly. Rushing is how you stress the slab.
- Lift evenly. If only one corner rises, you can twist the panel.
- Watch the joint. Stop if the joint closes tight and starts pinching. That is a sign the slab is binding.
- Do not fight the slab. If it will not lift, there may be an obstruction or the void may not be connected to your injection point.
Do not create reverse slope
After lifting, hose down the area lightly and watch where water goes. The goal is for water to shed away from the house and not pool at joints. It is very possible to “fix” a trip hazard and accidentally create a puddle factory, or worse, a slope that sends water toward a foundation or garage.
Root heave
If a tree root lifted your slab, leveling alone is often temporary. You can grind it, you can lift around it, you can even replace the panel, but the root is still alive and still growing.
- If it is a city tree: call the city first. They may handle root pruning or recommend specific approaches.
- If it is your tree: consider consulting an arborist before cutting major roots. Cutting the wrong root can destabilize the tree.
- Practical option: grinding is often the least invasive, because it reduces the trip hazard without disturbing the root zone.
Replacement basics
Replacement is the “reset button,” but only if the new slab is built on a decent base. If you are doing it yourself or evaluating a quote, these are the basics worth caring about:
- Base prep: remove soft soils, add and compact a proper granular base, and fix the drainage issue that caused settlement.
- Thickness: match local specs and use case (sidewalk is often thinner than a driveway). If it carries vehicles, do not guess.
- Slope: finish it so water sheds away from buildings and does not pond at joints.
- Control joints: cut or tool joints so cracks happen where you want them.
- Curing: fresh concrete needs time and moisture control to gain strength. Rushing it shortens the slab’s life.
- Finish: match the surrounding texture as best you can. A broom finish is common for traction.
Costs
Prices vary wildly by region, slab size, and access, but here is what usually drives the bill:
- Grinding: typically the lowest cost, especially if you rent a grinder for a few hours. Pros charge more if dust control and cleanup are complex.
- Mud jacking: priced by area and amount of material, plus minimum trip fees. Large voids and deep washouts cost more.
- Polyfoam: often higher per square foot than mud jacking, but can require less disruption and smaller patches.
- Replacement: demolition, disposal, base prep, forming, and finishing add up. Matching existing broom finish and slope takes skill.
If you are comparing quotes, ask what they do about void filling versus just lifting. Lifting a slab without properly filling the void underneath can lead to another dip later.
Safety essentials
- Silica dust: Grinding and drilling concrete can produce respirable crystalline silica. Use dust extraction and a NIOSH-approved respirator (a basic dust mask is not enough).
- Eye and hearing protection: Concrete chips and grinder noise are no joke.
- Trip control: Rope off the area while work is in progress. An open drilled hole is an ankle finder.
- Locate utilities: If you are drilling or digging near utilities, especially by a curb, meter, or irrigation line, verify locations first. In the US, you can start with 811. Elsewhere, use your local equivalent.
Decision checklist
- Small lip, slab is solid: grind
- Slab is intact but settled: lift (mud jacking or polyfoam)
- Slab is crumbling or badly cracked: replace
- In a city right-of-way: call public works before anything else
- Near a foundation: hire it out unless you have real experience
If you are only fixing the symptom and not the drainage, you are borrowing trouble. Get water away from the slab and most leveling repairs last a lot longer.
When to call a pro
I love DIY, but I also love not learning lessons the expensive way. Bring in a pro when:
- The slab is part of a step, stoop, or foundation-adjacent walkway
- You need precise slope for drainage away from the house
- The height difference is large or spans multiple connected slabs
- It is public sidewalk with permit or inspection requirements
- You suspect major voids from washout, broken pipe, or poor base
A good contractor will talk about why it moved, not just how fast they can lift it.
Bottom line
Uneven concrete is one of those home issues that feels bigger than it is, right up until someone trips. If the lip is small, grinding is often the simplest and safest fix. If the slab sank but is still in good shape, lifting it with mud jacking or polyfoam can bring it back without replacement. Whatever route you choose, take drainage seriously, work safely around silica dust, and do not ignore easements and shared boundaries.
About Marcus Vance
Content Creator @ Grit & Home
Marcus Vance is a lifelong DIY enthusiast and self-taught home renovator who has spent the last decade transforming a dilapidated 1970s ranch into his family's dream home. He specializes in budget-friendly carpentry, room-by-room renovations, and demystifying power tools for beginners. Through his writing, Marcus shares practical tutorials and hard-learned lessons to help homeowners tackle their own projects with confidence.