🚨 In a DIY emergency or rush?
Skip the details and jump straight to our 30-second cheat sheet for the most crucial info.
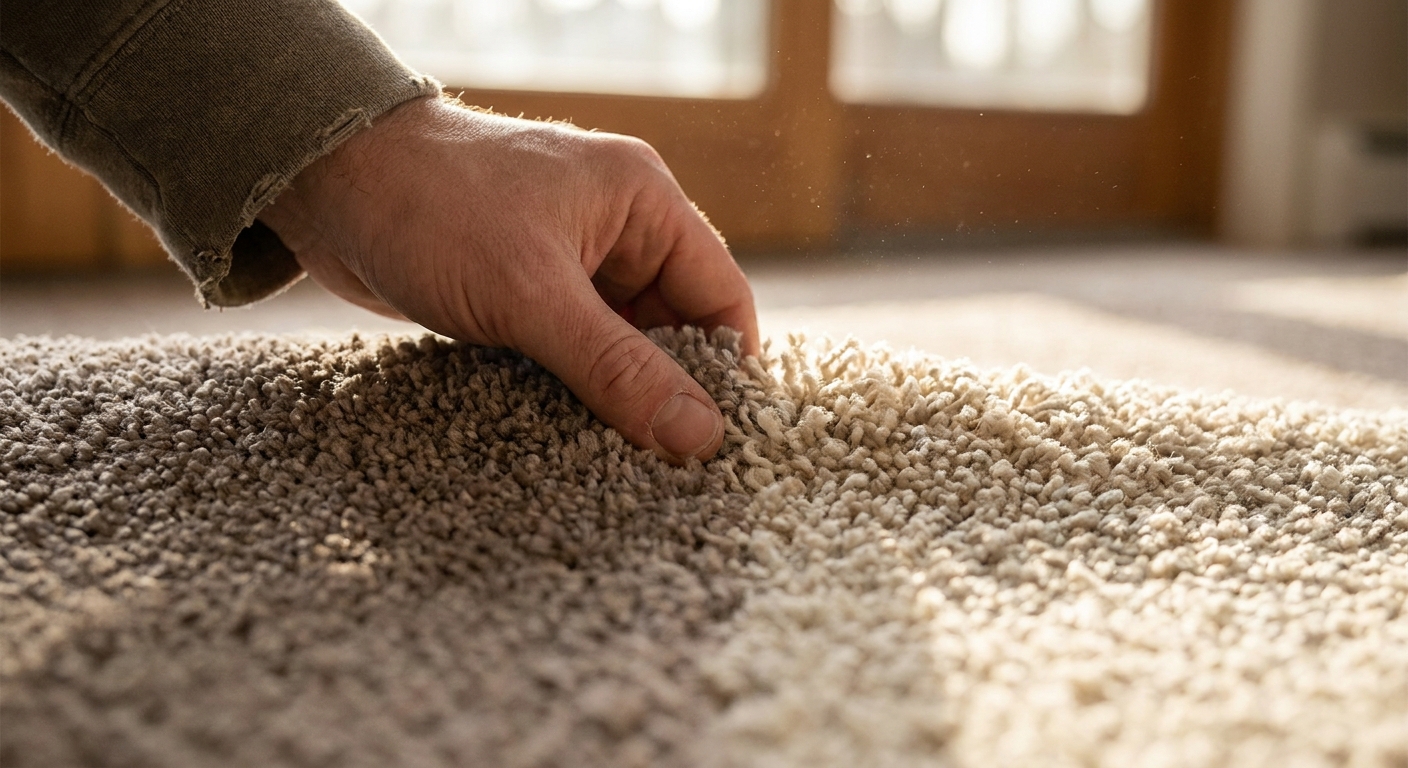
If you have a small carpet hole from a dropped coal in a fireplace room, a pet snag, or a mystery burn mark that showed up after game night, you can usually fix it without replacing the whole room. The trick is picking the right repair for the problem you actually have.
For missing carpet (a hole, a bald spot, a chewed corner), you want a plug patch cut from a matching remnant. For a tear or split seam where the carpet is still there but separated, you want heat-bond seam tape and a careful hand. I will walk you through both, plus how to make the repair disappear in normal lighting.

Jump to the right fix
- Small hole or missing fibers: Plug patch from a remnant (best invisible repair).
- Small tear or split: Heat-bond seam tape under the tear (fastest repair).
- Loose, rippled, or wrinkled carpet: A patch will not last. You likely need a re-stretch.
Quick size rule: DIY patching is most satisfying when the damaged area is under about 3 to 4 inches across and not sitting directly in a doorway traffic path. Bigger damage can still be patched, but seam-matching becomes much harder.
Tools and materials
Before you start
- Safety: Consider cut-resistant gloves, keep fingers clear of the blade path, and dispose of used blades in a sharps container or taped-up, labeled can.
- Go shallow: Especially with thin carpet and pad, use light passes so you do not slice into the pad or subfloor.
For plug patching (holes, burns, missing carpet)
- Matching carpet remnant (from install leftovers, closet, or under a bed)
- Carpet knife or sharp utility knife with fresh blades
- Carpet awl or small flat screwdriver (for separating fibers and seam cleanup)
- Permanent-rated seam or patch tape (pressure-sensitive or heat-bond) or carpet patch adhesive (more on this below)
- Seam roller (preferred) or a small rolling pin in a pinch
- Heavy book or flat weight
- Vacuum
- Optional for beginners: carpet patch cutter (cookie-cutter style). It makes clean, repeatable shapes and takes some stress out of cutting.
For heat-bond repairs (tears and splits)
- Heat-bond seam tape
- Seaming iron (best) or a household iron with caution
- Seam roller
- Wax paper or parchment paper (to protect fibers)
- Sharp scissors or utility knife
- Optional but smart: seam sealer (latex) for raw edges, especially if the tear is on or near a seam
Nice-to-have
- Painter’s tape (to hold edges aligned while adhesive sets)
- Latex gloves
- Small fan for odor control if using adhesive
Thrifty note: If you do not have a remnant, check inside a closet. You can sometimes steal a piece from the back corner that stays hidden behind hanging clothes, then replace that closet spot with a less perfect patch.
Step 1: Find a matching donor piece
The repair is only as invisible as the piece you patch in. You need the same color, pile height, and ideally the same texture pattern.
- Best: leftover roll from the original installation.
- Good: a piece from a closet, under a radiator cover, or under built-ins.
- Last resort: buy a close match and accept that it will read as a “spot” in certain light.
Also pay attention to pile direction, sometimes called nap. Run your hand across the carpet. One direction looks slightly darker because the fibers lay differently. Your patch must face the same way or it will look like a permanent shadow.
Carpet type note: Loop, Berber, and some woven carpets can snag or start a run if you cut from the top like you would with cut pile. If you have a looped carpet, work extra slowly, keep the blade shallow, and consider using a row cutter or seam cutter to follow the rows instead of slicing across them.
Pattern note: If your carpet has a visible pattern (geometrics, stripes, heavy texture repeats), you may need a larger donor piece so you can match the pattern repeat, not just the color.
How to plug patch a small hole
This is the method I use when I want the repair to survive vacuuming, kids, and regular foot traffic. The goal is a clean cutout, a clean plug, and a bond that holds without creating a stiff bump.
1) Cut the damage into a simple shape
Do not try to patch a jagged blob. Use your knife to cut the damaged spot into a square or rectangle with straight edges. Make it just big enough to remove all damaged fibers.
- Separate the fibers first: use an awl, a small flat screwdriver, or even your fingernail to open a path along your cut line. This helps you cut the backing without trimming surrounding pile short.
- Use a fresh blade and cut in multiple light passes.
- Cut through the carpet backing, not the padding.
- Pull the damaged piece out and vacuum the cavity.
2) Trace and cut the plug (avoid a mirrored plug)
This is the step that makes or breaks the fit. You want the plug to be the same orientation as the hole, not a mirrored version.
- Safest method (recommended): place your removed piece face-up on your remnant with the remnant face-up. Match the nap direction first, then trace. Separate the fibers along the line and cut carefully from the top.
- If you prefer cutting from the backing: flip the removed piece face-down onto the remnant backing before tracing. That keeps the plug oriented correctly so you do not accidentally mirror it.
Before you cut, double-check the pile direction matches the surrounding carpet.
Cut the plug slightly snug. A patch that drops in with a big gap will always show. I aim for a fit that needs a gentle press to seat fully.
3) Choose your bonding method
- Seam or patch tape (recommended): Strong, consistent, and less messy. Use permanent-rated carpet seam or patch tape, not generic double-sided “carpet tape” meant for temporary rugs.
- Carpet patch adhesive: Works, but it is easy to use too much and create a hard spot that grabs lint and shows as a ring.
4) Install the tape or adhesive under the opening
Lift the carpet edges around the hole and slide tape under the opening so it extends past all sides. If using pressure-sensitive tape, peel the liner as you go so it does not grab prematurely.
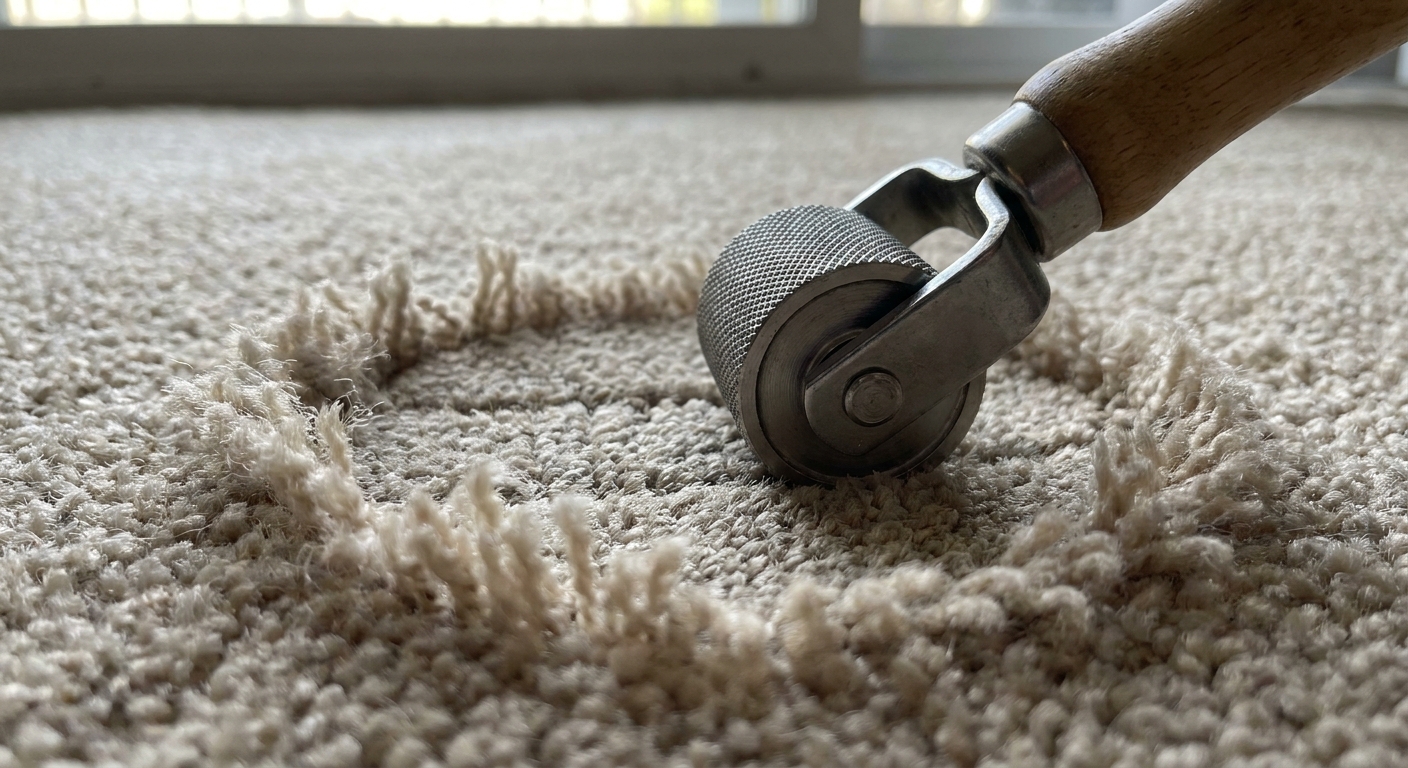
5) Set the plug and blend the seam
- Press the plug in, aligning pile direction and any texture pattern.
- Roll the seam gently with a seam roller to seat the backing into the adhesive.
- Use an awl or small screwdriver to tease a few fibers across the seam line.
- Place a flat weight over the patch for 30 to 60 minutes, or per the tape or adhesive instructions.
Finish by vacuuming slowly in one direction first, then the other. That helps the fibers stand up and hides the cut line.
Blending note: Frieze and shag usually need a little extra teasing and a lighter touch with the roller so you do not crush the texture.
How to repair a small tear
If the carpet is split but not missing, you can usually bring the edges back together and bond them from underneath. Done right, the tear stops spreading and the surface looks continuous again.
1) Inspect the tear and prep the edges
- Trim any loose fuzz or strings on the backing side.
- Make sure the two edges butt together cleanly without overlapping.
- Optional durability upgrade: if the tear exposes raw backing (especially on an old seam), run a thin bead of seam sealer (latex) along the raw edge and let it get tacky per the label before bonding.
- If the tear is on an old seam that is unraveling, you may need to cut and re-seam a longer section for strength.
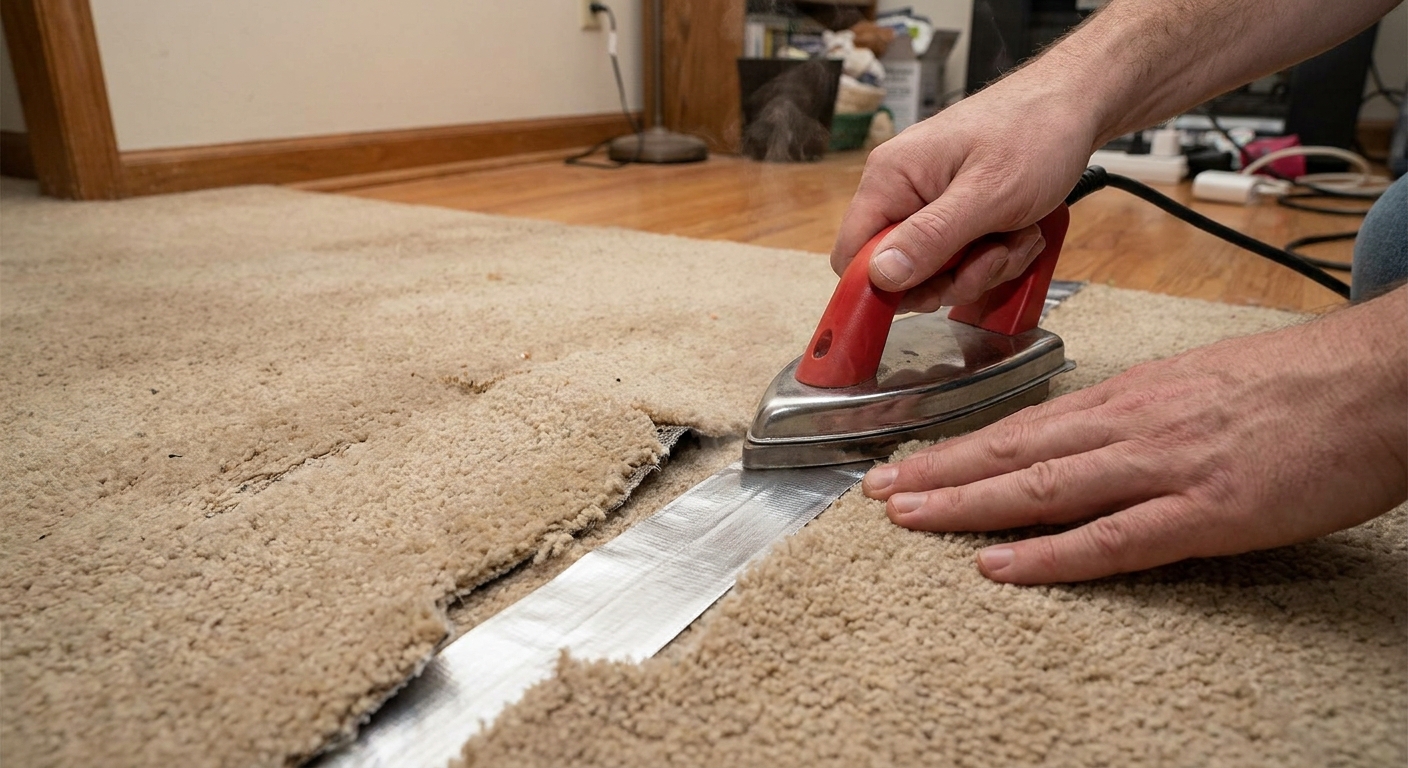
2) Slide seam tape under the tear
Center the tape under the split so the adhesive portion will grab both sides evenly. Keep the carpet pile out of the adhesive zone as much as possible.
3) Heat the tape in short sections
Using a seaming iron, heat a small section of tape until the adhesive liquefies, then pull the iron forward and immediately press the carpet edges down into the adhesive. Work a few inches at a time.
- Use wax paper or parchment paper to protect carpet fibers from stray adhesive.
- Do not rush. Overheating can melt fibers or make adhesive bleed up into the pile.
- If you only have a household iron: do not use steam, start on the lowest effective setting, keep it moving, and test on a scrap first. A seaming iron is still the right tool if you can get one.
4) Roll and cool
Roll the seam while the adhesive is still warm, then let it cool completely before you walk on it. Cooling is when the bond becomes strong.
Make the seam disappear
Most DIY carpet repairs fail cosmetically, not structurally. The bond holds, but your eye keeps catching the outline. These small steps make a big difference:
- Match pile direction: The number one reason a patch looks like a square “shadow.”
- Cut the backing, not the pile: separate the fibers along your cut line so the blade can slip between them instead of trimming the good pile short.
- Use a sharp blade: Dull blades tear backing and leave fuzzy edges that will not butt cleanly.
- Tease fibers across the seam: Use an awl to gently pull a few fibers over the line, then vacuum.
- Mind the lighting: Check the repair with lights on and with daylight. Raking light from a window can reveal seams you cannot see at night.
When to re-stretch
Sometimes a “hole” problem is really a “tension” problem. If the carpet is loose, it shifts under foot traffic and pulls at repairs until seams fail. Consider a re-stretch if you notice:
- Ripples or waves that come and go
- Carpet that slides when you kick it with your toe
- Multiple seams opening up, especially in high traffic lanes
- A patch that keeps telegraphing a gap, meaning you can see or feel the outline again after it looked fine at first
A pro uses a power stretcher to reset the carpet on the tack strips. It is not usually a long appointment, but it can save you from doing the same patch twice.
Common mistakes
- Using the wrong donor carpet: Similar is not the same. Texture mismatch is obvious even when color is close.
- Not checking nap direction: The patch fits perfectly and still looks wrong. Ask me how I know.
- Accidentally mirroring the plug: Tracing on the backing is fine, but only if you place the cutout piece face-down so you do not reverse it.
- Making the patch too small: You have to remove all damaged fibers. Leaving a scorched edge guarantees a visible ring later.
- Using the wrong tape: Temporary double-sided tapes can release. Use permanent-rated carpet seam or patch tape.
- Too much glue: It squeezes up, hardens, and makes a dark, crunchy spot that collects dirt.
- Overheating seam tape: Adhesive bleeds into the pile and creates a shiny line.
- Walking on it too soon: Cooling and cure times vary by product. Follow the label for traffic and vacuuming timelines.
Quick troubleshooting
- Patch sits proud (a bump): the plug may be slightly oversized, the pad may be bunched, or you used too much adhesive. Re-seat it, reduce adhesive, and make sure the tape is flat. A flatter weight helps.
- Visible gap around the plug: the plug is too small or the hole was cut unevenly. Re-cut the opening into a cleaner shape and cut a new snug plug.
- Fibers look crushed or shiny: too much rolling, too much weight, or too much heat. Lift the pile with an awl, then vacuum. Next time, use lighter pressure and lower heat.
Quick FAQ
Can I use super glue for a carpet patch?
I do not recommend it. It dries hard, can discolor fibers, and does not flex with carpet movement. Use seam or patch tape, or carpet-specific adhesive.
What if I do not have a seam roller?
A seam roller is cheap and worth it, but in a pinch you can use a small rolling pin with gentle, even pressure. Avoid pressing so hard that you crush the pile.
How long before I can vacuum?
With heat-bond tape, wait until fully cool, then give it a few hours before aggressive vacuuming. With pressure-sensitive tape or adhesive, follow the label. When in doubt, I wait overnight before hard vacuuming or heavy traffic.
The 30-Second Cheat Sheet
Essential takeaways for: How to Patch a Small Hole or Tear in Carpet
Pick the right method
- Hole or missing carpet: Do a plug patch using a matching remnant.
- Tear or split seam: Use heat-bond seam tape under the split (and seam sealer on raw edges if needed).
- Ripples or loose carpet: Patching will fail. Get a re-stretch .
Tools you actually need
- Matching remnant, sharp utility knife, vacuum
- Permanent-rated carpet seam or patch tape (pressure-sensitive or heat-bond)
- Seam roller (or small rolling pin)
- Seaming iron for heat-bond repairs (best)
- Optional beginner helper: carpet patch cutter (cookie-cutter style) for perfect circles or squares
Plug patch steps (holes, burns)
- Part fibers, then cut the damage into a clean square or rectangle.
- Match pile direction, trace and cut a snug plug from remnant (avoid a mirrored plug).
- Slide seam tape under opening.
- Press plug in, roll the seam, tease fibers over the cut line.
- Weight it 30 to 60 minutes, then vacuum to blend (or follow your product cure time).
Heat-bond tear repair steps (splits)
- Butt edges together cleanly.
- Center heat-bond tape under tear.
- Heat a few inches at a time with seaming iron, press edges into adhesive.
- Roll while warm, then let cool fully before walking on it.
Don’t blow the finish
- Always match nap direction or the patch will look like a dark square.
- Use a fresh blade and cut with fibers separated so you do not snip good pile short.
- Do not overheat seam tape and do not use too much glue.
💡 Tip: Scroll up to read the full article for detailed, step-by-step instructions.
⬆️ Back to topAbout Marcus Vance
Content Creator @ Grit & Home
Marcus Vance is a lifelong DIY enthusiast and self-taught home renovator who has spent the last decade transforming a dilapidated 1970s ranch into his family's dream home. He specializes in budget-friendly carpentry, room-by-room renovations, and demystifying power tools for beginners. Through his writing, Marcus shares practical tutorials and hard-learned lessons to help homeowners tackle their own projects with confidence.