Frozen pipes are one of those home problems that feels small right up until it becomes a very big, very wet emergency. I learned that the hard way in our 1970s ranch when a poorly insulated line near the rim joist froze overnight and cracked. The pipe did not flood the house until it thawed, which is exactly why frozen pipes are so sneaky.
This page walks you through prevention first, then safe thawing methods, and finally what to do if a pipe bursts. If you are reading this with no water at a faucet, jump to the thawing steps and keep a towel handy.
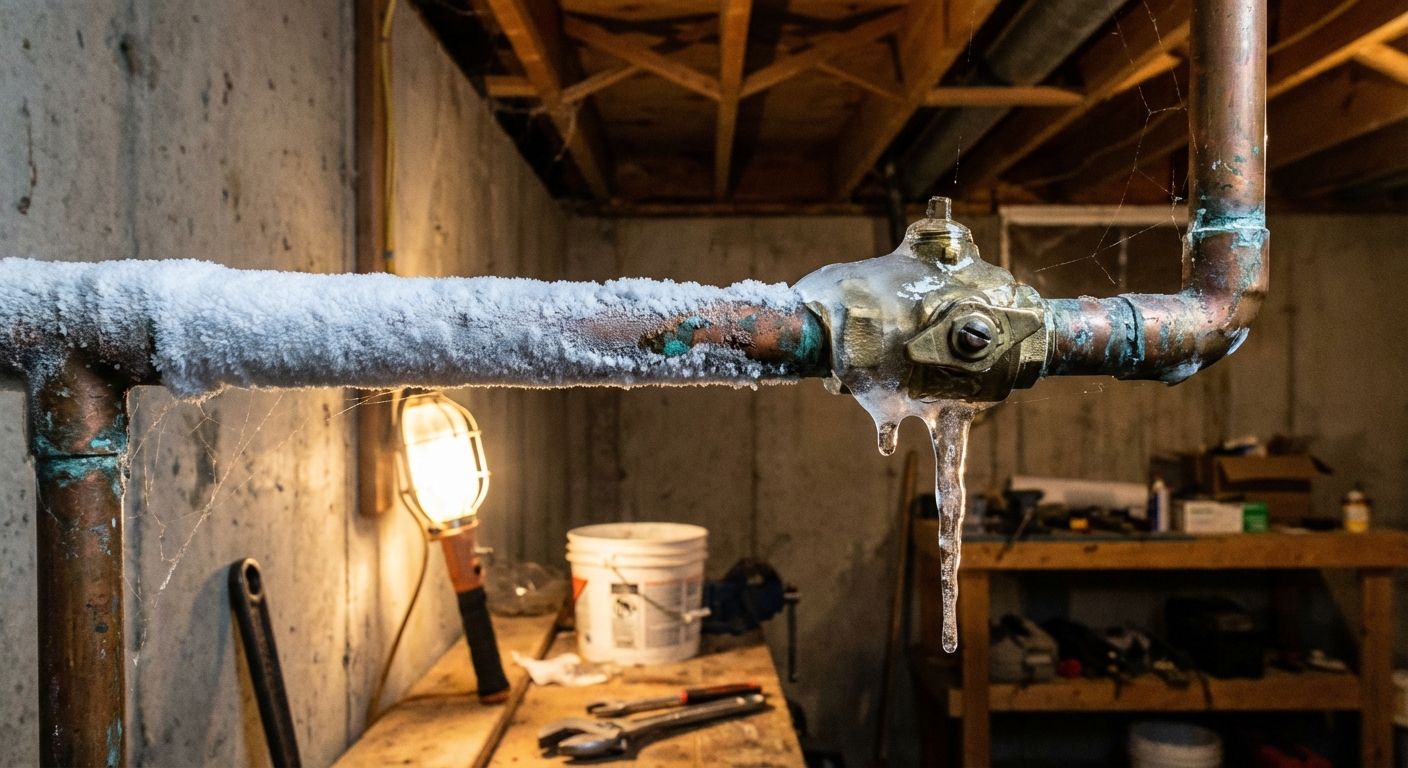
Why pipes freeze (and why they burst)
When water freezes, it expands. In a pipe, ice can form a plug that traps liquid water between the ice and a closed section of pipe (a valve, a bend, or simply a dead-end run). That trapped water can spike in pressure as more ice forms, and the pipe usually fails at a weak point, often just behind the frozen section.
The important detail is this: the pipe can split while it is still frozen, but the mess usually shows up when the pipe thaws and pressurized water starts moving again.
- Freezing happens fast when wind and subfreezing air hit exposed plumbing.
- Leaking often happens later, after temperatures rise or you apply heat.
- No water at one fixture often means a localized freeze in a branch line.
- No water anywhere can indicate a frozen main, well line, or a whole-house supply issue.
Pipes most at risk
If you are trying to figure out where to focus your prevention, start with pipes that are both close to exterior cold and underinsulated. In older homes, it is common to find plumbing routed through places that were never designed for modern comfort.
Top freeze-risk locations
- Exterior walls, especially behind kitchen sinks and bathroom vanities.
- Unheated areas like garages, crawl spaces, basements, and attics.
- Rim joists and band joists where the house framing meets the foundation.
- Near vents and leaky crawl space doors where cold air blows directly on the line.
- Hose bibs and the first few feet of pipe inside the wall behind them.
- Mobile home and slab-edge plumbing, where wind can get under or around the structure.
Which pipe materials freeze easier?
Any water-filled pipe can freeze. The bigger factor is exposure and airflow, not whether the pipe is copper, CPVC, or PEX.
- Copper: common in older homes, durable, but it can split when pressure spikes.
- CPVC: used for water supply in many homes, can crack when frozen and become brittle in cold.
- PVC: more common for drains and vents. It can still freeze and crack in unheated spaces.
- PEX: often tolerates freezing better than rigid pipe, but fittings and connections can still fail.
Prevention that actually works
My rule is simple: block the cold air, then insulate, then add backup heat if needed. Insulation helps, but moving air can defeat it fast. Start with air sealing where cold enters.
1) Seal air leaks first
Find the windy spots and stop the draft. Common culprits are gaps around sill plates, rim joists, hose bib penetrations, dryer vents, and plumbing holes through framing.
- Small gaps: use exterior-rated caulk.
- Larger gaps: use expanding foam, then trim once cured.
- Rim and band joist bays: rigid foam cut to fit plus foam around edges works great.
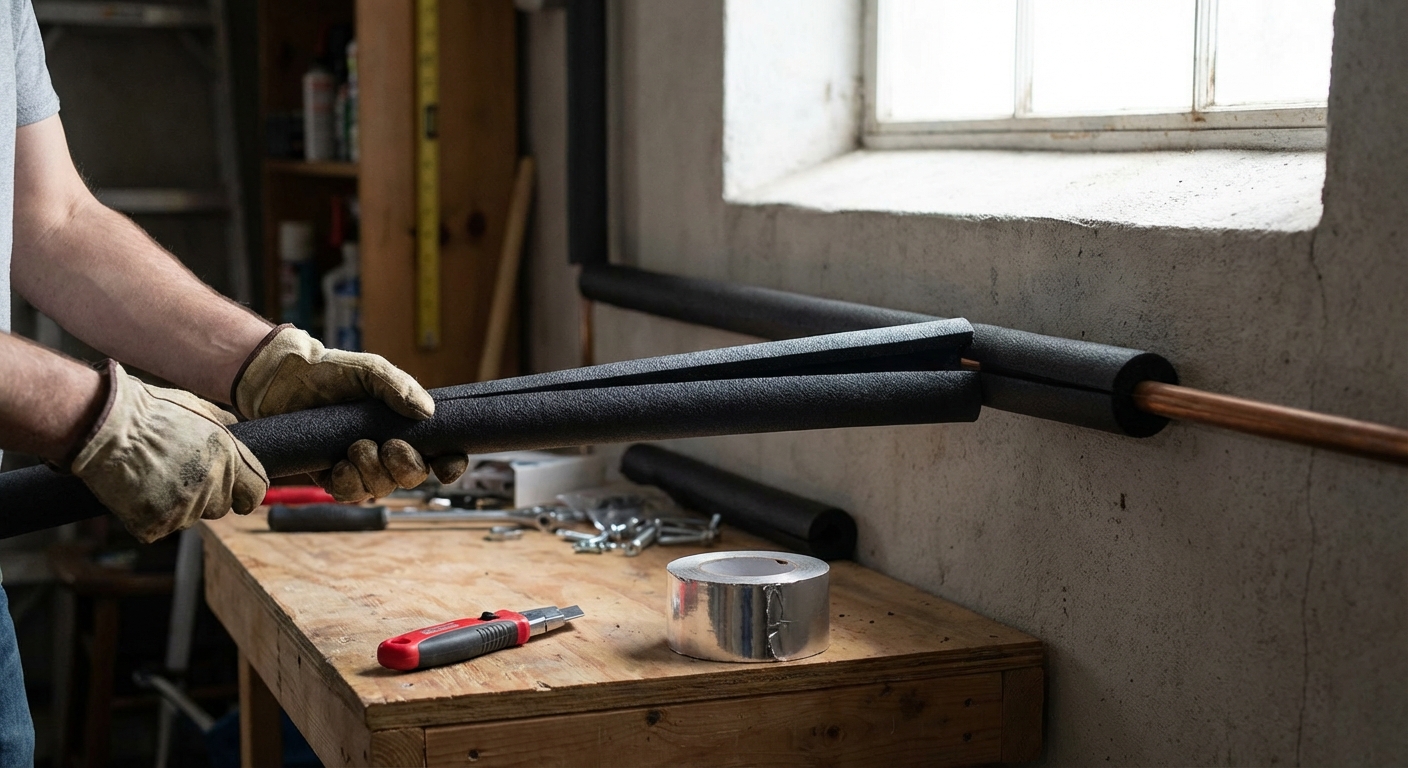
2) Insulate exposed pipes
For most DIYers, foam pipe sleeves are the best bang for the buck. They are quick, cheap, and effective when installed correctly.
Foam pipe insulation: quick install steps
- Measure your pipe diameter (common sizes are 1/2 inch and 3/4 inch).
- Clean dusty pipes so tape sticks.
- Slip the foam over the pipe (or open the slit and wrap it).
- Seal seams and joints with foil HVAC tape or the manufacturer-recommended tape.
- At elbows and tees, take your time. Gaps at fittings are where cold air loves to win.
What about fiberglass pipe wrap?
Fiberglass wrap works, especially on odd shapes, but it is itchier and easier to install poorly. If you use it, wear gloves and long sleeves and wrap it snug. Do not compress it flat, since trapped air is part of how it insulates.
3) Protect pipes in cabinets and exterior walls
- On very cold nights, open the cabinet doors under sinks to let warm room air circulate.
- Keep pipes on the warm side of insulation when remodeling. In exterior walls, that often means moving plumbing inward if possible.
- Do not block a heat register with stored items if the plumbing is in that cavity.
4) Keep a safe baseline temperature
For most homes, setting the heat to at least 55°F is a good minimum. If you have plumbing in a crawl space, garage wall, or far corner of the house, you may need higher. If your insurer has minimum temperature requirements, follow those.
5) Let a faucet drip (only when needed)
A steady trickle can help prevent freezing because moving water is harder to freeze than still water. Use this as a temporary tool during extreme cold, especially for fixtures served by a long run in an exterior wall.
- Choose the faucet farthest from where the water enters the house.
- Cold water drip is usually enough, but in very exposed runs, a small warm drip can help.
- Do not rely on dripping as your only plan. It is a patch, not a fix.
6) Consider heat cable (for chronic problem areas)
If a specific run freezes every winter, heat cable can be a lifesaver. Only use products listed for pipe heating (UL or ETL), and follow the installation instructions exactly. If your only option is an older, non-thermostatic heat tape, replace it. Those are not worth the risk.
- Use a thermostat-controlled heat cable when possible.
- Do not overlap heat cable unless the product instructions say it is allowed.
- Do not run heat cable through walls unless the manufacturer approves that use.
- Inspect cords for damage and plug into a properly protected outlet.
How to tell if a pipe is frozen
Sometimes it is obvious, sometimes it is not. Here are the most common clues.
- No water or a weak trickle from one faucet.
- Toilet will not refill after a flush.
- Frost on a visible pipe.
- Drain gurgling or odors during a deep freeze can point to a frozen drain or vent (different problem than a frozen supply line).
If you suspect a frozen supply pipe but cannot see it, look for piping near outside walls, in crawl spaces, or where insulation is missing or displaced.
Safely thaw frozen pipes (step-by-step)
Thawing is about applying gentle, controlled heat while giving pressure somewhere to go. The goal is to melt the ice without overheating the pipe or creating a hidden fire risk.
Before you apply heat
- Turn the faucet on at the affected fixture. Open it to a small steady flow. This relieves pressure and helps you know when water starts moving.
- Check for leaks first. If you see bulges, splits, or water stains, be ready to shut water off quickly.
- Know your shutoffs: main water valve location and how to turn it.
- Plug in safely: if you are using a hair dryer or space heater, plug into a GFCI-protected outlet when possible, keep cords out of wet areas, and do not stand in water.
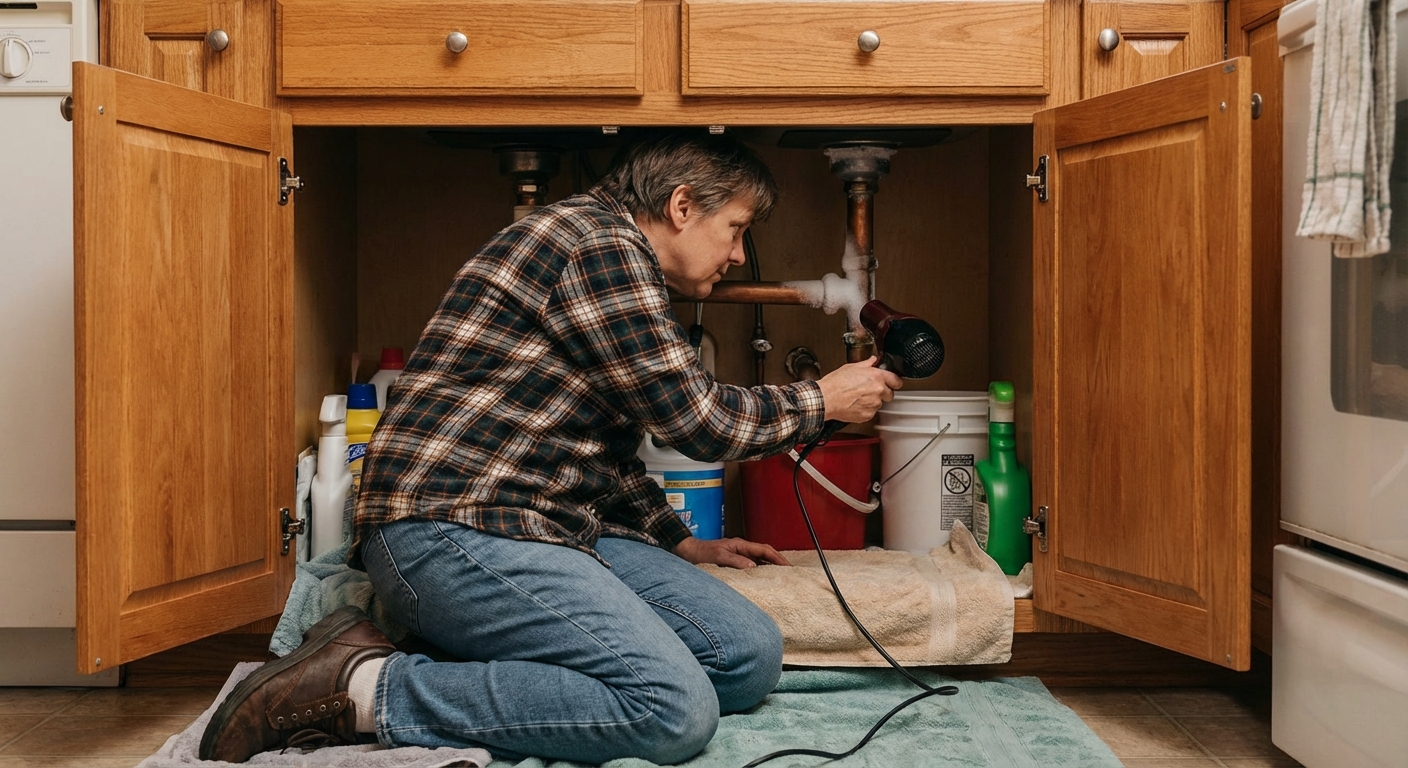
Method 1: Hair dryer (my go-to)
- Start heating nearest the open faucet and move toward the suspected freeze point.
- Keep the dryer moving and a few inches away from the pipe.
- Focus on valves and fittings since they freeze first.
- As water begins to trickle, keep going until full flow returns.
Why start near the faucet? Because you want meltwater to have an escape path. Working toward the blockage helps prevent pressure from building behind ice.
Method 2: Warm towels (slow but safe)
- Soak towels in hot water and wring them out so they are not dripping everywhere.
- Wrap the towels around the frozen section.
- Replace as they cool.
This works well for exposed short sections and is a good option if you do not want to use a powered heat source.
Method 3: Heat cable (best for long runs)
If you already have a listed, properly installed heat cable on the pipe, plug it in and monitor the thaw. If you are installing heat cable during an emergency, follow the product instructions exactly, keep it accessible, and stay nearby while it is operating.
Method 4: Space heater (open areas only)
A small space heater can warm an entire cabinet or crawl space section. Keep clearance from combustibles, keep it upright, and never leave it unattended. This method is for open, visible areas only. Use a GFCI outlet when possible and keep the heater and cord well away from any water.
What not to do
- Do not use an open flame like a propane torch. This is a top cause of house fires during freeze events.
- Do not crank the water pressure by closing the faucet and waiting. Pressure is what bursts pipes.
- Do not keep heating a wall blindly if you cannot locate the frozen section. Stop and call a plumber.
- Do not ignore it. A frozen pipe that is not leaking yet can still be cracked.
After the water is flowing again
- Leave the faucet running at a small stream for a few minutes to clear remaining slush.
- Inspect the thawed area for leaks. Watch fittings and joints closely.
- Check nearby lines too. If one run froze, another run in the same cold zone may be close behind.
- Keep an eye on the area for the next 24 to 48 hours. Slow leaks can show up later.
- Turn your attention to why it froze: missing insulation, an air leak, a failed crawl space vent cover, or a cold snap plus low thermostat setting.
If a pipe bursts: what to do fast
This is the moment where having a plan saves you thousands. You do not have to be calm. You just have to be in order.
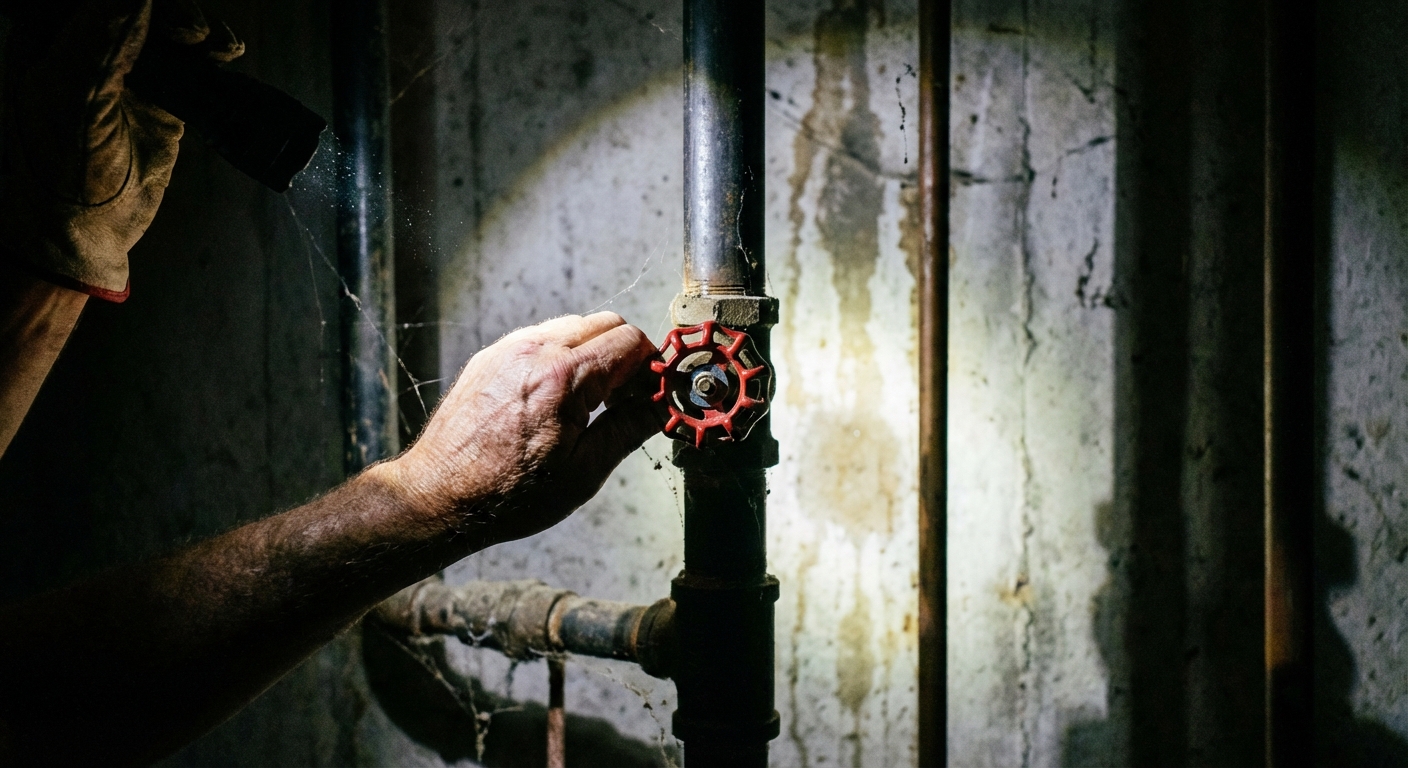
1) Shut off the water
- Close the main water shutoff to the house.
- If the burst is on a known branch with its own valve, you can shut that valve instead, but only if you are sure.
2) Shut off electricity if water is near outlets
If water is dripping near electrical outlets, cords, a furnace, or a panel, turn off power at the breaker for the affected area. If you are unsure or water is reaching the panel, call an electrician or your utility emergency line.
3) Drain pressure and reduce damage
- Open the lowest faucet in the home and a couple of higher faucets to drain the lines.
- Use towels, buckets, and a wet/dry vacuum to control water.
- Move rugs and valuables out of the path and pull up items stored on floors in basements.
4) Locate the break and decide your next move
If the pipe is accessible and you are comfortable with basic plumbing, you may be able to make a temporary repair. Otherwise, call a plumber and keep the water off until the repair is complete.
- Temporary clamp can slow a pinhole leak on copper, but it is not a permanent fix.
- PEX often allows faster repairs with push-to-connect fittings, but use the correct cutter and make clean, square cuts.
- If the break is inside a wall or ceiling, be prepared for controlled drywall removal to access and dry the area.
5) Dry out the area
Even a small burst can soak insulation and framing. Drying quickly helps prevent mold.
- Run fans and a dehumidifier.
- Remove soaked insulation where possible.
- Document damage with photos for insurance.
Winterization checklist
Use this list before the first hard freeze, and again before you leave town in winter. Ten minutes now beats a Saturday spent shop-vacuuming your basement later.
Outside
- Disconnect hoses and drain them.
- Shut off and drain exterior hose bibs if you have an interior shutoff.
- Install insulated faucet covers where appropriate.
- Seal gaps where pipes and vents penetrate siding.
- If you have irrigation, shut it down and winterize it (blow out lines if your system requires it).
Basement and crawl space
- Insulate exposed water lines, especially near rim and band joists and vents.
- Seal rim and band joist air leaks and missing insulation bays.
- Close crawl space vents if your home is designed for it and local code and best practice allow it.
- Confirm sump pump works and discharge line is protected from freezing.
Garage
- Insulate any water lines on exterior garage walls.
- Keep the garage door closed during cold snaps.
- If a laundry area is in the garage, consider adding heat during extreme cold.
Kitchen and baths
- Check under-sink cabinets for drafts and seal holes around pipes.
- Know which shutoff valves control each sink and toilet.
- On extreme nights, open cabinet doors to allow warm air in.
Whole-house habits
- Set thermostat to at least 55°F when away (or higher if your layout demands it, or your insurer requires it).
- Keep interior doors open to improve heat circulation to colder rooms.
- Locate and label your main water shutoff valve.
- Keep a hair dryer, foil tape, towels, and a flashlight accessible.
When to call a plumber
I am all for DIY, but there are times to hand it off.
- You cannot find the frozen section and multiple fixtures are out.
- The frozen area is inside a wall and you cannot access it safely.
- You suspect the main line is frozen between the house and meter or well.
- You thawed the line and still have no water, or you see signs of a crack.
- You are dealing with a repeat freeze in the same spot and need a permanent fix.
If you are dealing with a repeat freeze in the same spot, consider getting a pro opinion on rerouting the pipe, improving insulation strategy, or adding a permanent heat solution. The cheapest fix is the one you only do once.
My simple plan for the next cold snap
If you want the quick, no-overthinking version, here is what I do when the forecast gets serious:
- Walk the house and identify any pipes near exterior walls, rim and band joists, or drafty areas.
- Seal air leaks first, then add foam pipe insulation and tape the seams.
- Open under-sink cabinets on the coldest nights.
- Maintain a steady indoor temperature and do not drop the thermostat too low overnight.
- If a pipe has frozen before, treat it like a known problem and add listed heat cable or improve air sealing now.
Do that, and you will avoid most frozen pipe emergencies homeowners face every winter.
About Marcus Vance
Content Creator @ Grit & Home
Marcus Vance is a lifelong DIY enthusiast and self-taught home renovator who has spent the last decade transforming a dilapidated 1970s ranch into his family's dream home. He specializes in budget-friendly carpentry, room-by-room renovations, and demystifying power tools for beginners. Through his writing, Marcus shares practical tutorials and hard-learned lessons to help homeowners tackle their own projects with confidence.